- Android round image corners
- Android Shape Drawables Tutorial
- Have you ever wanted to reduce your Android application’s size or make it look more interesting? If yes, then you should try out ShapeDrawables.
- Why should you use ShapeDrawables?
- Are there any disadvantages?
- Let’s start coding
- Create a simple gradient ShapeDrawable in XML
- How to Make Rounded Corners(Boarder Radius) of ImageView in Android
- Android Example: Make an ImageView Image Rounded Corners in Android
- Download Complete Example Project
- ShapeableImageView — Material components for android
- Important attributes of ShapeableImageView
- Imageview in circle shape
- Corner Radius Imageview
- Corner cut imageview
- Selected Corner Radius / Cut imageview
- The Code City
- Search This Blog
- Rounded corners in ImageView Android Tutorial/Example
- How to Round the corners of an Image
Android round image corners
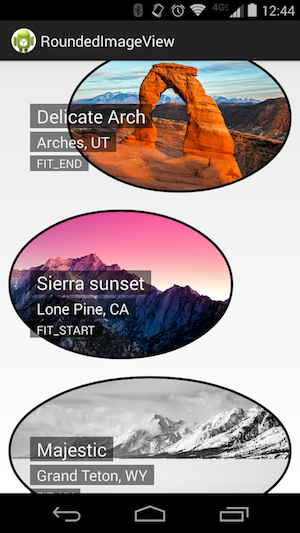
![]()
![]()
A fast ImageView (and Drawable) that supports rounded corners (and ovals or circles) based on the original example from Romain Guy. It supports many additional features including ovals, rounded rectangles, ScaleTypes and TileModes.

There are many ways to create rounded corners in android, but this is the fastest and best one that I know of because it:
- does not create a copy of the original bitmap
- does not use a clipPath which is not hardware accelerated and not anti-aliased.
- does not use setXfermode to clip the bitmap and draw twice to the canvas.
If you know of a better method, let me know (or even better open a pull request)!
Also has proper support for:
- Borders (with Colors and ColorStateLists)
- Ovals and Circles
- All ScaleType s
- Borders are drawn at view edge, not bitmap edge
- Except on edges where the bitmap is smaller than the view
- Borders are not scaled up/down with the image (correct width and radius are maintained)
- Anti-aliasing
- Transparent backgrounds
- Hardware acceleration
- Support for LayerDrawables (including TransitionDrawables)
- TileModes for repeating drawables
- VectorDrawables are not supported. This library is designed for BitmapDrawables only. Other drawables will likely fail or cause high memory usage.
- ColorDrawables are poorly supported, use your own rounded VectorDrawables instead if you want less memory pressure.
- Glide transforms are not supported, please use wasabeef/glide-transformations if you want to round images loaded from Glide.
RoundedImageView is available in Maven Central.
Источник
Android Shape Drawables Tutorial

Nov 3, 2017 · 6 min read

Have you ever wanted to reduce your Android application’s size or make it look more interesting? If yes, then you should try out ShapeDrawables.
First, we will go over the advantages and disadvantages of the ShapeDrawables. Then we will create some Drawables that could be used in your app and lastly for the grand finale we will try to replicate a gradient as can be seen in the Spotify app/website.
Why should you use ShapeDrawables?
When you want to use PNG or JPEG images in your applic a tion, you have to provide multiple copies of the same image for different screen densities. That, of course, clutters your app with copies of the same image. Yes, sometimes that is the path we have to choose because we can’t use Drawables for every single case, but we can dramatically reduce our application’s size if we can use Drawables instead. ShapeDrawables are a series of commands that tell how to draw something on the screen. That is why they can be resized and stretched as much as we want, without losing any quality. We can recolor and manipulate them even when the app is running and use the same ShapeDrawable multiple times in our app. Since ShapeDrawables are a subclass of the Drawable abstract class, we can use them in methods where a Drawable is expected. Click for the documentation of the ShapeDrawable.
Are there any disadvantages?
Of course, just like I have mentioned before we can’t use them in every case. I have said before that ShapeDrawable class is a subclass of the Drawable abstract class. There are other subclasses as well and every one of them has its own use case. You can click here to check other Drawable types and figure out which one is right for your case. Another issue is that they took a bit longer to draw than a Bitmap since there is a lot of parsing and drawing going on behind the scenes. But I think that is not a huge problem if your Drawables are simple.
My opinion is that you should use Drawables (ShapeDrawables) wherever you can, because they are easy to modify and they don’t take much space.
Let’s start coding
First let’s take a look at a simple example and then we will recreate a gradient as can be seen in the Spotify app/website.
Create a simple gradient ShapeDrawable in XML
First create a new drawable resource file.
Right click on res/drawable > New > Drawable resource file > give your file a name > use shape as a root element > click Ok
Shape root element defines that this is a ShapeDrawable.
This is how the first example looks like:
Источник
How to Make Rounded Corners(Boarder Radius) of ImageView in Android
How to Make Roundness in the Corners(Boarder Radius) in an Image of ImageView in Android. In this tutorial, you will learn to make an ImageView rounded corner using java code. By default in android ImageView don’t have option to make corners rounded(border radius). But if you need corner radius, you can make it by different ways. Follow following example step by step to make rounded corner of ImageView images.
Android Example: Make an ImageView Image Rounded Corners in Android
XML Layout File
Following is the simple android xml layout with a LinearLayout and an ImageView. This ImageView has an id image_view.
res/layout/activity_main.xml
Java Activity File
Following is the java code to make ImageView image corner rounded(border radius) . Following is the final code of MainActivity.java file.
src/MainActivity.java
Following is the default strings of strings.xml file.
res/values/strings.xml
Following is also the default content of AndroidManifest.xml file.
After running your application the output looks like below:
Output:
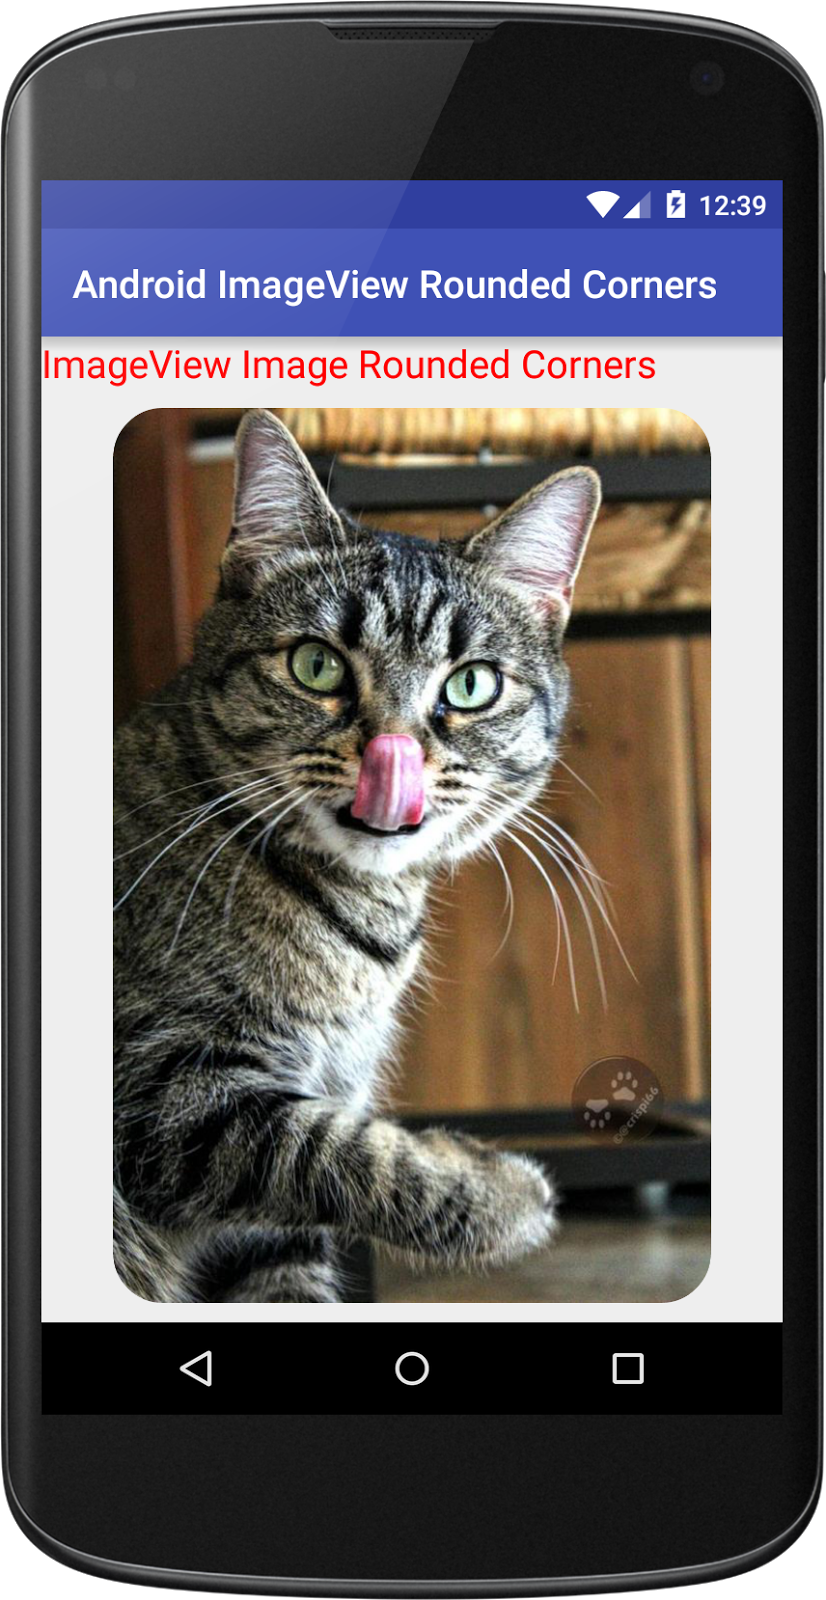 |
| Android ImageView Rounded Corners(Boarder Radius) |
Download Complete Example Project
Download complete How to Make Roundness in the Corners(Boarder Radius) in an Image of ImageView in Android project source code from GitHub.
Источник
ShapeableImageView — Material components for android

Do you want to change the shape of your ImageView in android ? . If yes then its the right place to look into it. Material Design 1.2.0 introduced ShapeableImageView that draws the image with the provided Shape in your imageview.
By using ShapeableImageView, you can change the shape of your image to circle, diamond, etc. Also, you can set corner radius to your imageview. You can do much more by using this ShapeableImageView with minimal code.
To work with ShapeableImageView in your android project, you need to add dependency material design 1.2.0 or higher.
Sliders — Material Components also introduced in material design 1.2.0.
Important attributes of ShapeableImageView
app:shapeAppearanceOverlay — This is working as a ThemeOverlay. ShapeAppearanceOverlay apply the defined changes without affecting the active theme.
The key to the overlay behavior is the empty parent attribute. This is what causes the overlay behavior. Lets create imageview in different shapes.
In the above style, cornerSize only affected by the overlay. remaining properties same as active theme.
cornerFamily — corner family to be used for all four corners
cornerFamilyTopLeft — corner family to be used for the top left corner
cornerFamilyTopRight — corner family to be used for the top right corner
cornerFamilyBottomRight — corner family to be used for the bottom right corner
cornerFamilyBottomLeft — corner family to be used for the bottom left corner
cornerFamily is a enum type and the supported values are rounded, cut.
cornerSize — corner size to be used for all four corners
cornerSizeTopLeft — corner size to be used for the top left corner
cornerSizeTopRight — corner size to be used for the top right corner
cornerSizeBottomRight — corner size to be used for the bottom right corner
cornerSizeBottomLeft — corner size to be used for the bottom left corner
Imageview in circle shape

as mentioned above, first we need to set the app:shapeAppearanceOverlay. In the overlay we need to mention the corner radius size to 50% to make the imageview as circle.
In your style.xml add,
If you want to add stroke to circle imageview, you can add stroke attributes in your ShapeableImageView.

Dynamically using Kotlin
set the corner radius in dimens.xml
Corner Radius Imageview

we need to set the app:shapeAppearanceOverlay. In the overlay we need to mention the corner radius size to 10% to set the corner radius.
In your style.xml add,
same way, If you want to add stroke to corner radius imageview, you can add stroke attributes in your ShapeableImageView.

Dynamically using Kotlin
set the corner radius in dimens.xml
Corner cut imageview

For the corner cut imageview, we are going to use cornerFamily attribute.
by default, cornerFamily will be rounded. In our case, we need it to be cut. So we are changes cornerFamily to cut.
By changing the cornerSize, we can make different shapes like diamond, hexagon, etc.
Dynamically using Kotlin
setAllCorners() used to set both cornerFamily and cornerRadius.
Selected Corner Radius / Cut imageview

To set corner radius for the selected position, we need to use both cornerSize and cornerFamily for the particular position.
For example, check the below example to set the corner radius for the right top position of the imageview.
for the cut corner radius in style.xml :
same way for the multiple corners, we need to add cornerRadius and cornerFamily.

Dynamically using Kotlin
setTopRightCorner() used to set the corner radius for the top right corner. To set multiple corners we can use setBottomLeftCorner(), setTopLeftCorner() and setBottomRightCorner() .
Thanks for reading.
You can download the example in github.
Источник
The Code City
Search This Blog
Rounded corners in ImageView Android Tutorial/Example
- Get link
- Other Apps
To get full sized from the android camera, you need to use file provider as shown in example below. What generally happens when using camera to get photos is you only get the thumbnail quality image from the data.getExtras, so to get full size image you need to save it in phone storage first and then use that image. Here are the steps involved in getting full sized image. As it’s clear from the title already, in this post we will discuss how we can display round corners in an ImageView. There can be several ways to show rounded corners, some of the ones I have tried are:
- Using a library like this one: Rounded ImageView Library
- Create a CardView with required corner radius and put ImageView inside it.
- Add rounding to the image itself.
In this post we will do everything our-self because, a: It’s ease and b: We can. 😉
So let get started:
Here’s the screenshot of rounded corner effect we will create as a result of this example:
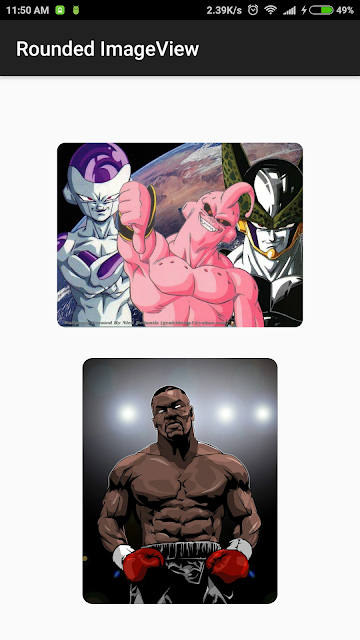 |
| Round Corner in ImageView |
How to Round the corners of an Image
Let’s first understand how we will be rounding the corners the Image. It just requires two steps
- First we will draw a rectangle on a canvas with the required roundness of corners.
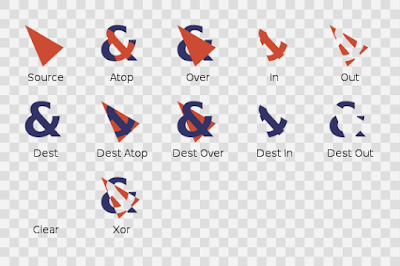
- Then we will draw the required Bitmap on the canvas with the PorterDuff.Mode.SRC_IN mode set in the paint. You are probably confused about PorterDuff, I was too. It’s basically a way to merge different images with each other where different images are on different layers similar to Photoshop. Below is the image of different PorterDuff modes. You can read more about it here: PorterDuff Modes:

Porter Duff Modes - You are done! Just return the new Bitmap created by step 1 and 2 and display it in ImageView.
The Code for Rounding the corners of Image.
1. activity_main.xml
This is simple we just two ImageViews where we will add images after the corner of the image has been rounded.
xmlns:tools=»http://schemas.android.com/tools»
android:layout_width=»match_parent»
android:layout_height=»match_parent»
android:gravity=»center»
android:orientation=»vertical»
android:padding=»@dimen/activity_horizontal_margin»
tools:context=».MainActivity»>
2. ImageConverter.java
This is the meat of the code. The getRoundedCornerBitmap method takes the Bitmap and the required rounded of corners as parameter and returns new Bitmap with round corners. I’ve comment all the main parts of the code should be self explanatory.
import android.graphics.Bitmap;
import android.graphics.Canvas;
import android.graphics.Color;
import android.graphics.Paint;
import android.graphics.PorterDuff;
import android.graphics.PorterDuffXfermode;
import android.graphics.Rect;
import android.graphics.RectF;
public class ImageConverter <
public static Bitmap getRoundedCornerBitmap(Bitmap bitmap, int pixels) <
//Setting the width and height of the Bitmap that will be returned //equal to the original Bitmap that needs round corners.
Bitmap output = Bitmap.createBitmap(bitmap.getWidth(), bitmap.getHeight(), Bitmap.Config.ARGB_8888);
//Creating canvas with output Bitmap for drawing
Canvas canvas = new Canvas(output);
//Setting paint and rectangles.
final int color = Color.BLACK;
final Paint paint = new Paint();
final Rect rect = new Rect(0, 0, bitmap.getWidth(), bitmap.getHeight());
final RectF rectF = new RectF(rect);
final float roundPx = pixels;
paint.setAntiAlias(true);
canvas.drawARGB(0, 0, 0, 0);
paint.setColor(color);
canvas.drawRoundRect(rectF, roundPx, roundPx, paint);
//SetXfermode applies PorterDuffXfermode to paint.
paint.setXfermode(new PorterDuffXfermode(PorterDuff.Mode.SRC_IN));
canvas.drawBitmap(bitmap, rect, rect, paint);
return output;
>
>
3. MainActivity.java
We have everything ready, now we just need the use our ImageConverter class’s getRoundedCornerBitmap Method and apply the returned Bitmap as ImageView’s background and we are done!
import android.graphics.Bitmap;
import android.graphics.BitmapFactory;
import android.os.Bundle;
import android.support.v7.app.AppCompatActivity;
import android.widget.ImageView;
public class MainActivity extends AppCompatActivity <
ImageView iv1, iv2;
@Override
protected void onCreate(Bundle savedInstanceState) <
super.onCreate(savedInstanceState);
setContentView(R.layout.activity_main);
iv1 = (ImageView)findViewById(R.id.imageView1);
iv2 = (ImageView)findViewById(R.id.imageView2);
Bitmap bitmap1 = BitmapFactory.decodeResource(this.getResources(),R.drawable.img1);
Bitmap circularBitmap1 = ImageConverter.getRoundedCornerBitmap(bitmap1, 100);
Bitmap bitmap2 = BitmapFactory.decodeResource(this.getResources(),R.drawable.img2);
Bitmap circularBitmap2 = ImageConverter.getRoundedCornerBitmap(bitmap2, 100);
>
Voila! now you have finally created Images with round corner. If you have any questions, feel free to comment below. Happy Coding.
Источник


