- How to stop Android apps running in the background
- Update your device! Get to Android 10 or better if you can
- Check what’s draining your phone
- Battery
- Stop the app, kill it, or uninstall your background apps
- Find the app in Developer Options and stop it
- Find the background app, Force Stop or Uninstall
- Limit problematic background apps
- What next?
- How to Stop Apps From Running in the Background on Android
- Troubleshoot those battery drains on your smartphone
- What to Know
- How to Stop Apps From Running in the Background on Android
- How Background Apps Affect Your Android Battery
- See Which Apps Run in the Background on Android
- Android run any app in background
How to stop Android apps running in the background
Having your battery drain faster than expected is one of the biggest headaches with any Android phone. Tracking down a charger and plugging in shortly after a full charge overnight is always a sad feeling. If you’re ready to thwart your battery woes, a simple culprit may be to blame. Here’s what you need to know to conquer background apps.
These apps can sap your battery and precious resources, but there may be a few different causes for your problems. Some apps might not be well optimized, some might be malware, or some might have a bug. All you need now is a little know-how, and we’ll have you living the charged life shortly.
Ready for a little extra juice at no cost? Let’s get into the best battery improvements.
Update your device! Get to Android 10 or better if you can

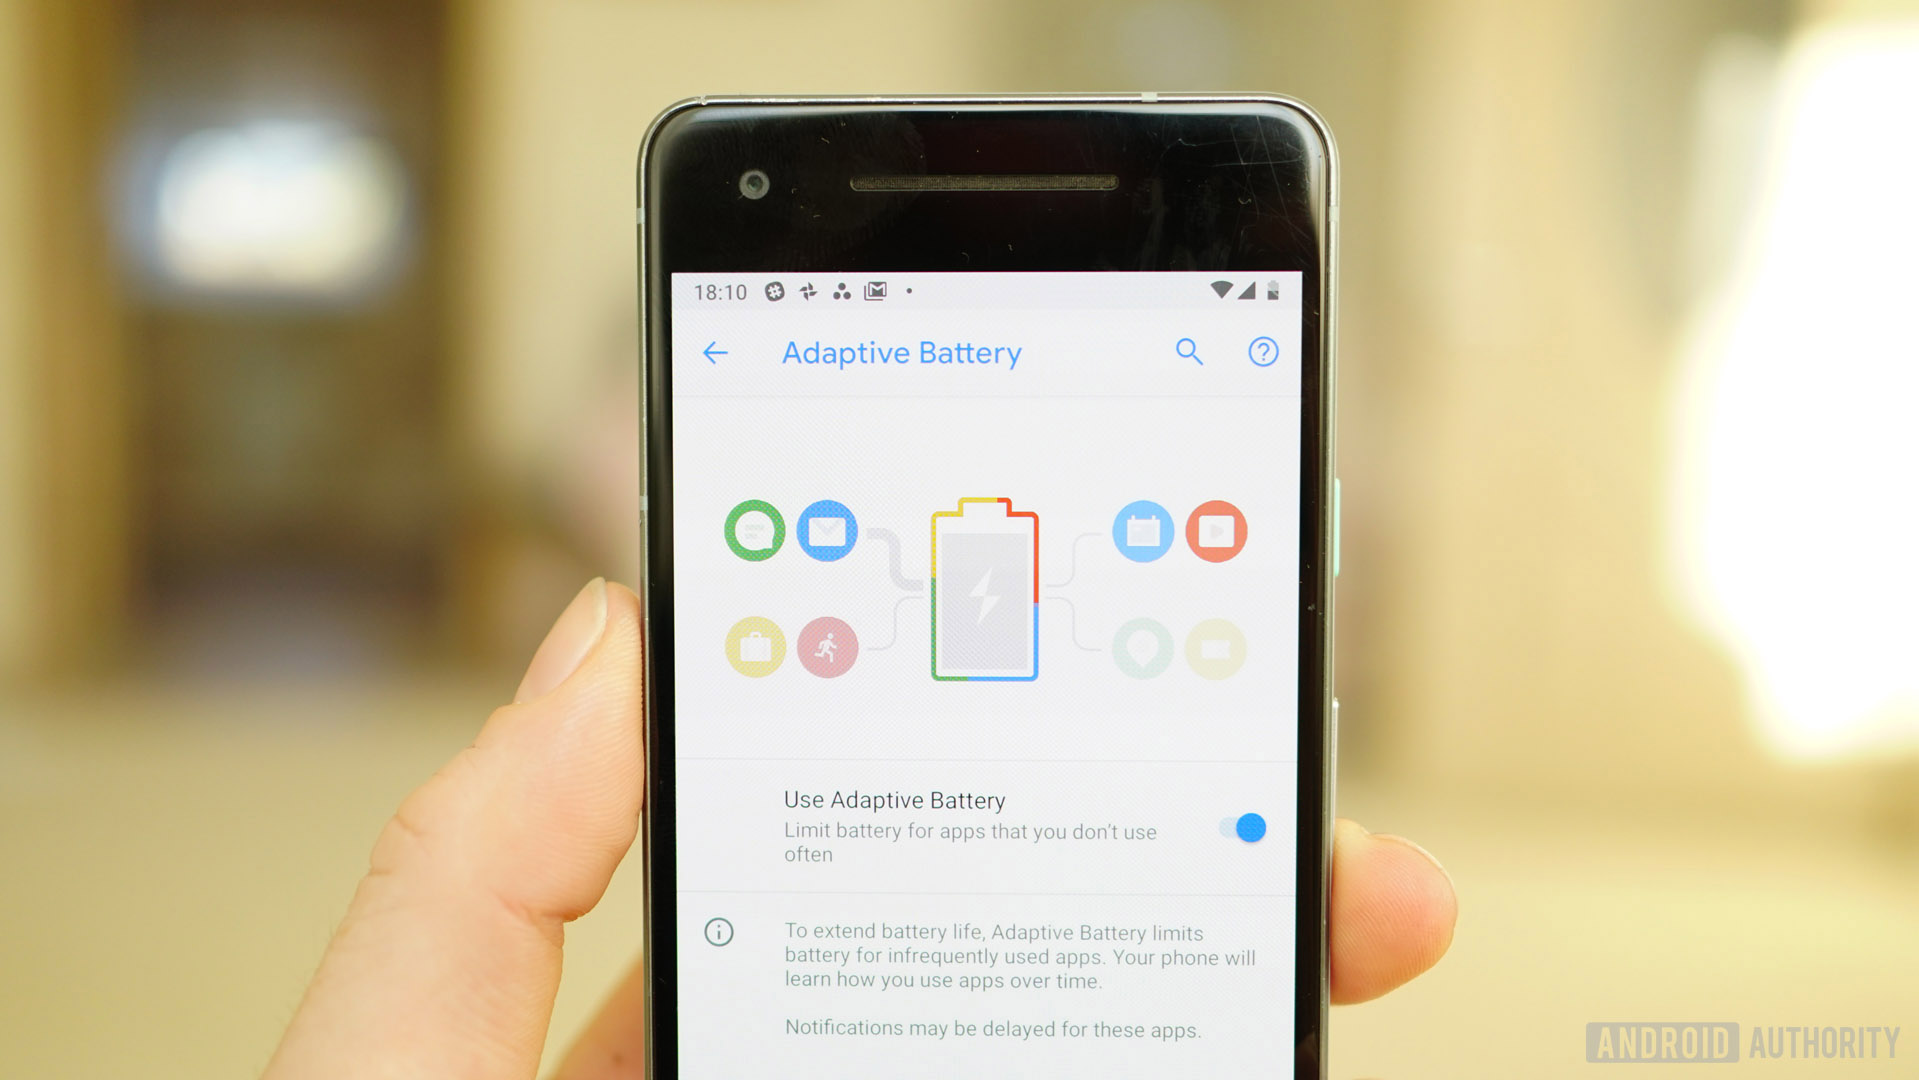
Many phones are still running on Android 10 even though Android 11 has been out for a while. Luckily, that’s good news for users. Android 10 has great power management features that place limits on background apps and therefore extend your phone’s battery life. One of them is called Adaptive Battery, which uses machine learning to figure out which apps you’ll use in the next few hours and which ones you won’t use until later, if at all today. Based on your usage patterns, it places each app into one of the five App Standby Buckets: Active, Working set, Frequent, Rare, and Never. Each of these buckets has its limitations for how much resources the apps it contains can use.
To put it simply, an app placed in the Never bucket is hardly ever used, which is why the system will limit its access to resources like the CPU. This means it will use less battery. On the other hand, apps in buckets like Active are the ones you use the most and will get full access to the system’s resources, so you can expect to get all your notifications on time.
The process is automatic and dynamic, which means the system learns your usage pattern over time and moves the apps from one bucket to the other accordingly.
Check what’s draining your phone

Battery
Since battery life is so important, it’s well monitored by your Android OS. To look at the apps guzzling power, go to Settings > Battery > Battery Usage. You’ll get a list accurate to two decimal points of what’s draining your battery. Depending on your device and software, the apps will be split into either system or non-system apps or by hardware and software to make things even easier.
The more you use certain apps, the higher on the list they’ll sit. Look out for any apps you don’t recognize using more than a tiny percentage of your battery. Any app using over a few percent is worth looking into — saving five percent here or four percent there will add up. Anything that’s a Google app or service is probably not something to worry about and just a natural part of Android and Google Mobile Services.
Using Developer options, you can also check out which apps dominate your phone’s limited memory, also known as RAM. It may be that an app is not using a lot of battery, but when you’re only working with 2GB of RAM and an app you’re not using is taking up a few hundred MB, leaving you short on available memory.
You can check this out in a few different ways, but here’s the sure-fire winner that works in new Android versions:
- Go to Settings >System > About phone.
- Scroll down and find “Build number” and then tap it seven times. This will enable “Developer options” on your device, and you’ll see a notification that this has happened.
Now go back to Settings > System, and you’ll be able to select “Developer options” from there.
Then go Settings > Developer Options > Processes (or Settings > System > Developer Options > Running services.)
Here you can view which processes are running, your used and available RAM, and which apps are using it up. Again, some of these services are essential to keep your phone running. You should be primarily looking for demanding apps you’ve downloaded personally.
If this method doesn’t work to unlock developer options, a quick Google search of your phone model and “developer options unlock” should help.
Stop the app, kill it, or uninstall your background apps
Once you’ve found your culprit, you have to know what to do next. Luckily, you have a few options to choose from if you don’t want to remove the app entirely.
Find the app in Developer Options and stop it
The first involves the Developer Options > Running services method we described above.

Find the background app, Force Stop or Uninstall
Once you’ve identified your background apps, it might be worth checking out all the apps you have installed and giving them a once over.
Go to Settings > Apps & Notifications > Apps.
You’ll see your apps load in alphabetical order, and from here, you can click into any app and decide to Force Stop or Uninstall it. As with before, Force Stop might cause a crash, but you’ll be OK following a reboot.

Limit problematic background apps
If you want to keep using an app that appears to have high demand, you might be able to limit what it can do.
Some Samsung and Huawei phones include OS options to manage background apps. In Battery Settings, Huawei offers an “App launch” option, which allows you to identify specific apps, restrict launches, and target power-saving measures. Samsung also offers a power-saving option to help manage apps.
If you don’t have access to a proprietary built-in option, there are, of course, good apps to help. The perennial favorite is Greenify, which offers fine controls over apps and places them in hibernation. If you have a rooted phone, you’ll have even more control, but it works well with standard devices too.
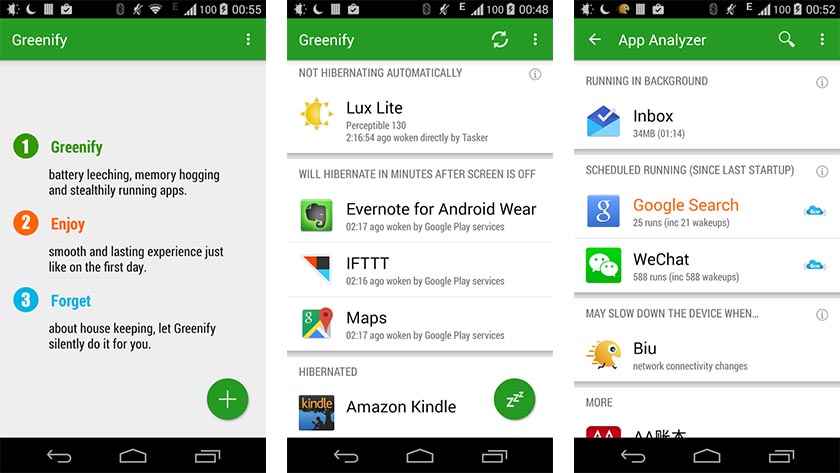
One problem with apps like this is intentionally introducing another app to monitor your device. In our popular post titled 13 tricks and hacks to speed up Android, our own Adam Sinicki noted that while background apps can kill the battery, background app killers can slow you down as well:
What next?
Android 11 is landing for most people, and we expect Google to continue upgrading Android’s ability to quash any apps that make your life harder. We’ll probably hear more as the update hits even more devices, and Android 12, which is currently in beta, should offer improvements in the future as well.
Источник
How to Stop Apps From Running in the Background on Android
Troubleshoot those battery drains on your smartphone
:max_bytes(150000):strip_icc()/RyanDube-214359-8f50cb3133cd47c7ae1f3d4f09349f4e.JPG)
What to Know
- Go to Settings >Apps, select an app you want to stop, then tap Force Stop.
- If you don’t want the app to relaunch when you restart your phone, tap Uninstall to get rid of the app permanently.
- To see what apps are running in the background and the resources they consume, go to Settings >Developer Options >Running Services.
This article explains how to stop apps from running in the background on Android. Instructions apply to Android 7 and higher.
How to Stop Apps From Running in the Background on Android
Here’s how to kill background apps on Android:
The Settings interface may differ depending on your phone’s manufacturer and your version of Android, but the same options should be available.
Go to Settings > Apps.
Select an app you want to stop, then tap Force Stop.
If you choose to Force Stop the app, it stops during your current Android session. However, when you restart your phone, the app relaunches. If you want to get rid of the app permanently, select Uninstall.
:max_bytes(150000):strip_icc()/001_stop-apps-from-running-in-the-background-on-android-4777510-b9ccf042feb443beabec0ea848940629.jpg)
The app clears battery or memory issues only until you restart your phone. Any apps that launch on startup will restart and could cause the same issues. Uninstall any apps you don’t use much, and this will help improve the battery or memory issues permanently.
How Background Apps Affect Your Android Battery
Your Android device is equipped to run multiple apps in the background. If the app is written by a professional programmer, it won’t cause any problems with battery or memory consumption. This is because when an app is running in the background, it consumes only a little bit of the device’s battery (in the form of memory use or CPU time). Some apps use more or less depending on what the app is.
That said, one common reason your Android device’s battery can drain too quickly is when there are too many apps running. You can see the apps you have running in the background by tapping the square navigation icon at the lower-right corner of your Android display.
Keep in mind, there may be multiple windows inside of apps, like multiple tabs inside of the Google Chrome mobile browser. Each of these could potentially consume resources.
There are many poorly written apps on Google Play, and when you install those on your phone, they may consume more battery power, CPU, or memory than they’re supposed to. Over time, if you’ve installed a lot of apps that you’ve forgotten about, your Android memory, battery, and CPU could be burdened by the excessive load of poorly written Android background apps.
See Which Apps Run in the Background on Android
The best way to alleviate the burden on your Android’s system resources and extend battery life is to make sure the only apps running in the background are the ones you want running.
There are a few ways to see what apps are running in the background and consuming your Android’s resources.
Go to Settings, then scroll to the bottom and look for Developer Options. If you don’t see Developer Options in your settings menu, scroll down and select About phone > Software information. Then, tap Build number seven times. This will enable Developer Options in the Settings menu.
:max_bytes(150000):strip_icc()/003_stop-apps-from-running-in-the-background-on-android-4777510-a48c08aafd04400eb334624e6170a9ba.jpg)
Tap Developer options.
Tap Running Services. This shows the apps that are currently running on your Android, how much RAM they’re consuming, and how long each has been running.
:max_bytes(150000):strip_icc()/002_stop-apps-from-running-in-the-background-on-android-4777510-6524235469a94459a432001b0fad5080.jpg)
To see apps consuming battery power, go to Settings > Device Care > Battery > Battery Usage.
As you perform these next steps, look for and consider closing any apps that:
- Consume excessive memory or battery power and are not optimized.
- You forgot about or didn’t expect to see running in the background.
:max_bytes(150000):strip_icc()/004_stop-apps-from-running-in-the-background-on-android-4777510-7b3711b2de8246158b4d7a7dd343834e.jpg)
To put your phone into battery-saving mode, go to Device Care > Battery > Power mode and select Medium power saving or Maximum power saving. The latter gives you access to only the minimum required features of your phone.
Источник
Android run any app in background
Cordova Background Plugin ![]()

Plugin for the Cordova framework to perform infinite background execution.
Most mobile operating systems are multitasking capable, but most apps dont need to run while in background and not present for the user. Therefore they pause the app in background mode and resume the app before switching to foreground mode. The system keeps all network connections open while in background, but does not deliver the data until the app resumes.
Infinite background tasks are not official supported on most mobile operation systems and thus not compliant with public store vendors. A successful submssion isn’t garanteed.
Use the plugin by your own risk!
- Android/Amazon FireOS
- Browser
- iOS
- Windows(see #222)
The plugin can be installed via Cordova-CLI and is publicly available on NPM.
Execute from the projects root folder:
Or install a specific version:
Or install the latest head version:
Or install from local source:
The plugin creates the object cordova.plugins.backgroundMode and is accessible after the deviceready event has been fired.
Enable the background mode
The plugin is not enabled by default. Once it has been enabled the mode becomes active if the app moves to background.
To disable the background mode:
Check if running in background
Once the plugin has been enabled and the app has entered the background, the background mode becomes active.
A non-active mode means that the app is in foreground.
Listen for events
The plugin fires an event each time its status has been changed. These events are enable , disable , activate , deactivate and failure .
To remove an event listeners:
Transit between application states
Android allows to programmatically move from foreground to background or vice versa.
Override the back button on Android to go to background instead of closing the app.
Recent task list
Exclude the app from the recent task list works on Android 5.0+.
Detect screen status
The method works async instead of isActive() or isEnabled().
Unlock and wake-up
A wake-up turns on the screen while unlocking moves the app to foreground even the device is locked.
To indicate that the app is executing tasks in background and being paused would disrupt the user, the plug-in has to create a notification while in background — like a download progress bar.
The title, text and icon for that notification can be customized as below. Also, by default the app will come to foreground when tapping on the notification. That can be changed by setting resume to false. On Android 5.0+, the color option will set the background color of the notification circle. Also on Android 5.0+, setting hidden to false will make the notification visible on lockscreen.
To modify the currently displayed notification
Note: All properties are optional — only override the things you need to.
Run in background without notification
In silent mode the plugin will not display a notification — which is not the default. Be aware that Android recommends adding a notification otherwise the OS may pause the app.
Various APIs like playing media or tracking GPS position in background might not work while in background even the background mode is active. To fix such issues the plugin provides a method to disable most optimizations done by Android/CrossWalk.
Note: Calling the method led to increased resource and power consumption.
- Fork it
- Create your feature branch ( git checkout -b my-new-feature )
- Commit your changes ( git commit -am ‘Add some feature’ )
- Push to the branch ( git push origin my-new-feature )
- Create new Pull Request
This software is released under the Apache 2.0 License.
Источник


