- How to start using C++ code in your Android project
- How to start using C++ code in your Android project
- Warm Up
- Android Run Time
- ART & C++
- C++ Build Process
- Some Concepts
- CMake and Gradle
- Things to do in case you want to try it out
- Add C and C++ code to your project
- Download the NDK and build tools
- Create a new project with C/C++ support
- Build and run the sample app
- Create new C/C++ source files
- Additional resources
- Codelabs
How to start using C++ code in your Android project
How to start using C++ code in your Android project
Last year I gave a talk at the GDG DevFest in Ankara, Turkey. I have been planning to share that talk here ever since. Now that I’m a PhD candidate and have a bit more time, I’m putting the post down here.
If you would like to get the presentation, it’s available on my drive.
Warm Up
I would like to start by explaining the build process of an app in Android. Because you need to know some basic internal stuff, this topic is somewhat technical.
You don’t need to know everything shown in the image above — but it’s a good reference.
Now say that you write an application for Android using Java. You’re going to have:
- the source code for that application
- some sort of resource files (like images or xml files for the arrangement of the GUI)
- and perhaps some AIDL files, which are Java interfaces that make processes talk to each other.
You’re probably also going to use additional libraries and their related files in your project.
When building a working app, you first compile those source codes together. A compiler will yield a DEX file which then can be read by a virtual machine. This machine-readable file and some additional information about the app will be packaged together by a package manager. The final package — called an APK package — is the final app.
This is the build process of an Android package in the simplest terms.
Android Run Time
Now let’s talk about the run time stuff. You have an app, and when it starts running it’s read by a machine. Android has two kinds of virtual machines to run an app. I won’t introduce the old one, called Dalvik, as today most Android devices run a virtual machine called Android Run Time, ART — so that’s what we’ll talk about here.
ART is an ahead-of-time (AOT) virtual machine. So, what does that mean? Let me explain. When your app starts running for the first time, its code is compiled to machine code which can then be read by the real machine. This means that the code isn’t compiled part by part at run time. This enhances the install time of the app while reducing the battery usage.
In sum, you write an app then compile it to binary code which is read by the ART. Then the ART converts that code to native code which can be read by the device itself.
ART & C++
What if you write an Android app using Java but there is some C++ code that is in contact with the Java? What’s the effect of that C++ code on your app’s build process or run time? Not too much.
The C++ code is compiled directly to the real machine code by its compiler. So, if you use C++ code, it will be packaged as machine-readable code in your package. The ART will not reprocess it while it converts the ART-readable code into machine-readable code at the first time usage. You don’t need to worry about this process. You’re only responsible for writing an interface which lets Java talk to C++. We’re going to talk about that soon.
C++ Build Process
We now have to talk about the C++ build process. The source code (the .cpp and .h files) is turned into expanded source code by a preprocessor in the very first step. This source code contains a whole lot of code. While you can get the final executable file using a command like the above, it’s possible to cut the build steps with related flags. You can get the extended source by giving the -E flag to the g++ compiler. I have a 40867 line file for a 4 line ‘hello world’ .cpp source code.
Use g++ -E hello.cpp -o hello.ii in order to get the extended source code.
The second one is the actual compilation step. The compiler compiles our code to obtain an assembler file. So, the real compilation yields an assembler file, not the executable. This file is assembled by an assembler. The resulting code is called object code. When we have multiple libraries aimed to be linked to each other we have many object codes. Those object codes are linked by a linker. Then we get an executable.
There are two kinds of linking: dynamic and static.
So now it’s time to go a bit deeper as we discuss pure C++ stuff.
The important thing: You can consider static linked libraries as a part of your code. So be careful when you link a library to your project. Because the library you use might not have a suitable license to be statically linked. Most open source libraries have been restricted to be used as dynamically linked.
From a technical point of view, a statically linked library is linked to the project at build time by the compiler. On the other hand, a dynamically linked library is linked by the operating system at run time. So you don’t need to distribute your project with the library code you use. You can use another project’s library or system library as well.
Because of this fact dynamic linking may cause vulnerability in your project. While the security case is out of the scope of this post, however.
Some Concepts
CMake and Gradle
If we want to add C++ code in our Android project, it’s good to use CMake to handle build operations. Remember the build process I have just introduced above? When you have a bunch of C++ libraries and source code it becomes more complicated to handle all of them. A tool like CMake makes it easier to carry out the build process.
CMake will be available by default when you choose to include C++ support at the start of your project. Also you need to use a Gradle closure in order to package libraries to your APK.
As you know, Android is distributed for a variety of devices. Each device might have a different CPU architecture. When you develop an Android application that contains C++ code, you should care about the platforms on which your application will run.
Remember the C++ build mechanism I introduced above? The C++ code should be compiled as a library for each platform you target. You can compile the library for all the supported platforms, or you can choose to compile it for only one platform.
Please note that 64-bit ABI support will be mandatory with Android Pie release if you want to put your app in the Google Play Store.
Android support table for different CPUs.
This is the last thing I would like introduce you to concerning C++ usage in Android. As I mentioned previously, I’m introducing you these concepts considering you want to develop an app using Java.
JNI is an abbreviation for Java Native Interface. It allows C++ and Java parts to talk to each other in the simplest terms. For example, if you want to call a function from C++ in Java, you should write a JNI interface for this purpose.
The native-lib.cpp is the interface and it connects the C++ code to the Java code. In the above example, the only C++ code is the JNI itself. However, you can include the libraries you want to use and implement a function which calls them. This new function can be called from the Java part. So it works as a bridge in that way.
Things to do in case you want to try it out
Here, you have all the necessary and basic knowledge to use C++ in your Android project. If you want to give it a try, this is how to create a simple Android project with C++ code.
The below images show you the steps to start such a project. After finishing them, you might want to read over this post to modify and understand the mechanism more deeply.
This post was only an introduction. Don’t forget there are many more things to learn. However, I aimed to introduce you the most important things about the concept of using C++.
If this article was helpful, tweet it.
Learn to code for free. freeCodeCamp’s open source curriculum has helped more than 40,000 people get jobs as developers. Get started
freeCodeCamp is a donor-supported tax-exempt 501(c)(3) nonprofit organization (United States Federal Tax Identification Number: 82-0779546)
Our mission: to help people learn to code for free. We accomplish this by creating thousands of videos, articles, and interactive coding lessons — all freely available to the public. We also have thousands of freeCodeCamp study groups around the world.
Donations to freeCodeCamp go toward our education initiatives and help pay for servers, services, and staff.
Источник
Add C and C++ code to your project
You can add C and C++ code to your Android project by placing the code into a cpp directory in your project module. When you build your project, this code is compiled into a native library that Gradle can package with your app. Your Java or Kotlin code can then call functions in your native library through the Java Native Interface (JNI). To learn more about using the JNI framework, read JNI tips for Android.
Android Studio supports CMake, which is good for cross-platform projects, and ndk-build, which can be faster than CMake but only supports Android. Using both CMake and ndk-build in the same module is not currently supported.
If you want to import an existing ndk-build library into your Android Studio project, learn how to link Gradle to your native library project.
This page shows you how to set up Android Studio with the necessary build tools, create a new project with C/C++ support, and add new C/C++ files to your project.
If instead you want to add native code to an existing project, you need to follow these steps:
- Create new native source files and add them to your Android Studio project.
- You can skip this step if you already have native code or want to import a prebuilt native library.
- Configure CMake to build your native source code into a library. You also require this build script if you are importing and linking against prebuilt or platform libraries.
- If you have an existing native library that already has a CMakeLists.txt build script, or uses ndk-build and includes an Android.mk build script, you can skip this step.
- Configure Gradle by providing a path to your CMake or ndk-build script file. Gradle uses the build script to import source code into your Android Studio project and package your native library (the SO file) into the app.
Once you configure your project, you can access your native functions from Java or Kotlin code using the JNI framework. To build and run your app, simply click Run .
Note: If your existing project uses the deprecated ndkCompile tool, you should migrate to using either CMake or ndk-build. To learn more, go to the section about how to Migrate from ndkCompile.
Attention experimental Gradle users: Consider migrating to plugin version 2.2.0 or higher, and using CMake or ndk-build to build your native libraries if any of the following apply to you: Your native project already uses CMake or ndk-build; you would rather use a stable version of the Gradle build system; or you want support for add-on tools, such as CCache. Otherwise, you can continue to use the experimental version of Gradle and the Android plugin.
Download the NDK and build tools
To compile and debug native code for your app, you need the following components:
- The Android Native Development Kit (NDK): a toolset that allows you to use C and C++ code with Android, and provides platform libraries that allow you to manage native activities and access physical device components, such as sensors and touch input.
- CMake: an external build tool that works alongside Gradle to build your native library. You do not need this component if you only plan to use ndk-build.
- LLDB: the debugger Android Studio uses to debug native code.
For information on installing these components, see Install and configure the NDK, CMake, and LLDB.
Create a new project with C/C++ support
Creating a new project with support for native code is similar to creating any other Android Studio project, but there is an additional step:
- In the Choose your project section of the wizard, select the Native C++ project type.
- Click Next.
- Complete all other fields in the next section of the wizard.
- Click Next.
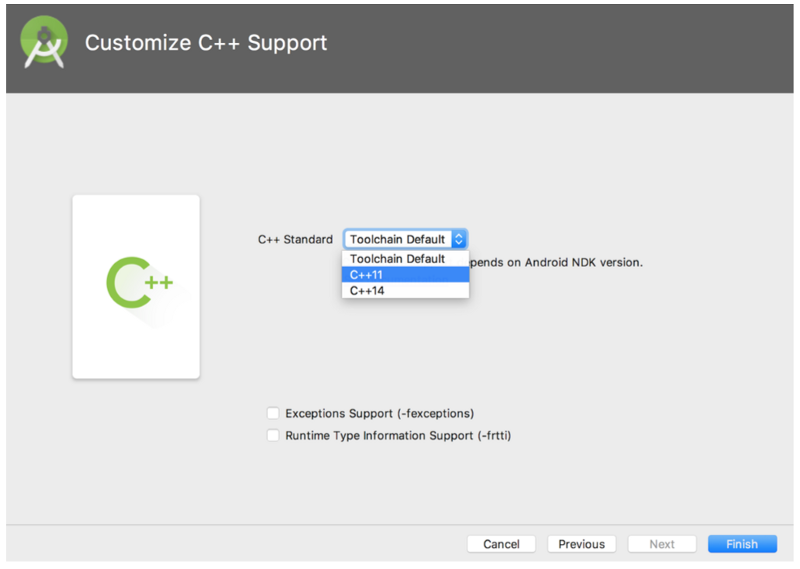
- In the Customize C++ Support section of the wizard, you can customize your project with the C++ Standard field. Use the drop-down list to select which standardization of C++ you want to use. Selecting Toolchain Default uses the default CMake setting.
- Click Finish.
After Android Studio finishes creating your new project, open the Project pane from the left side of the IDE and select the Android view. As shown in figure 2, Android Studio adds the cpp group:

Figure 2. Android view groups for your native sources and external build scripts.
Note: This view does not reflect the actual file hierarchy on disk, but groups similar files to simplify navigating your project.
The cpp group is where you can find all the native source files, headers, build scripts for CMake or ndk-build, and prebuilt libraries that are a part of your project. For new projects, Android Studio creates a sample C++ source file, native-lib.cpp , and places it in the src/main/cpp/ directory of your app module. This sample code provides a simple C++ function, stringFromJNI() , that returns the string «Hello from C++». You can learn how to add additional source files to your project in the section about how to Create new native source files.
Similar to how build.gradle files tell Gradle how to build your app, CMake and ndk-build require a build script to know how to build your native library. For new projects, Android Studio creates a CMake build script, CMakeLists.txt , and places it in your module’s root directory. To learn more about the contents of this build script, read Configure CMake.
Build and run the sample app
When you click Run , Android Studio builds and launches an app that displays the text «Hello from C++» on your Android device or emulator. The following overview describes the events that occur in order to build and run the sample app:
- Gradle calls upon your external build script, CMakeLists.txt .
- CMake follows commands in the build script to compile a C++ source file, native-lib.cpp , into a shared object library and names it libnative-lib.so , which Gradle then packages into the app.
- During runtime, the app’s MainActivity loads the native library using System.loadLibrary() . The library’s native function, stringFromJNI() , is now available to the app.
- MainActivity.onCreate() calls stringFromJNI() , which returns «Hello from C++», and uses it to update the TextView .
Note: Instant Run is not compatible with components of your project written in native code.
If you want to verify that Gradle packages the native library in the app, you can use the APK Analyzer:
- Select Build > Build Bundles(s) / APK(s) > Build APK(s)
- Select Build > Analyze APK.
- Select the APK or AAB from the app/build/outputs/ directory and click OK.
- As shown in figure 3, you can see libnative-lib.so in the APK Analyzer window under lib// .

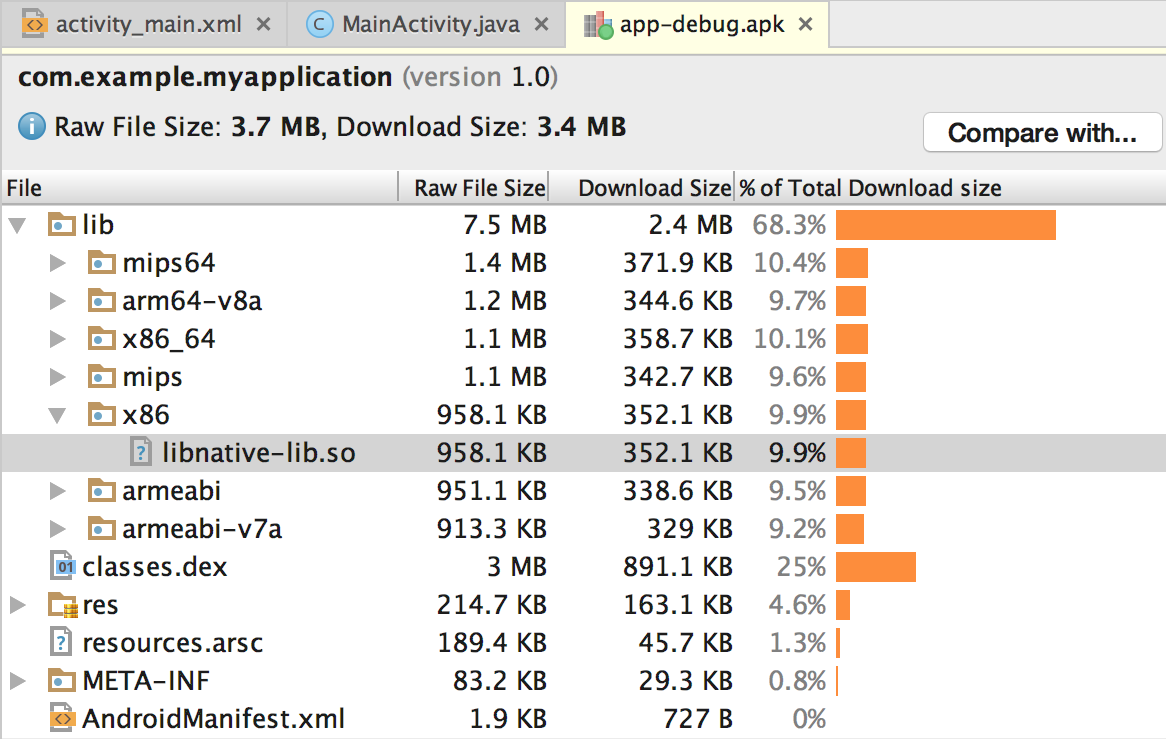
Figure 3. Locating a native library using the APK Analyzer.
Tip: If you want to experiment with other Android apps that use native code, click File > New > Import Sample and select a sample project from the Ndk list.
Create new C/C++ source files
To add new C/C++ source files to an existing project, proceed as follows:
- If you don’t already have a cpp/ directory in the main source set of your app, create one as follows:
- Open the Project pane from the left side of the IDE and select the Project view from the drop-down menu.
- Navigate to your-module > src, right-click on the main directory, and select New > Directory.
- Enter cpp as the directory name and click OK.
Right-click on the cpp/ directory and select New > C/C++ Source File.
Enter a name for your source file, such as native-lib .
- From the Type drop-down menu, select the file extension for your source file, such as .cpp .
- You can add other file types to the drop-down menu, such as .cxx or .hxx , by clicking Edit File Types . In the C/C++ dialog box that pops up, select another file extension from the Source Extension and Header Extension drop-down menus and click OK.
If you also want to create a header file, check the Create an associated header checkbox.
After you add new C/C++ files to you project, you still need to configure CMake to include them in your native library.
Additional resources
To learn more about supporting C/C++ code in your app, try the following resource.
Codelabs
- Create Hello-CMake with Android Studio, a codelab that shows you how to use the Android Studio CMake template to start Android NDK project development
Content and code samples on this page are subject to the licenses described in the Content License. Java is a registered trademark of Oracle and/or its affiliates.
Источник


