- Getting Started
- 1. System Requirements
- 2. Downloading Samsung SDKs
- Downloading SDKs from Samsung Developers:
- 3. Getting started with Android Studio
- Creating an Android Studio project
- Adding a Samsung library to Android Studio
- Running the App
- Running a sample app
- Home Office на мобильном устройстве: используем Samsung DeX
- Что такое Samsung DeX
- Какой выбрать адаптер для DeX
- Как подключить рабочую станцию
- Начало работы с DeX
- Удаленный офис
- Using a Galaxy Emulator Skin
- What You Need
- How To Use
- Tips on Using Emulators
- Emulator Limitations
Getting Started
This guide teaches developers how to set up their workstations in order to use Samsung Mobile SDKs in their apps. It covers basic topics such as how to download and install the SDK.
This section covers:
- System Requirements.
- Downloading Samsung Mobile SDKs.
- Getting started with Android Studio.
1. System Requirements
To develop apps for Samsung mobile devices, you must first set up your Android development environment. If your development environment is already configured, you can skip this section.
- Verify that your development system meets the requirements specified by the Android System Requirements.
- Set up your Java environment:
To develop Android apps in Java, you need the following:
- Java Development Kit (JDK) — this provides the tools required to build a Java app.
- Java Runtime Environment (JRE) — this lets you run Java apps on your computer.
To set up these components: 1. Go to Java SE Downloads. 2. Click Java Download to display the download page for the latest version of JDK, which includes JRE. 3. Click the download package for your operating system: Windows, Mac OS X, or Linux. 4. Install the JDK package. For details about the installation, see the Java Platform Installation.
- Download Android Studio:
- Go to Android Studio.
- If the browser has detected your operating system, click Download Android Studio. Otherwise, click Download Options and select a different platform: Windows, Mac OS X, or Linux.
- Unzip and install the bundle. It includes essential components and the Studio IDE.
- Launch Android Studio.
- If you get a notice of Platform and Plugin Updates, click update to exit Studio and launch the SDK Manager. Then install the suggested packages.
2. Downloading Samsung SDKs
Downloading SDKs from Samsung Developers:
- Go to Mobile page
- Select the SDK you want to download
- Go to the Resources page for the SDK
- Click the download button
- Read the license agreement, select I agree to this SDK License Agreement and click Download
- Unzip the downloaded SDK to a folder of your choice. The SDKs typically provide the following folders
- Docs: Programming guides and API references
- Libs: Java and C libraries to use in your app
- Samples: Sample apps showing example source code
- Tools: Additional tools that may be needed to use the SDK
- Extras: Additional support resources
3. Getting started with Android Studio
This section describes how to create your first project in Android Studio and run an app.
Creating an Android Studio project
- Launch Android Studio.
- Create a new project by clicking File > New Project
- Fill out the fields:
- Application name: your app name
- Company domain: the qualifier for your app package name.
- Package name: this is the combination of the company domain and application name, which must be unique across all packages in the Android environment. Android generates this from the application name and company domain values.
- Project Location: the directory where your app is stored. You can use the default or specify another location, if desired.
- Click Next
- Select the type of device you want to target, for example, Phone and Tablet
- Select the Minimum SDK level you need to support the SDKs you’re using. In this example, select API 21. Click Next
- Use the default Empty Activity type and click Next. For more about activities, see Android Activities.
- Use the default Activity Name and Layout Name and click Finish For more about creating a project in Android Studio, see Creating Projects.
Adding a Samsung library to Android Studio
To use a Samsung SDK in your app, you add the library files that are bundled with the SDK to your Android Studio project.
- Open your project in Android Studio.
- Use a file browser to navigate to the folder containing the Samsung SDK
- Open the add-on SDK folder, then open:
- Docs > API Reference > index.html: to see what libraries and API methods are provided by the SDK
- Libs folder: to copy the libraries you want to use in your app
- In your Android Studio project, top-left drop-down menu, change the Android view to Project
- Right-click your app’s libs directory and select Paste
- In the Copy dialog, click OK to paste the copied files into your project
- The libraries now appear in your project under the libs folder
- Right-click the libraries and select Add As Library.
- Select the module to add the library to. If your app contains several modules, ensure that you add the library to the appropriate module. Click OK. Your project now includes the SDK you downloaded.
Running the App
Android Studio provides two ways to compile and test your app: — On an Android Virtual Device (AVD) — On a physical Samsung device To run your app:
- Plug your Samsung mobile device into your computer using a USB cable
- If you are using a Windows computer, go to Samsung Android USB Driver for Windows, then download and install the USB driver onto your computer
- Enable developer options on your device by going to Settings > About device > Software info and tapping Build number seven times. (Devices with Android 4.1 or older already have developer options displayed by default.)
- Turn on USB debugging by tapping Settings > Developer options > USB debugging
If My Knox is installed, USB debugging is grayed out; try using another device.
- In Android Studio, with your project open, click Run > Run ‘app’ (or press Shift + F10)
- Select the device you want run the app on, under either Connected Devices or Available Emulators
Running a sample app
The sample apps are in the Samples folder of the SDK you downloaded. To run a sample app:
- Open Android Studio
- In the top navigation menu, select File > Open
- Navigate to the sample app directory in the SDK you downloaded
- Click OK to import the file to your project
Источник
Home Office на мобильном устройстве: используем Samsung DeX
Многие компании в настоящее время уже перевели своих сотрудников на удаленную работу. Другие же планируют это сделать в ближайшее время. А можно ли работать из дома, имея в наличии только Android-смартфон или планшет? Конечно, возможно, особенно если это устройство с поддержкой Samsung DeX. Ниже вы найдете краткий обзор платформы и ее пока недолгой истории, а также описание реального кейса использования – тонкий клиент с подключением к удалённому рабочему столу по RDP.

Что такое Samsung DeX

DeX (Desktop Experience) – это Android Desktop, режим запуска Android на внешнем дисплее (или на дисплее самого планшета) в формате десктопной ОС. При подключении DeX запускает графическую оболочку, похожую на привычный рабочий стол десктопа, с возможностью открытия нескольких окон, drag and drop, горячими клавишами клавиатуры и т.д.
DeX доступен для всех смартфонов Galaxy серии S начиная с S8/S8+ и Note, начиная с Note 8, а также планшетов Tab S4 и старше.

Ещё в 2017 для использования режима DeX была необходима объёмная док-станция. Про нее шутили, намекая на сходство с тарелкой для еды. В 2020 необходимое оборудование редуцировалось до небольшого переходника – DeX стал удобнее и доступнее.
Какой выбрать адаптер для DeX
Для работы с DeX понадобится адаптер, подключающий телефон к HDMI-разъёму монитора. На рынке существует несколько вариантов HDMI адаптеров Samsung: от обычного кабеля до полноценной док-станции с возможностью одновременной зарядки, подключения USB периферии и LAN кабеля.
HDMI адаптеры сторонних производителей также могут поддерживать режим DeX, но их использование не гарантирует оптимальное качество изображения и производительность.
Как подключить рабочую станцию
Как только мы определились с адаптером, можно запускать DeX. Для этого:
1. Подключите устройство с помощью адаптера к внешнему экрану (монитору, телевизору или проектору) или запустите режим DeX на своём планшете. Важно: внешний экран должен поддерживать соотношение сторон экрана 16:9 и одно из следующих разрешений FHD (1920×1080), HD+ (1600×900) или WQHD (2560×1440).
2. (Опционально) Подключите клавиатуру и мышь по Bluetooth или через USB порт (если адаптер позволяет такую возможность). Вместо клавиатуры и мыши можно использовать экран устройства как тачпад. Таким образом, возможны 2 сценария использования экрана смартфона в DeX: с тачпадом или с дополнительным экраном:
3. По возможности подключите зарядное устройство (Fast Charge-адаптер, идущий в комплекте с мобильным устройством). DeX-режим более интенсивно использует ресурсы мобильного устройства, а значит, быстрее расходует заряд батареи.
4. Далее следуйте инструкциям на экране устройства.
Выглядеть это будет примерно так:

Более подробно ознакомиться с техническими деталями и спецификациями DeX, включая полный список поддерживаемых устройств, вы можете здесь
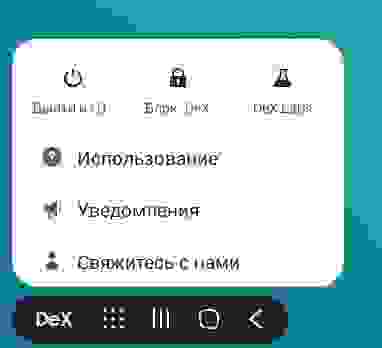
Начало работы с DeX
Настало время познакомиться поближе с интерфейсом DeX:

Разберем каждый элемент интерфейса в отдельности:
В правом нижнем углу находится Меню нотификации. Здесь также можно переключиться между режимом DeX и обычным дублированием экрана устройства. Еще через нотификационную панель можно переключить экран девайса в режим тачпада. Это удобно, если у вас нет отдельной мыши, или вам сложно ее подключить (не хватает гнезд на адаптере).

Там же есть и Меню быстрых настроек:

В левом нижнем углу находятся стандартные для Android кнопки Назад, Главный экран и Недавние приложения. А также Меню приложений – доступ ко всем приложениям на устройстве.

В левом нижнем углу — кнопка DeX. Здесь можно получить основную информацию, заблокировать, выключить DeX или активировать режим Dex Labs.
Dex Labs – это набор «экспериментальных» возможностей платформы, позволяющих открывать последнее запущенное приложение при переходе в DeX и принудительно менять размер окна для тех приложений, которые пока не адаптированы для работы в режиме DeX.
Удаленный офис
Мы увидели множество возможностей DeX. Но, главное не это. Нам ведь нужен рабочий инструмент, а не еще одна функция в смартфоне. И среди большого количества адаптированных под DeX приложений, есть категория, которая интересует нас больше всего – это клиенты для подключения к удаленной рабочей станции (VNC, RDP, TeamViewer) или к облачным VDI (Citrix Receiver, VMware Horizon и т.д.)
Откроем, для примера, приложение Microsoft Remote Desktop.
Для начала, нужно создать новое подключение. Программа предложит подключиться автоматически, если активировано авто-обнаружение на машине, либо можно прописать конфигурацию вручную: указать адрес удаленной станции и имя пользователя:

На удаленном компьютере при этом должен быть установлен пароль для пользователя.
Также необходимо разрешить удаленный доступ в Панели управления Windows.
Далее, покажем настройки на примере Windows 10. Идем в настройки Системы (правая кнопка «Этот компьютер» — Свойства, или Панель управления – Система и безопасность — Система). Слева меню Дополнительные параметры системы – вкладка Удаленный доступ – «Разрешить удаленные подключения к этому компьютеру».
Среди настроек подключения клиента RDP в DeX есть, например, возможность выбора воспроизведения аудио – на удаленной машине или на стороне клиента, т.е. через встроенные динамики устройства или наушники.

Еще клиент дает возможность получить доступ к памяти телефона на удаленном компьютере. Если активировать опцию «Redirect local storage», в Windows можно открыть документы на телефоне прямо из Проводника:


А так выглядит интерфейс RDP клиента в момент после установления соединения. Можно переключаться между разными машинами, либо перейти в режим полного экрана (Fullscreen).

Приложение работает аналогично RDP клиенту в Windows. Поддерживается общий буфер обмена между системами и передача звука.
Таким образом, организовать удаленную работу возможно, имея в наличии только телефон или планшет. Этот вариант можно рассматривать как замену ноутбука или PC, если они используются только в качестве тонкого клиента для доступа к удаленной рабочей станции, либо в поездках, когда нет под рукой полноценной десктопной ОС.
И в качестве заключения, небольшое обзорное видео о DeX:
Автор:
Алексей Клюев,
Lead Engineer
Business Development Team
Samsung R&D Institute, Russia
Источник
Using a Galaxy Emulator Skin
What You Need
Android Studio and Android SDK
At least one platform installed in Android SDK > Platform
Downloaded Galaxy Emulator Skin
How To Use
Download your preferred Galaxy Emulator Skin.
Extract the downloaded skin and copy it in Android Studio > plugins > android > lib > device-art-resources.
Alternatively, you may store the downloaded file anywhere in your file directory. Just locate it later on when configuring the hardware profile.
Launch Android Studio and open AVD Manager by going to Tools > AVD Manager.

If you have an existing virtual device, click Edit button and simply select the downloaded Emulator Skin. Otherwise, click Create Virtual Device in AVD Manager.

In Virtual Device Configuration, click New Hardware Profile to create a profile for your new virtual device.

Fill in the specification of your virtual device.

Screen size and Resolution should match the Emulator Skin to be used.
In the Default Skin, select the downloaded Emulator Skin.

Or locate it by clicking the . button beside the Default Skin dropdown menu. Click OK then Finish.

The Hardware Profile for your virtual device has been created. Proceed by selecting its System Image.

Make sure that you have at least one system image downloaded before you can proceed.
Verify all configuration and check if the Emulator Skin is applied by clicking Show Advanced Settings.

Launch the newly created virtual device in the AVD Manager.

Afterwards, your virtual device with its Galaxy Emulator Skin will appear.

Tips on Using Emulators
By clicking the . (More) in the toolbar beside the emulator, you will see the Extended Controls window. Click Help to see the list of Keyboard shortcuts.
The buttons and other controls on the emulator work as they would on the actual device. For example, clicking on the home button will bring up the home screen.
Tweak the AVD hardware configuration to speed up your emulator. Increasing the memory or setting the screen to a smaller size gives a minor performance increase.
When starting an AVD, you may select a screen size suitable to your computer to enlarge or reduce the size of the emulator.
Emulator Limitations
The Galaxy Emulator Skin defines only the appearance and controls of an Android Virtual Device (AVD), which still runs on a stock Android OS. It does not include any One UI feature, since it only serves as skins for an AVD.
The emulator lacks support for the following features:
Placing or receiving actual phone calls. However, you can simulate phone calls (placed and received) through the emulator console.
Back camera/video capture. Front camera works if you have a webcam installed on your computer.
Источник


