- Полный список
- Android save preferences to file
- Android Persistence with preferences and files — Tutorial
- 1. File based persistence
- 1.1. Methods of local data persistence
- 1.2. Internal vs. external storage
- 1.3. Application on external storage
- 2. Preferences
- 2.1. Storing key-value pairs
- 2.2. Preference Listener
- 2.3. User interface for preferences
- 3. Exercise: Prerequisites
- 4. Exercise: Preference setting for the RSS feed
- 4.1. Create preference file
- 4.2. Create settings fragment
- 4.3. Connect your settings fragment
- 4.4. Use the preference value to load the RSS feed
- 4.5. Validate
- 4.6. Optional: Show the current value in the settings
- 5. Android File API
- 5.1. Using the file API
- 5.2. External storage
Полный список
— хранение данных с помощью Preferences
Хватит об Intent и Activity. Поговорим о хранении данных. В Android есть несколько способов хранения данных:
Preferences — в качестве аналогии можно привести виндовые INI-файлы
SQLite — база данных, таблицы
обычные файлы — внутренние и внешние (на SD карте)
Мы начнем с самого простого – Preferences. Значения сохраняются в виде пары: имя, значение. Так же, как и например extras в Intent.
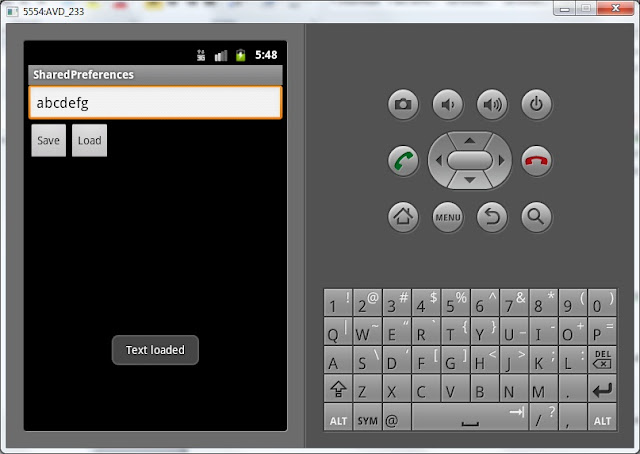
Разработаем приложение. В нем будет поле для ввода текста и две кнопки – Save и Load. По нажатию на Save мы будем сохранять значение из поля, по нажатию на Load – загружать.
Project name: P0331_SharedPreferences
Build Target: Android 2.3.3
Application name: SharedPreferences
Package name: ru.startandroid.develop.p0331sharedpreferences
Create Activity: MainActivity
Откроем main.xml и создадим такой экран:
Поле ввода и две кнопки.
Теперь пишем код в MainActivity.java:
Определение элементов экрана, присвоение обработчиков и реализация onClick – тут все понятно и как обычно. Нам интересны методы, которые мы вызываем в onClick
saveText – сохранение данных. Сначала с помощью метода getPreferences получаем объект sPref класса SharedPreferences, который позволяет работать с данными (читать и писать). Константа MODE_PRIVATE используется для настройки доступа и означает, что после сохранения, данные будут видны только этому приложению. Далее, чтобы редактировать данные, необходим объект Editor – получаем его из sPref. В метод putString указываем наименование переменной – это константа SAVED_TEXT, и значение – содержимое поля etText. Чтобы данные сохранились, необходимо выполнить commit. И для наглядности выводим сообщение, что данные сохранены.
loadText – загрузка данных. Так же, как и saveText, с помощью метода getPreferences получаем объект sPref класса SharedPreferences. MODE_PRIVATE снова указывается, хотя и используется только при записи данных. Здесь Editor мы не используем, т.к. нас интересует только чтение данных. Читаем с помощью метода getString – в параметрах указываем константу — это имя, и значение по умолчанию (пустая строка). Далее пишем значение в поле ввода etText и выводим сообщение, что данные считаны.
Все сохраняем, запускаем приложение.
Для начала, давайте убедимся, что сохранение в принципе нужно. Введите какой-нить текст в поле ввода

и не нажимая кнопку Save закройте приложение кнопкой Назад.
Теперь найдите приложение в общем списке приложений эмулятора

и запустите снова.
Поле ввода пустое. То, что мы вводили – пропало при закрытии программы. Нажатие на Load тоже ничего не даст – мы ничего не сохраняли.

Давайте попробуем сохранять. Снова введите значение и нажмите Save.

Значение сохранилось в системе.
Теперь закроем приложение (Назад), снова откроем и нажмем Load. Значение считалось и отобразилось.
Давайте сделаем так, чтобы сохранение и загрузка происходили автоматически при закрытии и открытии приложения и не надо было жать кнопки. Для этого метод loadText будем вызывать в onCreate.
(Добавляете только строку 8)
а метод saveText — в onDestroy
Все сохраним, запустим. Теперь можно вводить данные, закрывать приложение, снова открывать и данные не потеряются. Кнопки Save и Load также работают. В какой момент сохранять данные в ваших приложениях – решать только вам. По нажатию кнопки, при закрытии программы или еще по какому-либо событию. Главное – теперь вы это умеете.
Еще немного слов по этой теме.
Preferences-данные сохраняются в файлы и вы можете посмотреть их. Для этого в Eclipse откройте меню Window > Show View > Other и выберите Android > File Explorer. Отобразилась файловая система эмулятора.
Открываем папку data/data/ru.startandroid.develop.p0331sharedpreferences/shared_prefs и видим там файл MainActivity.xml. Если его выгрузить на комп и открыть — увидим следующее:
Все верно, имя — saved_text и значение — abcdefg.
Обратите внимание, что в пути к файлу используется наш package.
Теперь разберемся, откуда взялось наименование файла MainActivity.xml. Кроме метода getPreferences, который мы использовали, есть метод getSharedPreferences. Он выполняет абсолютно те же функции, но позволяет указать имя файла для хранения данных. Т.е., например, если бы мы в saveText использовали для получение SharedPreferences такой код:
То данные сохранились бы в файле MyPref.xml, а не в MainActivity.xml.
Теперь если мы посмотрим исходники метода getPreferences, то видим следующее:
Используется метод getSharedPreferences, а в качестве имени файла берется имя класса текущего Activity. Отсюда и появилось имя файла MainActivity.xml.
— используете getPreferences, если работаете с данными для текущего Activity и не хотите выдумывать имя файла.
— используете getSharedPreferences, если сохраняете, например, данные — общие для нескольких Activity и сами выбираете имя файла для сохранения.
Кстати, в File Explorer вы можете видеть юниксовые rwx-права доступа к файлу. Попробуйте при сохранении данных использовать не MODE_PRIVATE, а MODE_WORLD_READABLE или MODE_WORLD_WRITEABLE и посмотрите, как будут меняться права.
Полный код MainActivity.java:
На следующем уроке:
— хранение данных с помощью SQLite
Присоединяйтесь к нам в Telegram:
— в канале StartAndroid публикуются ссылки на новые статьи с сайта startandroid.ru и интересные материалы с хабра, medium.com и т.п.
— в чатах решаем возникающие вопросы и проблемы по различным темам: Android, Kotlin, RxJava, Dagger, Тестирование
— ну и если просто хочется поговорить с коллегами по разработке, то есть чат Флудильня
— новый чат Performance для обсуждения проблем производительности и для ваших пожеланий по содержанию курса по этой теме
Источник
Android save preferences to file

Shared Preferences allow you to save and retrieve data in the form of key, value pair. Data in Shared Preferences will be persistent even though user closes the application.
Shared Preferences is application specific, i.e. the data is lost when you perform one of the options: uninstall the application or clear application data (through Settings).
Android stores Shared Preferences settings as XML file in shared_prefs folder under DATA/data/[application package] directory. The DATA folder can be obtained by calling Environment.getDataDirectory() , usually it is /data.
To get access to the preferences, we have three APIs to choose from:
- getPreferences() : used from within your Activity, to access activity-specific preferences
- getSharedPreferences() : used from within your Activity (or other application Context), to access application-level preferences
- getDefaultSharedPreferences() : used on the PreferenceManager, to get the shared preferences that work in concert with Android’s overall preference framework
In order to use shared preferences, you have to call a method getSharedPreferences() that returns a SharedPreference instance pointing to the file that contains the values of preferences.
The first parameter is the KEY and the second parameter is the MODE. Apart from private there are other modes available that are listed below:
- MODE_PRIVATE . By setting this mode, the file can only be accessed using calling application.
- MODE_APPEND . This will append the new preferences with the already exisiting preferences.
- MODE_WORLD_READABLE . This mode allow other application to read the preferences. This constant was deprecated in API level 17.
- MODE_WORLD_WRITEABLE . This mode allow other application to write the preferences. This constant was deprecated in API level 17.
You can save something in the Shared Preferences by using SharedPreferences.Editor class. You will call the edit method of SharedPreference instance and will receive it in an editor object. Its syntax is
Apart from the putString method , there are methods available in the editor class that allows manipulation of data inside shared preferences. They are listed as follows:
- putLong(String key, long value) . It will save a long value in a preference editor.
- putInt(String key, int value) . It will save a integer value in a preference editor.
- putFloat(String key, float value) . It will save a float value in a preference editor.
- contains(String key) . Check if key exists.
- clear() . It will remove all values from the editor.
- remove(String key) . It will remove the value whose key has been passed as a parameter.
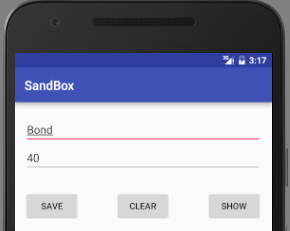
Following example demonstrates the use of the Shared Preferences. It display a screen with some EditText fields, whose value are saved when you click on Button and restore when you click on another Button .
Following is the content of the modified main activity activiy_main.xml.
Following is the content of the modified MainActivity.java.
Storing Java objects in SharedPreferences
Android Shared Preferences allows you to store only primitive values or set of strings ( java.util.Set ). To store custom Java objects (object, arrays or lists) in Shared Preferences you can use one of the following methods:
- Generate toString() method in your class and save the object as String by calling toString() . This method is not useful when you want to retrieve the value and construct the object from String .
- Using external library such as gson or jackson to convert Java object to/from JSON. After converting to JSON object, you can store it as string in SharedPreferences .
Источник
Android Persistence with preferences and files — Tutorial
File based persistence in Android. This tutorial describes how to save key-value pairs using the preference API in Android. It also explains how to read and write files in Android.
1. File based persistence
1.1. Methods of local data persistence
Android allows to persists application data via the file system. For each application the Android system creates a data/data/[application package] directory.
Android supports the following ways of storing data in the local file system:
Files — You can create and update files
Preferences — Android allows you to save and retrieve persistent key-value pairs of primitive data type.
SQLite database — instances of SQLite databases are also stored on the local file system.
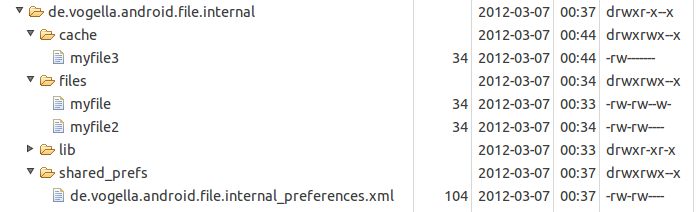
Files are saved in the files folder and application settings are saved as XML files in the shared_prefs folder.
If your application creates an SQLite database this database is saved in the main application directory under the databases folder.
The following screenshot shows a file system which contains file, cache files and preferences.
Only the application can write into its application directory. It can create additional sub-directories in this application directory. For these sub-directories, the application can grant read or write permissions for other applications.
1.2. Internal vs. external storage
Android has internal storage and external storage. External storage is not private and may not always be availale. If, for example, the Android device is connected with a computer, the computer may mount the external system via USB and that makes this external storage not avaiable for Android applications.
1.3. Application on external storage
As of Android 8 SDK level it is possible to define that the application can or should be placed on external storage. For this set the android:installLocation to preferExternal or auto.
In this case certain application components may be stored on an encrypted external mount point. Database and other private data will still be stored in the internal storage system.
2. Preferences
2.1. Storing key-value pairs
The SharedPreferences class allows to persists key-value pairs of primitive data types in the Android file system.
The PreferenceManager class provides methods to get access to these preferences. The following code shows how to access preferences from a certain file
Preferences should be created private for the application. They can be accessed via all application components.
A default store for preferences can be accessed via the PreferenceManager.getDefaultSharedPreferences(this) method call. Preference value are accessed via the key and the instance of the SharedPreferences class, as demonstrated in the following listing.
To create or change preferences you have to call the edit() method on the SharedPreferences object. Once you have changed the value you have to call the apply() method to apply your asynchronously to the file system.
The usage of the commit() method is discouraged, as it write the changes synchronously to the file system.
2.2. Preference Listener
You can listen to changes in the preferences via the registerOnSharedPreferenceChangeListener() method on SharedPreferences .
One watch out is that SharedPreferences keeps listeners in a WeakHashMap hence listener may be recycled if your code does not hold a reference to it.
2.3. User interface for preferences
Android allows you to create XML resource files which describes preference key-values. An instance of PreferenceActivity or PreferenceFragment can generate an user interface for these files. The user interfaces takes care of persisting the key-value pairs.
To create a preference resource file of type XML.
Android provides the PreferenceFragment class which simplifies the creation of an user interface for maintaining preference values. This fragment can load an XML preference definition file via the method addPreferencesFromResource() .
3. Exercise: Prerequisites
The following exercise assumes that you have created an Android project with the top-level package com.example.android.rssfeed. This application has at least one entry in the toolbar with the R.id.action_settings id. Once this toolbar entry is selected, an existing fragment is replaced.
4. Exercise: Preference setting for the RSS feed
In this exercise you allow the user to enter his preferred URL for an RSS feed via another fragment. This fragment uses a preference xml file to define the user interface.
4.1. Create preference file
Create an Android XML resource called mypreferences.xml in the xml folder. Add entries to this file similar to the following listing.
4.2. Create settings fragment
Create the class SettingsFragment . It should extends PreferenceFragment . This fragment loads the preference file and allows the user to change the values.
4.3. Connect your settings fragment
Ensure that you open the preference fragment via the onOptionsItemSelected() method. The relevant code is demonstrated in the following listing.
4.4. Use the preference value to load the RSS feed
The following code snippet demonstrates how you can access the preference value in a method.
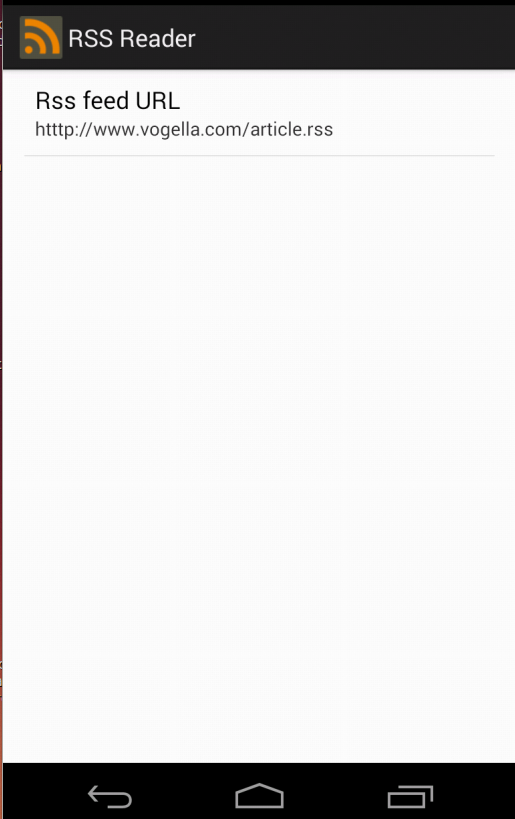
4.5. Validate
Run your application. Select from your action bar the Settings action. You should be able to enter a URL. If you press the back button and press the refresh button, ensure that the value of the url preference is used in your activity.
4.6. Optional: Show the current value in the settings
The following code snippet demonstrates how to show the current value in the preference screen.
5. Android File API
5.1. Using the file API
Access to the file system is performed via the standard java.io classes. Android provides also helper classes for creating and accessing new files and directories. For example the getDir(String, int) method would create or access a directory. The openFileInput(String s) method provides access to an FileInputStream for the file. The openFileOutput(String s, Context.MODE_PRIVATE) method provides access to an FileOutputStream for the file.
All modes except Context.MODE_PRIVATE are deprecated, files should be private to the application.
The following example shows the API usage.
5.2. External storage
Android supports also access to an external storage system, e.g., the SD card. All files and directories on the external storage system are readable for all applications with the correct permission.
To read from external storage your application need to have the android.permission.READ_EXTERNAL_STORAGE permission.
To write to the external storage system your application needs the android.permission.WRITE_EXTERNAL_STORAGE permission. You get the path to the external storage system via the Environment.getExternalStorageDirectory() method.
Via the following method call you can check the state of the external storage system. If the Android device is connected via USB to a computer, external storage might not be available.
The following shows an example for reading from the external storage system.
Источник


