- How to Capture a Screenshot and Screen Recording of an Android Device Using Android Studio?
- Implementation of Capture a Screenshot
- Implementation of Screen Recording
- Android screen capture java
- How to capture screenshot programmatically in Java
- 1. About the Robot.createScreenCapture() and ImageIO.write() methods
- 2. Capture full screen Java example
- 3. Capture a portion of the screen Java example
- 4. Capture a GUI component Java example
- API References:
- About the Author:
- Screen Capture — Android 5.x
- Using the Screen Capturer API
- Need some help?
- Как записывать экран и делать скриншоты, используя Android API?
- проблема
- что я нашел
- вопросы
How to Capture a Screenshot and Screen Recording of an Android Device Using Android Studio?
Android Studio is the official IDE (Integrated Development Environment) for Android app development and it is based on JetBrains’ IntelliJ IDEA software. Android Studio provides many excellent features that enhance productivity when building Android apps. Whenever we are developing an app and in that device, you don’t know how to capture screenshots then this is for you. Here, we are going to explain how to capture screenshots and Screen Recording of an Android Device using Android studio.
Implementation of Capture a Screenshot
Step 1: Open Your Logcat in Android Studio. You can use the shortcut for opening Logcat (Alt+6). Or select View > Tool Windows > Logcat in Android Studio.
Step 2: Select the device and a process from the drop-down at the top of the window in Logcat.
Step 3: Click Screen Capture (Camera Button) on the left side of the window.
Step 4: Then, It will show Obtaining Screenshot from the device…
Step 5: Then it will show your Captured Screenshot. You can save that screenshot.
Implementation of Screen Recording
Step 1: Open Your Logcat in Android Studio. You can use the shortcut for opening Logcat (Alt + 6). Or select View > Tool Windows > Logcat in Android Studio.
Step 2: Select the device and a process from the drop-down at the top of the window in Logcat.
Step 3: Click Screen Capture (Recoding Button) on the left side of the window.
Step 4: Then, It will show Recording Started. You can click on Stop Recording to stop the recording.

Step 5: Then you can rename the file according to your choice and can save it on your laptop.
Источник
Android screen capture java
Android fast screen capture — image or compressed image stream output
- Android fast screen capture take a screenshot or compressed stream on any other Android device.
- Not needed root devices.
- ADB required (default run permissions using).
- For best perfomance using OpenMP for Android.
- Include all using system library, fake version (for Android 5.1.1 headers)
- Default build tools: ndk-build, including Code::Blocks project using C::B NDK project template, NDK build auto configuration support.
- Features
- Stream/Image compressed — header format using
- Installing pre-build binary
- Using from command line
- Example using SDL2 output format
- image output format: raw bitmap 24 bpp , include header.
- video stream output format: raw compressed bitmap lz4 stream — 24 bpp , include header + packet header.
- video stream is 5 — 20 fps, depends on the CPU device.
- pack image by ratio: valid values 1-9 ( lz4 ).
- resize image by ratio: valid values 1-5 .
- rotate image: 90,180,270
- mirror image.
- SDL2 Texture output compatible mode: Landscape screen.
- save image to location specified (bmp format).
- default save path: /data/local/tmp/AScreenCap.bmp
Run time statistic, milliseconds:
Stream/Image compressed — header format using
Packet stream include no pack header, size 160bit uint32[5] , after image compressed body:
- octet 0 — unique identifier BMZ1 ( 0x315a4d42 / 828001602 ).
- octet 1 — size to uncompressed image.
- octet 2 — size to compressed image.
- octet 3 — image width.
- octet 4 — image height.
Download binary for you device from dist/ directory:
Application platform: android-21
Android system AOSP library version compatible: 5.1.1 — 7.x.x
NDK build version: r20-beta2
Application platform: android-27
Android system AOSP library version compatible: 8.0.0 — 8.1.x
NDK build version: r20-beta2
Application platform: android-28
Android system AOSP library version compatible: 9.0.0 — 9.1.x
NDK build version: r20-beta2
Источник
How to capture screenshot programmatically in Java
1. About the Robot.createScreenCapture() and ImageIO.write() methods
BufferedImage createScreenCapture(Rectangle screenRect)
We pass a screen region (in rectangle) to be captured as this method’s parameter. The captured graphic is returned as a BufferedImage object which can be drawn onto a GUI component or saved to a file. And we use the ImageIO.write() static method to save the BufferedImage object to a file:
boolean write(RenderedImage im, String formatName, File output)
where the formatName can be “jpg”, “png”, “bmp”, etc.
NOTE: The captured image does not include the mouse cursor.
2. Capture full screen Java example
And the following program captures a full screenshot and saves it to a JPG image file:
3. Capture a portion of the screen Java example
And following code is for a complete program:
The image file ( PartialScreenshot.jpg ) is stored under the program’s current directory.
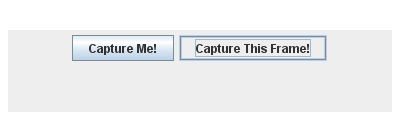
4. Capture a GUI component Java example
Run the demo program ( ComponentGUICaptureExample.java in the attachments section):
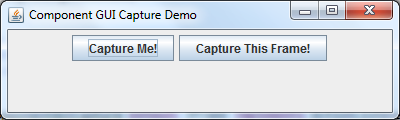
Click the Capture Me! button, its image will be saved as the button1.png file which looks like this:
And click the Capture This Frame! button, image of the frame’s content will be saved as the frame0.png file which looks like this:
API References:
Other Java Graphics Tutorials:
About the Author:
 Nam Ha Minh is certified Java programmer (SCJP and SCWCD). He started programming with Java in the time of Java 1.4 and has been falling in love with Java since then. Make friend with him on Facebook and watch his Java videos you YouTube.
Источник
Screen Capture — Android 5.x
In this guide we’ll use the Screen Capturer quickstart to demonstrate how to share your Android device application screen with other participants connected to a Room using the MediaProjection API.
If you are interested in capturing from an Android View in the View hierarchy instead of capturing from the device screen you can take a look at our custom video capturer example instead:
Using the Screen Capturer API
The ScreenCapturer class that ships with the Video Android SDK is used to provide video frames for a LocalVideoTrack from a device’s screen. The frames are provided via the MediaProjection api. This capturer is only compatible with Build.VERSION_CODES.LOLLIPOP or higher.
Setup your app Manifest
Starting in Android 10, developers are required to specify a foreground service when using the MediaProjection API. Reference the following snippet from the quickstart example AndroidManifest.xml .
Initialize a Video View
Request screen capture permission from user
Get an instance of the MediaProjectionManager service. Call the createScreenCaptureIntent method in a new activity. This initiates a prompt dialog for the user to confirm screen projection.
Request Screen Capturer Permission
Start Screen capture when permission received
Initialize the ScreenCapturer class, after permission is received from the user. Create the LocalVideoTrack object and pass the ScreenCapturer object to pass the captured local video frames. Set the VideoView object to Visible . Call the addRender method on the LocalVideoTrack object. Pass the VideoView object to begin receiving the screen capture video.
Using the Screen Capturer Class
Found an error ? Open an issue on Github
Stuck on something? Can’t find what you’re looking for? Don’t hesitate to reach out to us at help@twilio.com and we’ll happily give you a hand.
Need some help?
We all do sometimes; code is hard. Get help now from our support team, or lean on the wisdom of the crowd by visiting Twilio’s Community Forums or browsing the Twilio tag on Stack Overflow.
Источник
Как записывать экран и делать скриншоты, используя Android API?
Android получил новый API на Kitkat и Lollipop, чтобы захватить видео на экране. Вы можете сделать это либо с помощью инструмента ADB, либо с помощью кода (начиная с Lollipop).
С тех пор, как новый API вышел, многие приложения пришли, которые используют эту функцию, позволяя записывать экран, и Microsoft даже сделал свой собственный Google-Now-On-tap конкурент приложение.
используя ADB, вы можете использовать:
вы даже можете сделать это из Android Studio себя.
проблема
Я не могу найти учебник или объяснение о том, как это сделать с помощью API, то есть в коде.
что я нашел
единственное место, которое я нашел, это документация (здесь, в разделе» захват экрана и совместное использование»), говоря мне это:
Android 5.0 позволяет добавлять захват экрана и общий доступ к экрану возможности для вашего приложения с новым android.сми.проекция Апис. Эта функция полезна, например, если вы хотите включить совместное использование экрана в приложении для видеоконференций.
новая createVirtualDisplay() метод позволяет вашему приложению захватывать содержимое главного экрана (дисплей по умолчанию) в поверхность объект, который ваше приложение может затем отправить по сети. Только API позволяет захватывать незащищенное содержимое экрана, а не системный звук. К начните захват экрана, ваше приложение должно сначала запросить пользователя разрешение на запуск диалог захвата экрана с использованием намерения получено через createScreenCaptureIntent() метод.
пример использования новых API см. В разделе MediaProjectionDemo класс в образце проекта.
дело в том, что я не могу найти образец «MediaProjectionDemo». Вместо этого я нашел образец «Screen Capture», но я не понимаю, как он работает, так как, когда я его запустил, все, что я видел, это мигающий экран, и я не думаю, что он сохраняет видео в файл. Образец кажется очень детская коляска.
вопросы
Как выполнить эти действия с помощью нового API:
- начните запись, опционально включая аудио (микрофон/динамик/оба).
- остановить запись
- сделайте скриншот, а не видео.
кроме того, как настроить его (разрешение, запрошенный fps, цвета, время. ) ?
Источник


