- Android: Full Screen UI with Transparent Status Bar
- How to Change the Color of Status Bar in an Android App?
- Method 1: Creating a New Theme
- Method 2: Using setStatusBarColor Method
- Hiding the Status Bar
- This lesson teaches you to
- You should also read
- Try it out
- Hide the Status Bar on Android 4.0 and Lower
- Hide the Status Bar on Android 4.1 and Higher
- Make Content Appear Behind the Status Bar
- Synchronize the Status Bar with Action Bar Transition
Android: Full Screen UI with Transparent Status Bar

Activities, the building block of any Android app. Something so simple, yet so complex. Here we are going to talk about something similar related to activities which looks very simple from the outset but gets complex pretty soon. We will build a full screen layout with transparent status bar. I’m not going to talk about why would you need a full screen layout and in what situations. That’s a topic for another discussion.
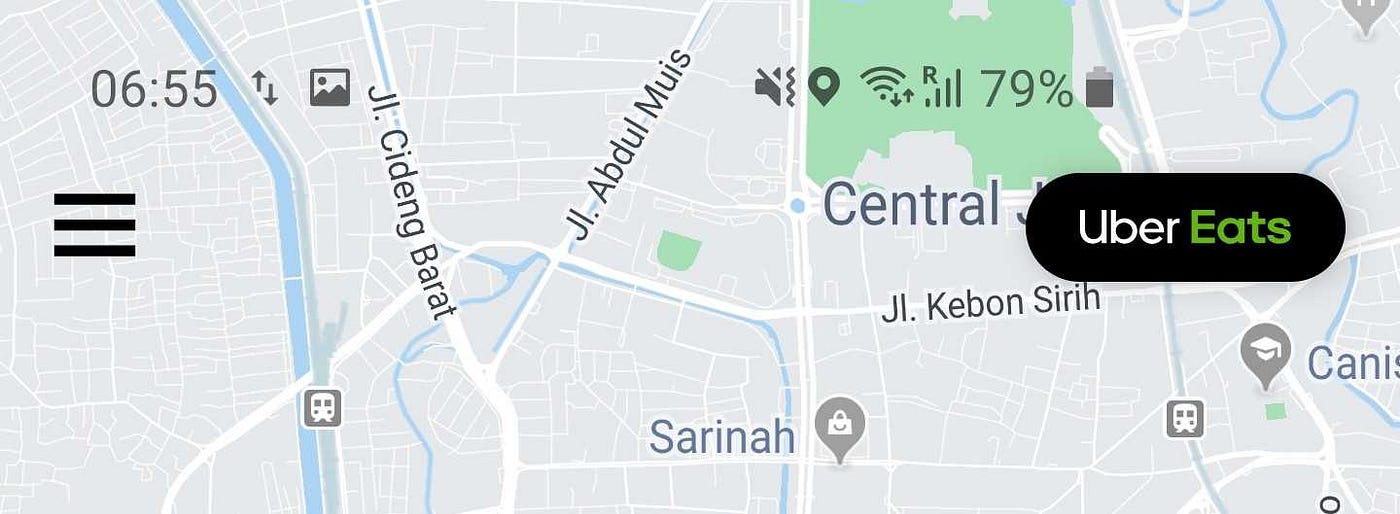
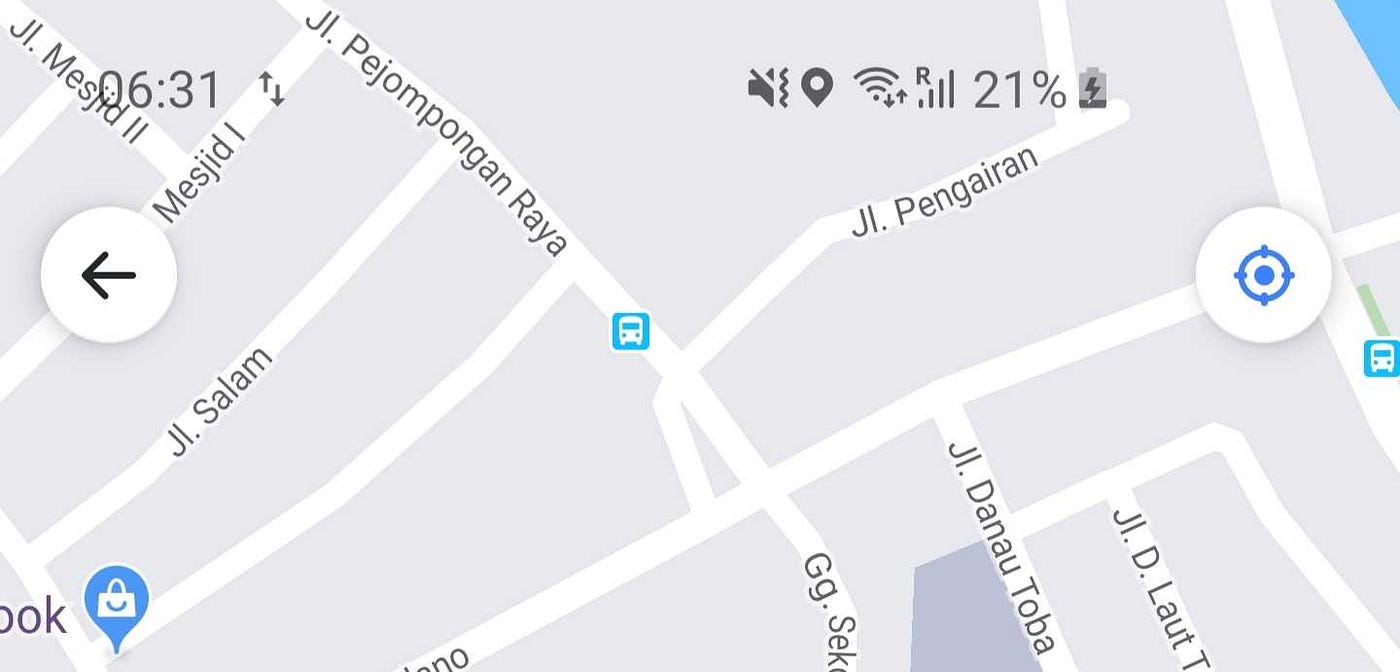
However, here’s a simple use-case. If you have ever seen any app with a map(like a ride-hailing app), you would see that the map occupies the space below the status bar as well. The content of the layout other than the map doesn’t overlap with the system bar icons. Doesn’t it look sweet?
So, we are just gonna recreate that UI. Something like these:
Set a theme for the Activity
Let’s start with the basics(i assume you already have created an Activity with a map and some content) and so, let’s set a theme for our activity:
And then apply theme to the activity as usual:
Easy peasy!! Let’s see what we have got.
Make UI fullscreen
Now, let’s get down to the fun part. How to make the layout a full screen layout and set the status bar colour?
Let’s jump right into code, try it out on your device and then let’s get down to understanding what is actually happening:
For lollipop and above devices:
What is a Window?
When you open any standard app, you would see a status bar, a navigation bar, and the actual activity. Each of these components have a different window. Each of these components are given a window to draw themselves into. The activity is given a window where it draws the view hierarchy specified by us. The status bar is given a window where the system draws things like time, battery, notification icons etc. The navigation bar also has a different window where it draws the back button, the home button etc. All these windows on a single screen are managed by WindowManager.
What are these different flags you can apply to a window?
If FLAG_TRANSLUCENT_STATUS is enabled, translucent status bar will be shown which we don’t want. So, we first remove this flag.
FLAG_DRAWS_SYSTEM_BAR_BACKGROUNDS flag tells the system that our window is responsible for drawing the background for system bars.
What is systemUiVisibility?
Using this method, we can control the visibility of the system UI drawn by the system. System UI elements are elements like status bar, naviagtion bar etc. SYSTEM_UI_FLAG_LAYOUT_FULLSCREEN helps keep the content from resizing when the system bars hide and show while going in and out of full screen mode.
I think setStatusBarColor() needs no explanation. However, this API is available on or above API 21.
Problem on marshmallow and above devices:
The system bar icons are all white which may not look good if the general colour scheme in your layout is also light.
How to fix it?
Again, setSystemUiVisibility to the rescue. SYSTEM_UI_FLAG_LIGHT_STATUS_BAR makes sure that the status bar icons are drawn in such a way so that they are fully visible in light mode.
Cool..so, now our status bar looks pretty good on most of the API levels. But but.. what’s up with the Floating Action Button. This guy is overlapping with the system bar icons and this kind of UI makes me as an user uncomfortable. So, let’s fix this:
Shift the content
The actual content of your app layout needs to be shifted down so that it doesn’t overlap with the status bar icons. Ok, what do we need to shift it down? Margin..a marginTop will do. Right?
But now comes the million dollar question. How do we know how much marginTop do we need to give to the content view? There are many ways to do that but i’m going to go with the most definitive approach which has worked for me on a variety of devices.
Window insets to the rescue….
What are window insets?
Window insets gives us the size of system view that we would need here. The system view we are talking of here is the status bar. So, the top window inset would give us the margin that we need to apply to our content.
How to get the insets of your current visible window?
Now, it’s just down to getting the view and setting a marginTop on it equal to the topInset of the window:
View Extensions for reuse
Usually in a large application, things like these are repeated. So, wouldn’t it be better to create a helpful kotlin extension on the Activity which we can call from any activity instead of repeating this code everywhere?
And then all we need to do in any Activity is:
A sample Android app using these concepts can be found here.
Источник
How to Change the Color of Status Bar in an Android App?
A Status Bar in Android is an eye-catching part of the screen, all of the notification indication, battery life, time, connection strength, and plenty of things shows here. An Android user may look at a status bar multiple times while using an Android application. It is a very essential part of the design that the color of the status bar should follow the color combination of the layout. You can look out to many android apps on your phone and can see how they changed it according to its primary colors. There can be multiple ways for changing the status bar color but we are going to tell you about the best hand-picked two methods which you can use either in Java or Kotlin.
Method 1: Creating a New Theme
You can follow this method in apps that are built with Kotlin or Java. It will work in both.
Attention reader! Don’t stop learning now. Get hold of all the important Java Foundation and Collections concepts with the Fundamentals of Java and Java Collections Course at a student-friendly price and become industry ready. To complete your preparation from learning a language to DS Algo and many more, please refer Complete Interview Preparation Course.
Step 1: Open Android Studio and start a new project by selecting an empty activity. Give it a name of your choice, then select your language and API level. At last click on finish.
Step 2: Find an XML file called styles.xml by navigating res/values/styles.xml.
Step 3: Find another XML file by navigating res/values/colors.xml, and also add that color here which you want to change for the status bar.
Step 4: Now in the style.xml file, add the below code just before the tag and change the colors of it as your choice. ColorPrimaryDark is always going to be responsible for your status bar color.
You can do the same with android:statusBarColor but it will work only in above API Level 21. ColorPrimaryDark for the status bar will also not support in API Level 19. By default in most of the API Levels, ColorPrimaryDark will be the default color for statusBarColor, So it is good to go with changing ColorPrimaryDark.
Tip: You can create multiple themes and you can use them in any activity. In any theme, There is a set of colors that needs to be defined, you can also create new colors in the colors.xml file in the same directory and use it on the styles.xml file.
Step 6: Now go to the manifest/AndroidManifest.xml and here search the activity for which you want to apply that theme or change the color of the status bar. and add an attribute android:theme=”@style/DemoTheme”.
That’s done! Check your application by running it on an emulator or a physical device.
Method 2: Using setStatusBarColor Method
This method can be only used in the above API Level 21. Officially status bar color is not supporting below API Level 21. Although, Here we added an if condition, because in case if you haven’t selected above or equal to API 21 then it will check the android API Version, and then it will execute the code. It will not change the color of the status bar is below API Level 21 but the rest code will work well.
Step 1: After opening the android studio and creating a new project with an empty activity.
Step 2: Navigate to res/values/colors.xml, and add a color that you want to change for the status bar.
Step 3: In your MainActivity, add this code in your onCreate method. Don’t forget to replace your desired color with colorName.
Источник
Hiding the Status Bar
This lesson teaches you to
You should also read
Try it out
This lesson describes how to hide the status bar on different versions of Android. Hiding the status bar (and optionally, the navigation bar) lets the content use more of the display space, thereby providing a more immersive user experience.
Figure 1 shows an app with a visible status bar:

Figure 1. Visible status bar.
Figure 2 shows an app with a hidden status bar. Note that the action bar is hidden too. You should never show the action bar without the status bar.

Figure 2. Hidden status bar.
Hide the Status Bar on Android 4.0 and Lower
You can hide the status bar on Android 4.0 (API level 14) and lower by setting WindowManager flags. You can do this programmatically or by setting an activity theme in your app’s manifest file. Setting an activity theme in your app’s manifest file is the preferred approach if the status bar should always remain hidden in your app (though strictly speaking, you could programmatically override the theme if you wanted to). For example:
The advantages of using an activity theme are as follows:
- It’s easier to maintain and less error-prone than setting a flag programmatically.
- It results in smoother UI transitions, because the system has the information it needs to render your UI before instantiating your app’s main activity.
Alternatively, you can programmatically set WindowManager flags. This approach makes it easier to hide and show the status bar as the user interacts with your app:
When you set WindowManager flags (whether through an activity theme or programmatically), the flags remain in effect unless your app clears them.
You can use FLAG_LAYOUT_IN_SCREEN to set your activity layout to use the same screen area that’s available when you’ve enabled FLAG_FULLSCREEN . This prevents your content from resizing when the status bar hides and shows.
Hide the Status Bar on Android 4.1 and Higher
You can hide the status bar on Android 4.1 (API level 16) and higher by using setSystemUiVisibility() . setSystemUiVisibility() sets UI flags at the individual view level; these settings are aggregated to the window level. Using setSystemUiVisibility() to set UI flags gives you more granular control over the system bars than using WindowManager flags. This snippet hides the status bar:
Note the following:
- Once UI flags have been cleared (for example, by navigating away from the activity), your app needs to reset them if you want to hide the bars again. See Responding to UI Visibility Changes for a discussion of how to listen for UI visibility changes so that your app can respond accordingly.
- Where you set the UI flags makes a difference. If you hide the system bars in your activity’s onCreate() method and the user presses Home, the system bars will reappear. When the user reopens the activity, onCreate() won’t get called, so the system bars will remain visible. If you want system UI changes to persist as the user navigates in and out of your activity, set UI flags in onResume() or onWindowFocusChanged() .
- The method setSystemUiVisibility() only has an effect if the view you call it from is visible.
- Navigating away from the view causes flags set with setSystemUiVisibility() to be cleared.
Make Content Appear Behind the Status Bar
On Android 4.1 and higher, you can set your application’s content to appear behind the status bar, so that the content doesn’t resize as the status bar hides and shows. To do this, use SYSTEM_UI_FLAG_LAYOUT_FULLSCREEN . You may also need to use SYSTEM_UI_FLAG_LAYOUT_STABLE to help your app maintain a stable layout.
When you use this approach, it becomes your responsibility to ensure that critical parts of your app’s UI (for example, the built-in controls in a Maps application) don’t end up getting covered by system bars. This could make your app unusable. In most cases you can handle this by adding the android:fitsSystemWindows attribute to your XML layout file, set to true . This adjusts the padding of the parent ViewGroup to leave space for the system windows. This is sufficient for most applications.
In some cases, however, you may need to modify the default padding to get the desired layout for your app. To directly manipulate how your content lays out relative to the system bars (which occupy a space known as the window’s «content insets»), override fitSystemWindows(Rect insets) . The fitSystemWindows() method is called by the view hierarchy when the content insets for a window have changed, to allow the window to adjust its content accordingly. By overriding this method you can handle the insets (and hence your app’s layout) however you want.
Synchronize the Status Bar with Action Bar Transition
On Android 4.1 and higher, to avoid resizing your layout when the action bar hides and shows, you can enable overlay mode for the action bar. When in overlay mode, your activity layout uses all the space available as if the action bar is not there and the system draws the action bar in front of your layout. This obscures some of the layout at the top, but now when the action bar hides or appears, the system does not need to resize your layout and the transition is seamless.
To enable overlay mode for the action bar, you need to create a custom theme that extends an existing theme with an action bar and set the android:windowActionBarOverlay attribute to true . For more discussion of this topic, see Overlaying the Action Bar in the Adding the Action Bar class.
Then use SYSTEM_UI_FLAG_LAYOUT_FULLSCREEN , as described above, to set your activity layout to use the same screen area that’s available when you’ve enabled SYSTEM_UI_FLAG_FULLSCREEN . When you want to hide the system UI, use SYSTEM_UI_FLAG_FULLSCREEN . This also hides the action bar (because windowActionBarOverlay=”true”) and does so with a coordinated animation when both hiding and showing the two.
Источник


