- Папки в Android-смартфоне и что они означают
- Константин Иванов
- Иерархия памяти устройства на Android
- Приложения и папки в разделе данных
- Итак, какие папки мне можно (или нужно) удалять?
- How to Format SD Card on Android Phone?
- This is a detailed tutorial on how to format an SD card on Android. There are several situations when you may need to format a memory stick. We also show you how to troubleshoot common problems and recover lost data.
- What Are the Common Situations of Formatting an SD Card?
- Steps to Format SD Card on Android
- 1. Format SD Card on Android Phone
- 2. Format Android Memory Card on Computer
- 3. Format SD Card as Internal Storage
- Workable Solutions to SD Card Not Formatted Error
- 1. Damaged or Corrupt SD Card
- 2. Sudden Power Failure
- Tips You Should Know When Formatting an SD Card
- 1. How to Do an SD Card Data Backup
- 2. Recover Accidentally Formatted Android Files
- Closing Words
- Related Questions Searched for Frequently
Папки в Android-смартфоне и что они означают
Константин Иванов

Файловые менеджеры на Android могут быть удобным инструментом для организации хранения данных в вашем смартфоне, но сама структура Android (или ее кажущееся отсутствие) c непривычки может показаться несколько запутанной. Данные приложений, картинки, музыка – и доступ к этому всему из одной корневой папки – это несколько иной подход к иерархической структуре, чем то, к чему привыкли пользователи ПК и Mac, и подход этот дает пользователям намного больше возможностей, чем iOS.
В Android вы не сможете получить доступ к глубоко спрятанным системным файлам через обычный файловый менеджер или с помощью подключения к ПК. Но это не значит, что вы можете удалить по своей прихоти любой файл, какой захотите. Давайте посмотрим, как организованы типичные папки в памяти устройства, для чего они нужны и что из этого вы можете удалить, а что нет.
Иерархия памяти устройства на Android
Поскольку Android – это операционная система на базе Linux, в вашем телефоне файловая система также организована по принципу Linux. В этой системе на каждом устройстве есть шесть основных разделов: boot, system, recovery, data, cache и misc. Карты памяти microSD также имеют собственную иерархию памяти. Устройства, несущие на борту Android 7.0 Nougat, получили возможность непрерывного обновления за счет того, что в пару к системному разделу создается второй и один из них в фоне обновляется, а при перезагрузке происходит переключение, позволяющее обновленной системе заработать.
Вот краткое описание того, что содержится в каждой папке.
- boot – Эта папка содержит ядро, виртуальный диск и др., то есть то, что требуется для загрузки телефона, когда вы его включаете.
- system – Папка system содержит файлы операционной системы (также известные как образ системы), которые включают в себя также графический интерфейс Android и предустановленные приложения.
- recovery – Альтернативная возможность загрузить ОС, программы из папки recovery позволяют пользователю делать бэкапы других папок и восстанавливать их.
- data – Папка data сохраняет информацию пользователя, от контактов и сообщений до приложений и музыки, и вот к этому разделу вы имеете доступ через файловый браузер. После сброса до заводских настроек этот раздел стирается.
- cache – Android хранит здесь часто используемые данные и компоненты приложений. Этот раздел может быть стерт для устранения определенных проблем и автоматически восстановлен и обновлен со временем.
- misc – Этот раздел содержит другую важную информацию о настройках системы, такую как конфигурация USB, настроек сети вашего оператора и другие аппаратные настройки, которые в графическом интерфейсе отображаются в виде переключателей вкл./выкл.
Без root–прав пользователи Android могут иметь доступ только к разделу с данными, который открывается вам, когда вы подключаете устройство к своему ПК или используете файловый браузер. Если память вашего телефона может быть расширена при помощи карты, память карты также включается в этот раздел с данными, доступными через ПК или просмотрщик файлов.
Обычно у вас есть доступ только данным приложений, которые хранятся в разделе пользовательских данных. Для доступа к остальной памяти вам потребуются root-права
Приложения и папки в разделе данных
Итак, бегло окинув взглядом основные папки, мы отметили, что у нас нет доступа к загрузочным файлам, файлам восстановления и или системным файлам Android, когда мы просто просматриваем файлы при помощи браузера. Из чего следует утешительный вывод: нельзя просто так взять и вызвать своими действиями крах системы. Совсем другая ситуация возникает, когда у вас есть root-права. Так или иначе, с тем, что хранится в данном разделе, надо быть поаккуратнее: определенные приложения могут задействовать данные, которые здесь сохранены, и перемещение или удаление их может повлечь за собой нестабильную работу системы.
Теперь давайте посмотрим, что находится в разделе данных на вашем устройстве. Для того, чтобы это было возможно, в телефонах с Android версий Marshmallow или Nougat есть свой файловый менеджер, который дает доступ ко всему разделу. Эту опцию можно найти в меню Настройки- Память-Накопитель-Другое. Ряд аппаратов на более старых версиях Android могут иметь, а могут не иметь собственный файловый менеджер, зависит от производителя.
В качестве альтернативы есть множество сторонних приложений, доступных в Play Store, которые выполняют ту же самую роль, например, FX File Explorer или Total Commander.
Можно также управлять вашими файлами с вашего ПК при помощи подключения по USB. Стоит только удостовериться, что ваш телефон находится в режиме MTP (Передача файлов), чтобы вы могли видеть все свои файлы.

Получить доступ к памяти вашего устройства можно при помощи ПК или напрямую через файловый браузер
Если у вас есть ощущение, что память устройства выглядит переполненной и папок слишком много, приглядитесь к ним. Вы увидите многочисленные папки, связанные с приложениями, возможно, даже остатки от тех приложений, что вы уже удалили. Как правило, лучше не трогать никакие папки приложений, но если вы помните, что приложение было удалено, а папка от него осталась, ее удаление вреда не причинит. Скорее всего, она пустая или в ней остались какие-то бесполезные лог-файлы.
Даже если вы не устанавливали большого количества приложений, по умолчанию этот раздел с пользовательскими данными может содержать ряд папок – в них хранятся ваши контакты, музыка, картинки и все остальное. Вот самые основные папки, не связанные со сторонними приложениями, которые вы можете найти.
- Android – это место, куда по умолчанию сохраняются кэш приложений и данные. Эту папку не рекомендуется удалять, если вы не хотите потерять данные приложений. Удаление этой папки может привести к некорректной работе некоторых из них.
- Alarms, Ringtones, Notifications – как видно из названий, в этих папках хранятся аудиофайлы для будильников, рингтонов и уведомлений, которые могут быть использованы как дефолтными, так и сторонними приложениями.
- Cardboard – здесь хранятся данные для ряда приложений VR, а если таковых нет, она остается пустой.
- DCIM – здесь лежат фотографии, которые вы делали при помощи своего основного приложения камеры. Также вы можете увидеть такую папку и на карте microSD, если вы сохраняете фотографии и на нее.
- Downloads – здесь находится все, что скачано вами в веб-браузере, например, в Chrome или Firefox.
- Pictures, Music, Movies, Video – Это папки, которые по умолчанию используются вашими медиаприложениями. Некоторые приложения позволяют вам назначать другие папки, но большая часть медиаплееров по умолчанию будет использовать эти директории. Скриншоты чаще всего сохраняются в папке с картинками.
- Podcasts – Эта папка используется рядом приложений, чтобы отделять подкасты от остальных музыкальных файлов. Если вы не пользуетесь приложениями для прослушивания подкастов, она будет пустой.
Итак, какие папки мне можно (или нужно) удалять?
Не уверен – не удаляй. Это справедливо для всех папок приложений, и трогать их не стоит, за исключением тех случаев, когда вы точно знаете, что хотите сделать. Добавлять и удалять файлы из любых папок с медиа абсолютно безопасно, но постарайтесь в порыве наведения порядка не снести саму папку. Если вы видите, что папка пуста, например, ничего нет в папке Alarms, вы, можете подумать, что она и сама не нужна. Но, с другой стороны, папка не занимает много места. И возможно, она потребуется какому-либо приложению впоследствии, поэтому так ли вам необходимо ее удалять?
Со временем встроенная память вашего устройства будет содержать гораздо больше папок, чем было перечислено выше. Вы будете устанавливать и удалять все большее число приложений. Поэтому наводить порядок в своем устройстве никогда не повредит, ну, разве что вы вообще редко перемещаете файлы в своем телефоне, скачиваете и удаляете их. И еще, удаление пустой папки не освободит вам дополнительного места в памяти. Так что, если требуется выиграть место, лучше посмотрите, какие вы можете удалить ненужные приложения/фильмы, которые не станете пересматривать и т.п.
Теперь, когда вы получили более полную картину того, что это за папки хранятся в памяти вашего устройства, вам будет проще управлять своими файлами, не боясь «сделать что-нибудь не то».
Источник
How to Format SD Card on Android Phone?
This is a detailed tutorial on how to format an SD card on Android. There are several situations when you may need to format a memory stick. We also show you how to troubleshoot common problems and recover lost data.

Eleanor Reed
Oct 30, 2021 • Filed to: SD Card Solutions • Proven solutions
Why would we want to format an SD card? Well, with daily use on your Android phone, there are several situations — malware, storage errors, and other issues that can only be cured by formatting. In this article, we show you how to format an SD card on Android and recover from any errors that you encounter in the process.
What Are the Common Situations of Formatting an SD Card?
Formatting in computing refers to the deletion of all data in a storage medium and setting up a file system. Before you begin, you may want to back up your SD card (memory stick) if it contains files you don’t want to lose.
Before we begin, let us examine some common situations where you need to format a memory stick on an Android phone.
1. SD card is damaged or simply isn’t working and you have some kind of error message on your phone e.g. «SD card is corrupted».
2. Compatibility issues. Some older Android phones don’t have support for the exFAT file system. In such a scenario, you would need to reformat to FAT32.
3. You may experience performance degradation. If that’s the case and the memory stick’s performance can improve, then formatting becomes an option.
4. Data security. If you don’t know where the memory stick has been and you’re not sure what kind of files could be there, or you suspect it could be infected by a virus, the easiest thing to do is to format it.
5. File size restrictions. For large files over 4GB, you can’t use the FAT32 file system which has a maximum file size of 4GB. In such a situation, you would have to format the SD card to exFAT.
Steps to Format SD Card on Android
There are several ways to format a memory stick. As already mentioned most devices with SD cards including phones, computers, and cameras have a formatting option.
1. Format SD Card on Android Phone
Different Android versions have slightly different steps on how you go about formatting. But the main idea is to navigate to the Storage area in your phone Settings, tap on the SD card, and look for the Format option. Below, we show you an example of how to format an SD card in Samsung on Android OS version 10.
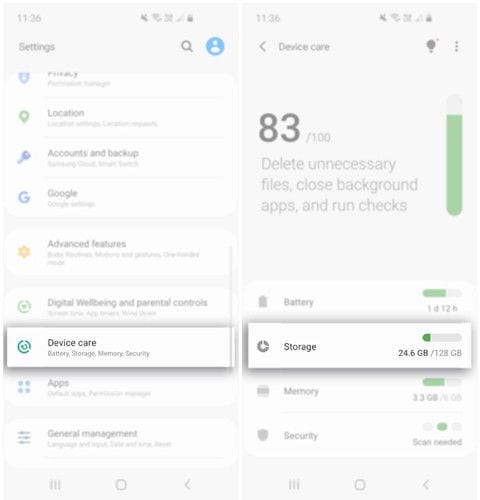
On your phone, navigate to Settings > Device Care. Next, select Storage.
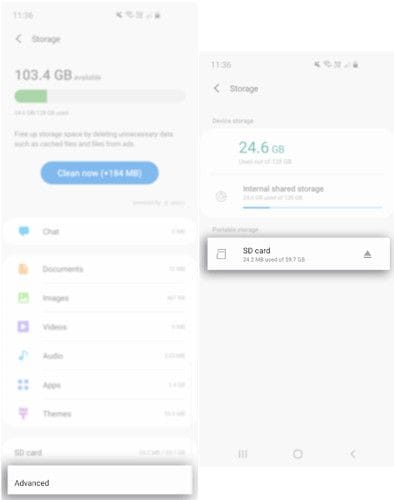
Tap on Advanced. Here, you will see Portable storage. Proceed and select SD Card.
Next, tap Format. Finally, in the pop-up message, select Format SD Card.

Wait a few minutes for the process to terminate then begin using the card.
2. Format Android Memory Card on Computer
There are two options to format an SD memory card on a computer.
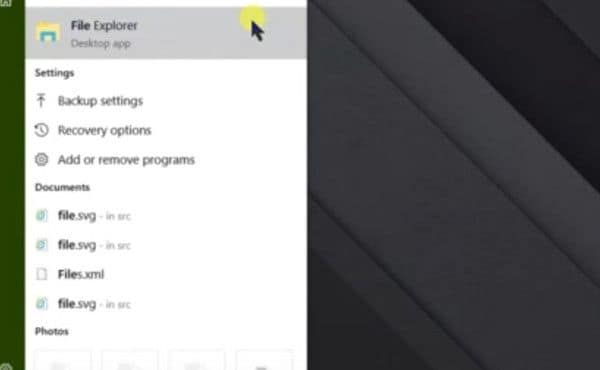
For the first option, connect the memory stick to the computer. Depending on the PC model, you can use a built-in reader or an adapter. Next, open Windows Explorer and locate the SD card on your drive list or wait for a few seconds for the drive to load.
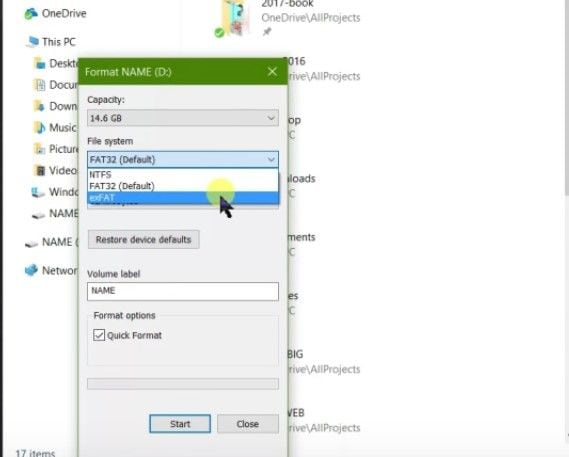
Right-click on the drive and select Format. You should then see a format window that defaults to FAT32. You may want to change this to exFAT if you anticipate having files larger than 4GB on the memory stick.

Next, enter the desired name in the Volume Label field. Check the Quick Format box or else the process can take a long time especially for large SD cards. To finish the process, click the Start button.
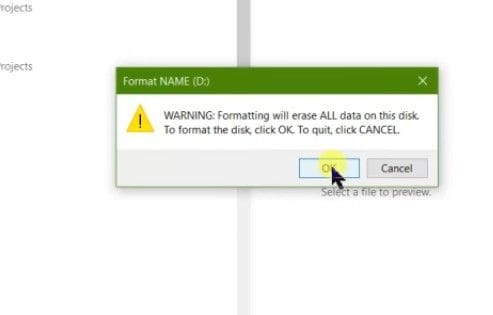
A warning message will appear. Click OK to proceed.
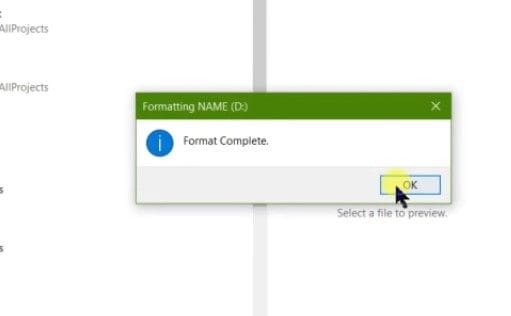
After a few seconds, the SD card is formatted.
3. Format SD Card as Internal Storage
If your Android phone runs out of internal memory for your apps, the only solution is to use the SD card as internal storage. To do so, you need to format it as Internal Storage.
Begin by inserting it on your Android phone and wait a few seconds for it to be detected.
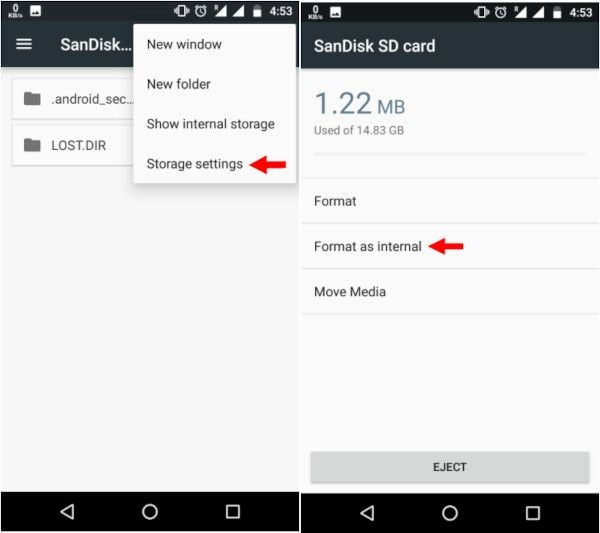
Next, go to Settings. Scroll down to Storage and Tap the SD card. Next, tap the three dots located in the top right corner of the screen. Tap Storage Settings. Next, select the Format as an Internal option.
Tap Erase & Format. If it is too slow, you will get a notification. Android may reject formatting a slow SD as Internal Storage.

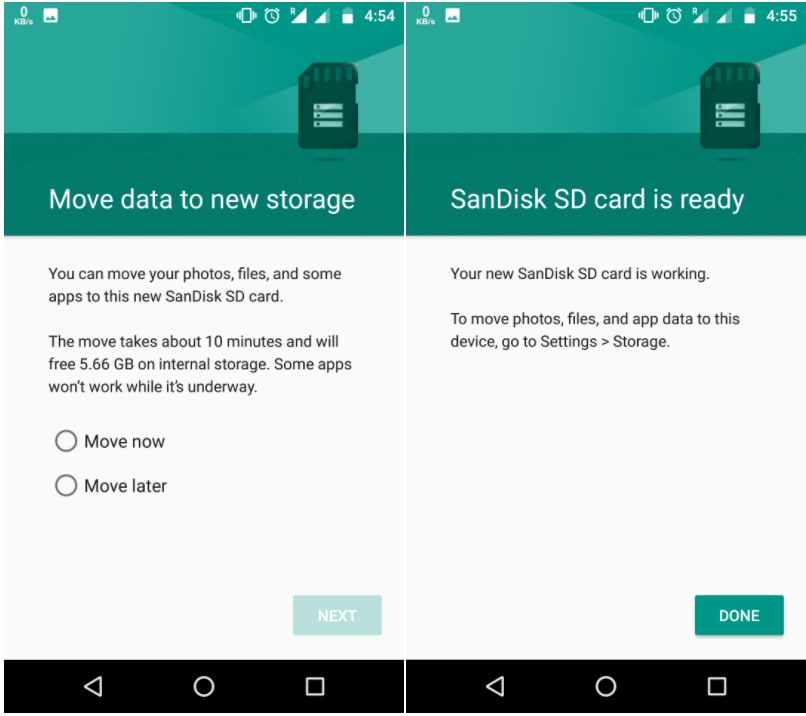
Tap OK to continue then begin the data migration process by checking the Move Now radio button or Move Later to do it later.
Tap Done to complete the process.
Workable Solutions to SD Card Not Formatted Error
In the process of formatting an SD card using any of the methods described above, you may come across some errors. If you come across an error message stating, «Micro SD card not formatted», then the following are possible causes and solutions.
1. Damaged or Corrupt SD Card
An SD card may be damaged or corrupted due to bad sectors or a virus in the files. To fix this error, connect the memory stick to your PC and navigate to File Explorer and take note of the drive letter.
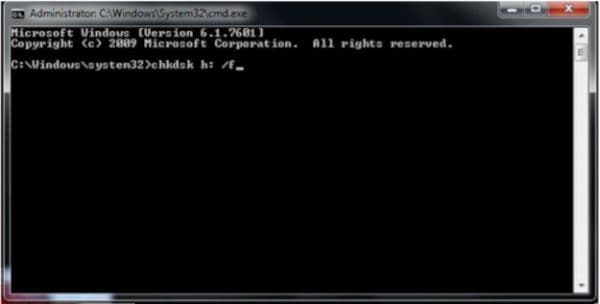
Next, launch the command line utility by typing «CMD» in the Windows search and running the app as an administrator.

In the command line window, type «chkdsk h: /f«, where «h» represents your drive letter. This commands the PC to check and fix (f) any disk errors.
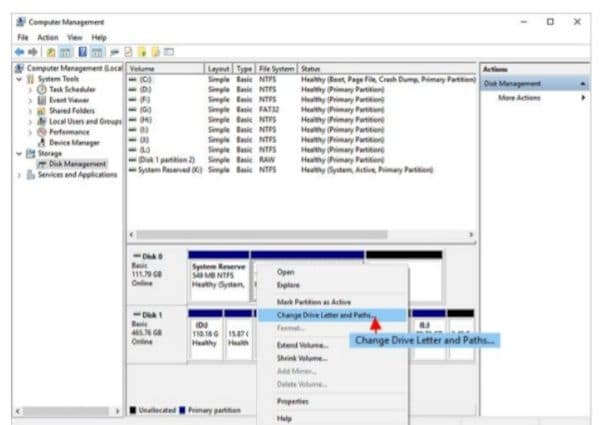
If this does not work, you can try and change the letter assigned to the drive.
To do this, go to This PC, right-click then click Manage. Click on Disk Management under the Storage menu and then right-click on the volume of the drive letter you wish to change. In the drop-down menu, select Change Drive Letter and Paths. Click Change and choose a different drive letter. Select OK, then Yes to the warning then wait a few seconds for the new drive letter to be assigned. You can view this change in Disk Management or File Explorer.
Retry the process.
The Memory Stick is Write-protected
You may have write-protected the memory stick without realizing it. The fix for this is quite easy. If it uses physical protection, identify the switch, and slide it to the appropriate position.

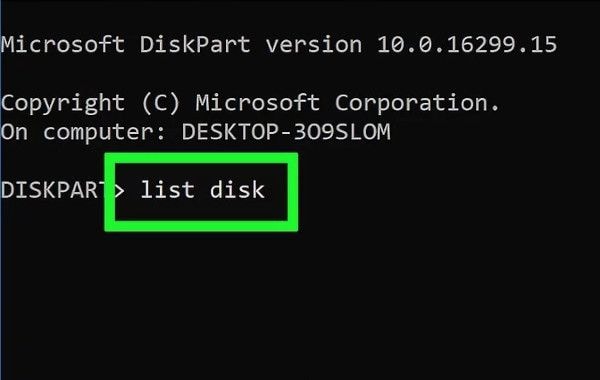
If it isn’t using a physical switch, connect it to your PC. Take note of the drive letter in File Explorer and then type «CMD» in the Windows search bar at the bottom left of your screen. This will launch the Command Line utility. Type «diskpart» and press Enter.
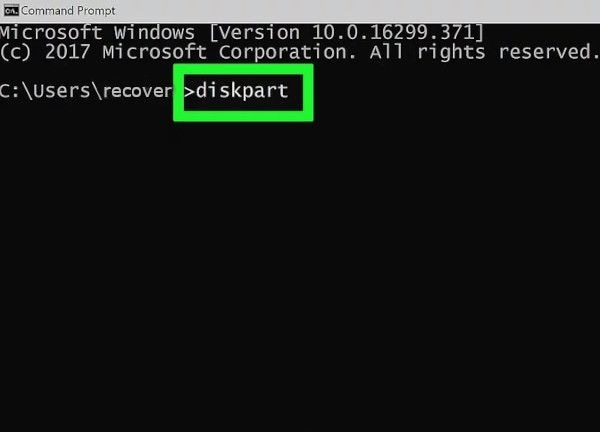
Next, type «list disk» to see a list of all the drives.
Identify it and note the disk number allocated to it.
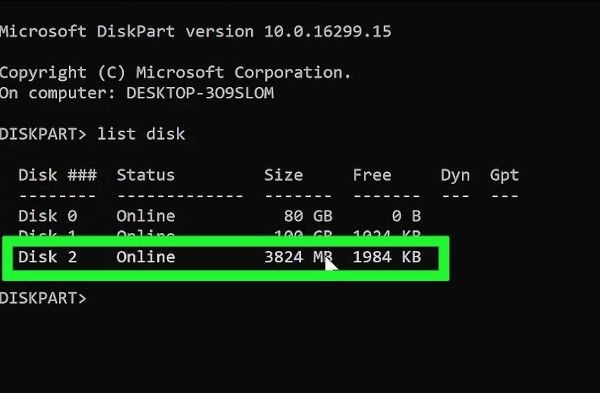
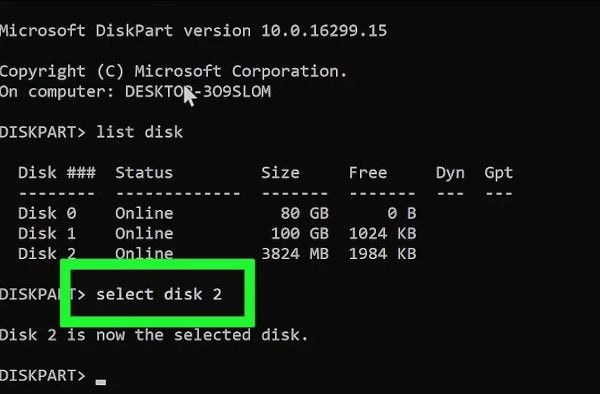
Next, type «Select Disk x» where «x» represents the actual disk number on your system e.g. «Select Disk 2».
Next, type «attributes disk clear readonly«. This will clear the read-only attribute.
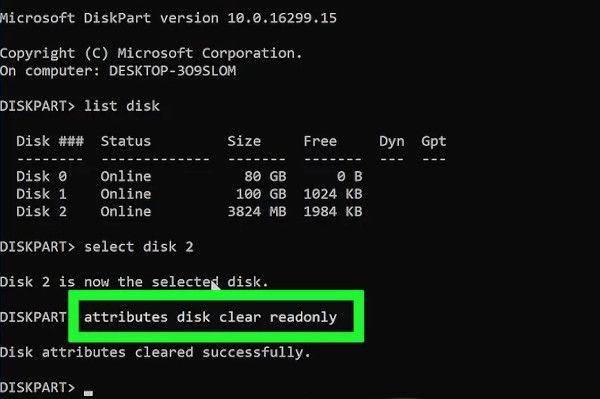
Close the Command Line utility and retry formatting the memory stick.
2. Sudden Power Failure
In the event of a sudden power loss, as the Phone or computer is formatting the memory stick, the process terminates prematurely. This is a simple fix, just retry the process once again and you should succeed.
All-Around Tips to Format SD Card Without Losing Data
One of the problems that can arise when formatting an SD card is data loss. Below are a few tips to format an SD card without losing data.
Tips You Should Know When Formatting an SD Card
Formatting refers to the complete erasure of data on the SD card and the creation of a file system.
1. How to Do an SD Card Data Backup
The best way to prevent data loss is to first perform a data backup. There are two ways to do this. Using your Android phone or backing up to a PC.
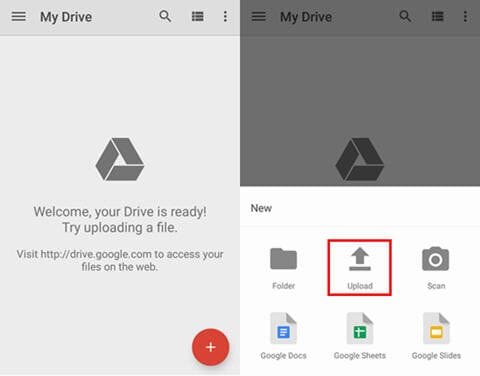
1. To back up using an Android phone, you will need a Google account and the Google Drive app. Install the Google Drive app from the Play Store and launch it.
2. Next, tap the + icon and select Upload.
3. Navigate to your SD card then select the files you want to upload or choose to upload everything.
4. Click Done and Google will begin uploading the files to Google Drive.
The second backup method involves using a PC. Connect the SD card to a PC and use File Explorer to navigate the drive. Right-click on the drive, click Copy and then paste in a different location on your computer. This action makes a copy of your SD card contents on your PC.
2. Recover Accidentally Formatted Android Files
In the unfortunate event that you fail to make a backup, do not worry. Wondershare Recoverit software can recover accidentally formatted Android files using Windows or Mac. This useful software can save you the trouble of having to hire a data recovery expert to get back your files. With Wondershare Recoverit Software, you can recover accidentally formatted Android files in three minutes.
To recover your files, follow these steps.
Step 1: Launch Wondershare Recoverit on Windows
Download Wondershare Recoverit and install it on your PC. Next, open the application. You can do so by typing «Recoverit» in the Windows search bar. Click it to launch it.
Step 2: Connect the SD Card
Next, connect the SD card to the computer and make sure it is recognized or detected.
Step 3: Select the SD Card
From within Wondershare Recoverit software, select the SD card from the list of locations.

Step 4: Scan the SD Card
Click Start and a scan will be launched on the SD card. You can pause or stop this process at any time.

Step 5: Preview and Recover the Files
At the end of the scan, preview the files from the list of results. To get your files back, simply click Recover, and save them in a location on your computer.

Wondershare Recoverit software is guaranteed to recover files accidentally deleted from an SD card. It can recover data in numerous types and formats, and even includes a video repair tool to repair corrupted videos.
Closing Words
We hope these tips have taught you how to format an SD card on Android without losing data. If you encounter a problem, go through the solutions again to solve the problem. And, most importantly, if you accidentally delete your data, you can always recover files from your Android SD card using Wondershare Recoverit Software.
Related Questions Searched for Frequently
1. How do I format my SD card on my Samsung?
Источник


