- Installing the Android SDK
- Установка среды разработки Android
- Что вы создадите
- Что вам потребуется
- Настройка среды для разработки под Android
- Если необходимо, создание виртуального устройства Android
- How To Set Android SDK Path In Windows And Mac
- 1. Configure Android SDK Variable In Windows.
- 1.1 Get Android SDK Install Directory Path.
- 1.2 Set %ANDROID_HOME% and %Path% System Environment Variable.
- 2. Configure Android SDK Variable In macOS.
- How To Install Android SDK Tools On Windows
- Step 1 — Download SDK Tools
- Step 2 — Install Command Line Tools
- Step 3 — Install Platform Tools
- Step 4 — Configure Environment Variable
- Step 5 — Configure Commands
- Step 6 — Using the SDK Manager
- Step 7 — Using the Emulator and AVD Manager
- Summary
Installing the Android SDK
Android Studio provides everything you need to start developing apps for Android, including the Android Studio IDE and the Android SDK tools.
If you didn’t download Android Studio, go download Android Studio now, or switch to the stand-alone SDK Tools install instructions.
Before you set up Android Studio, be sure you have installed JDK 6 or higher (the JRE alone is not sufficient)—JDK 7 is required when developing for Android 5.0 and higher. To check if you have JDK installed (and which version), open a terminal and type javac -version . If the JDK is not available or the version is lower than 6, go download JDK.
To set up Android Studio on Windows:
- Launch the .exe file you just downloaded.
- Follow the setup wizard to install Android Studio and any necessary SDK tools.
On some Windows systems, the launcher script does not find where Java is installed. If you encounter this problem, you need to set an environment variable indicating the correct location.
Select Start menu > Computer > System Properties > Advanced System Properties. Then open Advanced tab > Environment Variables and add a new system variable JAVA_HOME that points to your JDK folder, for example C:\Program Files\Java\jdk1.7.0_21 .
The individual tools and other SDK packages are saved outside the Android Studio application directory. If you need to access the tools directly, use a terminal to navigate to the location where they are installed. For example:
To set up Android Studio on Mac OSX:
- Unzip the downloaded zip file, android-studio-ide- -mac.zip .
- Drag and drop Android Studio into the Applications folder.
- Open Android Studio and follow the setup wizard to install any necessary SDK tools.
Depending on your security settings, when you attempt to open Android Studio, you might see a warning that says the package is damaged and should be moved to the trash. If this happens, go to System Preferences > Security & Privacy and under Allow applications downloaded from, select Anywhere. Then open Android Studio again.
The individual tools and other SDK packages are saved outside the Android Studio application directory. If you need access the tools directly, use a terminal to navigate into the location where they are installed. For example:
To set up Android Studio on Linux:
- Unpack the downloaded Tar file, android-studio-ide- -linux.zip , into an appropriate location for your applications.
- To launch Android Studio, navigate to the android-studio/bin/ directory in a terminal and execute studio.sh .
You may want to add android-studio/bin/ to your PATH environmental variable so that you can start Android Studio from any directory.
If the SDK is not already installed, follow the setup wizard to install the SDK and any necessary SDK tools.
Note: You may also need to install the ia32-libs, lib32ncurses5-dev, and lib32stdc++6 packages. These packages are required to support 32-bit apps on a 64-bit machine.
Android Studio is now ready and loaded with the Android developer tools, but there are still a couple packages you should add to make your Android SDK complete.
The stand-alone SDK Tools package does not include a complete Android development environment. It includes only the core SDK tools, which you can access from a command line or with a plugin for your favorite IDE (if available).
If you didn’t download the SDK tools, go download the SDK now, or switch to the Android Studio install instructions.
To get started on Windows:
Your download package is an executable file that starts an installer. The installer checks your machine for required tools, such as the proper Java SE Development Kit (JDK) and installs it if necessary. The installer then saves the Android SDK Tools to a specified the location outside of the Android Studio directories.
- Double-click the executable ( .exe file) to start the install.
- Make a note of the name and location where you save the SDK on your system—you will need to refer to the SDK directory later when using the SDK tools from the command line.
- Once the installation completes, the installer starts the Android SDK Manager.
To get started on Mac OSX:
Unpack the ZIP file you’ve downloaded. By default, it’s unpacked into a directory named android-sdk-mac_x86 . Move it to an appropriate location on your machine, such as a «Development» directory in your home directory.
Make a note of the name and location of the SDK directory on your system—you will need to refer to the SDK directory later when using the SDK tools from the command line.
To get started on Linux:
Unpack the .zip file you’ve downloaded. The SDK files are download separately to a user-specified directory.
Make a note of the name and location of the SDK directory on your system—you will need to refer to the SDK directory later when using the SDK tools from the command line.
Troubleshooting Ubuntu
- If you need help installing and configuring Java on your development machine, you might find these resources helpful:
- https://help.ubuntu.com/community/Java
- https://help.ubuntu.com/community/JavaInstallation
- Here are the steps to install Java:
-
If you are running a 64-bit distribution on your development machine, you need to install additional packages first. For Ubuntu 13.10 (Saucy Salamander) and above, install the libncurses5:i386 , libstdc++6:i386 , and zlib1g:i386 packages using apt-get :
For earlier versions of Ubuntu, install the ia32-libs package using apt-get :
The Android SDK tools are now ready to begin developing apps, but there are still a couple packages you should add to make your Android SDK complete.
Then, select which SDK bundle you want to install:
Источник
Установка среды разработки Android
Этот урок описывает установку и настройку среды для разработки под Android.
Что вы создадите
Вы изучите, как установить инструменты для сборки Android приложений. При необходимости, создадите виртуальное устройство Android (AVD).
Что вам потребуется
- Примерно 15 минут свободного времени
- Любимый текстовый редактор или IDE
- JDK 6 и выше
Настройка среды для разработки под Android
Перед тем, как вы сможете собрать Android приложение, вы должны установить Android SDK. При установке Android SDK также устанавливается AVD Manager, графический пользовательский интерфейс для создания и управления Android Virtual Devices (AVDs).
- С сайта Android скачайте актуальную версию Android SDK для вашей операционной системы.
- Распакуйте архив в выбранное вами место. К примеру, в Linux или Mac этим местом может быть пользовательский каталог. Более подробную информацию по установке смотрите на сайте Android Developers.
- Установите значение переменной окружения ANDROID_HOME в местоположение Android SDK. Дополнительно, добавьте в переменную окружения PATH значения ANDROID_HOME/tools и ANDROID_HOME/platform-tools .
Mac OS X
Linux
Windows
Загруженный Android SDK не содержит какую-то конкретную платформу. Для запуска кода этого урока вам необходимо загрузить и установить последнюю версию SDK платформы. Для этого вы можете использовать Android SDK и AVD Manager, которые вы установили в предыдущем разделе.
1. Откройте окно Android SDK Manager:
2. Установите галочку для Tools.
3. Установите галочку для latest Android SDK.
4. В каталоге Extras установите галочку для Android Support Library.
5. Нажмите кнопку Install packages. для завершения загрузки и установки.
Если необходимо, создание виртуального устройства Android
Если у вас нет Android устройства для тестирования, то вы можете использовать виртуальное устройство Android. Для этого у вас должны быть установлены Android SDK и соответствующая версия SDK платформы и пакетов. См. Настройка среды для разработки под Android.
Эта команда создает новое AVD под названием «Default» на основе Android 4.2.2, API Level 19:
Как вариант, вы можете использовать android GUI инструмент для создания AVD.
Ниже приведена информация об использованных параметрах:
- —name Название нового AVD
- —target Назначаемый ID нового AVD
- —abi CPU/ABI, которое будет эмулировано для AVD
Эта команда отображает список доступных заданий. Используйте их для создания различных AVD на основе различных Android версий по необходимости.
Как вы можете увидеть, значение «29» ассоциировано с Android 4.2.2. Обратите внимание на три доступных ABI(CPU) для данного ID. Команда, использованная ранее для создания AVD указывала на ARM CPU.
Просмотр списка доступных AVD производится командой:
Ниже информация о только что созанном AVD:
Проверяем, что AVD работает:
Поздравляем! Вы только что установили и настроили окружение для разработки под Android, которое можно использовать с Spring.
Источник
How To Set Android SDK Path In Windows And Mac
After you installed android studio, you still need to configure some android SDK environment variables then you can use it easily. This article will tell you how to correctly configure Android SDK environment variables such as ANDROID_HOME, PATH on Windows and macOS.
1. Configure Android SDK Variable In Windows.
1.1 Get Android SDK Install Directory Path.
Before you can configure it, you should first get the android SDK install directory follow below steps.
- Open android studio, click File —> Settings menu item in the top men bar.
- Expand Appearance & Behavior —>System Settings —>Android SDK menu item on the left side of the popup window. Then you can find the Android SDK Location directory path on the right side ( in this example, the Android SDK location path is C:\Users\Jerry\AppData\Local\Android\Sdk ), remember it.
1.2 Set %ANDROID_HOME% and %Path% System Environment Variable.
- Right-click the computer icon in Windows file explorer left side, click Properties menu item in the popup menu list. This will open the windows system configuration window.
- Click the Advanced system settings link on left panel, it will popup the System Properties window, click the Environment Variables button to open Environment Variables window.
- Click the New… button to add a new system variable, input ANDROID_HOME as the variable name, and input the Android SDK location directory path ( such as C:\Users\Administrator\AppData\Local\Android\Sdk ) as the variable value.
- Select variable Path and click Edit button and add ;%ANDROID_HOME%\tools;%ANDROID_HOME%\tools\bin;%ANDROID_HOME%\platform-tools at the end of its value. Please note the ; must be English character otherwise it will not take effect .
- Click OK to close the system environment variables settings window, open a dos window, type command adb in it. If you see output like below that means the android SDK path variable has been configured successfully.
2. Configure Android SDK Variable In macOS.
- Open Android Studio on macOS, then click Android Studio —> Preferences menu item at the left top toolbar.
- Input search keyword sdk in the search box of the popup Preferences dialog window left side.
- It will focus on the Android SDK menu item on the left side, and you can get the Android SDK Location directory path value on the right side Android SDK Location text box.
- Generally, the Android SDK is installed in the /Users/user-name/Library/Android/sdk folder on macOS.
- If you can not find the above folder in macOS finder or terminal, this is because the Library folder is a hidden folder by default, you should make the hidden folder visible by executing the command $ defaults write com. apple . finder AppleShowAllFiles TRUE in a macOS terminal window ( please read article How To Show Hidden Files In Mac OS Finder And Select Hidden Files In Html Upload File Form ).
- You can also see the hidden Library folder by opening a macOS Finder window, then click Go —> Go to Folder… menu item, and input
/Library in the popup dialog input text box, then click Go button.
- This is also another method to show the hidden Library folder, open a macOS Finder window, click Go —> Home menu item. Right-click the home folder, then click the Show View Options menu item in the popup menu list. Check the Show Library Folder checkbox.
- Use nano to create or edit user bash profile in user home directory.
- Add ANDROID_HOME and PATH environment variable in user bash profile.
- Make the added system environment take effect.
- Now open a terminal and run adb, you should also see something output like in windows.
Источник
How To Install Android SDK Tools On Windows
It provides all the steps required to install Android Platform Tools and SDK Manager on Windows 10 without using Android Studio.
In this tutorial, we will discuss all the steps required to install Android Platform Tools and SDK Manager on Windows 10. This tutorial provides the steps for Windows 10, though the steps should be the same on other versions of Windows.
This post is useful for the developers using Android Platform Tools and SDK manager without installing Android Studio for the use cases including hybrid app development using Ionic. It also assumes that a valid JAVA_HOME environment variable exists pointing to the installation directory of Java.
You can follow How To Install Java 8 On Windows 10, How To Install Java 11 On Windows, How To Install Java 15 On Windows, or How To Install OpenJDK 15 On Windows to install Java on Windows. In case you are interested in developing Android applications using Android Studio, you can also follow How To Install Android Studio On Windows.
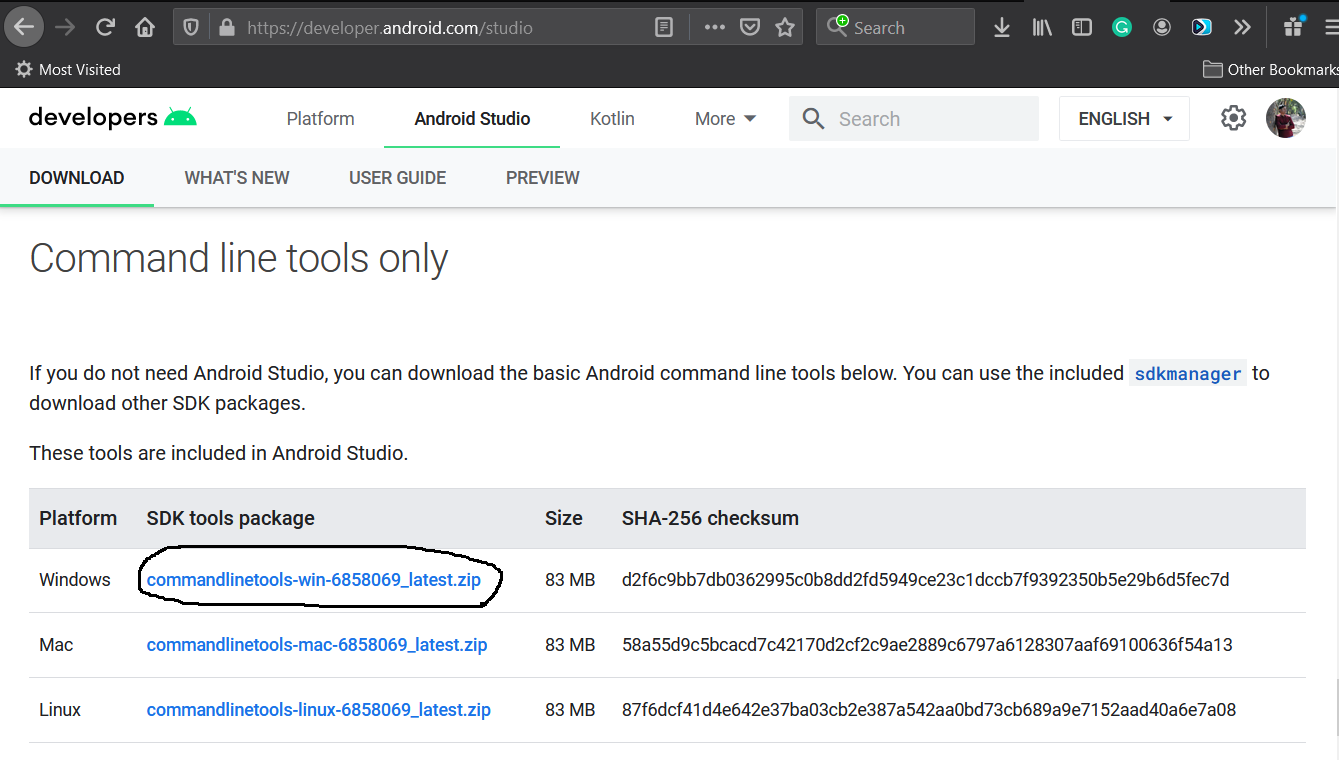
Step 1 — Download SDK Tools
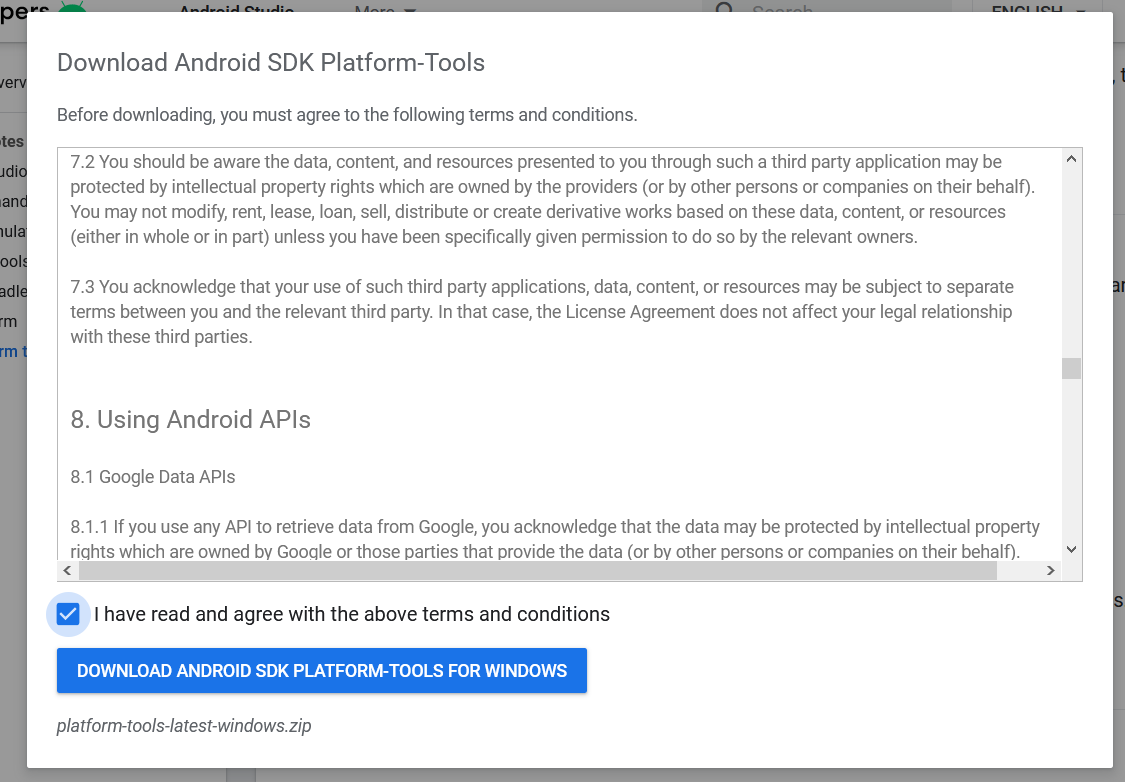
Open the download tab of Android Studio and scroll down to the Command line tools only section. This section shows various options to download the SDK tools as shown in Fig 1.

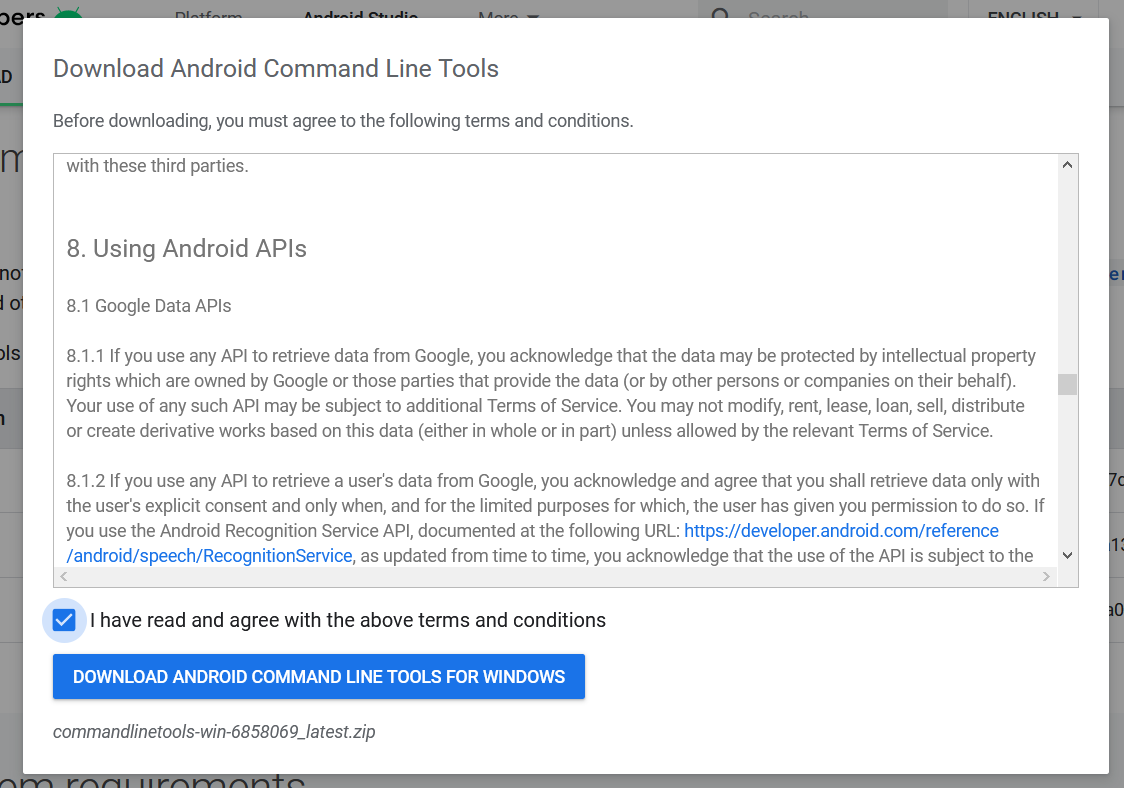
Click the first link having the download option for Windows as highlighted in Fig 1. It will ask to accept to terms and conditions as shown in Fig 2.
Go through the details, agree on the terms and conditions and click the Download Button to start the download.
Step 2 — Install Command Line Tools
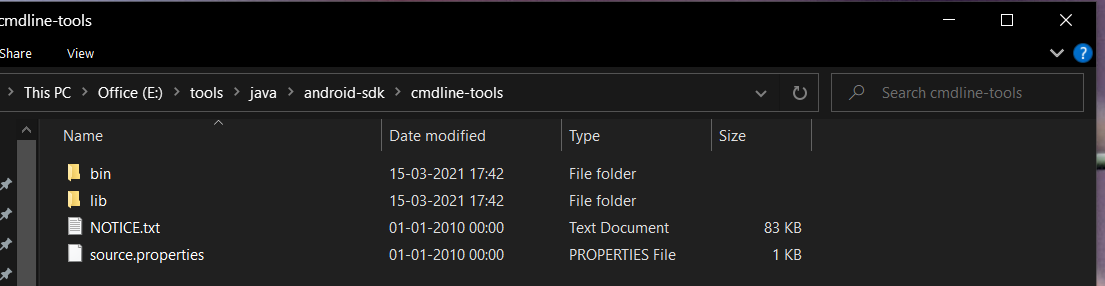
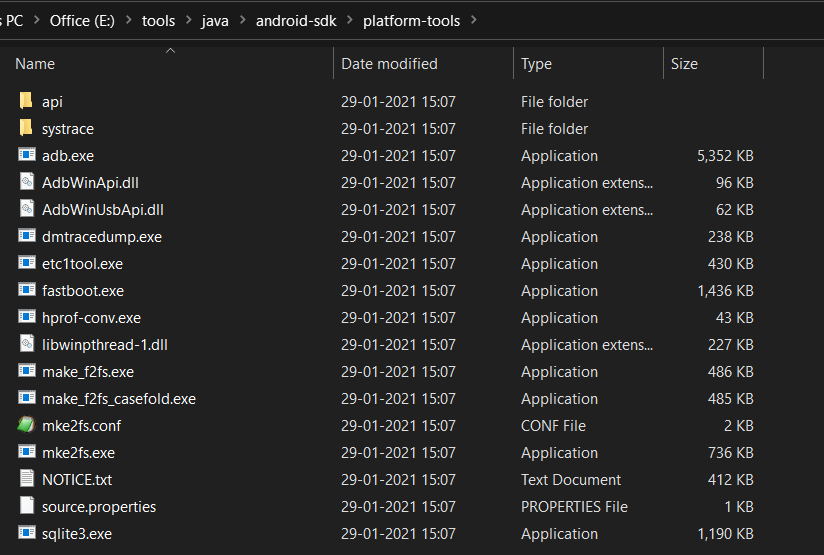
In this step, we will install the Android Command Line Tools on Windows 10. Create the directory android-sdk at your preferred location and extract the content of the downloaded SDK Tools zip to this directory. Make sure that the extracted content is available within the android-sdk directory created by us as shown in Fig 3.
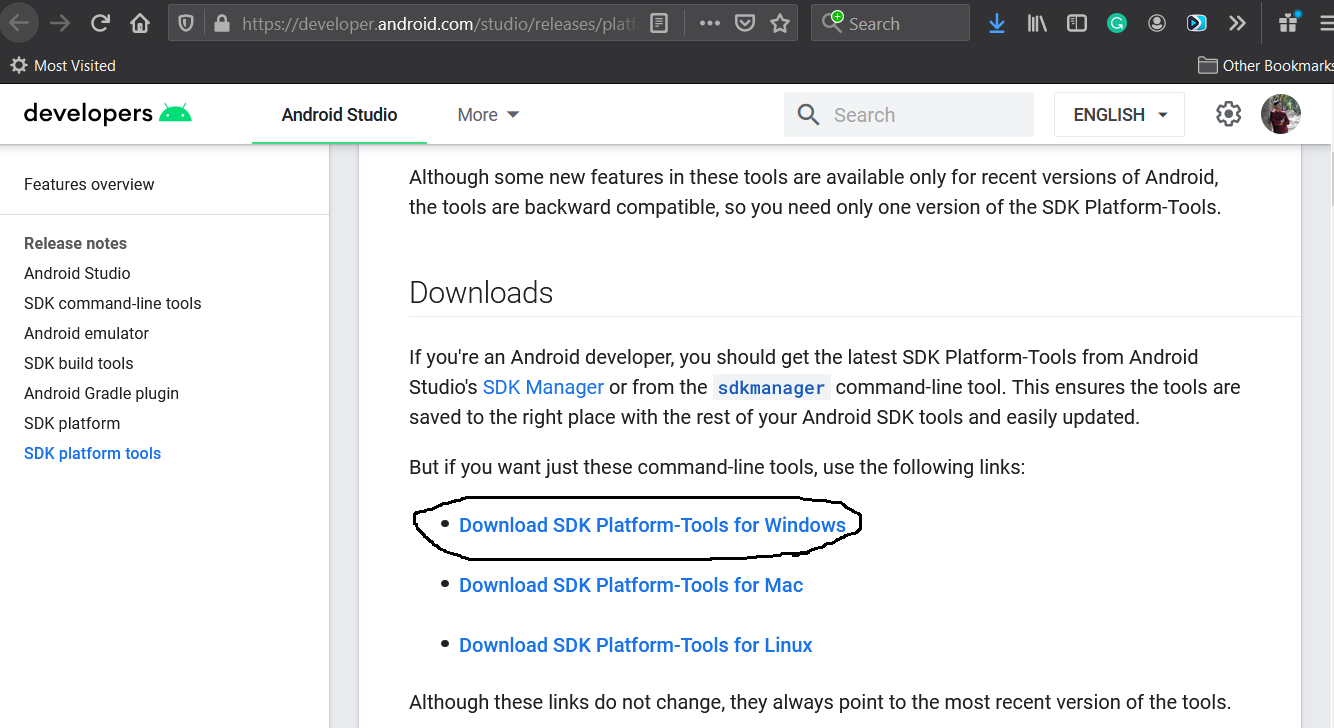
Step 3 — Install Platform Tools
In this step, we will install the Android Platform Tools on Windows 10. Follow the same steps similar to Android SDK Tools to install Android Platform Tools using the download link as shown in Fig 4, Fig 5, and Fig 6.
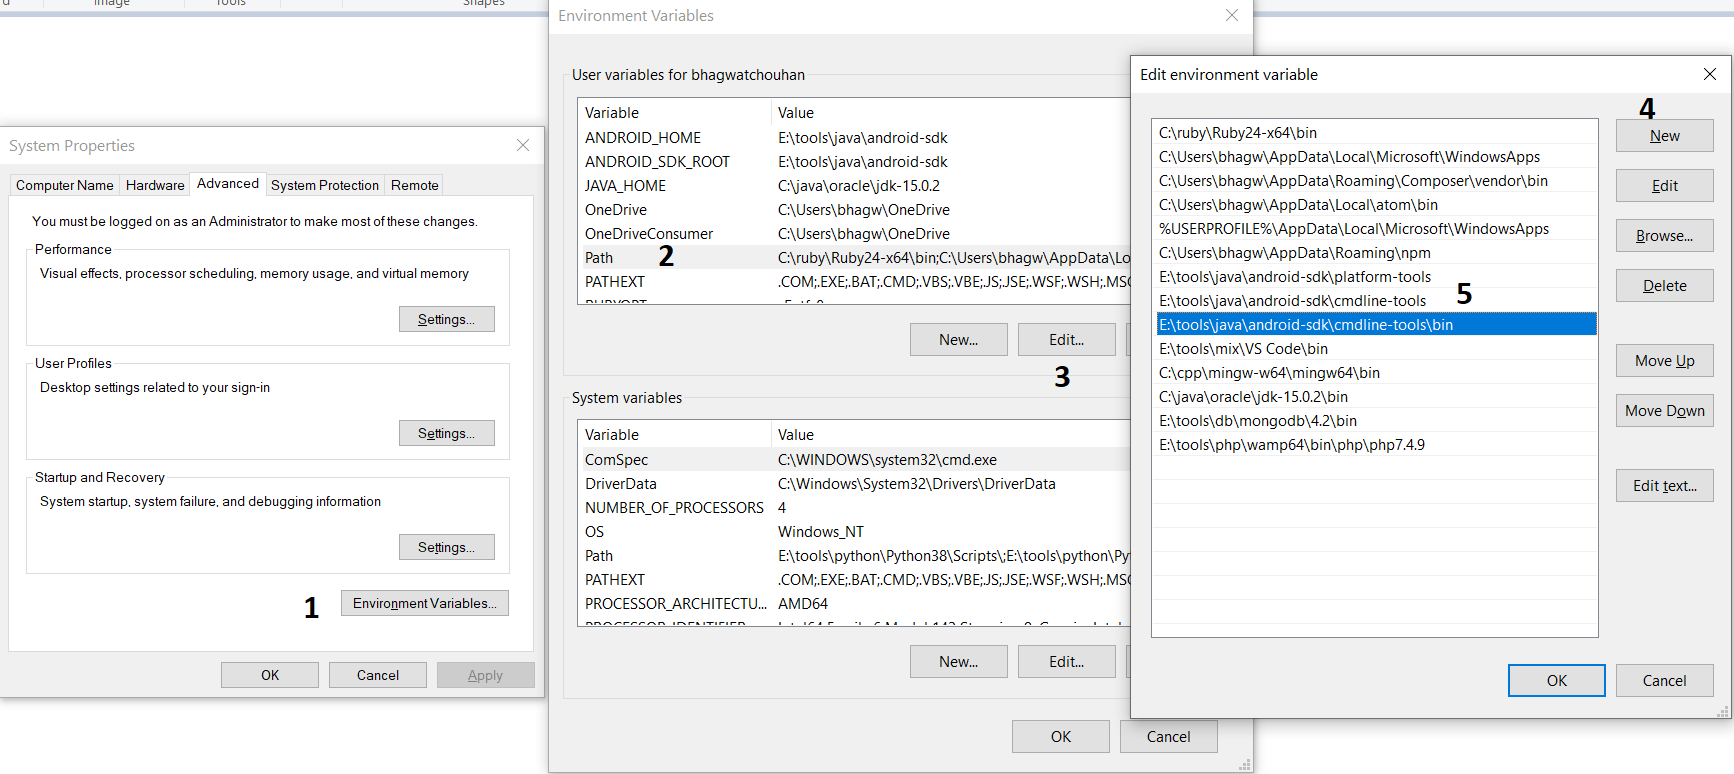
Step 4 — Configure Environment Variable
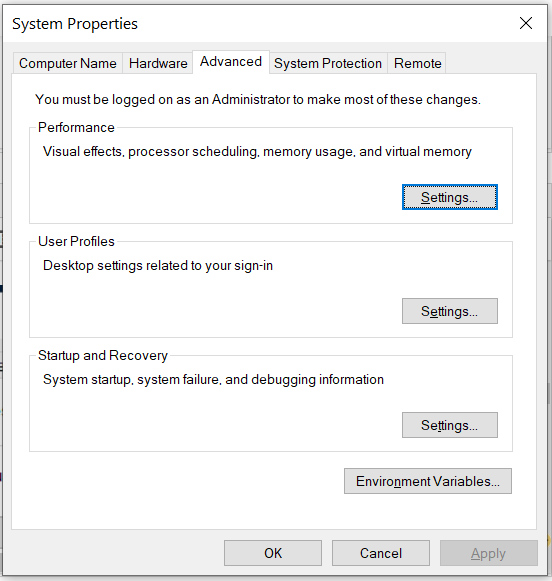
Right-click the My Computer or This PC on the desktop and click the Properties Option. Now click the Advanced system settings. It will show the System Properties dialog having Advanced Tab options as shown in Fig 7.
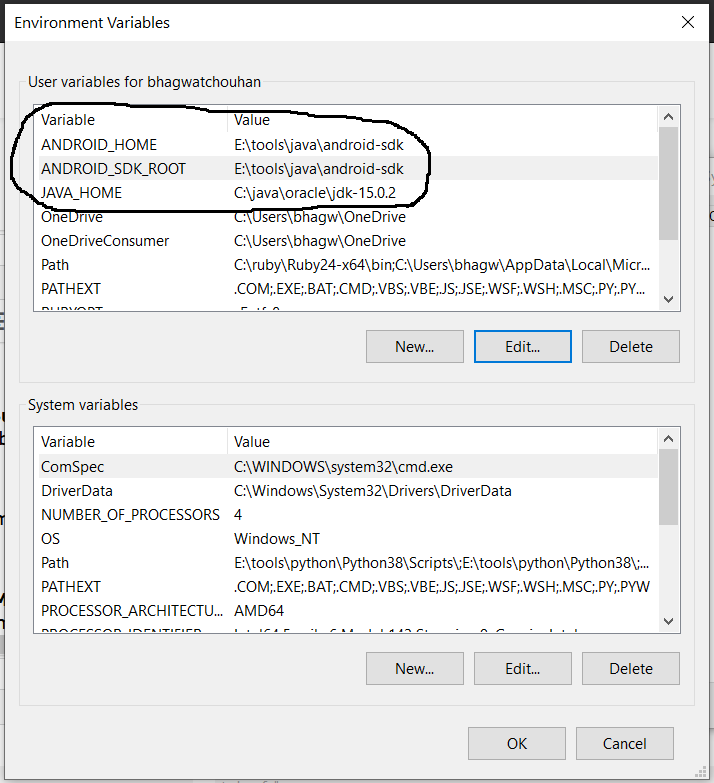
Click the Environment Variables Button and click the New Button in the first section. Set the Variable Name field to ANDROID_HOME and Variable Value to the android-sdk directory created by us in the previous step.
Similarly, also configure the environment variable ANDROID_SDK_ROOT to the android-sdk directory.
Also , make sure that the JAVA_HOME environment variable is set to the JDK installation directory. It must not end with the bin as we do with the system path variable.
Step 5 — Configure Commands
In previous steps, we have downloaded and extracted the Command Line Tools and Platform Tools to the android-sdk directory. Both the tools provide several command-line utilities which we need to run by going to the appropriate directory having the executable files.
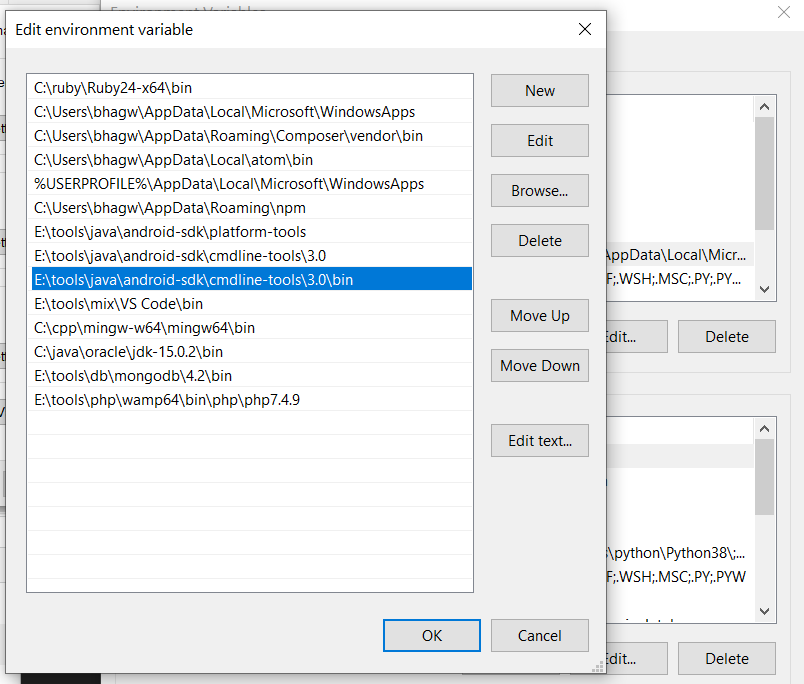
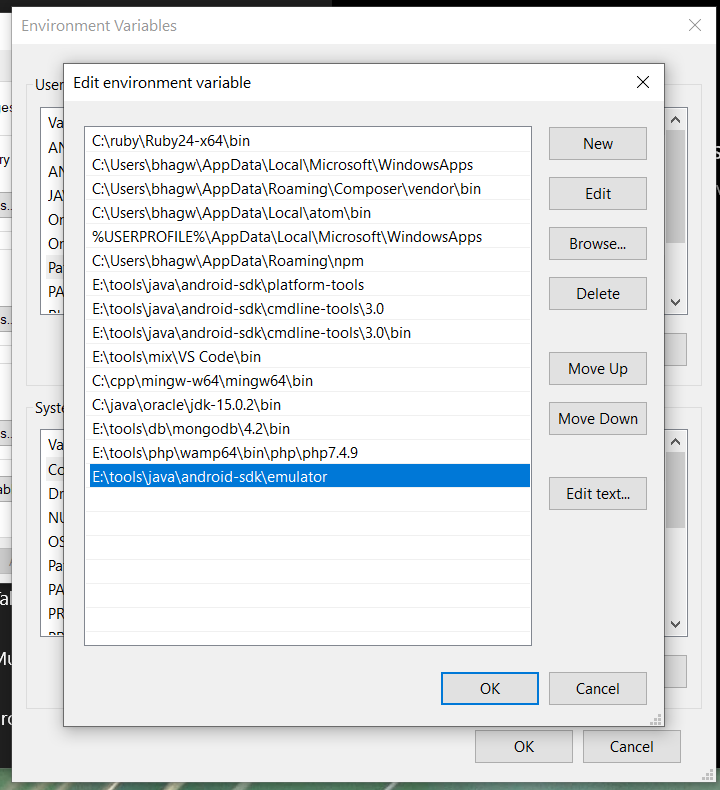
We can make these commands available at the system level without going to these directories by adding the path to tools, tools\bin, and platform-tools to the system path as shown in Fig 9. Make sure that these executables do not break other commands having the same name before adding these paths to the PATH environment variable.
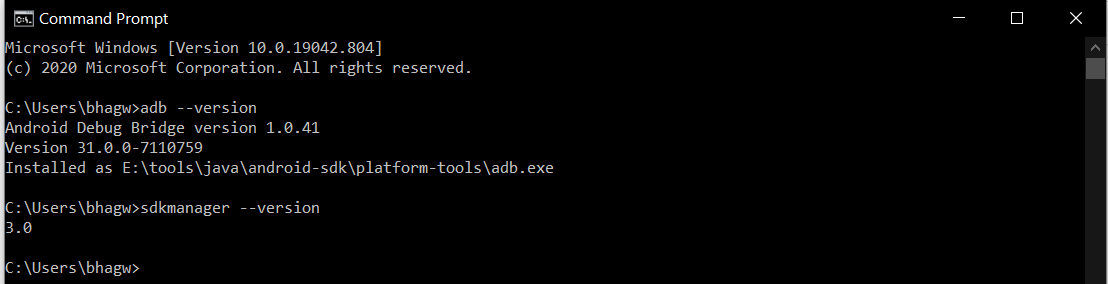
Now open the Command Prompt and check the ADB and SDK Manager versions as shown in Fig 10. You might be required to restart the system to apply the environment variables set by us.
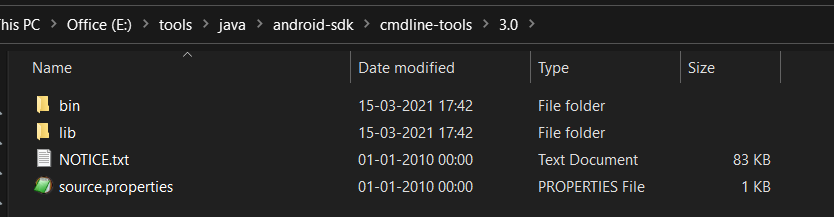
We can see that the ADB command works well and shows the version details, but the sdkmanager shows an error — «error: could not determine sdk root. error: either specify it explicitly with —sdk_root= or move this package into its expected location: \cmdline-tools\latest\» since it expects the Command Line Tools in a version-specific directory. Now open the source.properties file from the cmdline-tools directory to check the version. It will show the version details as shown below.
Now move all the files to the directory cmdline-tools/3.0 as shown in Fig 10.
Also, update the system path as shown in Fig 11.
Now close and open the Command Prompt. Also, check the ADB and SDK Manager versions as shown in Fig 12.
Step 6 — Using the SDK Manager
List — We can list the installed and available packages and images using the list command as shown below.
Install Platform — Use the below-mentioned command to install the Android 10 (API level 30) using the SDK manager.
It will ask to accept the terms and conditions as shown in Fig 13. Enter y and hit Enter Key to accept the terms and conditions. This command creates the directory platforms within android-sdk and installs the package android-30 having all the required files to run the emulator for Android 10.
If we again check the installed packages, the list command shows the installed options as shown below.
Update SDK Manager — Update the SDK manager using the below-mentioned command.
Add System Image — We can add system images from available images shown by the list command using the SDK manager as shown below. We are adding the most recent default 64-bit system image.
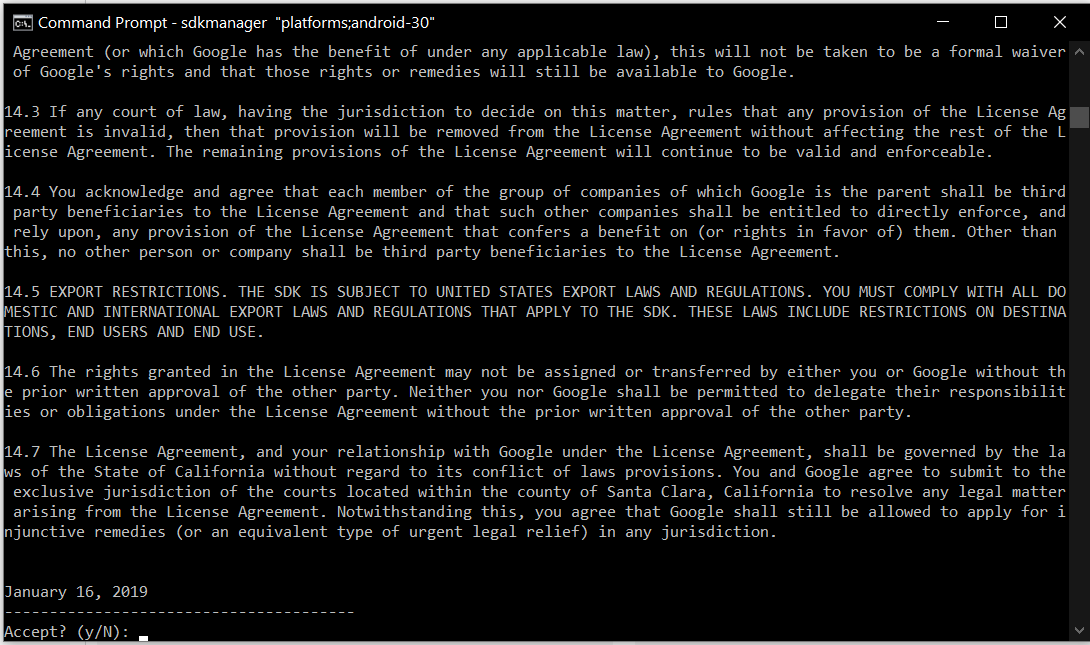
Accept the License Agreement to complete the download.
There are several projects which need Google Play Services. We need system images specific to Google Play Services as shown below.
Accept the License Agreement to complete the download.
Install Emulator — We need to install the emulator before creating the AVD using SDK Manager.
Accept the License Agreement to complete the download.
Install Build Tools — Install the most recent build tool listed by the list command.
Step 7 — Using the Emulator and AVD Manager
Create Android Emulator — Create the emulator using the system image downloaded in the previous step as shown below. Replace with the actual name preferred by you.
The above commands ask a bunch of questions to configure the AVD if we choose the custom hardware profile option. We have excluded the details of these options from this tutorial since these configuration details depend on the actual needs. After completing all the configurations, it creates the AVD using the name provided by us while configuring it.
Similarly, we can also install the AVD of older versions as shown below.
List Android Emulators — Now go to the tools directory on the command line and check the installed platform as shown below.
Notes: Add Emulator to the system path as shown in Fig 14.
Close and re-open the Command Prompt to check the AVDs created by us in the previous steps.
It will list all the AVDs installed by us.
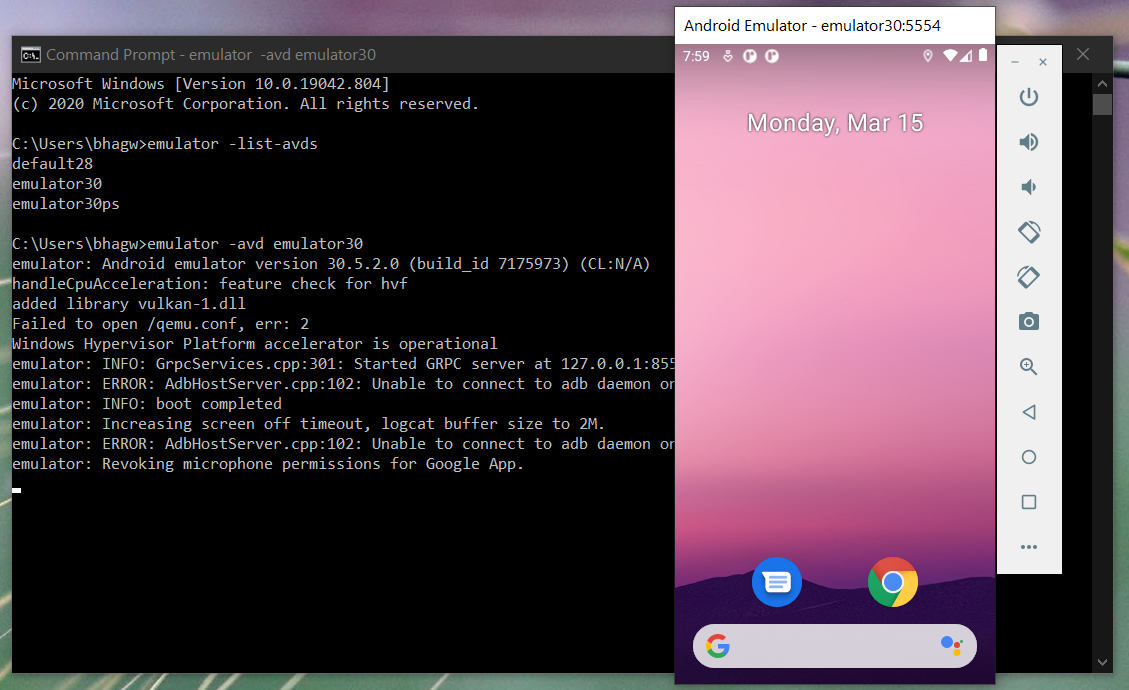
Run Emulator — We can run the emulator created by us as shown below.
The emulator will take some time to completely launch the AVD. The final results should look similar to Fig 15.
Delete Emulator — We can also delete an existing emulator as shown below.
Summary
This tutorial provided all the steps required to install Android Platform Tools and Android SDK Manager on Windows 10. It also provided the steps required to create and launch the AVDs using the Emulator.
Источник
-