- Building the APK
- Build yourself instead of download
- Important notes
- Recommended specification of computer for building apk file
- This article is divided into two parts.В
- Overview
- Step by step walkthrough
- Install git (if you don’t have it)В
- Install Android Studio
- Set git path in preferences
- Windows
- Download AndroidAPS code
- Download Android SDK
- Generate signed APK
- How to make Android apps without IDE from command line
- How to do Android development faster without Gradle
- IntelliJ IDE, but not Gradle
- 1. Install Java
- 2. Install all SDK tools
- Download Android Studio and SDK Tools | Android Studio
- Download the official Android IDE and developer tools to build apps for Android phones, tablets, wearables, TVs, and…
- 3. Code the application
- How to use JavaMail on Android (without Gradle)
- Hello guys!
- 4. Build the code
- 5. Sign the package
- 6. Align the package
- 7. Test the application
- 8. Make a script
- Notes
Building the APK
Build yourself instead of download
AndroidAPS is not available as download due to regulation for medial devices. It is legal to build the app for your own use but you must not give a copy to others! See FAQ page for details.
Important notes
- Please use Android Studio Version 4.1.1 or newer to build the apk.
- Windows 10 32-bit systems are not supported by Android Studio 4.1.1.
Configuration on demand is not supported by the current version of the Android Gradle plugin!
If your build fails with an error regarding “on demand configuration” you can do the following:
- Open the Preferences window by clicking File > Settings (on Mac, Android Studio > Preferences).
- In the left pane, click Build, Execution, Deployment > Compiler.
- Uncheck the Configure on demand checkbox.
- Click Apply or OK.
Recommended specification of computer for building apk file
| OS(Only 64 bit) | Windows 8 or higher | Mac OS 10.14 or higher | Any Linux supports Gnome, KDE, or Unity DE; GNU C Library 2.31 or later |
|---|---|---|---|
| x86_64 CPU architecture; 2nd generation Intel Core or newer, or AMD CPU with support for a Windows Hypervisor | ARM-based chips, or 2nd generation Intel Core or newer with support for Hypervisor.Framework | x86_64 CPU architecture; 2nd generation Intel Core or newer, or AMD processor with support for AMD Virtualization (AMD-V) and SSSE3 | |
Please be in mind that both 64 bit CPU and 64 bit OS are mandatory condition. If your system DOES NOT meet this condition, you have to change affected hardware or software or the whole system. It is strongly recommended to use SSD(Solid State Disk) instead of HDD(Hard Disk Drive) because it will take less time when you are building the APS installation apk file. Recommended is just recommended and it is not a mandatory. However, you may still use a HDD when you are building apk file if you can spend a long time ALONE to complete the build.
This article is divided into two parts.В
- In the overview part there is an explanation on what steps are necessary to build the APK file.
- In the step by step walkthrough part you will find the screenshots of a concrete installation. Because the versions of Android Studio — the software development environment which we will use to build the APK — will change very quickly this will be not identical to your installation but it should give you a good starting point. Android Studio also runs on Windows, Mac OS X and Linux and there might be small differences in some aspects between each platform. If you find that something important is wrong or missing, please inform the facebook group “AndroidAPS users” or in the Discord chat Android APS so that we can have a look at this.
Overview
In general, the steps necessary to build the APK file:
Step by step walkthrough
Detailed description of the steps necessary to build the APK file.
Install git (if you don’t have it)В
Follow the manual on the git installation page .
Install Android Studio
The following screenshots have been taken from Android Studio Version 3.6.1. Your screen might look a bit different if you use a newer version of Android Studio. But you should be able to find your way through. Help from the community is provided.
One of the most important things when installing Android Studio: Be patient! During installation and setup Android Studio is downloading a lot of stuff which will take its time.
Install Android Studio and setup during first start.
Select “Do not import settings” as you have not used it before.

Decide whether you want to share data with Google or not.

On the following screen click “Next”.

Select “Standard” installation and click “Next”.

Select the theme for the user interface you like. (In this manual we used “Light”.) Then click “Next”. This is just the color scheme. You can select any you like (i.e. “Darcula” for dark mode). This selection has no influence on building the APK.

Click “Finish” on the “Verify Settings” dialog.

Wait while Android Studio downloads additional components and be patient. Once everything is downloaded button “Finish” turns blue. Click the button now.

Set git path in preferences
Make sure git is installed on your computer.
On the Android Studio welcome screen click the small triangle (1. in next screenshot) and select “Settings” (2.).

Windows
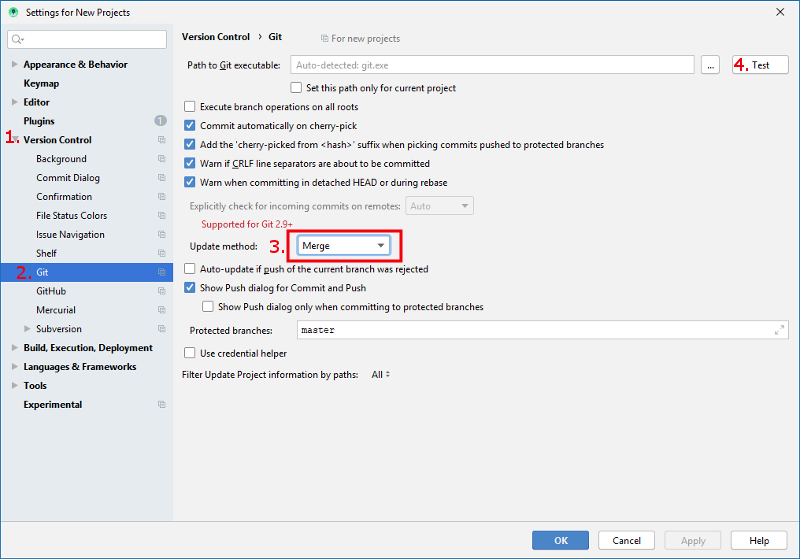
Click the small triangle next to Version Control (1.) to open the sub-menu.
Make sure update method “Merge” (3.) is selected.
Check if Android Studio can locate path to git.exe automatically by clicking the button “Test” (4.)
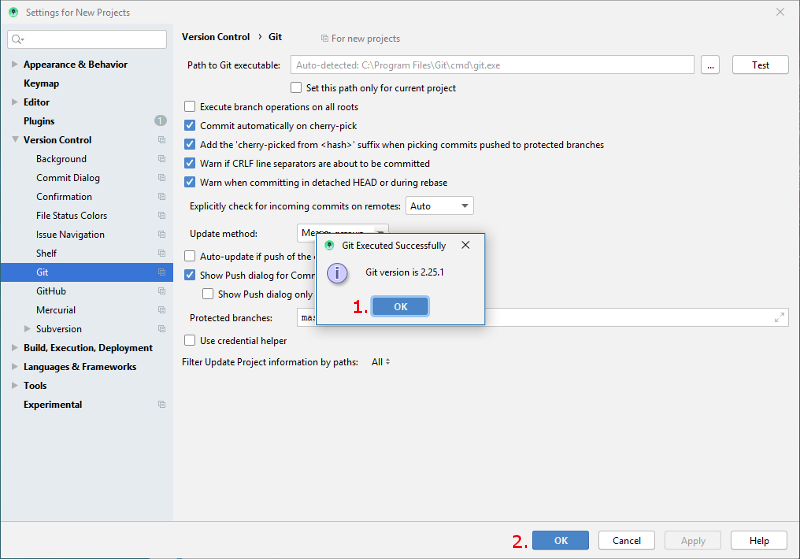
If automatic setting is successful git version will be displayed.
Click “OK” in the dialog box (1.) and “OK” in the settings window (2.).
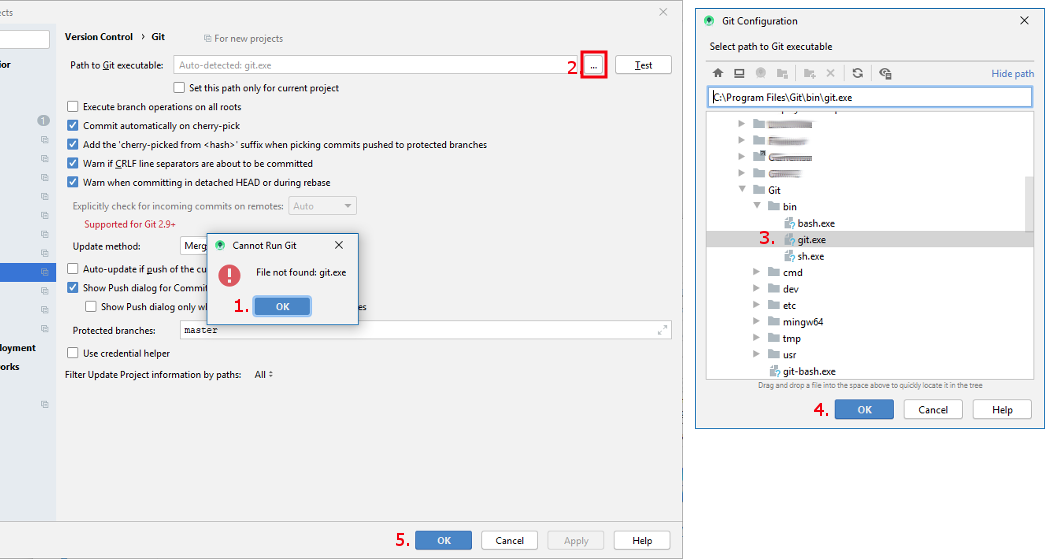
In case file git.exe cannot be found click “OK” in the dialog box (1.) and then the button with the three dots (2.).
Use search function in windows explorer to find “git.exe” if you are unsure where it can be found. You are looking for git.exe located in \bin\ folder.
Select path to git.exe and make sure you selected the one in ** \bin\ ** folder (3.) and click “OK” (4.).
Close settings window by clicking “OK” button (5.).
Reboot your computer to update system environment.
- Any git version should work. For example https://git-scm.com/download/mac.
- Use homebrew to install git: $ brew install git .
- For details on installing git see the official git documentation.
- If you install git via homebrew there is no need to change any preferences. Just in case: They can be found here: Android Studio — Preferences.
Download AndroidAPS code
If you haven’t already rebooted your computer after setting git path in preferences do it now. System environment must be updated.
There are two options to start a new project:
On the Android Studio welcome screen click “Get from version control”

If you already opened Android Studio and do not see the welcome screen anymore select File (1.) > New (2.) > Project from Version Control. (3.)

Fill in the URL to the main AndroidAPS repository (https://github.com/nightscout/AndroidAPS) (1.).
Choose the directory where you want to save the cloned code. (2.)
Click button “Clone” (3.).

Do not click “Background” while repository is cloned!

After repository is cloned successfully open your local copy by clicking “Yes”.

In the lower right corner you will see the information that Android Studio is running background tasks.

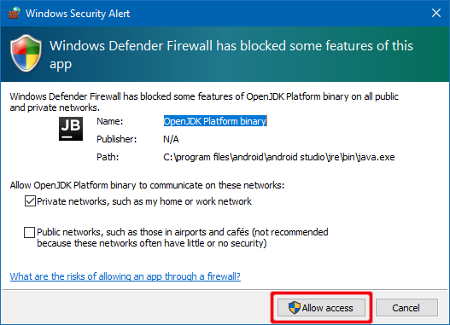
Grant access if your firewall is asking for permission.
Once the background tasks are finished you will probably see the following error message:

Download Android SDK
Click File > Settings.

Click the small triangle next to Appearance & Behaviour (1.).
Click the small triangle next to System Settings (2.) and select Android SDK (3.)
Check the box left of “Android 9.0 (Pie)” (4.) (API Level 28).

Confirm changes by clicking OK.

Accept licence agreement (1.) and click “Next” (2.).

Wait until installation is finished.

When SDK installation is completed the “Finish” button will turn blue. Click this button.

Android Studio might recommend to update the gradle system. Never update gradle! This might lead to difficulties!
If you see an information on the lower right side of your Android Studio window that Android Gradle Plugin is ready to update click on the text “update” (1.) and in the dialog box on “Don’t remind me again for this project” (2.).

Generate signed APK
Signing means that you indicate your app to be your own creation but in a digital way as a kind of digital fingerprint within the app itself. That is necessary because Android has a rule that it only accepts signed code to run for security reasons. For more information on this topic, follow this link.
Click “Build” in the menu bar and select “Generate Signed Bundle / APK. ”.

Select “APK” (1.) instead of “Android App Bundle” and click “Next” (2.).

Make sure that module is set to “app” (1.).
Click “Create new. ” (2.) to start creating your key store.
A key store in this case is nothing more than a file in which the information for signing is stored. It is encrypted and the information is secured with passwords.

Click the folder symbol (1.) to select your key store path.
Select the path where your key store shall be saved (2.). Do not save in same folder as project. You must use a different directory! One option might be your home folder.
Type a file name for your key store (3.).
Passwords for key store and key do not have to be very sophisticated. Make sure to remember those or make a note in a safe place. In case you will not remember your passwords in the future you see troubleshooting for lost key store.
Enter (5.) and confirm (6.) the password for your key store.
Do the same for your key (7. + 8.).
Validity (9.) is 25 years by default. You do not have to change the default value.
First and last name must be entered (10.). All other information is optional.
Click “OK” (11.) when you are done.

Make sure the box to remember passwords is checked (1.). So you don’t have to enter them again next time you build the apk (i.e. when updating to a new AndroidAPS version).

Select build variant “fullRelease” (1.).
Check boxes V1 and V2 for signature versions (2.).

Android Studio will display the information “APK(s) generated successfully. ” after build is finished.
In case build was not successful refer to the troubleshooting section .
Easiest way to find the apk is to click on “Event log”.
Источник
How to make Android apps without IDE from command line

Nov 26, 2017 · 5 min read
A HelloWorld without Android Studio
Update: I’ve made a new course that explain how you can avoid Android Studio and Gradle, but still use IntelliJ iDE:
How to do Android development faster without Gradle
IntelliJ IDE, but not Gradle
In this tutorial, I will show you how you can build/compile an APK (an A n droid app) from your java code using terminal (on Linux) without IDE or in other words without Android Studio. At the end, I will also show you a script to automate the process. In this example, I will use Android API 19 (4.4 Kitkat) to make a simple HelloWorld. I want to say that I will do this tutorial without android command which is deprecated.
1. Install Java
First, you need to install java, in my case, I install the headless version because I don’t use graphics (only command line):
2. Install all SDK tools
Then download the last SDK tools of Android which you can find here:
Download Android Studio and SDK Tools | Android Studio
Download the official Android IDE and developer tools to build apps for Android phones, tablets, wearables, TVs, and…
I recommend to unzip it in the /opt directory inside another directory that we will call “android-sdk”:
Now, we have to install platform tools (which contain ADB), an Android API and build tools.
In fact, if you are on Debian, you can avoid installing platform-tools package and only install ADB like that:
3. Code the application
In this example, I want to compile a simple HelloWorld. So, first, we need to make a project directory:
Then we have to make the files tree:
If you use exernal libraries (.jar files), also make a folder for them:
You have an example here:
How to use JavaMail on Android (without Gradle)
Hello guys!
Make the file src/com/example/helloandroid/MainActivity.java and put that inside:
Make the strings.xml file in the res/values folder. It contains all the text that your application uses:
The activity_main.xml is a layout file which have to be in res/layout:
You also have to add the file AndroidManifest.xml at the root:
4. Build the code
Now, I recommend to store the project path in a variable:
First, we need generate the R.java file which is necessary for our code:
- -m instructs aapt to create directories under the location specified by -J
- -J specifies where the output goes. Saying -J src will create a file like src/com/example/helloandroid/R.java
- -S specifies where is the res directory with the drawables, layouts, etc.
- -I tells aapt where the android.jar is. You can find yours in a location like android-sdk/platforms/android-/android.jar
Now, we have to compile the .java files:
If you have use an external, add it the classpath:
The compiled .class files are in obj folder, but Android can’t read them. We have to translate them in a file called “classes.dex” which will be read by the dalvik Android runtime:
But if you use external libraries, do rather:
If you have the error UNEXPECTED TOP-LEVEL EXCEPTION , it can be because you use old build tools and DX try to translate java 1.7 rather than 1.8. To solve the problem, you have to specify 1.7 java version in the previous javac command:
The -source option specify the java version of your source files. Note that we can use previous versions of Java even we use OpenJDK 8 (or 1.8).
We can now put everything in an APK:
Be aware: until now, we used three AAPT commands, the first and the second one are similar but they don’t do the same. You have to copy the classes.dex file at the root of project like above! Otherwise, AAPT won’t put this file at right place in the APK archive (because an APK is like a .zip file).
The generated package can’t be installed by Android because it’s unaligned and unsigned.
If you want, you can check the content of the package like this:
5. Sign the package
To do so, we firstly create a new keystore with the command keytool given by Java:
Just answer the questions and put a password.
You can sign an APK like this:
Note that apksigner only exist since Build Tools 24.0.3.
6. Align the package
It’s as simple as that:
Alignment increase the performance of the application and may reduce memory use.
7. Test the application
To test the application, connect your smartphone with a USB cable and use ADB:
But before run this command, I recommend to run this one:
If there is an error during installation or running, you see it with that command.
Voila! Here’s the result:

8. Make a script
If you don’t want to run all these steps every time you would like to compile your app, make a script! Here’s mine:
Notes
- You can remove “test” if you just want to compile without testing.
- This script only compile and run the app on the phone. But I can also make a script to automatically generate a new project like this one. I think I have a good idea to do so, but I need to know if you are interested. If it’s the case, please leave a comment or send me an e-mail.
- I can also complete the script for external libraries. Likewise, let me know if you want this.
If you have any questions, don’t hesitate to ask them below or by e-mail ;-)! EDIT: Well I’m very busy actually…
Источник


