- Qt Documentation
- Contents
- Requirements
- Specifying Android Device Settings
- Manual Setup
- Viewing Android Tool Chain Settings
- Managing Android NDK Packages
- Managing Android SDK Packages
- Managing Android Virtual Devices (AVD)
- Creating a New AVD
- Debugging on Android Devices
- Android SDK Setup
- 1. Download the Android SDK
- 2. Install the Android SDK
- 3. Enable USB debugging on your device
- 4. Connect your Android device to the SDK
- 5. Add the Android SDK path to Unity
- Android Debug Bridge (ADB) Connect to Device over USB, WiFi
- What is Android Debug Bridge (ADB)?
- USB debugging and ADB Configuration-
- How to Connect to an Emulator
- How to Connect Android Device with ADB (Android Debug Bridge)
- How to Configuring ADB for Wi-Fi Support
Qt Documentation
Contents
You can connect Android devices to the development PC using USB cables to build, run, debug, and analyze applications from Qt Creator. Devices with Android version 4.1 (API level 16) or later are supported when developing with Qt 5 and devices with Android version 6.0 (API level 23) when developing with Qt 6.
To develop for Android, you must have a tool chain for building applications for Android devices installed on the development PC. Qt Creator can automatically dowload and install the tool chain and create a suitable build and run kit that contains the tool chain and the Qt version for Android for the device’s architecture.
Starting from Qt 5.14.0, the Qt for Android package contains all the architectures (ABIs) installed as one.
To enable helpful code editing features for Java, such as code completion, highlighting, function tooltips, and navigating in code, specify settings for a Java language server.
The Android Debug Bridge (adb) command line tool is integrated to Qt Creator to enable you to deploy applications to connected Android devices, to run them, and to read their logs. It includes a client and server that run on the development host and a daemon that runs on the emulator or device.
Requirements
To use Qt Creator to develop Qt applications for Android, you need Qt for Android 5.2, or later, and the tool chain that Qt Creator can automatically download, install, and configure for you. For more information, see Installing the Prerequisites.
Specifying Android Device Settings
Qt Creator offers to automatically install all the necessary packages and tools and to set up your development environment by creating debuggers, tool chains, and kits. You can use Qt Creator to:
- Download and extract the Android SDK Command-line Tools.
- Install or update the essential packages such as NDKs, build tools, and platform tools.
To set up the development environment for Android:
- Select Tools >Options >Devices >Android on Windows and Linux or Qt Creator >Preferences >Devices >Android on macOS.
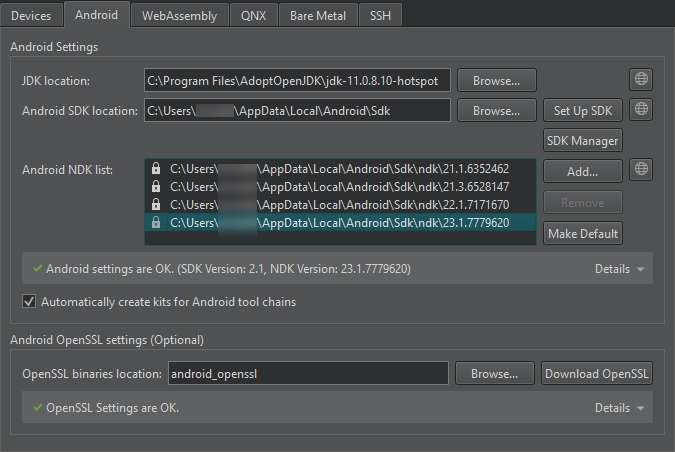
In the JDK location field, set the path to the JDK. Qt Creator checks the JDK installation and reports errors.
By default, Qt Creator tries to find a supported AdoptOpenJDK or OpenJDK installation. If none is found, you must set the path manually. If you don’t have a supported JDK installed, select  to open the JDK download web page in the default browser.
Note: We recommended using a 64-bit JDK, because the 32-bit one might cause issues with cmdline-tools , and some packages might not be listed.
The SDK Manager checks whether the tool chain is installed. If packages are missing or updates are needed, the SDK Manager offers to add or remove those packages. Before taking action, it prompts you to accept the changes it is about to make. In addition, it prompts you to accept Google licenses, as necessary.
For Qt applications that require OpenSSL support, Qt Creator allows to quickly add the Android OpenSSL support to your project. For more information, see Adding External Libraries.
Manual Setup
Note: We recommend that you use the latest Android SDK Command-Line Tools. Using Android SDK Tools version 25.2.5 or earlier is not supported, because they cannot be fully integrated with Qt Creator.
However, if the automatic setup does not meet your needs, you can download and install Android SDK Command-line Tools, and then install or update the NDKs, tools and packages needed for development. For more information, see Getting Started with Qt for Android.
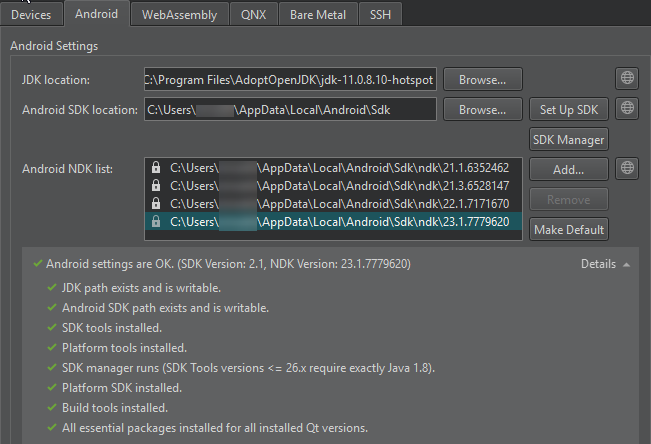
Viewing Android Tool Chain Settings
The Android SDK Command-Line Tools download URL, the essential packages list, and the appropriate NDK for each Qt version are defined in a JSON configuration file. The file is located under the user’s Qt Creator resource folder:
For example, the SDK configuration file defines the NDK version 19.2.5345600 to be used for Qt 5.12.0 to 5.12.5 and Qt 5.13.0 to 5.13.1 versions:
You can view the latest version of the configuration file that is up-to-date with the Android SDK and NDK changes, sdk_definitions.json, in Git.
Managing Android NDK Packages
To view the installed Android NDK versions, select Tools > Options > Devices > Android on Windows and Linux or Qt Creator > Preferences > Devices > Android on macOS.
The locked versions were installed by the SDK Manager, and can only be modified from the SDK Manager tab. For more information, see Managing Android SDK Packages.
To manually download NDKs, select .
To add custom NDK paths manually to the global list of NDKs, select Add. This creates custom tool chains and debuggers associated to that NDK. However, you have to manually create a kit that uses the custom NDK. For more information, see Adding Kits.
Managing Android SDK Packages
Since Android SDK Tools version 25.3.0, only a command-line tool, sdkmanager, is provided by Android for SDK package management. To make SDK management easier, Qt Creator provides an SDK Manager for installing, updating, and removing SDK packages. You can still use sdkmanager for advanced SDK management.
To view the installed Android SDK packages, select Tools > Options > Devices > Android > SDK Manager on Windows and Linux or Qt Creator > Preferences > Devices > Android > SDK Manager on macOS.

To filter the packages, select Available, Installed, or All in Show Packages.
To update the installed Android SDK packages, select Update Installed. Select the packages to update, and then select Apply.
To specify advanced sdkmanager settings, select Advanced Options and enter arguments in the SDK Manager arguments field. The available arguments are listed and described in Available arguments.
Managing Android Virtual Devices (AVD)
The available AVDs are listed in Tools > Options > Devices on Windows and Linux or Qt Creator > Preferences > Devices > on macOS. You can add more AVDs.

You can see the status of the selected device in Current state. To update the status information, select Refresh.
To start an AVD, select Start AVD. Usually, you don’t need to start AVDs separately because they are automatically started when you select them in the kit selector to deploy applications to them.
To remove an AVD from the list and the kit selector, select Erase AVD.
To specify options for starting an AVD, select AVD Arguments.
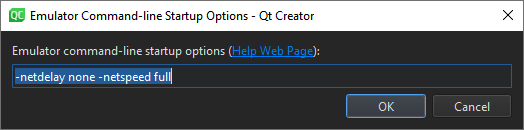
Specify the options in Emulator command-line startup options. For available options, see Start the emulator from the command line.
Note: The Android Emulator has a bug that prevents it from starting on some systems. If an AVD does not start, you can try starting it manually by running the following commands:
Creating a New AVD
To create new virtual devices:
- Select Tools >Options >Devices >Add >Android Device on Windows and Linux or Qt Creator >Preferences >Devices >Add >Android Device on macOS to open the Create New AVD dialog.
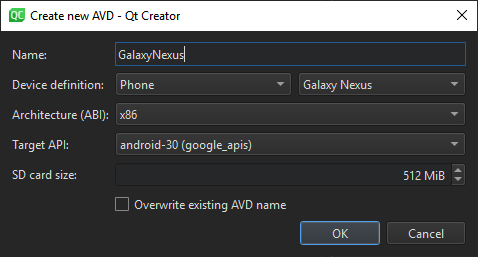
For more advanced options for creating a new AVD, use the command-line tool avdmanager or the Android Studio’s native AVD Manager UI.
Debugging on Android Devices
Debugging is enabled in different ways on different Android devices. Look for USB Debugging under Developer Options. On some devices Developer Options is hidden and becomes visible only when you tap the Build number field in Settings > About several times. For more information, see Configure on-device developer options.
Select a debug build configuration to build the application for debugging.
Note: Qt Creator cannot debug applications on Android devices if Android Studio is running. If the following message is displayed in the Output pane, close Android Studio and try again:
В© 2021 The Qt Company Ltd. Documentation contributions included herein are the copyrights of their respective owners. The documentation provided herein is licensed under the terms of the GNU Free Documentation License version 1.3 as published by the Free Software Foundation. Qt and respective logos are trademarks of The Qt Company Ltd in Finland and/or other countries worldwide. All other trademarks are property of their respective owners.
Источник
Android SDK Setup
Whether you’re building an Android application in Unity or programming it from scratch, you need to set up the Android SDK (software development kit) before you can build and run any code on your Android device.
1. Download the Android SDK
On your PC, go to the Android Developer SDK website. Download and unpack the latest Android SDK.
2. Install the Android SDK
Follow the instructions in Installing the SDK. You can skip the optional sections relating to Eclipse. In step 4 of Installing the SDK, be sure to add at least one Android platform with API level equal to or higher than 9 (Platform 2.3 or greater), the Platform Tools, and the USB drivers if you’re using Windows.
3. Enable USB debugging on your device
USB debugging is a useful way to debug while connecting your Android device to the SDK, so get this set up before moving on to the next step.
To enable USB debugging, you first need to enable Developer options. To do this, navigate your phone to the “Build number” portion in your device’s Settings. Finding it can be different depending on the device:
- Stock Android: Settings >About phone >Build number
- Samsung Galaxy S5: Settings >About device >Build number
- LG G3: Settings >About phone >Software information >Build number
- HTC One (M8): Settings >About >Software information >More >Build number
Note: On operating systems older than version 4.2 (Jelly Bean), the Developer options aren’t hidden. Go to Settings > Developer options, then enable USB debugging.
Navigate to Build number using the instructions above. Tap on the build number 7 times. A small pop-up notification appears saying “you are now X steps away from being a developer” with a number that counts down with every additional tap. On the 7th tap, Developer options are unlocked. Go to Settings > Developer options, and check the USB debugging checkbox to enable debug mode when the device is connected to a computer via USB.
4. Connect your Android device to the SDK
This can be tricky, especially under Windows-based systems where drivers tend to be a problem. Your device may come with additional information or specific drivers from the manufacturer.
- Windows: If the Android device is automatically recognized by the system you still might need to update the drivers with the ones that came with the Android SDK. You can do this through the Windows Device Manager. If the device is not recognized automatically, use the drivers from the Android SDK, or any specific drivers provided by the manufacturer. Find further information regarding USB Drivers for Windows on the Android Developer page.
- Mac: If you’re developing on macOS, you usually don’t need any additional drivers.
If you are unsure whether your device is properly installed on your system, please read the Android development troubleshooting page for details.
5. Add the Android SDK path to Unity
The first time you build a project for Android (or if Unity later fails to locate the SDK), you will be asked to locate the folder where you installed the Android SDK. Select the root folder of the SDK installation. If you wish to change the location of the Android SDK, in the menu bar go to Unity > Preferences, then click External Tools.
Источник
Android Debug Bridge (ADB) Connect to Device over USB, WiFi
Updated October 7, 2021
What is Android Debug Bridge (ADB)?
Android Debug Bridge (ADB) is a command-line tool that allows you to communicate with a device. It is used to bridge communication between an emulator instance (Android device) and the background running daemon process (server). It helps you perform different actions like installing or debugging a device and run various commands on a device by providing access to a Unix shell.
Using any real device for mobile automation Testing has always been a challenge for testers. But, Android offers a handful of solutions to connect a real device over USB (Universal Serial Bus), i.e., Android Debug Bridge (ADB).
In this tutorial, you will learn-
USB debugging and ADB Configuration-
APPIUM offers an advantage to execute test on real devices. But prior to run the test, we need to setup following pre-requisite.
- USB debugging should be enabled
- ADB configuration
- Desired capability setup as per the hardware changes.
Here we will see both, connecting to emulator as well as with real device for testing. See steps below for connecting to an emulator.
How to Connect to an Emulator
Pre-Requisite- SDK (Software Development Kit) should be installed on the machine. ADB in Android is packaged with Google’s Android SDK (Software Development Kit).
Steps to enable ADB from SDK Manager.
Step 1) Open Android SDK folder
Step 2) Double click on SDK Manager
Step 3) From the list of all packages select Tools and mark the checkbox for
- Android SDK Tools and
- Android SDK Platform-tools.

How to Connect Android Device with ADB (Android Debug Bridge)
Step 1) Enable USB Debugging on your device
Enable USB debugging option from ‘Developer Option’ in Android phone. Now, connect your Android device to the computer using USB cable.

Step 2) Go to the Android SDK folder
Open the local folder where Android SDK files has been saved ‘Android SDK >> Platform-tools’ eg: C:\android-sdk\platform-tools

Step 3) Open the Command window
Inside folder hold Shift + Right click menu >> Select ‘Open command window here’ option.
It will open the folder using command prompt.
Note– you can also open the folder path directly from the Run command in command prompt.

This command window will directly open the folder in command prompt window.

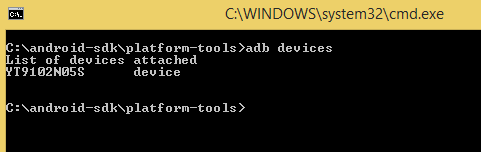
Step 4) Connect an external Android device
Now, prior to check the device, user have to connect an external Android device (mobile phone). To connect use the device USB cable connector to the system. Then in above command prompt type command-
It will display all list of all the connected devices.
But, prior to this we should check that ADB server. Check whether it is running as background process or not. Just open the command prompt from above mentioned procedure and write ‘adb’ and press enter. It should display all the adb’s process running.
When server starts, it always bind the local TCP port 5037. All ADB clients listen to 5037 TCP port to communicate with server request.
Now, the running ADB server can scan all connected emulator or device instances by scanning the port.
Always remember that ADB daemon runs on odd numbered port between the ranges of 5555 to 5558.
ADB daemon process runs with console connection that acquires even number port for connection.
For example: If single device connected then server automatically scan the device and get connected but if multiple device or emulator running the user need to give ADB connect to device USB command line instruction to connect.
The emulator instance connected on odd numbered port 5557 has the same console running over even numbered 5556 port ie. Each running devices has 1 odd and 1 even connected port.
Command to detect all connected device –
Command detecting a single device from multiple connected devices-
It will detect the adb connection for device -5554 and install the application.
So, this way user can set up a successful connection to access ADB USB connect instances using ADB commands.
How to Configuring ADB for Wi-Fi Support
Just like configuring ADB connect USB, user can also configure ADB over wi-fi.
Pre-requisite
- Both Android device and the host computer should be connected to same wireless network and
- Device Bluetooth option should disabled.
Steps to connect-
- Connect device using USB cable to the host computer. Confirm USB debugging is enabled in device.
- Set target device to connect TCP/IP on port 5555

- Now, disconnect the USB cable from the device.
- In Android device find the IP address from Settings >> wi-fi Setting >> Advanced >> IP Address.Use the same Android Debug Bridge IP address to connect the device via ADB connect device USB connection
Hence, the final configuration done and ‘adb’ successfully configured over wireless network.
NOTE- If any connection error occurred just reset or kill the adb host connection. For that use following command
Источник


