- Android sdk create virtual device
- Установка Intel HAXM
- Размеры и разрешение экрана
- Создание виртуального устройства
- Managing Virtual Devices with the Android Device Manager
- Android Device Manager on Windows
- Requirements
- Launching the Device Manager
- Main Screen
- New Device
- Edit Device
- Additional Options
- Android Device Manager on macOS
- Requirements
- Launching the Device Manager
- Main Screen
- New Device
- Edit Device
- Additional Options
- Troubleshooting
- Android SDK in Non-Standard Location
- Wrong Version of Android SDK Tools
- Snapshot disables WiFi on Android Oreo
- Wrong Version of Android SDK Tools
- Snapshot disables WiFi on Android Oreo
- Generating a Bug Report
- Summary
- Related Links
- Related Video
Android sdk create virtual device
 Виртуальное устройство Android (Android Virtual Device, AVD) позволяет разработчику тестировать свои приложения, не имея под рукой телефона с Android. Можно создавать несколько эмуляторов – устройств AVD, с различными видами конфигурации, чтобы эмулировать различные типы реальных телефонов.
Стандартный эмулятор работает достаточно медленно. Если на Вашем ПК установлен процессор Intel с поддержкой технологии виртуализации VT-x (Intel Virtualization Techology for x86 VT-x) (данные параметры устанавливаются в BIOS), то достаточно просто можно повысить его производительность. Для этого необходимо с помощью SDK Manager инсталлировать следующие пакеты:
- Intel x86 Atom System Image
- Intel x86 Emulator Accelerator (HAXM)

Образ Intel x86 Atom System Image будет доступен при создании и настройке конкретного эмулятора.

Далее необходимо установить пакет Intel x86 Emulator Accelerator (HAXM). Он находится здесь \sdk\extras\intel\Hardware_Accelerated_Execution_Manager.
Установка Intel HAXM
В процессе установки вам предложат определить объем выделяемой оперативной памяти. Вы можете оставить значение, предложенное по умолчанию. Если в процессе работы вы захотите изменить это значение – запустите установку еще раз.

Если режим не включен или не поддерживается, то появится окно сообщения:

В этом случае проверьте настройки в BIOS, возможно виртуализация поддерживается вашей системой, но по умолчанию отключена.
Размеры и разрешение экрана
Общие сведения о размерах и разрешении экранов нам понадобятся при создании виртуального устройства. Приведем основные сведения.
Существует 4 диапазона размеров экранов:
small — QVGA (320×426 dp)
normal — HVGA (320×470 dp)
large — VGA (480×640 dp)
xlarge — HVGA (720×960 dp), доступно с API 9 (Android 2.3)
и следующие диапазоны плотностей экранов:
| Плотность пикселей на дюйм | Соотношение dp к px |
| ldpi — 120dpi | 1 dp = 3/4 px |
| mdpi — 160dpi | 1 dp = 1 px |
| hdpi — 240dpi | 1 dp = 1.5 px |
| xdpi — 320dpi | 1 dp = 2 px |
| xxdpi — 480dpi (с API 16, Android 4.1) | 1 dp = 3 px |
| xxxdpi — 640dpi (с API 18, Android 4.3) | 1 dp = 4 px |
| nodpi — «как есть» | |
| tvdpi — 1.33 * mdpi | 1 dp = 1.33 px |
Вот несколько примеров:
- QVGA (Quarter Video Graphics Array) 240×320 dp – низкая плотность, размер 2-3,5″;
- WQVGA (Wide Quarter Video Graphics Array) 240×400 dp – низкая плотность, размер 2-3,5″;
- HVGA (Half Video Graphics Array) 320×480 dp – средняя плотность, размер 3-4″;
- WVGA800 (Wide Video Graphics Array) 480×800 dp) –высокая плотность, размер 4-7″;
- WVGA854 (Wide Video Graphics Array) 480×854 dp) –высокая плотность, размер 4-7″;
Создание виртуального устройства
После установки образа эмулятора Android для x86 необходимо создать новое виртуальное устройство с помощью Android Virtual Device Manager. Для этого:
- Запускаем ADV Manager. Меню Tools|Android|AVD Manager.
Примечание. Если запустить ADV Manager из папки установки SDK, то появится более простое и знакомое диалоговое окно по IDE Eclipse. - Выбираем создание устройства «+Create Virtual Device«


На этом экране из возможных типов эмуляторов мобильных устройств выбираем тип Phone и переходим к выбору эмулятора модели телефона.
В начале разработки приложения, как правило, наиболее важным параметром эмулятора является скорость его работы, поэтому следует выбрать достаточно простой и быстрый эмулятор. На последующих этапах разработки приложения можно перейти на эмулятор, который наиболее точно моделирует работу реального устройства или использовать реальное устройство. В этой связи для учебных целей выбираем устройство: Nexus One (3.7” 480×800 hdpi) или Nexus S(4.0″480×800 hdpi). Эти эмуляторы требует немного оперативной памяти (500 mb и 375 mb) и поэтому достаточно быстро работают. Следует помнить, что «крутой эмулятор» потребует большие ресурсы ПК, что приводит к медленной его работе, а иногда он может просто не запуститься.
Далее жмём кнопку «Next» и переходим на экран, предлагающий выбрать версию операционной системы для эмулятора.

У Google издавна сложилась традиция называть разрабатываемые версии операционных систем тремя словами:
KitKat — Key Lime Pie(Лаймовый Пирог)
Lollipop — Lemon Meringue Pie(Лимонный Пирог Безе)
MNC — Macadamia Nut Cookie (Печенье из Ореха Макадамия).

Поскольку на ПК, на котором будет запускаться эмулятор, установлен процессор Intel с поддержкой технологии виртуализации VT и используется ОС Windows 7 x86, то выбираем Lollipop уровень API 22, ABI x86, целевая версия Android 5.1.1.
ABI — двоичный интерфейс приложения (Application binary interface)- это образ аппаратной части выбираемой аппаратной платформы создаваемого виртуального устройства. Здесь как раз и следует выбирать x86 образ, который был установлен нами ранее.
Target — целевая версия Android это версия API, на которую ориентировано приложение. Выберем самую новую.
Лучше всегда использовать более новую версию потому, что она содержит более новую версию компилятора и дополнительные проверки, позволяющие в автоматическом режиме находить часто встречающие ошибки. Кроме того:
- использование самой последней версии гарантирует, что у нас корректный и оптимальный код.
- это нас ни как не ограничивает, чтобы поддерживать более старые версии платформы в готовом приложении.
Если необходима поддержка более старых версий, то необходимо перед созданием виртуального устройства скачать и установить соответствующие пакеты (точно так же как описана установка примеров из SDK приведенная выше).
Если мы ошибочно выберем образ системы, который нами не установлен, то будет выдано соответствующее предупреждение : Consider using an x86 system image for better emulator performance (рассмотрите использование образа системы x86 для повышения производительности эмулятора). Соответствующий экран представлен ниже.

Переходим к следующему экрану. Здесь при необходимости можно внести изменения в характеристики создаваемого виртуального устройства.


Обратим внимание на следующие параметры:
AVD Name — Имя устройства. Можно задать какое нравится, рекомендую указывать что-то простое, на латинице, без пробелов, например, имя устройства и номер AIP: Nexus_S_API22.
Startup size and orientation
Scale – позволяет изменить размер эмулятора на экране монитора.
Orientation — позволяет задать книжную или альбомную ориентацию
Emulated performance — производительность эмулятора.
Use Host GPU — использование аппаратного ускорения графики при работе эмулятора. Рекомендуется включить данную опцию — так графика в эмуляторе будет работать быстрее.
Snapshot — снимок системы — при включении этой опции эмулятор виртуального устройства будет сохранять свое состояние при рестарте, т.е. после включения (загрузки) получаем устройство в том же состоянии как перед выключением (выгрузкой) эмулятора. Данную опцию пока трогать не будем, оставим ее в выключенном состоянии.
Camera — камера
Front Back — включение эмуляции камер (фронтальной и основной), при желании можно вывести через них картинку с web-камеры. Оставим значения по умолчанию — None, так как в простых учебных примерах камеры практически не применяются, а «боевые» приложения, использующие «сложные» аппаратные возможности надежнее отлаживать на реальных устройствах.
Memory and Storage — опции памяти и внутреннего хранилища.
Здесь указывается, сколько оперативной (RAM) памяти будет доступно в эмуляторе, а так же размер VM Heap — количество доступной памяти для одного экземпляра приложения. Рекомендуется эти значения указывать исходя из ресурсов реальных устройств, поэтому оставим значения по умолчанию (512 и 32). Однако, при увеличении этих параметров приложение в эмуляторе будет работать быстрее, но следует помнить что вы разрабатываете приложение для реального устройства, где объем оперативной памяти жестко задан производителем устройства и поменять его невозможно.
Internal Storage — внутреннее хранилище. Здесь указывается объем внутреннего устройство хранения, опять таки — указывайте значение, которое возможно на реальном устройстве.
SD Card — SD карта. Здесь, если требуется, можно указать параметры используемой виртуальной SD карты памяти (которые используются на реальных устройствах повсеместно, для расширения внутреннего хранилища). Оставим поле Size (размер) пустым — пока что не будем использовать SD карту. Для удобства программиста здесь же можно указать готовый образ SD карты в файле, если такая необходимость есть.
Frame Frame – имитировать ли внешний вид реального устройства.
Skin — скин эмулятора. Включение отображения аппаратных элементов управления в окне эмулятора (hardware buttons). Так же воспользуемся данным пунктом, что бы видеть кнопки устройства в окне эмулятора.
Keyboard — клавиатура. Включение представления аппаратной клавиатуры (hardware keyboard). Воспользуемся данным пунктом.

Теперь осталось запустить и проверить все ли настроено верно. Выбираем созданный эмулятор и запускаем его кнопкой «Start”.

Далее идем в настройки и выполняем следующие действия:
- Устанавливаем русский язык
- Проверяем работает ли эмулятор в режиме поддержки технологии виртуализации ( образ x86)
Если все было сделано правильно, то для нашего примера, в поле «Модель» мы увидим строку «Android SDK Build for x86«.
Источник
Managing Virtual Devices with the Android Device Manager
This article explains how to use the Android Device Manager to create and configure Android Virtual Devices (AVDs) that emulate physical Android devices. You can use these virtual devices to run and test your app without having to rely on a physical device.
After you have verified that hardware acceleration is enabled (as described in Hardware Acceleration for Emulator Performance), the next step is to use the Android Device Manager (also referred to as the Xamarin Android Device Manager) to create virtual devices that you can use to test and debug your app.
Android Device Manager on Windows
This article explains how to use the Android Device Manager to create, duplicate, customize, and launch Android virtual devices.
You use the Android Device Manager to create and configure Android Virtual Devices (AVDs) that run in the Android Emulator. Each AVD is an emulator configuration that simulates a physical Android device. This makes it possible to run and test your app in a variety of configurations that simulate different physical Android devices.
Requirements
To use the Android Device Manager, you will need the following items:
Visual Studio 2019 Community, Professional, or Enterprise.
OR Visual Studio 2017 version 15.8 or later is required. Visual Studio Community, Professional, and Enterprise editions are supported.
Visual Studio Tools for Xamarin version 4.9 or later.
The Android SDK must be installed (see Setting up the Android SDK for Xamarin.Android). Be sure to install the Android SDK at its default location if it is not already installed: C:\Program Files (x86)\Android\android-sdk.
The following packages must be installed (via the Android SDK Manager):
- Android SDK Tools version 26.1.1 or later
- Android SDK Platform-Tools 27.0.1 or later
- Android SDK Build-Tools 27.0.3 or later
- Android Emulator 27.2.7 or later.
These packages should be displayed with Installed status as seen in the following screenshot:

Launching the Device Manager
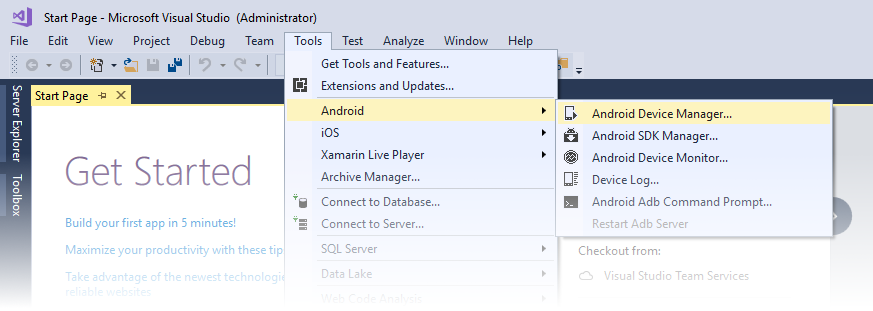
Launch the Android Device Manager from the Tools menu by clicking Tools > Android > Android Device Manager:
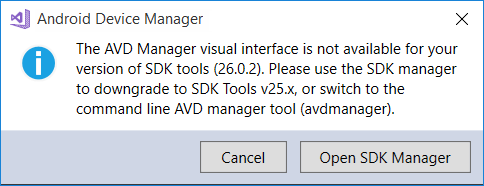
If the following error dialog is presented on launch, see the Troubleshooting section for workaround instructions:
Main Screen
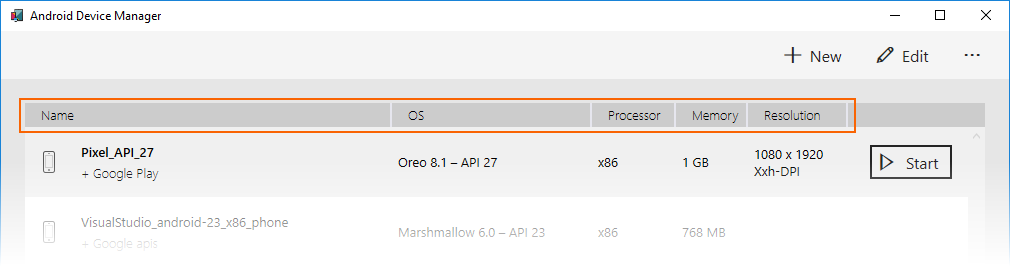
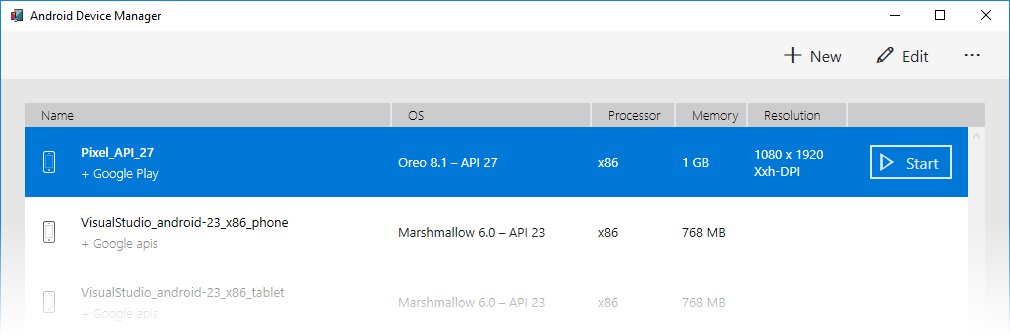
When you first launch the Android Device Manager, it presents a screen that displays all currently-configured virtual devices. For each virtual device, the Name, OS (Android Version), Processor, Memory size, and screen Resolution are displayed:
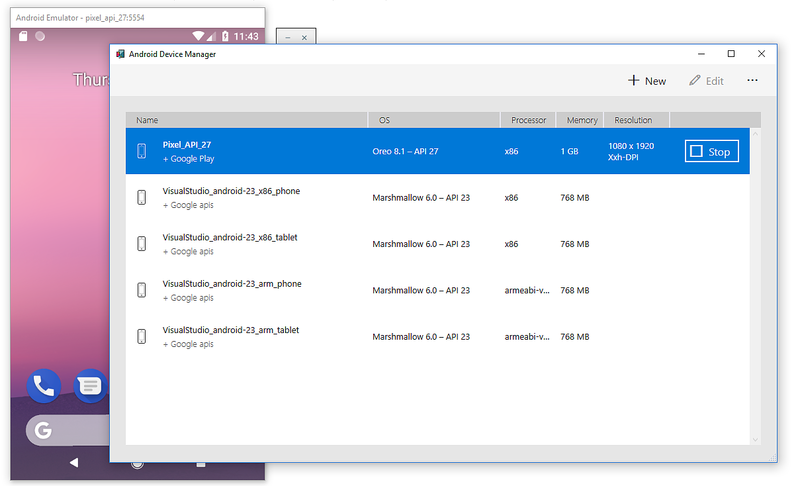
When you select a device in the list, the Start button appears on the right. You can click the Start button to launch the emulator with this virtual device:
After the emulator starts with the selected virtual device, the Start button changes to a Stop button that you can use to halt the emulator:
New Device
To create a new device, click the New button (located in the upper right-hand area of the screen):
Clicking New launches the New Device screen:
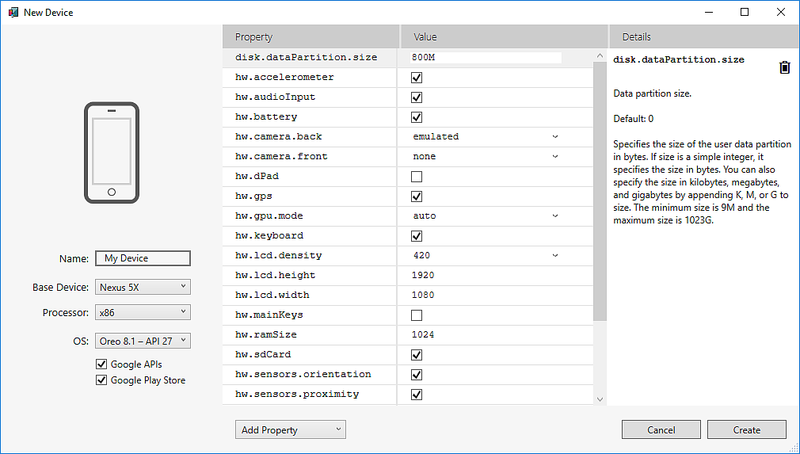
To configure a new device in the New Device screen, use the following steps:
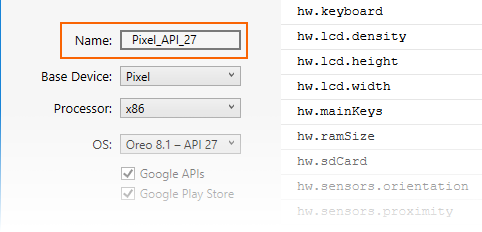
Give the device a new name. In the following example, the new device is named Pixel_API_27:
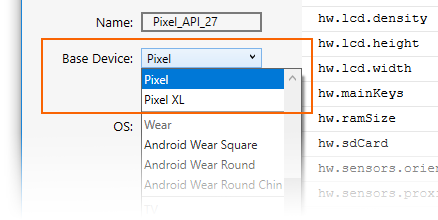
Select a physical device to emulate by clicking the Base Device pull-down menu:
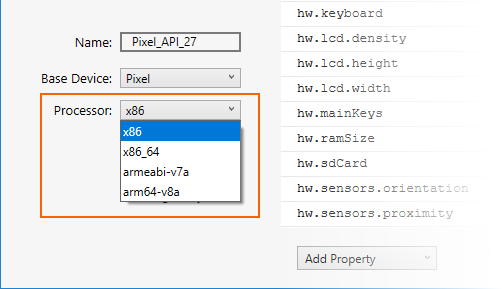
Select a processor type for this virtual device by clicking the Processor pull-down menu. Selecting x86 will provide the best performance because it enables the emulator to take advantage of hardware acceleration. The x86_64 option will also make use of hardware acceleration, but it runs slightly slower than x86 (x86_64 is normally used for testing 64-bit apps):
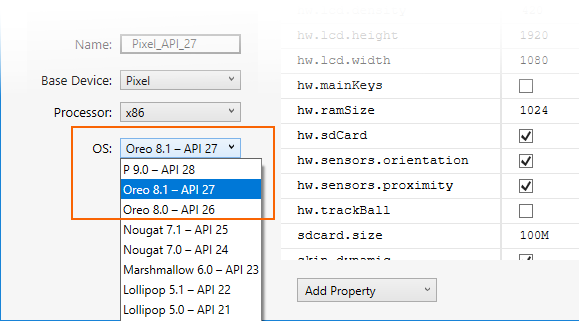
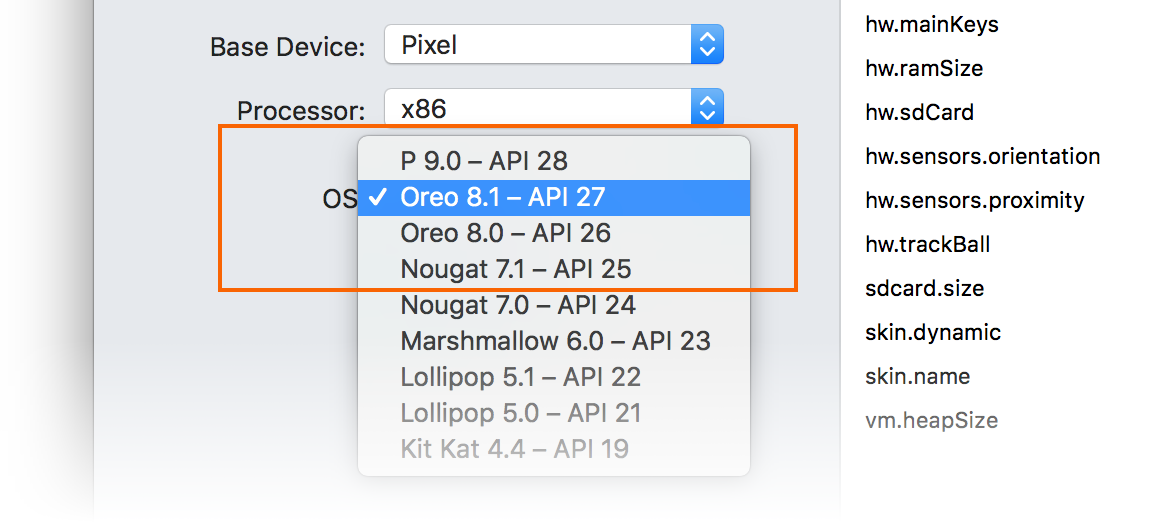
Select the Android version (API level) by clicking the OS pull-down menu. For example, select Oreo 8.1 — API 27 to create a virtual device for API level 27:
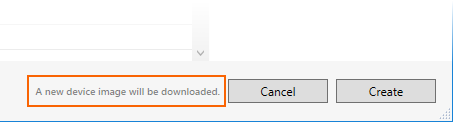
If you select an Android API level that has not yet been installed, the Device Manager will display A new device will be downloaded message at the bottom of the screen – it will download and install the necessary files as it creates the new virtual device:
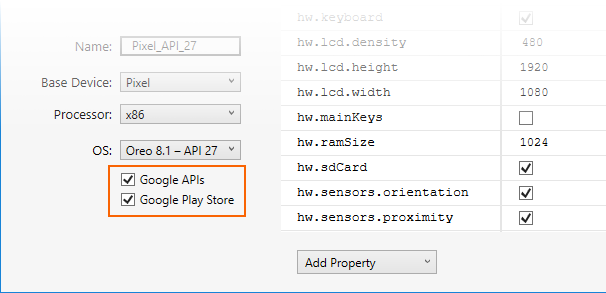
If you want to include Google Play Services APIs in your virtual device, enable the Google APIs option. To include the Google Play Store app, enable the Google Play Store option:
Note that Google Play Store images are available only for some base device types such as Pixel, Pixel 2, Nexus 5, and Nexus 5X.
Edit any properties that you need to modify. To make changes to properties, see Editing Android Virtual Device Properties.
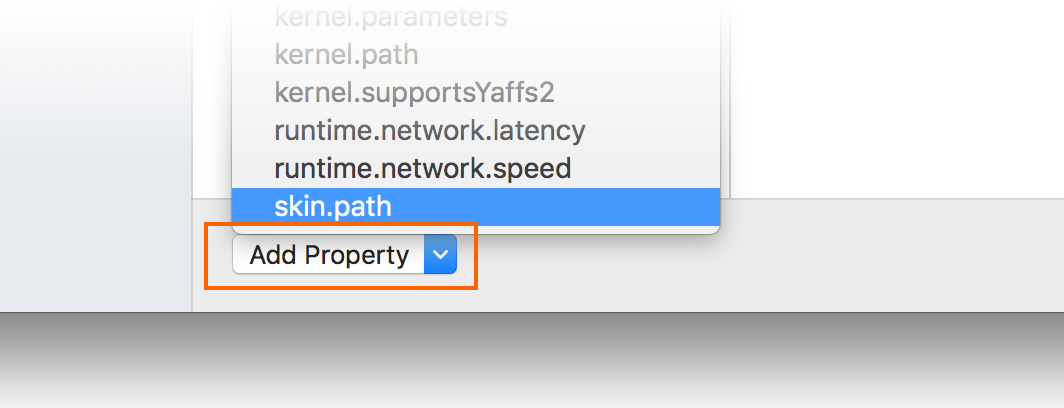
Add any additional properties that you need to explicitly set. The New Device screen lists only the most commonly-modified properties, but you can click the Add Property pull-down menu (at the bottom) to add additional properties:
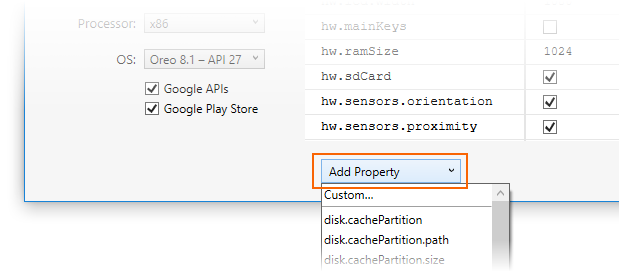
You can also define a custom property by selecting Custom. at the top of the property list.
Click the Create button (lower right-hand corner) to create the new device:
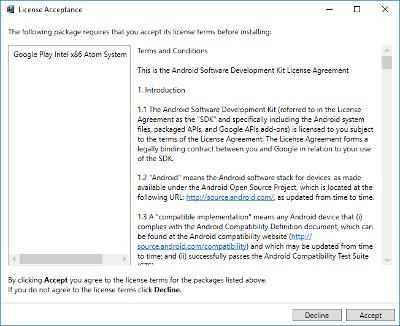
You might get a License Acceptance screen. Click Accept if you agree to the license terms:
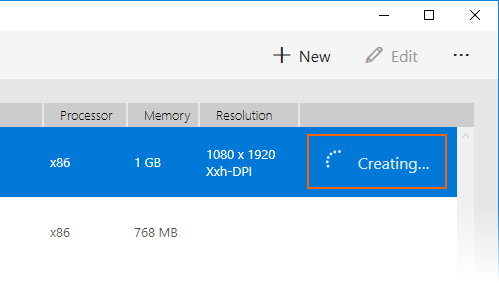
The Android Device Manager adds the new device to the list of installed virtual devices while displaying a Creating progress indicator during device creation:
When the creation process is complete, the new device is shown in the list of installed virtual devices with a Start button, ready to launch:
Edit Device
To edit an existing virtual device, select the device and click the Edit button (located in the upper right-hand corner of the screen):
Clicking Edit launches the Device Editor for the selected virtual device:
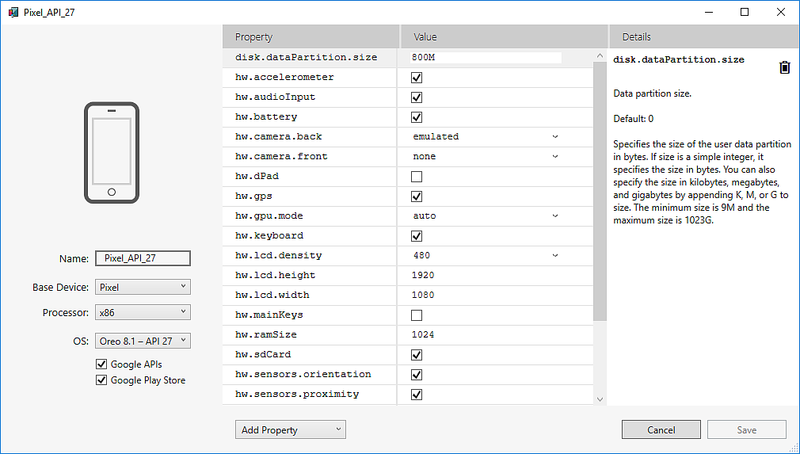
The Device Editor screen lists the properties of the virtual device under the Property column, with the corresponding values of each property in the Value column. When you select a property, a detailed description of that property is displayed on the right.
To change a property, edit its value in the Value column. For example, in the following screenshot the hw.lcd.density property is being changed from 480 to 240:
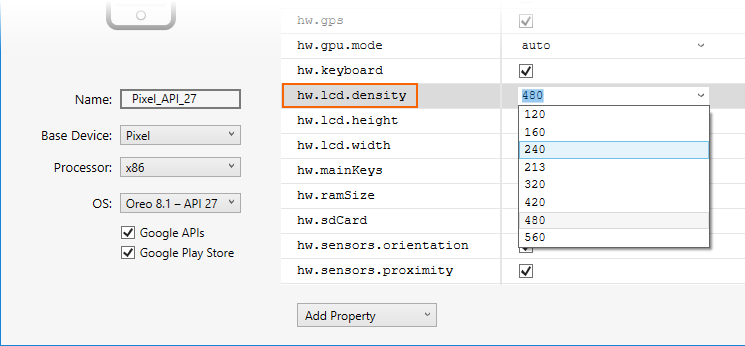
After you have made the necessary configuration changes, click the Save button. For more information about changing virtual device properties, see Editing Android Virtual Device Properties.
Additional Options
Additional options for working with devices are available from the Additional Options (…) pull-down menu in the upper right-hand corner:

The additional options menu contains the following items:
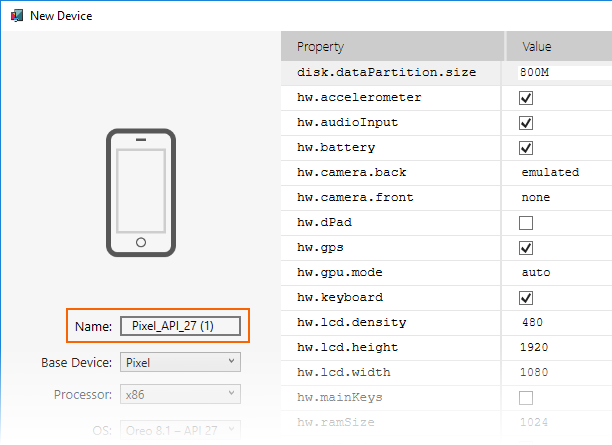
Duplicate and Edit – Duplicates the currently-selected device and opens it in the New Device screen with a different unique name. For example, selecting Pixel_API_27 and clicking Duplicate and Edit appends a counter to the name:
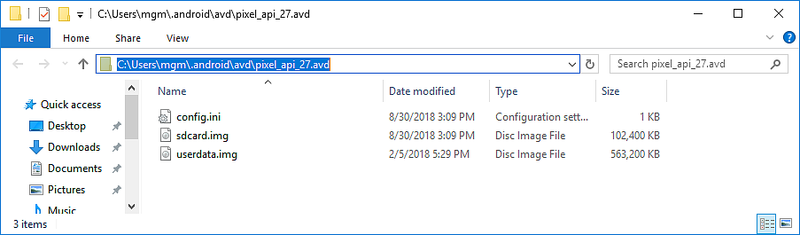
Reveal in Explorer – Opens a Windows Explorer window in the folder that holds the files for the virtual device. For example, selecting Pixel_API_27 and clicking Reveal in Explorer opens a window like the following example:
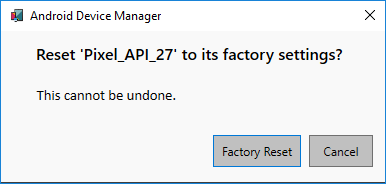
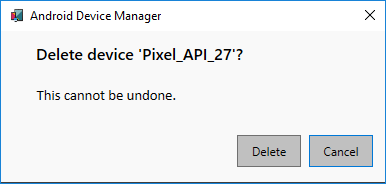
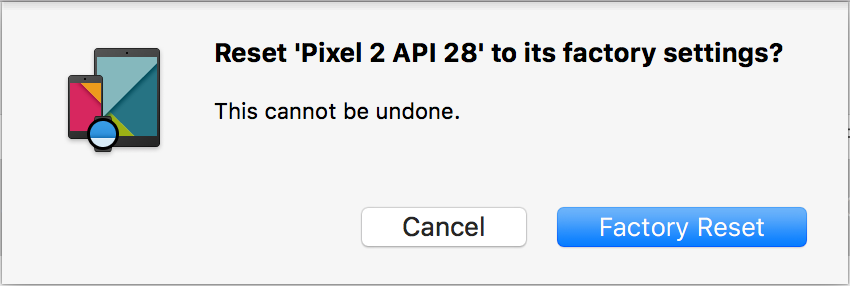
Factory Reset – Resets the selected device to its default settings, erasing any user changes made to the internal state of the device while it was running (this also erases the current Quick Boot snapshot, if any). This change does not alter modifications that you make to the virtual device during creation and editing. A dialog box will appear with the reminder that this reset cannot be undone. Click Factory Reset to confirm the reset:
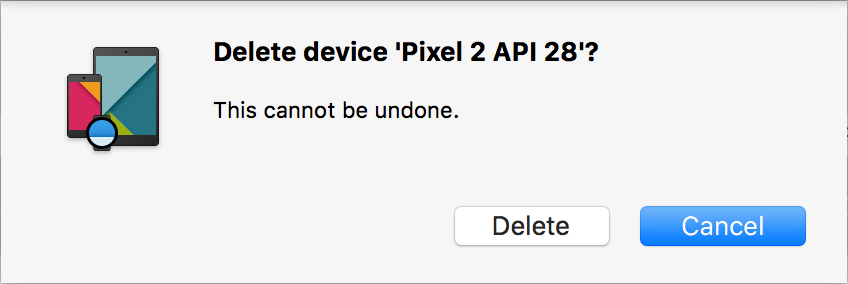
Delete – Permanently deletes the selected virtual device. A dialog box will appear with the reminder that deleting a device cannot be undone. Click Delete if you are certain that you want to delete the device.
If you are using a Mac with an Apple chip, such as the M1, you will need to install the Android Emulator for M1 preview from GitHub.
Android Device Manager on macOS
This article explains how to use the Android Device Manager to create, duplicate, customize, and launch Android virtual devices.

You use the Android Device Manager to create and configure Android Virtual Devices (AVDs) that run in the Android Emulator. Each AVD is an emulator configuration that simulates a physical Android device. This makes it possible to run and test your app in a variety of configurations that simulate different physical Android devices.
Requirements
To use the Android Device Manager, you will need the following items:
Visual Studio for Mac 7.6 or later.
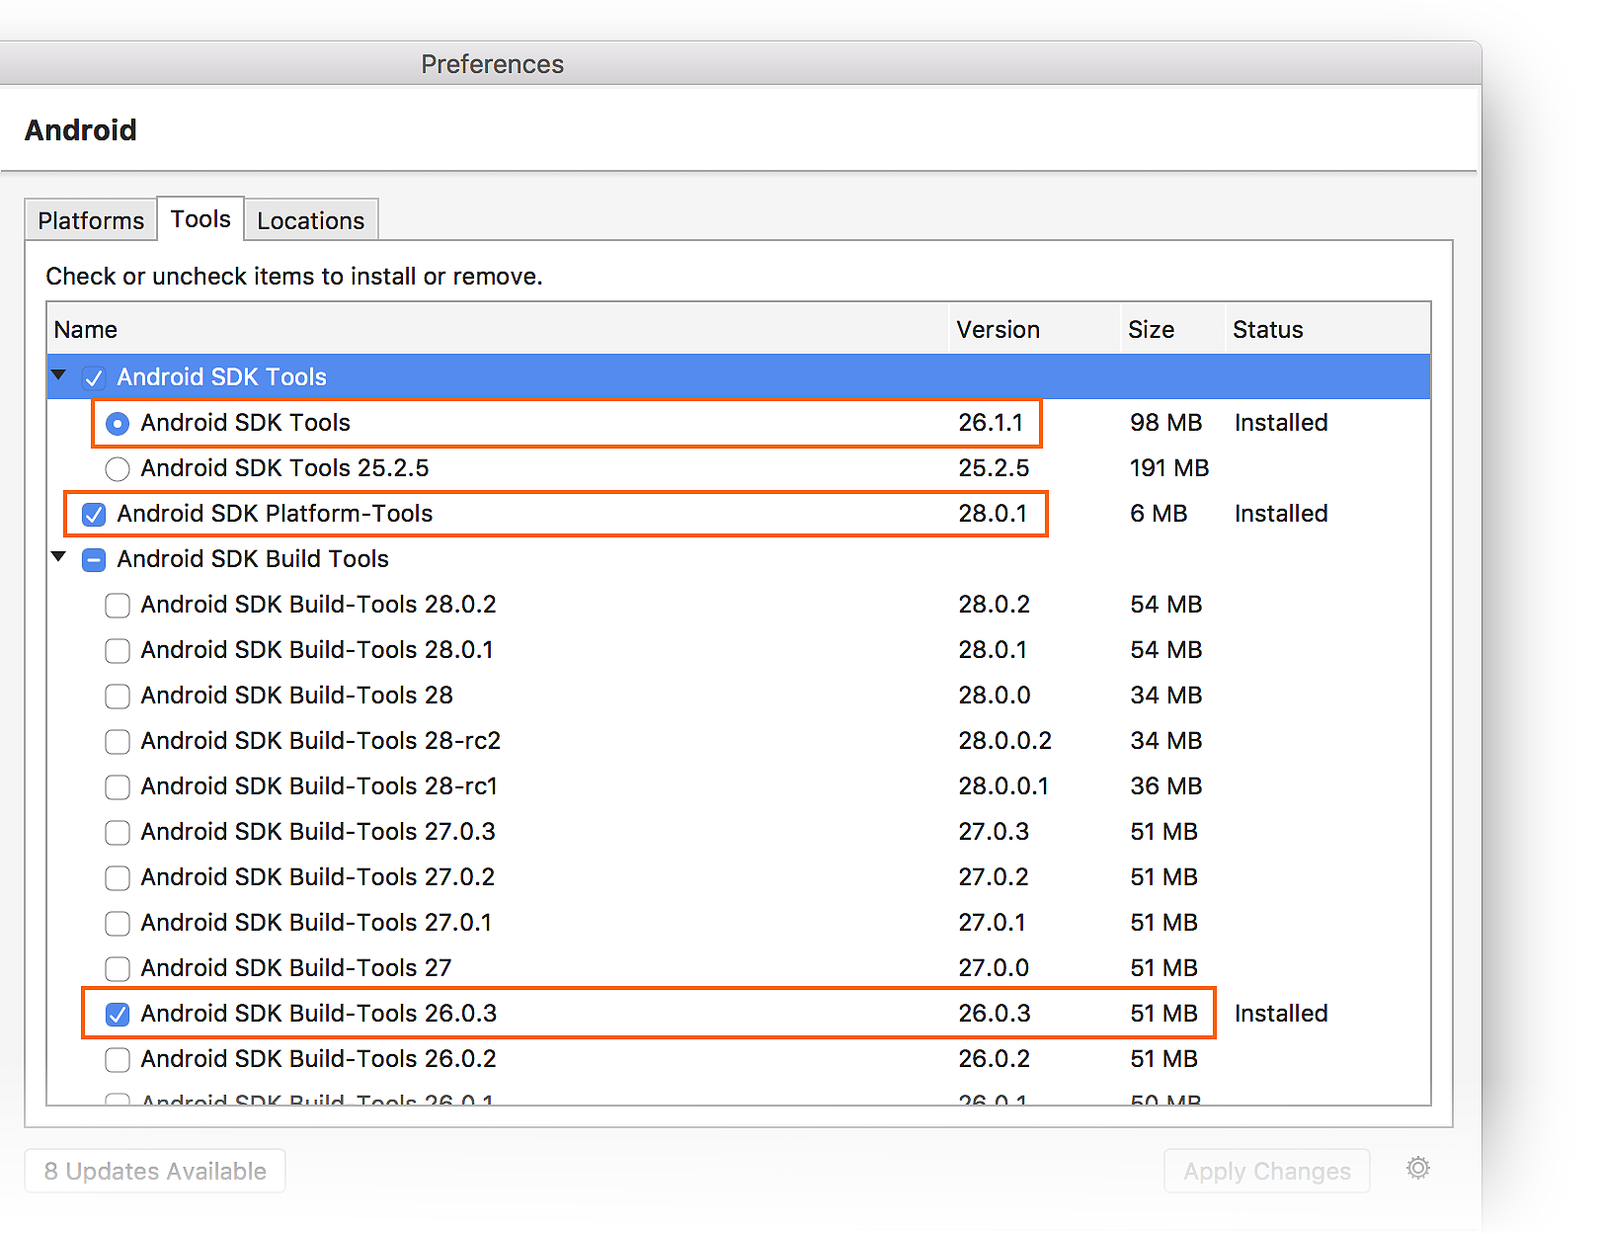
The following packages must be installed (via the Android SDK Manager):
- SDK tools version 26.1.1 or later
- Android SDK Platform-Tools 28.0.1 or later
- Android SDK Build-Tools 26.0.3 or later
These packages should be displayed with Installed status as seen in the following screenshot:
Launching the Device Manager
Launch the Android Device Manager by clicking Tools > Device Manager:
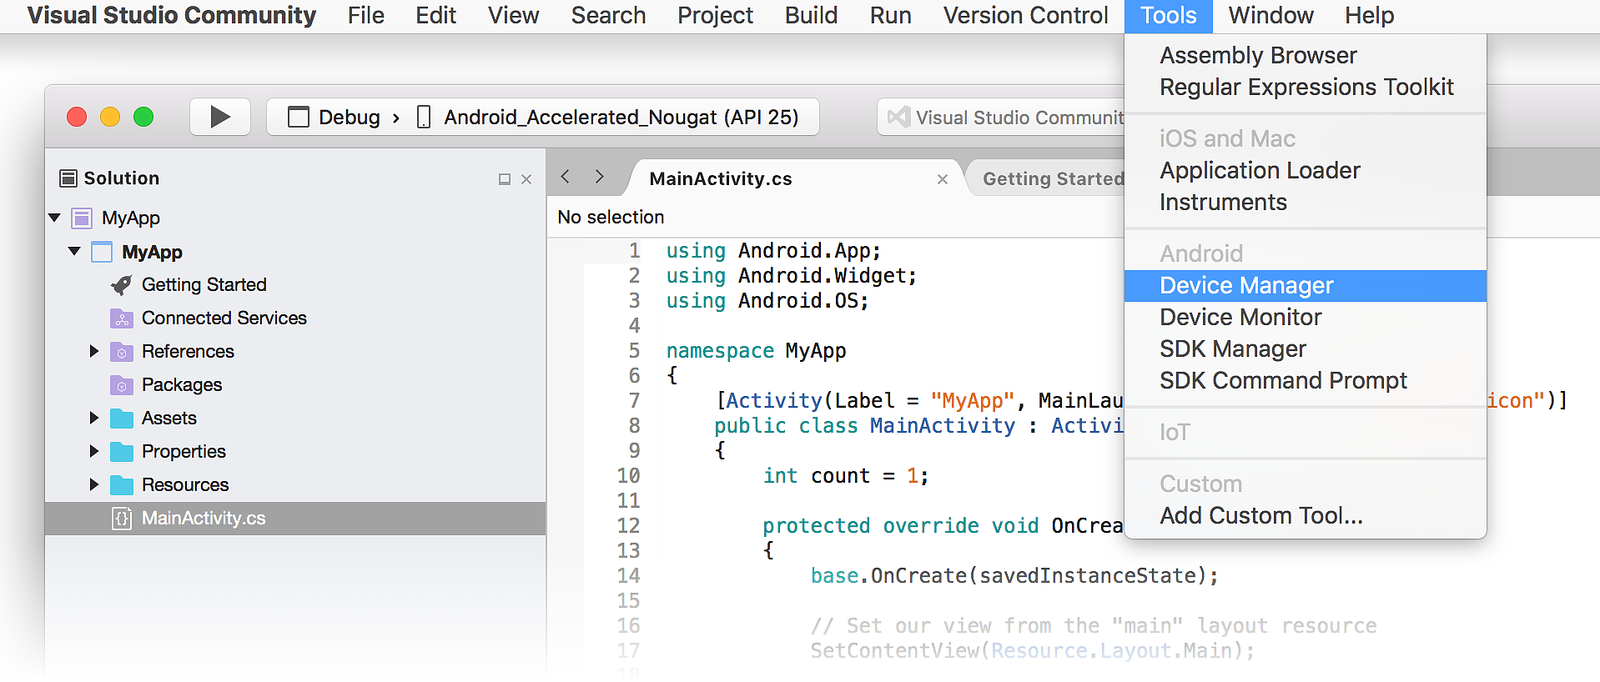
If the following error dialog is presented on launch, see the Troubleshooting section for workaround instructions:
Main Screen
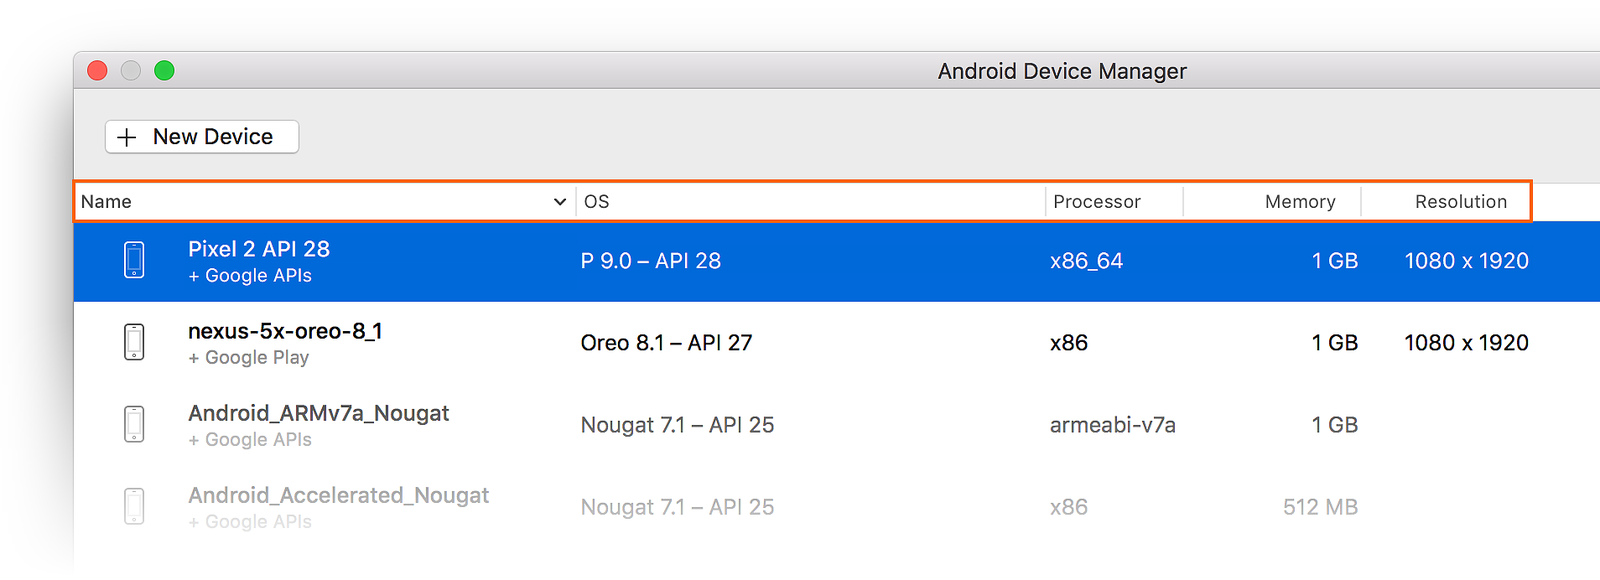
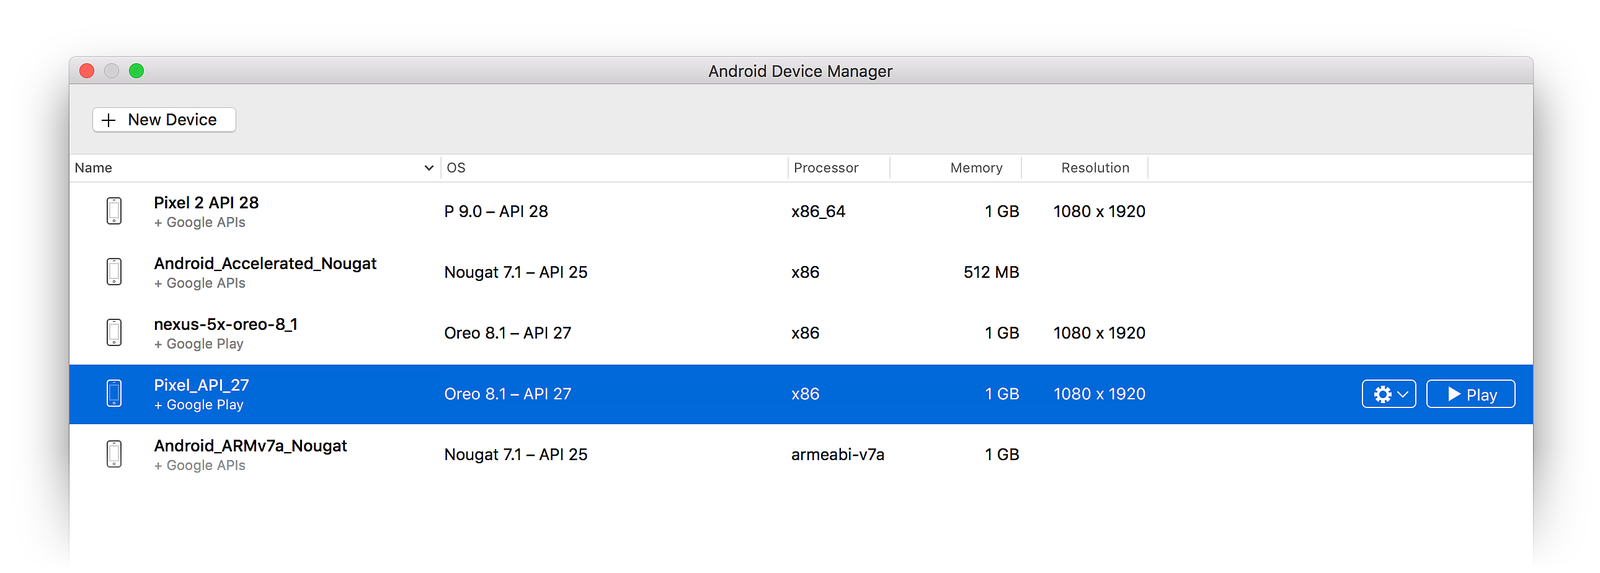
When you first launch the Android Device Manager, it presents a screen that displays all currently-configured virtual devices. For each virtual device, the Name, OS (Android Version), Processor, Memory size, and screen Resolution are displayed:
When you select a device in the list, the Play button appears on the right. You can click the Play button to launch the emulator with this virtual device:
After the emulator starts with the selected virtual device, the Play button changes to a Stop button that you can use to halt the emulator:
When you stop the emulator, you may get a prompt asking if you want to save the current state for the next quick boot:
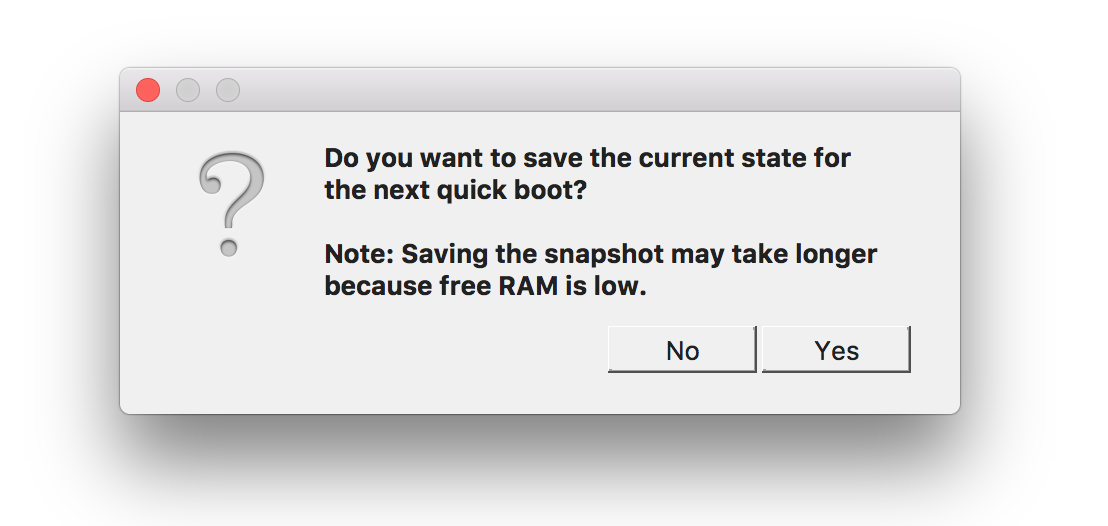
Saving the current state will make the emulator boot faster when this virtual device is launched again. For more information about Quick Boot, see Quick Boot.
New Device
To create a new device, click the New Device button (located in the upper left-hand area of the screen):
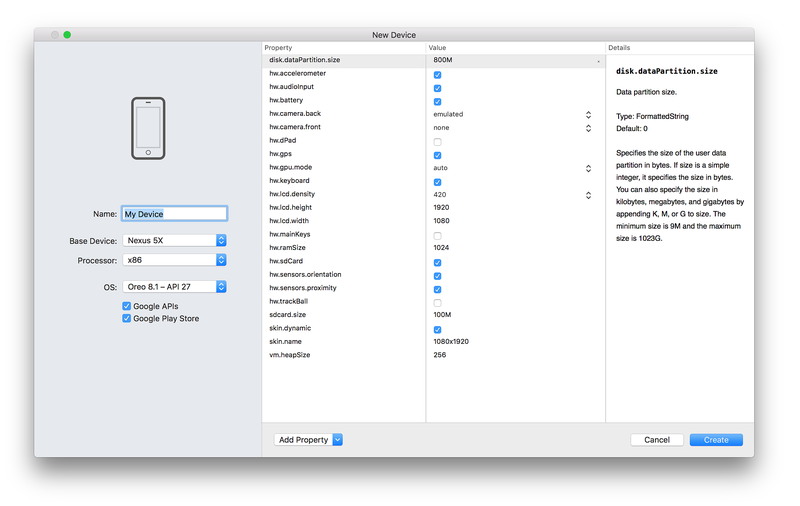
Clicking New Device launches the New Device screen:
Use the following steps to configure a new device in the New Device screen:
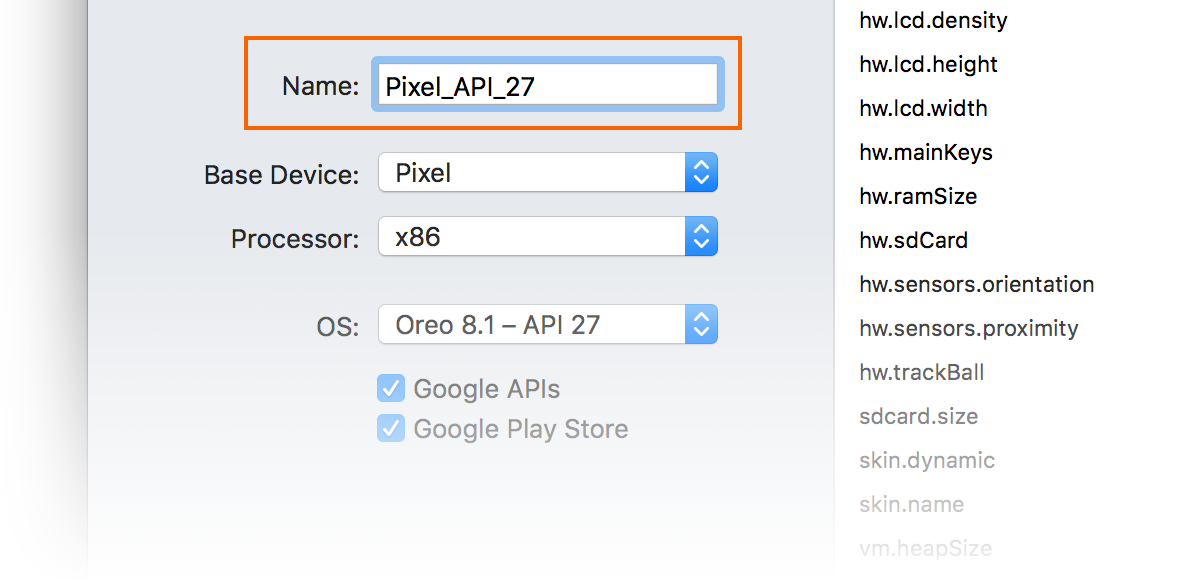
Give the device a new name. In the following example, the new device is named Pixel_API_27:
Select a physical device to emulate by clicking the Base Device pull-down menu:

Select a processor type for this virtual device by clicking the Processor pull-down menu. Selecting x86 will provide the best performance because it enables the emulator to take advantage of hardware acceleration. The x86_64 option will also make use of hardware acceleration, but it runs slightly slower than x86 (x86_64 is normally used for testing 64-bit apps):

Select the Android version (API level) by clicking the OS pull-down menu. For example, select Oreo 8.1 — API 27 to create a virtual device for API level 27:
If you select an Android API level that has not yet been installed, the Device Manager will display A new device will be downloaded message at the bottom of the screen – it will download and install the necessary files as it creates the new virtual device:

If you want to include Google Play Services APIs in your virtual device, enable the Google APIs option. To include the Google Play Store app, enable the Google Play Store option:
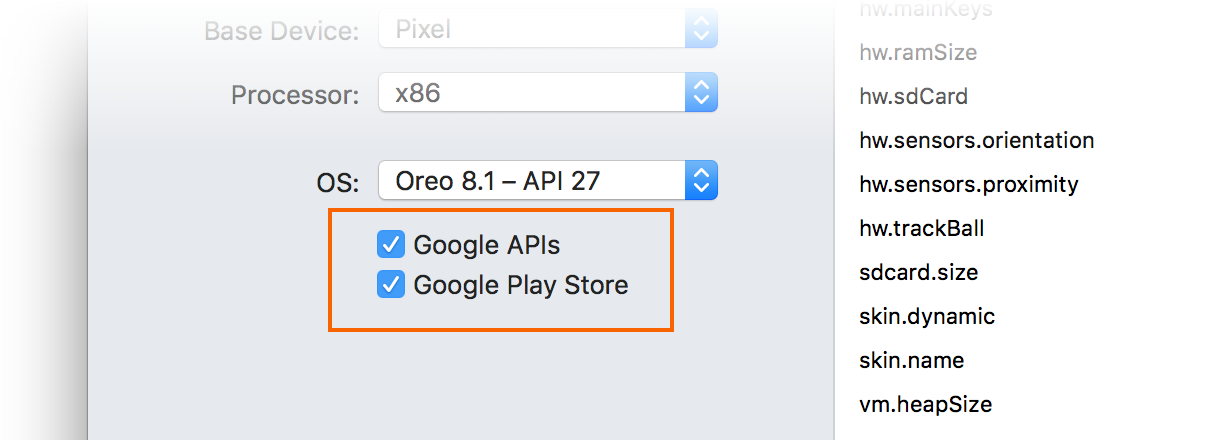
Note that Google Play Store images are available only for some base device types such as Pixel, Pixel 2, Nexus 5, and Nexus 5X.
Edit any properties that you need to modify. To make changes to properties, see Editing Android Virtual Device Properties.
Add any additional properties that you need to explicitly set. The New Device screen lists only the most commonly-modified properties, but you can click the Add Property pull-down menu (at the bottom) to add additional properties:
You can also define a custom property by clicking Custom. at the top of this property list.
Click the Create button (lower right-hand corner) to create the new device:
The Android Device Manager adds the new device to the list of installed virtual devices while displaying a Creating progress indicator during device creation:

When the creation process is complete, the new device is shown in the list of installed virtual devices with a Start button, ready to launch:
Edit Device
To edit an existing virtual device, select the Additional Options pull-down menu (gear icon) and select Edit:
Clicking Edit launches the Device Editor for the selected virtual device:
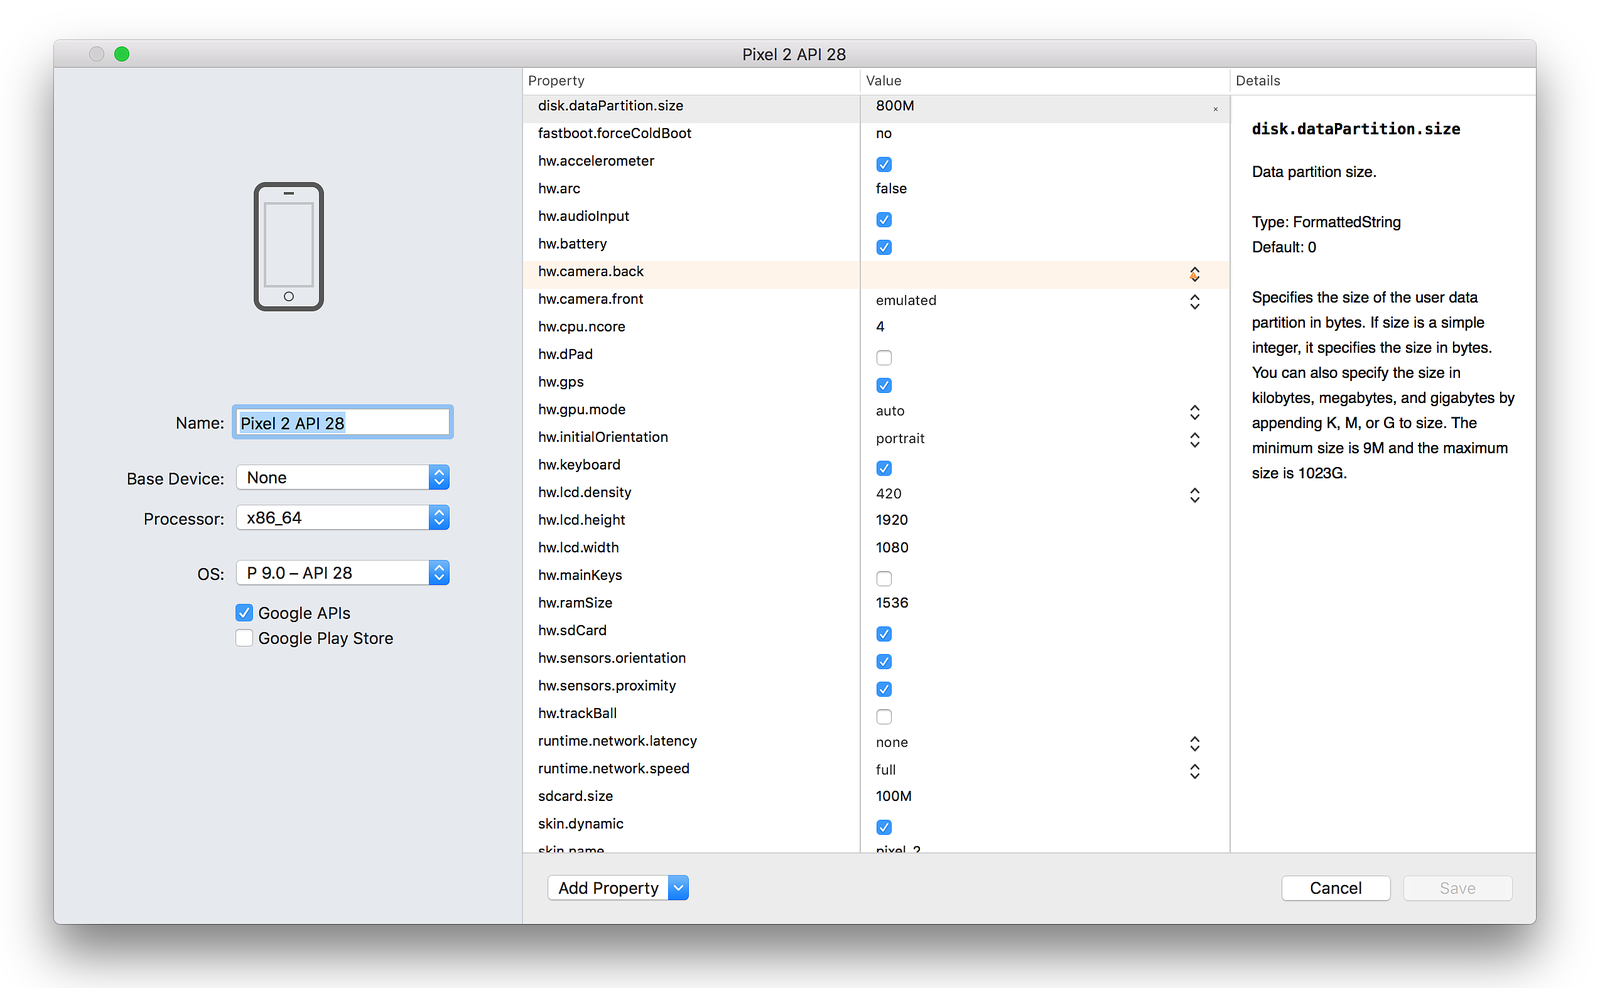
The Device Editor screen lists the properties of the virtual device under the Property column, with the corresponding values of each property in the Value column. When you select a property, a detailed description of that property is displayed on the right.
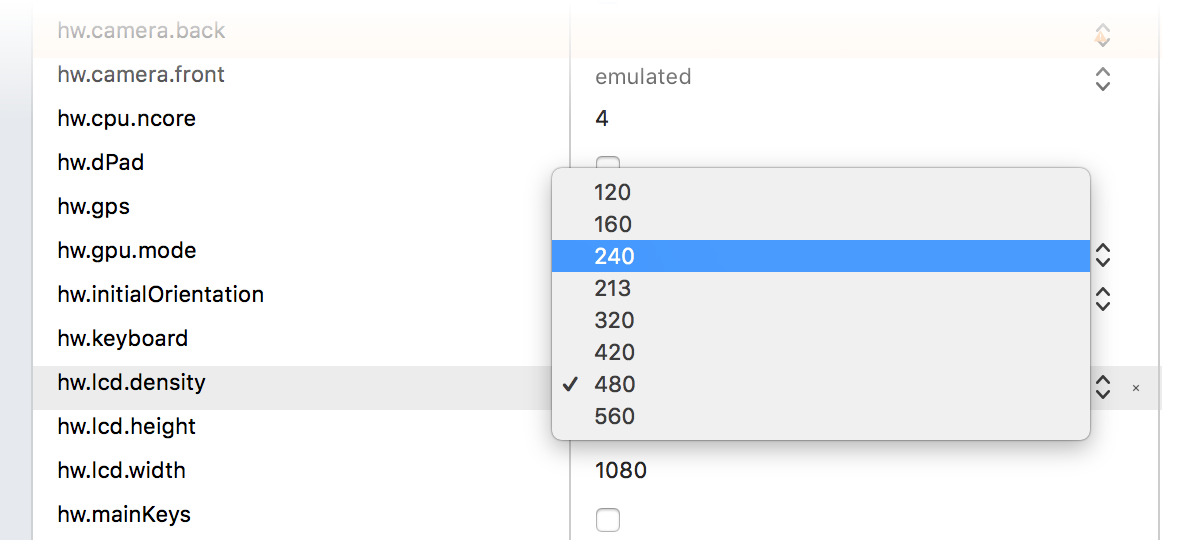
To change a property, edit its value in the Value column. For example, in the following screenshot the hw.lcd.density property is being changed from 480 to 240:
After you have made the necessary configuration changes, click the Save button. For more information about changing virtual device properties, see Editing Android Virtual Device Properties.
Additional Options
Additional options for working with a device are available from the pull-down menu located to the left of the Play button:
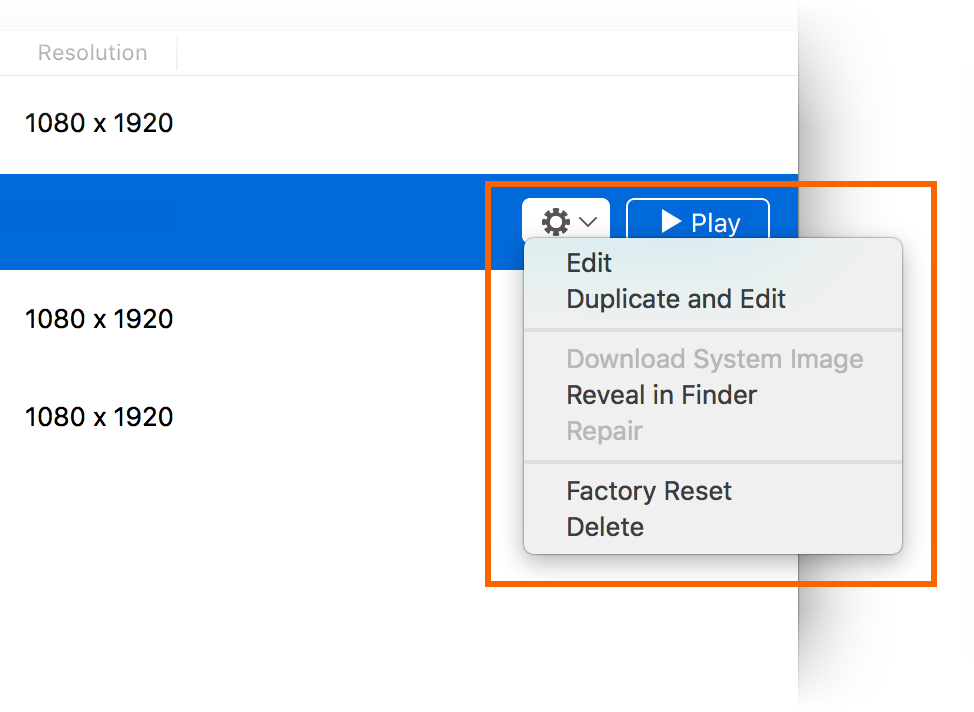
The additional options menu contains the following items:
Edit – Opens the currently-selected device in the device editor as described earlier.
Duplicate and Edit – Duplicates the currently-selected device and opens it in the New Device screen with a different unique name. For example, selecting Pixel 2 API 28 and clicking Duplicate and Edit appends a counter to the name:

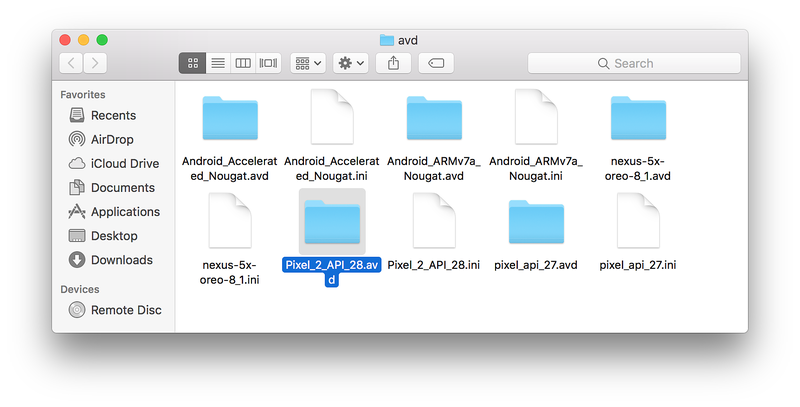
Reveal in Finder – Opens a macOS Finder window in the folder that holds the files for the virtual device. For example, selecting Pixel 2 API 28 and clicking Reveal in Finder opens a window like the following example:
Factory Reset – Resets the selected device to its default settings, erasing any user changes made to the internal state of the device while it was running (this also erases the current Quick Boot snapshot, if any). This change does not alter modifications that you make to the virtual device during creation and editing. A dialog box will appear with the reminder that this reset cannot be undone. Click Factory Reset to confirm the reset.
Delete – Permanently deletes the selected virtual device. A dialog box will appear with the reminder that deleting a device cannot be undone. Click Delete if you are certain that you want to delete the device.
Troubleshooting
The following sections explain how to diagnose and work around problems that may occur when using the Android Device Manager to configure virtual devices.
Android SDK in Non-Standard Location
Typically, the Android SDK is installed at the following location:
C:\Program Files (x86)\Android\android-sdk
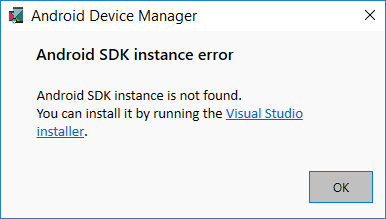
If the SDK is not installed at this location, you may get this error when you launch the Android Device Manager:
To work around this problem, use the following steps:
From the Windows desktop, navigate to C:\Users\username\AppData\Roaming\XamarinDeviceManager:

Double-click to open one of the log files and locate the Config file path. For example:

Navigate to this location and double-click user.config to open it.
In user.config, locate the element and add an AndroidSdkPath attribute to it. Set this attribute to the path where the Android SDK is installed on your computer and save the file. For example, would look like the following if the Android SDK was installed at C:\Programs\Android\SDK:
After making this change to user.config, you should be able to launch the Android Device Manager.
Wrong Version of Android SDK Tools
If Android SDK tools 26.1.1 or later is not installed, you may see this error dialog on launch:

If you see this error dialog, click Open SDK Manager to open the Android SDK Manager. In the Android SDK Manager, click the Tools tab and install the following packages:
- Android SDK Tools 26.1.1 or later
- Android SDK Platform-Tools 27.0.1 or later
- Android SDK Build-Tools 27.0.3 or later
Snapshot disables WiFi on Android Oreo
If you have an AVD configured for Android Oreo with simulated Wi-Fi access, restarting the AVD after a snapshot may cause Wi-Fi access to become disabled.
To work around this problem,
Select the AVD in the Android Device Manager.
From the additional options menu, click Reveal in Explorer.
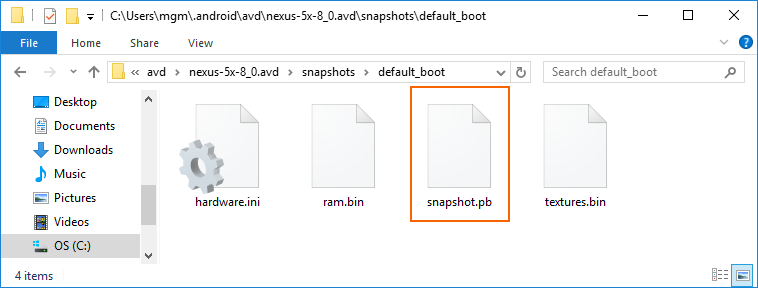
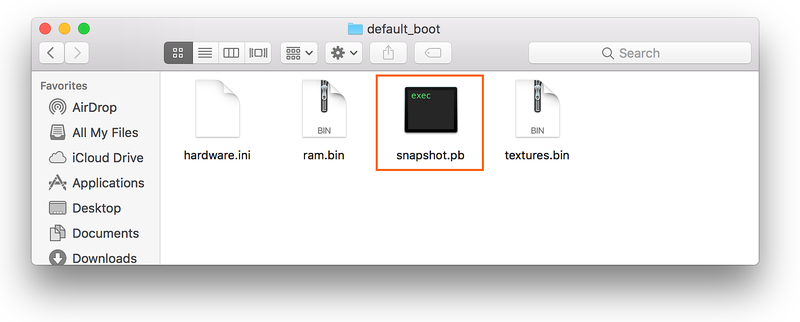
Navigate to snapshots > default_boot.
Delete the snapshot.pb file:
Restart the AVD.
After these changes are made, the AVD will restart in a state that allows Wi-Fi to work again.
Wrong Version of Android SDK Tools
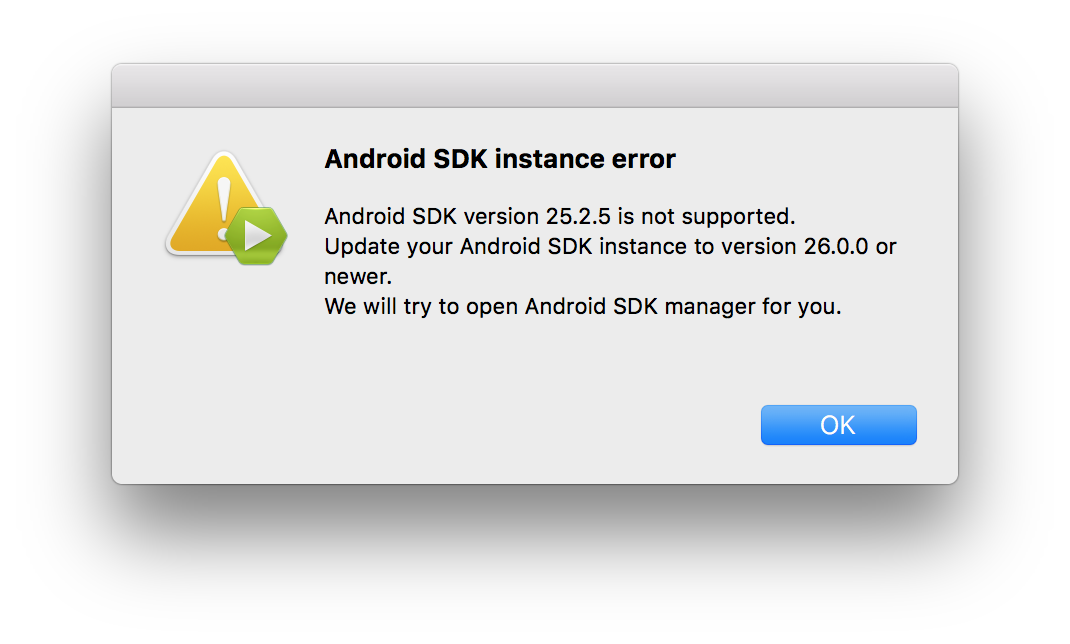
If Android SDK tools 26.1.1 or later is not installed, you may see this error dialog on launch:

If you see this error dialog, click OK to open the Android SDK Manager. In the Android SDK Manager, click the Tools tab and install the following packages:
- Android SDK Tools 26.1.1 or later
- Android SDK Platform-Tools 28.0.1 or later
- Android SDK Build-Tools 26.0.3 or later
Snapshot disables WiFi on Android Oreo
If you have an AVD configured for Android Oreo with simulated Wi-Fi access, restarting the AVD after a snapshot may cause Wi-Fi access to become disabled.
To work around this problem,
Select the AVD in the Android Device Manager.
From the additional options menu, click Reveal in Finder.
Navigate to snapshots > default_boot.
Delete the snapshot.pb file:
Restart the AVD.
After these changes are made, the AVD will restart in a state that allows Wi-Fi to work again.
Generating a Bug Report
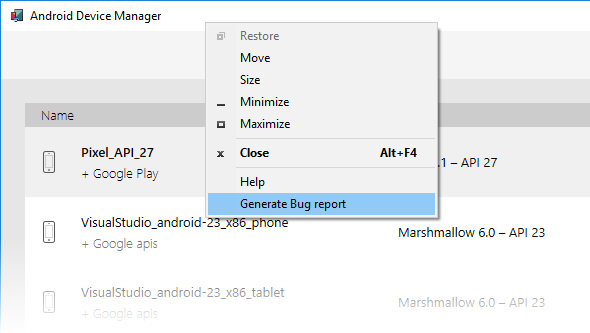
If you find a problem with the Android Device Manager that cannot be resolved using the above troubleshooting tips, please file a bug report by right-clicking the title bar and selecting Generate Bug Report:
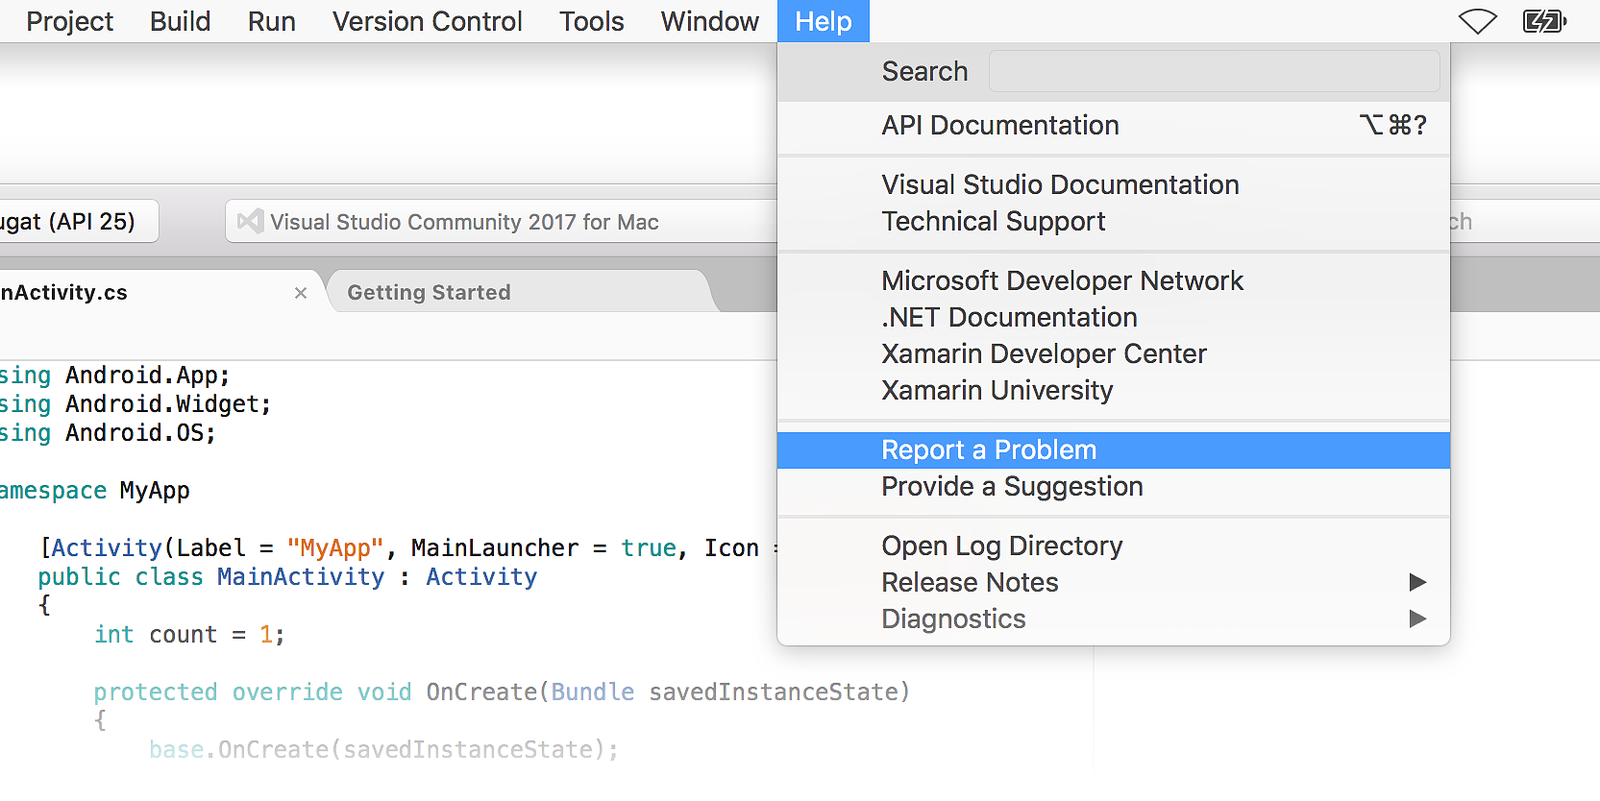
If you find a problem with the Android Device Manager that cannot be resolved using the above troubleshooting tips, please file a bug report by clicking Help > Report a Problem:
Summary
This guide introduced the Android Device Manager available in Visual Studio Tools for Xamarin and Visual Studio for Mac. It explained essential features such as starting and stopping the Android emulator, selecting an Android virtual device (AVD) to run, creating new virtual devices, and how to edit a virtual device. It explained how to edit profile hardware properties for further customization, and it provided troubleshooting tips for common problems.
Related Links
Related Video
Find more Xamarin videos on Channel 9 and YouTube.
Источник


