- Добавление пакетов Android SDK Manager
- Откроется окно настроек Android SDK:
- Обязательно выберите такие компоненты:
- Следующий курс: Создание вашего первого приложения
- Установка пакета Android SDK и настройка ADB
- Как установить Android SDK на Windows, Mac и Linux
- Ручная установка
- Установка компонентов
- Ссылки
- Download Google USB Drivers for Windows 10/8.1/7 [Latest]
- Download Google USB Drivers
- Direct Download
- Download via Android Studio
- How to Install Google USB Drivers
- On Windows 10
- On Windows 7 and Windows 8/8.1
- How to Modify Google USB Drivers to Support Other Android Devices
- Step 1: Get the VID and PID of your Android Device
- Step 2: Modify ‘android_winusb.inf’ file
- Step 3: Install the Modified USB Drivers
Добавление пакетов Android SDK Manager
По умолчанию, в Android SDK не установлено все необходимое для начала разработки. Пакет SDK содержит инструменты, платформы и другие компоненты, которые можно загрузить по мере необходимости, используя Android SDK Manager. Поэтому, прежде чем начать, вы должны добавить несколько пакетов в Android SDK.
Чтобы начать добавлять пакеты, запустите Android SDK Manager одним из следующих способов:
- В Android Studio при первом запуске в окне приветствия выберите пункт Configure> SDK Manager
- Если Android Studio уже запущена, выберите пункт меню Tools> Android> SDK Manager.
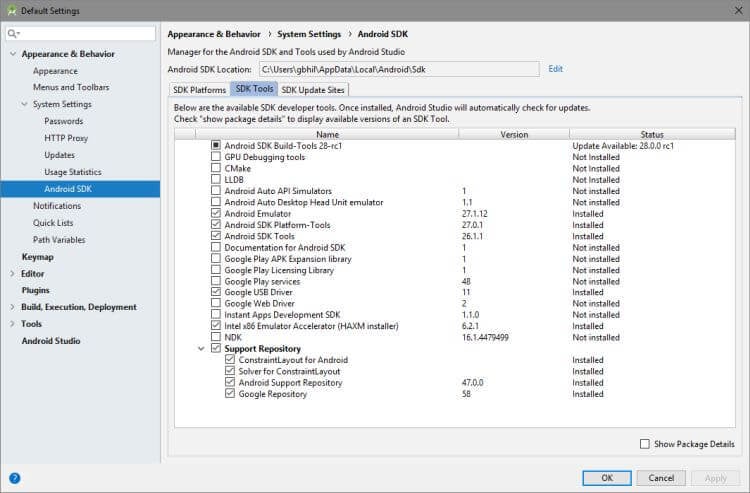
Откроется окно настроек Android SDK:

На вкладке SDK Platforms отметьте для загрузки все наиболее популярные на текущий момент версии Android. Их список постоянно обновляется на официальном сайте.
Перейдите на вкладку SDK Tools и отметьте для загрузки минимально необходимый набор компонентов, как показано на скриншоте:

Обязательно выберите такие компоненты:
- Android SDK Build-tools
- Android SDK Platform-tools (последняя версия)
- Android SDK Tools (последняя версия)
- Android Support Repository
После выбора нажмите кнопку Apply и дождитесь загрузки всех компонентов.

По окончании загрузки нажмите Finish. Среда разработки готова к работе.
Следующий курс: Создание вашего первого приложения


Прошу помощи. Только начал изучать разработку под андроид и возникла следующая проблема. Есть планшет Nexus 7 2012 WiFi, прошивка CyanogenMOD Android KitKat (4.4.4). Создаю новый пустой (Empty Activity) проект в Android Studio v 3.0.1, вообще ничего не меняю и пытаюсь запустить проект на устройстве — оно устанавливается и планшет переходит в ребут. Далее запускается очень много раз вылетает ошибка, что Trebuchet (это лаунчер) остановлен. Вообщем еле-еле удаляю приложение и всё становиться нормально. SDK установлены с версии 19 (4.4.4) по 26. Минимальный sdk установлен как 19. Такой же проект на Samsung (android 6.0) запускается без проблем. В чём может быть проблема ума не приложу. Мне кажется, что это возможно как-то связано с движком тем Cyanogen а может и нет, так как пробовал прошивку ParanoidAndroid — та же беда. Прошу поставьте меня на путь истинный
Любые сторонние прошивки вы устанавливаете на свой страх и риск. Нормальная работа системы при этом не гарантируется. Об этом все авторы прошивок пишут.
Это я прекрасно понимаю, и претензий не имею. Дело в том, что система работает стабильно. Остальные приложения которые были изначально написаны для 4.4.4 работают хорошо. И даже современные приложения устанавливаются и работаю -> а это значит, что авторы как то включили поддержку 4.4.4. Возможно ещё где-нибудь нужно нажать «галочку » для поддержки 4.4.4?
Объясните пожалуйста, зачем нужны эти пакеты?
Google APIs ARM EABI v7a System Image
Google APIs
И все пакеты в Extras.
Google APIs — ARM EABI v7a System Image — это образ эмулятора
Google APIs — API сервисов Google, например Maps или YouTube
в Extras самое необходимое — Android Support repository, android support library, google play services, google usb driver — названия как-бы не нуждаются в объяснении.
Что за WTF?! пишет отказано в доступе и доне нотхинг вас инсталед в конце чё делать
Здравствуйте
У меня установлена AS 2.1
Android SDK Build-tools не установлены (стоит прочерк)
Нужно ли устанавливать Android SDK Build-tools ? Все? И почему по умолчанию они не установлены вообще?
Для отправки комментария вам необходимо авторизоваться.
Источник
Установка пакета Android SDK и настройка ADB

Android SDK является самым популярным эмулятором мобильной платформы Android. Данный пакет используют многие разработчики для создания своих приложений, а обычный пользователи используют ей в качестве ознакомления с самой платформой. Однако пользователю предоставляется ряд дополнительных возможностей – например получение прав ROOT-пользователя для своего Sony Xperia. Для замены прошивки либо ядра ОС много пользователей используют программу ADB, являющаяся составляющим вышеописанного Android SDK. Данная программка позволяет установить связь между устройством и персональным компьютером и выполнять ряд манипуляций с системой.
Установки и настройка Android SDK и пакета ADB (Android Debug Bridge)
- И так, изначально необходимо скачать последнюю версию Android SDK эмулятора. Рекомендуется загружать zip архив, дабы не возникло проблем с установкой. Папку из архива под названием android-sdk-windows переносим в корневую папку диска C, в результате чего получиться путь C:\android-sdk-windows.
- Убедившись, что ПК подключен к интернету запустите программу SDK Manadger, которая находится в папке android-sdk-windows. Появится вот такое окошко.
Нам нужно загрузить и поставить Android SDK Platform-tools и Android SDK Tools. Из всех пунктов необходимо отметить эти два пункта и нажать кнопочку Install. Весь процесс установки пройдет автоматически. Теперь для работы с устройством нужно установить его драйвера.
Источник
Как установить Android SDK на Windows, Mac и Linux
22 октября 2008 года в Android появился магазин приложений Play Market. С тех пор прошло больше 10 лет и сегодня Google Play насчитывает почти 3 миллиона приложений в их числе Telegram с каналом AndroidInsider. Как же разработчикам со всего мира удается создавать качественные продукты? Они используют Android SDK. Чтобы получить все инструменты и средства разработки приложений, необходимо скачать среду разработки Android Studio. Но что, если вы хотите воспользоваться Android SDK с командной строкой без Android Studio и ненужных средств? В этом материале мы подскажем, как правильно установить и настроить Software Development Kit.
Ручная установка
Переходим по этой ссылке, находим раздел «Command line tools only» и скачиваем нужную версию в зависимости от вашей системы.
Создайте папку Android в корневой папке системы. В случае с Windows это локальный диск «С», а в OS X и Linux — домашняя папка пользователя. Распакуйте скачанный архив в папку Android. Для дальнейшей работы необходим установленный пакет Java на компьютере. OS X из коробки его поддерживает, чтобы проверить это, в терминале вбейте «which java», система должна выдать расположение пакета. На Windows и Linux устанавливаем JDK по этой ссылке.
Если вы используете Linux, вам понадобится установить еще несколько пакетов с помощью этой команды «sudo apt-get install lib32ncurses5 lib32stdc++6». Для других версий Linux необходимо найти подходящие пакеты ncurses5 и stdc++6.
Установка компонентов
Переходим в папку «Android/bin», находим исполняемый файл sdkmanager и запускаем, откроется следующее окно:
Выбираем «Android SDK Tools» и «Android SDK Platform-Tools», на Windows необходимо выбрать еще и «Google USB Driver». После этого подтвердите условия лицензионного соглашения, и начнется установка инструментов. В Windows они расположатся в папке «Windows\users\Имя пользователя\AppData\Local\Android», а на Linux и Mac в папке «.Android».
Ссылки
Теперь давайте создадим символическую ссылку на эти папки, чтобы можно было быстро запустить инструменты через командную строку.
В Windows переходим в «Этот компьютер → Свойства → Дополнительные параметры системы → Дополнительно → Переменные среды». В «Переменные среды для пользователя» находим строку «Path» и кликаем по ней 2 раза. Откроется окно, в нём нажимаем «Создать» и вставляем полный путь к инструментам через точку с запятой. Должно выглядеть примерно так «C:\Android\tools;C:\Android\platform-tools».
На Mac в домашней папке находим скрытый файл «.bash_profile» или просто «.profile». Открываем его командой «nano
/.profile» и добавляем путь до инструментов:
export PATH=»$HOME/Android/tools:$PATH»
export PATH=»$HOME/Android/platform-tools:$PATH»
Сохраняем файл комбинацией «CMD+X» и далее жмём «Y». На Linux процесс аналогичен, но нужно запускать файл .bashrc.
Вот и всё. Теперь команды Android SDK доступны через консоль. Вы сможете, например, устанавливать образы и вручную обновлять смартфон.
Источник
Download Google USB Drivers for Windows 10/8.1/7 [Latest]
Google USB Drivers are required to connect Google Pixel or Nexus devices to Windows PC using a USB cable. You will need these drivers to transfer files or sync data on your Pixel/Nexus device, and especially when working with the Android ADB and Fastboot tools.
You can download the latest Google USB Drivers from here and follow the instructions on how to manually install them on your Windows PC. Furthermore, we have also provided instructions on how to modify the ‘android_winusb.inf‘ file included in the drivers to support other Android devices.
Normally, the said USB drivers come bundled with SDK Manager in the Android Studio IDE, which IS constantly updated with the latest available drivers. But if you’re an average Android user, chances are that you might not have the IDE set up on your PC. That’s because it is used mostly by experienced developers and enthusiasts. In that case, you can use the standalone USB drivers, which as provided directly by Google for users who might face issues of Windows not recognizing their phone over a USB connection.
Google USB drivers also act as ‘Android ADB and Fastboot Drivers‘. So you can install them on your PC to use ADB (Android Debug Bridge) for debugging apps and ROMs, or use Fastboot to unlock the bootloader or flash factory images on your Pixel/Nexus device.
To sum up, the drivers are useful in various situations. With that in mind, go ahead to download the latest version of the USB Drivers from below and follow the instructions on how to install them on your Windows PC.
Download Google USB Drivers
Now, there are two different ways/methods to download the USB driver on Windows. You can either download the Google USB Driver ZIP file manually. Or, you can use the SDK Manager in the Android Studio to download it.
The latter gives an added benefit, that is the SDK Manager will automatically notify you when a newer version is available. The former method, on the contrary, will require you to manually check if a newer driver version is available and download it again.
In our personal experience, downloading the ZIP package directly is easier than using the Android Studio. But the choice is solely up to you. We have covered both the methods below.
Note: If you’re using macOS or Linux, you would not need these drivers.
Direct Download
Just click on the link below to download the Google USB Driver ZIP file to your PC.
Once downloaded, extract the ZIP file to a suitable location on your computer. The extracted ‘usb_drivers’ folder should contain the required ‘android_winusb.inf’ driver file.
Download via Android Studio
First of all, make sure that you have downloaded and installed the latest version of Android Studio on your Windows PC. Once you have it installed, follow the instructions below:
- Launch ‘Android Studio’ on your PC.
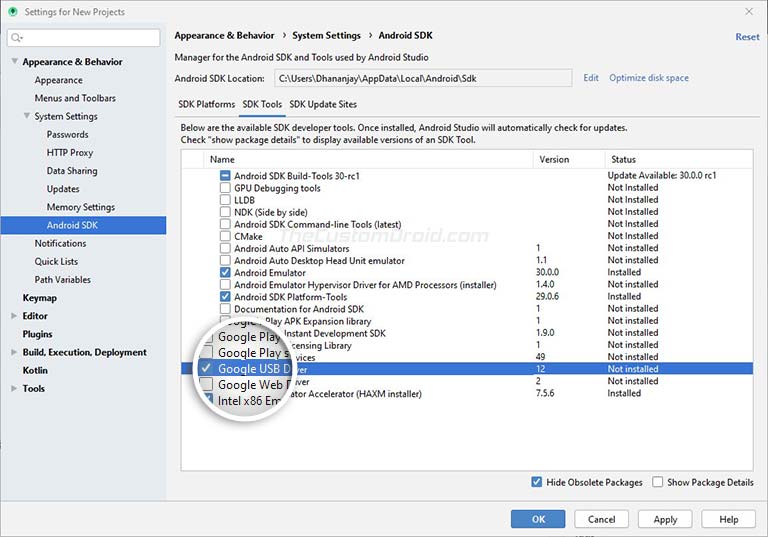
- Click on ‘Tools’ and select ‘SDK Manager’.
- Go to the ‘SDK Tools’ tab.
- Select ‘Google USB Driver’ and click on ‘Ok’.

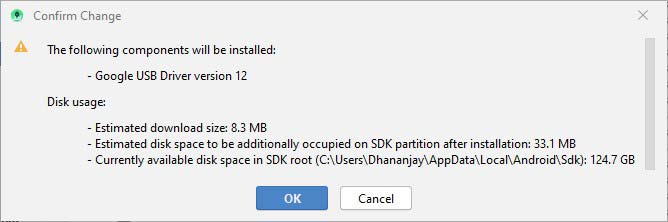
- Finally, click on ‘Ok’ when prompted with the ‘Confirm change’ message.
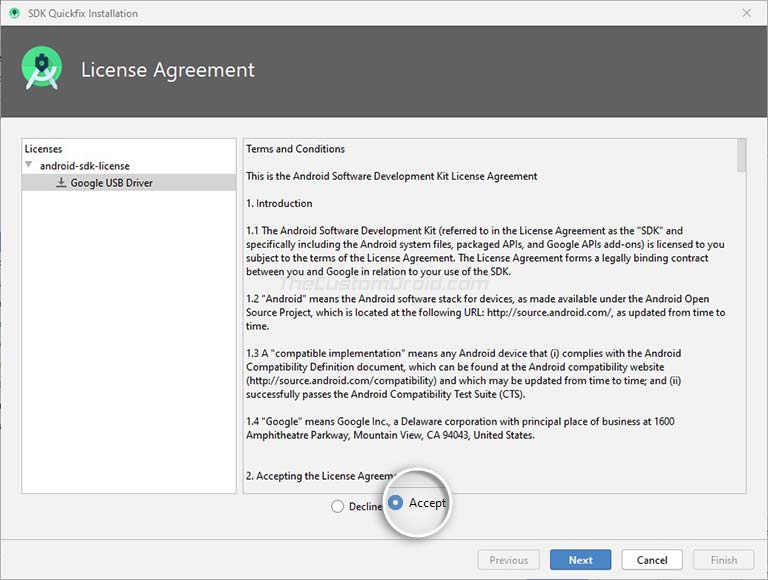
- You should see a ‘License Agreement’ message on the screen. Simply select ‘Accept’ and click on ‘Next’.
Android Studio will now download the Google USB drivers to ‘android_sdk\extras\google\usb_driver\‘ on your PC. Here ‘android_sdk’ is the folder where the Android SDK is installed on your PC.
How to Install Google USB Drivers
The Google USB Drivers come in the form of an ‘android_winusb.inf’ setup information file, rather than a Windows executable. So, you will need to manually install it on your Windows PC. The same steps can also be used to upgrade the existing drivers installed on your PC to the latest version available.
Now follow the installation guide below according to the Windows OS version you’re using. It’s quite easy and wouldn’t take more than a minute to install them.
On Windows 10
To install Google Android USB Drivers on Windows 10, follow the instructions below.
- First, connect your Android device to the PC’s USB port.
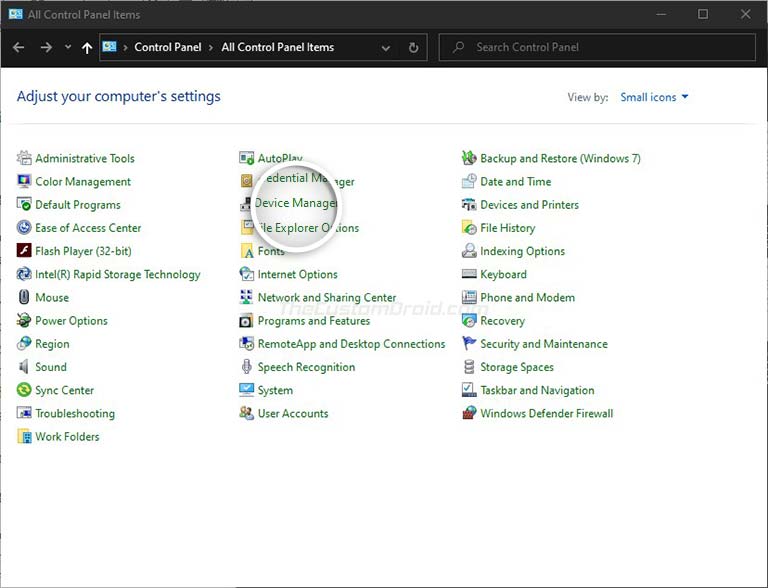
- Go to the ‘Control Panel‘ and click on ‘Device Manager‘. ‘Device Manager’ on your Windows 10 PC» width=»768″ height=»588″ srcset=»https://www.thecustomdroid.com/wp-content/uploads/2020/02/Install-Google-USB-Drivers-on-Windows-10-01.jpg 768w, https://www.thecustomdroid.com/wp-content/uploads/2020/02/Install-Google-USB-Drivers-on-Windows-10-01-300×230.jpg 300w» sizes=»(max-width: 768px) 100vw, 768px»/>
- Double-click on your device category to expand the list of connected devices.
- Right-click on your Android device’s name and click on ‘Update driver‘.
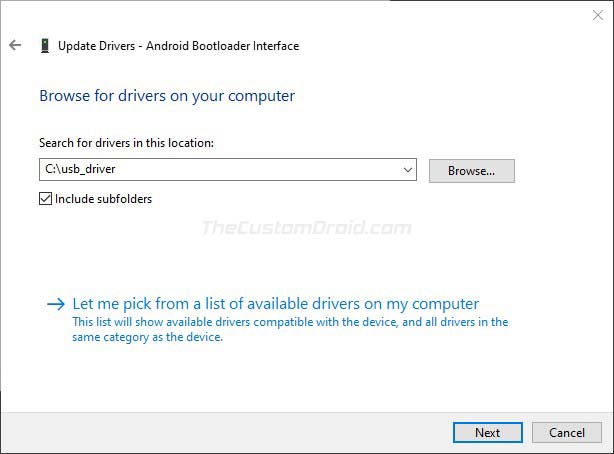
- Click on ‘Browse my computer for driver software‘ in the Hardware Update wizard.
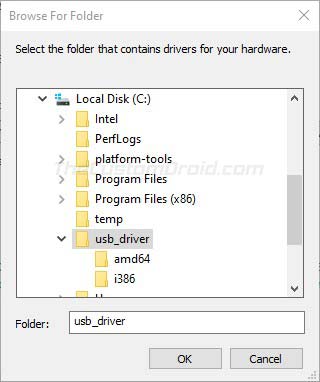
- Click ‘Browse‘ and select the ‘usb_driver‘ folder.
- For example: If you downloaded the drivers using Android Studio, the folder should be located in ‘android_sdk\extras\google\’ on the PC. Or, if you downloaded the ZIP file, then just locate the extracted ‘usb_driver’ folder.
- For example: If you downloaded the drivers using Android Studio, the folder should be located in ‘android_sdk\extras\google\’ on the PC. Or, if you downloaded the ZIP file, then just locate the extracted ‘usb_driver’ folder.
- Finally, click ‘Next‘ to install the drivers.
 ‘Device Manager’ on your Windows 10 PC» width=»768″ height=»588″ srcset=»https://www.thecustomdroid.com/wp-content/uploads/2020/02/Install-Google-USB-Drivers-on-Windows-10-01.jpg 768w, https://www.thecustomdroid.com/wp-content/uploads/2020/02/Install-Google-USB-Drivers-on-Windows-10-01-300×230.jpg 300w» sizes=»(max-width: 768px) 100vw, 768px»/>
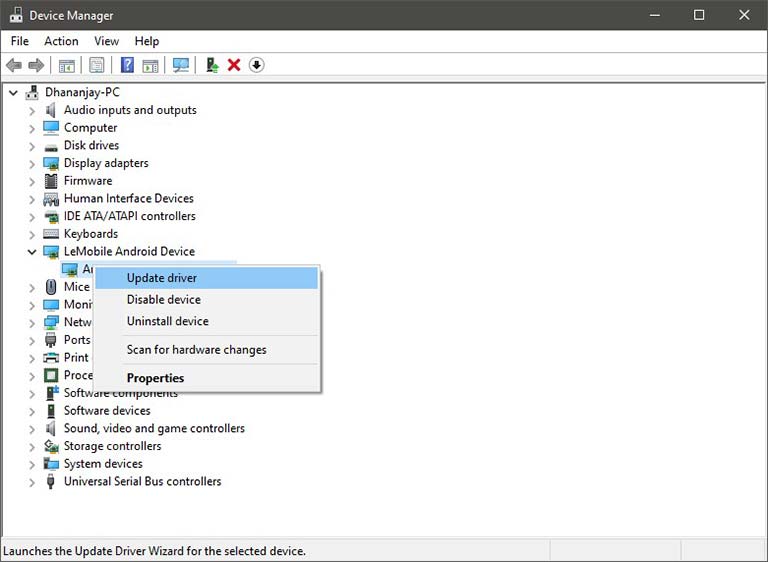
On Windows 7 and Windows 8/8.1
To install Google Android USB drivers on Windows 7, Windows 8, and Windows 8.1 PC, follow the instructions below.
- First, connect your Android device to the Windows PC’s USB port.
- Then right-click on ‘Computer‘ and select ‘Manage‘.
- Select Devices in the left pane.
- Double-click on ‘Other device‘ in the right pane to expand it.
- Right-click on the device name (e.g. Google Pixel) and select the ‘Update Driver‘ option.
- Click on ‘Browse my computer for driver software‘ in the Hardware Update wizard.
- Click ‘Browse‘ and locate the ‘usb_driver’ folder.
- Finally, click on ‘Next‘ to install the USB drivers.
You should now have the Google USB Drivers installed. Your Windows PC should now detect and recognize your Android device over the USB connection.
Important Note
If the drivers fail to install even after following the steps, OR the ADB/Fastboot commands do no work even if the drivers are installed, then it could be because you’re using a USB 3.0/3.1/3.2 port or an AMD based PC. This is an issue faced by a lot of users recently.
To fix it, simply try using a USB 2.0 port (If it’s not available, you can also use a USB 2.0 hub) on your PC. Also, try using an Intel-based PC for especially when using ADB/Fastboot tools.
How to Modify Google USB Drivers to Support Other Android Devices
Like we mentioned above, Google USB Drivers also work as ‘ADB Drivers’. But by default, they only support the Google Pixel and Nexus devices.
While Android OEMs do provide their own drivers, but it’s more often than they miss to include the required ADB USB drivers in them. In such cases, you can easily modify the ‘android_winusb.inf’ file in Google USB Drivers to support any other Android device to use the ADB and Fastboot tools.
In order for the drivers to support your non-Pixel/Nexus device, you will first need to acquire the Vendor ID (VID) and Product ID (PID) of your device. Once you have them, the second step is to edit the ‘android_winusb.inf’ file and add a new device section with the VID and PID of your own device. And finally, the third and last step is to install the modified drivers.
Sounds confusing? It’s quite simple actually. Just follow the step-by-step instructions below.
Step 1: Get the VID and PID of your Android Device
- First, connect your Android device to the PC using the USB cable.
- Go to ‘Control Panel‘ > ‘Device Manager‘ on the PC.
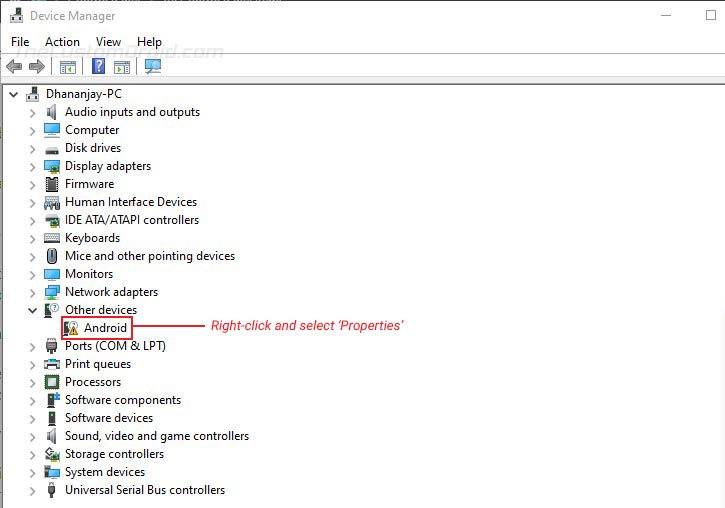
- Locate your unrecognized Android device. An unrecognized device can normally be located under the ‘Universal Serial Bus controllers‘ OR ‘Other devices‘ sections in Device Manager. You would see a yellow-colored triangle warning icon beside the connected device.
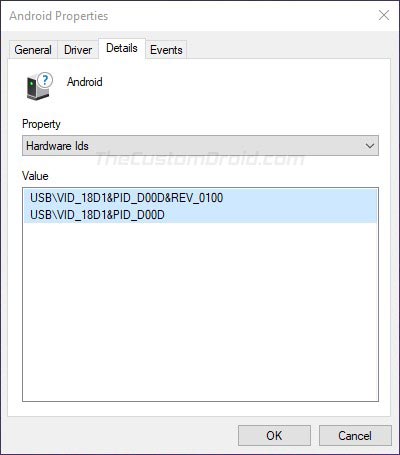
- Right-click on the device name and click on ‘Properties‘.
- Go to the ‘Details‘ tab and select ‘Hardware Ids‘ from the dropdown menu.
- You should now see the Vendor and Product IDs of your Android device.
Step 2: Modify ‘android_winusb.inf’ file
Now that you have the required IDs, you can modify/edit the ‘android_winusb.inf’ file to add your device to the supported list.
- First, locate the ‘usb_driver‘ folder on your PC. Inside the folder, you should have the ‘android_winusb.inf‘ file.
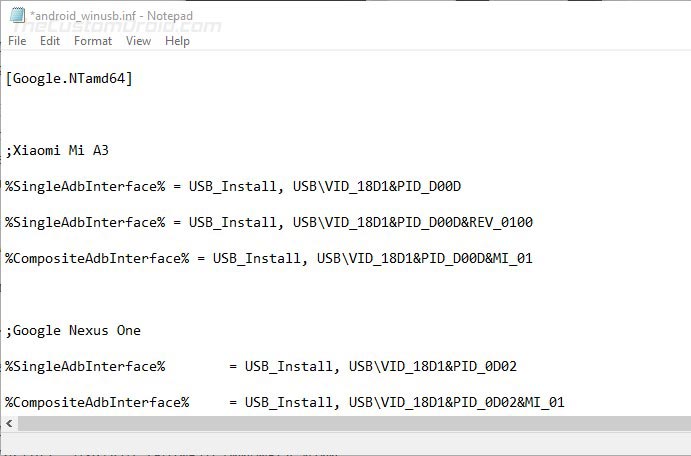
- Open the file using a text editor and locate the ‘[Google.NTx86]‘ section if your Windows PC is 32-bit (x86) or the ‘[Google.NTamd64]‘ section if your Windows PC is 64-bit (x64).
- In the said section, you will see a number of items with the following format:
- You can copy the above lines into the respective section and edit it accordingly.
- The first thing to do is to replace the ‘[device name]‘ item with your actual device name (Nothing specific, it could be anything).
- Next, you have to add your device’s VID and PID values to the %SingleAdbInterface% and %CompositeAdbInterface% items.
- In case your device also has a REV_xxxx ID, you will need to add two lines for the %SingleAdbInterface% item. One without and another with the REV ID. The line with the REV ID should look like:
- For the %CompositeAdbInterface% item, you will further need to add ‘MI_01‘ ID towards the end. With the MI_01 ID, the line should look like:
- For example, my Xiaomi Mi A3 has a VID and PID as ‘USB\VID_18D1&PID_D00D’ & ‘USB\VID_18D1&PID_D00D&REV_0100’. In that case, the lines should look like the following:
Once you have added the lines under the proper section (depending on your PC’s architecture), save the file and exit.
Step 3: Install the Modified USB Drivers
You have now successfully modified the Google USB Drivers to support your Android device. The last step is to install these modified drivers for your device.
To do so, go to ‘Control Panel’ > ‘Device Manager’ and right-click on your device’s name. Then select ‘Update drivers’ to launch the Hardware Update wizard. Simply click on ‘Browse my computer for driver software’ and select ‘Browse’. Now locate the ‘usb_driver’ folder that contains the modified android_winusb.inf file and select it.
Finally, click on ‘Next’ to install the modified drivers for your device. That’s it! Your Windows PC should now recognize your Android device over ADB or Fastboot.
Installing the Google USB Drivers is the easiest solution to make your Windows PC successfully recognize your Android device. And while it should work for most other Android devices too, it’s not a hundred percent guaranteed. And if this happens, you may want to install your device’s OEM specific drivers from this page or by clicking your device manufacturer link below.
For low-level firmware flashing, you could also use MediaTek or Qualcomm USB drivers.
If you face any issues installing the drivers on your PC, feel free to ask us through the comments.
Источник