- SDK Manager
- Recommended Packages
- Adding New Sites
- Troubleshooting
- Installing the Android SDK
- Installing the Android Development Tools
- Installing the JDK/SDK/NDK
- Handling an Android SDK Manager Issue on Windows 8
- Configuring RAD Studio to Work with Your Installed SDK
- Adding Java as a User Override to Your System Path
SDK Manager
The Android SDK separates tools, platforms, and other components into packages you can download using the SDK Manager. For example, when the SDK Tools are updated or a new version of the Android platform is released, you can use the SDK Manager to quickly download them to your environment.
You can launch the SDK Manager in one of the following ways:
- From Eclipse (with ADT), select Window >Android SDK Manager.
- From Android Studio, select Tools >Android >SDK Manager.
- On Windows, double-click the SDK Manager.exe file at the root of the Android SDK directory.
- On Mac or Linux, open a terminal and navigate to the tools/ directory in the location where the Android SDK is installed, then execute android sdk .
You can select which packages you want to download by toggling the checkboxes on the left, then click Install to install the selected packages.

Figure 1. The Android SDK Manager shows the SDK packages that are available, already installed, or for which an update is available.
There are several different packages available for the Android SDK. The table below describes most of the available packages and where they’re located in your SDK directory once you download them.
Recommended Packages
Here’s an outline of the packages required and those we recommend you use:
SDK Tools Required. Your new SDK installation already has the latest version. Make sure you keep this up to date. SDK Platform-tools Required. You must install this package when you install the SDK for the first time. SDK Platform Required.You must download at least one platform into your environment so you’re able to compile your application. In order to provide the best user experience on the latest devices, we recommend that you use the latest platform version as your build target. You’ll still be able to run your app on older versions, but you must build against the latest version in order to use new features when running on devices with the latest version of Android.
To get started, download the latest Android version, plus the lowest version you plan to support (we recommend Android 2.2 for your lowest version).
System Image Recommended. Although you might have one or more Android-powered devices on which to test your app, it’s unlikely you have a device for every version of Android your app supports. It’s a good practice to download system images for all versions of Android your app supports and test your app running on them with the Android emulator. Android Support Recommended. Includes a static library that allows you to use some of the latest Android APIs (such as fragments, plus others not included in the framework at all) on devices running a platform version as old as Android 1.6. All of the activity templates available when creating a new project with the ADT Plugin require this. For more information, read Support Library. SDK Samples Recommended. The samples give you source code that you can use to learn about Android, load as a project and run, or reuse in your own app. Note that multiple samples packages are available — one for each Android platform version. When you are choosing a samples package to download, select the one whose API Level matches the API Level of the Android platform that you plan to use.
Tip: For easy access to the SDK tools from a command line, add the location of the SDK’s tools/ and platform-tools to your PATH environment variable.
The above list is not comprehensive and you can add new sites to download additional packages from third-parties.
In some cases, an SDK package may require a specific minimum revision of another package or SDK tool. The development tools will notify you with warnings if there is dependency that you need to address. The Android SDK Manager also enforces dependencies by requiring that you download any packages that are needed by those you have selected.
Adding New Sites
By default, Available Packages displays packages available from the Android Repository and Third party Add-ons. You can add other sites that host their own Android SDK add-ons, then download the SDK add-ons from those sites.
For example, a mobile carrier or device manufacturer might offer additional API libraries that are supported by their own Android-powered devices. In order to develop using their libraries, you must install their Android SDK add-on, if it’s not already available under Third party Add-ons.
If a carrier or device manufacturer has hosted an SDK add-on repository file on their web site, follow these steps to add their site to the Android SDK Manager:
- Select Available Packages in the left panel.
- Click Add Add-on Site and enter the URL of the repository.xml file. Click OK.
Any SDK packages available from the site will now be listed under a new item named User Add-ons.
Troubleshooting
Problems connecting to the SDK repository
If you are using the Android SDK Manager to download packages and are encountering connection problems, try connecting over http, rather than https. To switch the protocol used by the Android SDK Manager, follow these steps:
Источник
Installing the Android SDK
Android Studio provides everything you need to start developing apps for Android, including the Android Studio IDE and the Android SDK tools.
If you didn’t download Android Studio, go download Android Studio now, or switch to the stand-alone SDK Tools install instructions.
Before you set up Android Studio, be sure you have installed JDK 6 or higher (the JRE alone is not sufficient)—JDK 7 is required when developing for Android 5.0 and higher. To check if you have JDK installed (and which version), open a terminal and type javac -version . If the JDK is not available or the version is lower than 6, go download JDK.
To set up Android Studio on Windows:
- Launch the .exe file you just downloaded.
- Follow the setup wizard to install Android Studio and any necessary SDK tools.
On some Windows systems, the launcher script does not find where Java is installed. If you encounter this problem, you need to set an environment variable indicating the correct location.
Select Start menu > Computer > System Properties > Advanced System Properties. Then open Advanced tab > Environment Variables and add a new system variable JAVA_HOME that points to your JDK folder, for example C:\Program Files\Java\jdk1.7.0_21 .
The individual tools and other SDK packages are saved outside the Android Studio application directory. If you need to access the tools directly, use a terminal to navigate to the location where they are installed. For example:
To set up Android Studio on Mac OSX:
- Unzip the downloaded zip file, android-studio-ide- -mac.zip .
- Drag and drop Android Studio into the Applications folder.
- Open Android Studio and follow the setup wizard to install any necessary SDK tools.
Depending on your security settings, when you attempt to open Android Studio, you might see a warning that says the package is damaged and should be moved to the trash. If this happens, go to System Preferences > Security & Privacy and under Allow applications downloaded from, select Anywhere. Then open Android Studio again.
The individual tools and other SDK packages are saved outside the Android Studio application directory. If you need access the tools directly, use a terminal to navigate into the location where they are installed. For example:
To set up Android Studio on Linux:
- Unpack the downloaded Tar file, android-studio-ide- -linux.zip , into an appropriate location for your applications.
- To launch Android Studio, navigate to the android-studio/bin/ directory in a terminal and execute studio.sh .
You may want to add android-studio/bin/ to your PATH environmental variable so that you can start Android Studio from any directory.
If the SDK is not already installed, follow the setup wizard to install the SDK and any necessary SDK tools.
Note: You may also need to install the ia32-libs, lib32ncurses5-dev, and lib32stdc++6 packages. These packages are required to support 32-bit apps on a 64-bit machine.
Android Studio is now ready and loaded with the Android developer tools, but there are still a couple packages you should add to make your Android SDK complete.
The stand-alone SDK Tools package does not include a complete Android development environment. It includes only the core SDK tools, which you can access from a command line or with a plugin for your favorite IDE (if available).
If you didn’t download the SDK tools, go download the SDK now, or switch to the Android Studio install instructions.
To get started on Windows:
Your download package is an executable file that starts an installer. The installer checks your machine for required tools, such as the proper Java SE Development Kit (JDK) and installs it if necessary. The installer then saves the Android SDK Tools to a specified the location outside of the Android Studio directories.
- Double-click the executable ( .exe file) to start the install.
- Make a note of the name and location where you save the SDK on your system—you will need to refer to the SDK directory later when using the SDK tools from the command line.
- Once the installation completes, the installer starts the Android SDK Manager.
To get started on Mac OSX:
Unpack the ZIP file you’ve downloaded. By default, it’s unpacked into a directory named android-sdk-mac_x86 . Move it to an appropriate location on your machine, such as a «Development» directory in your home directory.
Make a note of the name and location of the SDK directory on your system—you will need to refer to the SDK directory later when using the SDK tools from the command line.
To get started on Linux:
Unpack the .zip file you’ve downloaded. The SDK files are download separately to a user-specified directory.
Make a note of the name and location of the SDK directory on your system—you will need to refer to the SDK directory later when using the SDK tools from the command line.
Troubleshooting Ubuntu
- If you need help installing and configuring Java on your development machine, you might find these resources helpful:
- https://help.ubuntu.com/community/Java
- https://help.ubuntu.com/community/JavaInstallation
- Here are the steps to install Java:
-
If you are running a 64-bit distribution on your development machine, you need to install additional packages first. For Ubuntu 13.10 (Saucy Salamander) and above, install the libncurses5:i386 , libstdc++6:i386 , and zlib1g:i386 packages using apt-get :
For earlier versions of Ubuntu, install the ia32-libs package using apt-get :
The Android SDK tools are now ready to begin developing apps, but there are still a couple packages you should add to make your Android SDK complete.
Then, select which SDK bundle you want to install:
Источник
Installing the Android Development Tools
Important: You do not need to install the Android tools yourself.
- The installer for RAD Studio installs the current recommended and tested versions of the Android development tools during the RAD Studio product installation.
- The Android development tools are conveniently accessible using Start | All Programs | Embarcadero RAD Studio XE6 | Android SDKs , as shown here:

- The Android AVD Manager menu item opens a command window that invokes the Android SDK Manager, which in turn starts the Android Virtual Device Manager for you.
- The Android Tools menu item opens a command window that invokes the Android SDK Manager.
- The installer gives you the option to not install the Android SDK and NDK. If you opt out in the installer, you can either:
- Use a previously installed Android SDK and NDK.
- Install the Android development tools yourself, following the steps in this topic.
Be aware that you need to use the recommended versions of the Android development tools; alternate versions might introduce changes that cannot be supported by RAD Studio. Note: The JDK is installed if you do not have the recommended version of Java (1.6 or 1.7), regardless of whether the Android development tools are installed for you during product installation.
Having the Android development tools installed on your development system is required for developing Android apps using RAD Studio. To build mobile apps for the Android target platform, you also need to add an Android SDK to the RAD Studio SDK Manager.
Here are the default installed locations of the Android development tools as installed by the RAD Studio installer:
- Java Development Kit (JDK): C:\Program Files\Java\jdk1.7.0_25
- Android Software Development Kit (SDK): C:\Users\Public\Documents\Embarcadero\Studio\14.0\PlatformSDKs\adt-bundle-windows-x86-20131030\sdk
- Android Native Development Kit (NDK): C:\Users\Public\Documents\Embarcadero\Studio\14.0\PlatformSDKs\android-ndk-r9c
Installing the JDK/SDK/NDK
- Install the JDK (Java development kit):
- On the PC, download and run the JDK installer, which is available here: http://www.oracle.com/technetwork/java/javase/downloads/index.html
- Install the Android SDK (software development kit):
- In your browser on the PC, open the Android SDK download page and click Download the SDK Tools ADT Bundle for Windows.
- On the Get the Android SDK page, you can select either 32-bit or 64-bit, according to your Windows platform.
- This download includes the SDK tools and the Eclipse IDE. After the download completes, you can safely delete the SDK\adt-bundle-windows-x86-20131030\eclipse folder, unless you want to use the Eclipse IDE.
- From your directory, run SDK Manager.exe. Tips: If the Android SDK Manager does not start, try these suggestions:
- Right-click SDK Manager.exe and choose Run As Administrator.
- Run android.bat from the \tools directory inside your directory.
- In the Android SDK Manager tree, check (enable) the following nodes:
- Tools node
- SDK Platform node within the Android (API ) node, where must be 9 or a higher value (for example, «18»). Note: RAD Studio supports Android 2.3 and later versions regardless of which SDK Platform you download. Android SDK platforms are backward compatible.
- Click Install packages, click Accept License to accept the required licenses, and click Install to install the required software.
- You can close the Android SDK Manager when the installation finishes.
- In your browser on the PC, open the Android SDK download page and click Download the SDK Tools ADT Bundle for Windows.
- Install the Android NDK (native development kit):
- On the PC, download and unzip the NDK for your Windows version (32-bit or 64-bit), available here: http://developer.android.com/tools/sdk/ndk/index.html.
After installing these tools, you need to add an Android SDK to RAD Studio, as described in the next section, and then you can start building mobile applications for the Android platform.
Handling an Android SDK Manager Issue on Windows 8
On Windows 8, you might see errors when you start the Android SDK Manager. If this happens, you might not be able to download any additional SDKs.
The solution is to edit the android.bat file and change the line that launches the Android SDK Manager. Add -Djava.net.preferIPv4Stack=true to the call to Java, as follows:
call %java_exe% -Djava.net.preferIPv4Stack=true %REMOTE_DEBUG% -Dcom.android.sdkmanager.toolsdir=»%tools_dir%» -Dcom.android.sdkmanager.workdir=%work_dir% -classpath «%jar_path%;%swt_path%\swt.jar» com.android.sdkmanager.Main %*
This issue seems to be related to Windows 8 wanting to use Internet Protocol V6.
Configuring RAD Studio to Work with Your Installed SDK
You can use specific versions of the Android SDK simply by pointing the RAD Studio SDK Manager to your installed location.
- Open the Create a New Android SDK wizard by using either Tools Options or Project Manager:
- Choose Tools > Options > Environment Options >SDK Manager | Add | Add new .
- In the Project Manager:
- Right-click the Android target platform and select Properties from the context menu.
- In the SDK field on the Platform Properties dialog box, click Add new in the dropdown list.
- On the Add a New SDK dialog, click Add new in the dropdown list.
- In the Android SDK Base Path and the Android NDK Base Path fields, browse to and select your installed and locations, respectively.
- The Create a new Android SDK wizard now populates the rest of the fields here and on the Android tools locations page. Allow a moment for this process to complete.
- For any fields that are not auto-populated or are marked with , click the entry field and browse to the installed location of that library on your system.
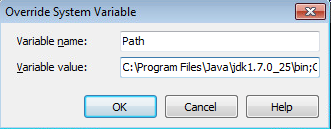
Adding Java as a User Override to Your System Path
If you installed the JDK yourself, Java might not be in your system path. For example, if Java is not in your system path, you must use android.bat to start the Android SDK Manager (instead of SDK Manager.exe). If you want to optimize for Android development, you should add Java to your system path environment variable.
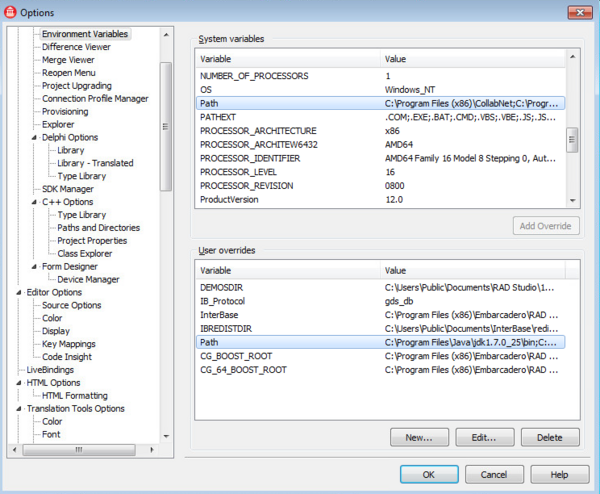
- Choose Tools > Options > Environment Options >Environment Variables .
- In the System variables pane, double-click the Path item.
- In the Override System Variable dialog box, click the Home button on your keyboard to bring the focus to the beginning of the path.
- Add the path to Java at the beginning of your system path (it must precede all references to System32). For example, the default installed path to java.exe in RAD Studio is: C:\Program Files\Java\jdk1.7.0_25\bin Note that you should only need to add an override if your Java installation is different from this. End your path entry with a semicolon (;):
- Click OK on the Override dialog box, and click Yes on the Confirm dialog box that follows.
- Verify that you see the path to Java shown at the start of the Path field in the User overrides pane:
- Click OK to close the Tools Options Dialog Box.
Источник
-

 , click the entry field and browse to the installed location of that library on your system.