Installing the Android SDK
Android Studio provides everything you need to start developing apps for Android, including the Android Studio IDE and the Android SDK tools.
If you didn’t download Android Studio, go download Android Studio now, or switch to the stand-alone SDK Tools install instructions.
Before you set up Android Studio, be sure you have installed JDK 6 or higher (the JRE alone is not sufficient)—JDK 7 is required when developing for Android 5.0 and higher. To check if you have JDK installed (and which version), open a terminal and type javac -version . If the JDK is not available or the version is lower than 6, go download JDK.
To set up Android Studio on Windows:
- Launch the .exe file you just downloaded.
- Follow the setup wizard to install Android Studio and any necessary SDK tools.
On some Windows systems, the launcher script does not find where Java is installed. If you encounter this problem, you need to set an environment variable indicating the correct location.
Select Start menu > Computer > System Properties > Advanced System Properties. Then open Advanced tab > Environment Variables and add a new system variable JAVA_HOME that points to your JDK folder, for example C:\Program Files\Java\jdk1.7.0_21 .
The individual tools and other SDK packages are saved outside the Android Studio application directory. If you need to access the tools directly, use a terminal to navigate to the location where they are installed. For example:
To set up Android Studio on Mac OSX:
- Unzip the downloaded zip file, android-studio-ide- -mac.zip .
- Drag and drop Android Studio into the Applications folder.
- Open Android Studio and follow the setup wizard to install any necessary SDK tools.
Depending on your security settings, when you attempt to open Android Studio, you might see a warning that says the package is damaged and should be moved to the trash. If this happens, go to System Preferences > Security & Privacy and under Allow applications downloaded from, select Anywhere. Then open Android Studio again.
The individual tools and other SDK packages are saved outside the Android Studio application directory. If you need access the tools directly, use a terminal to navigate into the location where they are installed. For example:
To set up Android Studio on Linux:
- Unpack the downloaded Tar file, android-studio-ide- -linux.zip , into an appropriate location for your applications.
- To launch Android Studio, navigate to the android-studio/bin/ directory in a terminal and execute studio.sh .
You may want to add android-studio/bin/ to your PATH environmental variable so that you can start Android Studio from any directory.
If the SDK is not already installed, follow the setup wizard to install the SDK and any necessary SDK tools.
Note: You may also need to install the ia32-libs, lib32ncurses5-dev, and lib32stdc++6 packages. These packages are required to support 32-bit apps on a 64-bit machine.
Android Studio is now ready and loaded with the Android developer tools, but there are still a couple packages you should add to make your Android SDK complete.
The stand-alone SDK Tools package does not include a complete Android development environment. It includes only the core SDK tools, which you can access from a command line or with a plugin for your favorite IDE (if available).
If you didn’t download the SDK tools, go download the SDK now, or switch to the Android Studio install instructions.
To get started on Windows:
Your download package is an executable file that starts an installer. The installer checks your machine for required tools, such as the proper Java SE Development Kit (JDK) and installs it if necessary. The installer then saves the Android SDK Tools to a specified the location outside of the Android Studio directories.
- Double-click the executable ( .exe file) to start the install.
- Make a note of the name and location where you save the SDK on your system—you will need to refer to the SDK directory later when using the SDK tools from the command line.
- Once the installation completes, the installer starts the Android SDK Manager.
To get started on Mac OSX:
Unpack the ZIP file you’ve downloaded. By default, it’s unpacked into a directory named android-sdk-mac_x86 . Move it to an appropriate location on your machine, such as a «Development» directory in your home directory.
Make a note of the name and location of the SDK directory on your system—you will need to refer to the SDK directory later when using the SDK tools from the command line.
To get started on Linux:
Unpack the .zip file you’ve downloaded. The SDK files are download separately to a user-specified directory.
Make a note of the name and location of the SDK directory on your system—you will need to refer to the SDK directory later when using the SDK tools from the command line.
Troubleshooting Ubuntu
- If you need help installing and configuring Java on your development machine, you might find these resources helpful:
- https://help.ubuntu.com/community/Java
- https://help.ubuntu.com/community/JavaInstallation
- Here are the steps to install Java:
-
If you are running a 64-bit distribution on your development machine, you need to install additional packages first. For Ubuntu 13.10 (Saucy Salamander) and above, install the libncurses5:i386 , libstdc++6:i386 , and zlib1g:i386 packages using apt-get :
For earlier versions of Ubuntu, install the ia32-libs package using apt-get :
The Android SDK tools are now ready to begin developing apps, but there are still a couple packages you should add to make your Android SDK complete.
Then, select which SDK bundle you want to install:
Источник
Where can I set my Android SDK locations?
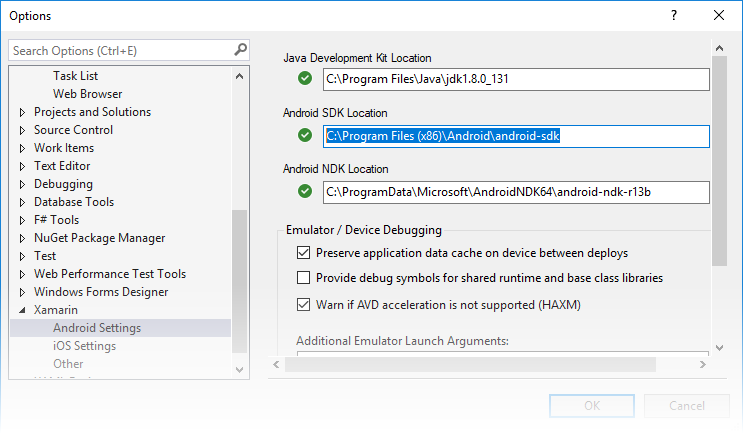
In Visual Studio, navigate to Tools > Options > Xamarin > Android Settings to view and set the Android SDK location:
The default location for each path is as follows:
Java Development Kit Location:
C:\Program Files\Java\jdk1.8.0_131
Android SDK Location:
C:\Program Files (x86)\Android\android-sdk
Android NDK Location:
C:\ProgramData\Microsoft\AndroidNDK64\android-ndk-r13b
Note that the version number of the NDK may vary. For example, instead of android-ndk-r13b, it could be an earlier version such as android-ndk-r10e.
To set the Android SDK location, enter the full path of the Android SDK directory into the Android SDK Location box. You can navigate to the Android SDK location in File Explorer, copy the path from the address bar, and paste this path into the Android SDK Location box. For example, if your Android SDK location is at C:\Users\username\AppData\Local\Android\Sdk, clear the old path in the Android SDK Location box, paste in this path, and click OK.
In Visual Studio for Mac, navigate to Preferences > Projects > SDK Locations > Android. In the Android page, click the Locations tab to view and set the SDK location:
The default location for each path is as follows:
Android SDK Location:
Android NDK Location:
Java SDK (JDK) Location:
/usr
Note that the version number of the NDK may vary. For example, instead of android-ndk-r14b, it could be an earlier version such as android-ndk-r10e.
To set the Android SDK location, enter the full path of the Android SDK directory into the Android SDK Location box. You can select the Android SDK folder in the Finder, press CTRL+вЊ+I to view folder info, click and drag the path to the right of Where:, copy, then paste it to the Android SDK Location box in the Locations tab. For example, if your Android SDK location is at
/Library/Developer/Android/Sdk, clear the old path in the Android SDK Location box, paste in this path, and click OK.
Источник
Где можно задать свои расположения пакета SDK для Android?
в Visual Studio перейдите в меню сервис параметры > Xamarin > Android Параметры , чтобы просмотреть и задать расположение пакет SDK для Android:
Расположение по умолчанию для каждого пути выглядит следующим образом:
Расположение пакета средств разработки Java:
C:\Program Филес\жава\ jdk1.8.0_131
Расположение пакета SDK для Android
C:\Program Files (x86) \Андроид\андроид-СДК
Расположение пакета Android NDK:
C:\ProgramData\Microsoft\AndroidNDK64\android-ndk-r13b
Обратите внимание, что номер версии NDK может отличаться. Например, вместо android-ndk-r13b может быть более ранняя версия, например android-ndk-r10e.
Чтобы задать расположение пакета SDK для Android, введите полный путь к каталогу пакета SDK для Android в поле Расположение пакета SDK для Android. Вы можете перейти к расположению пакета SDK для Android в проводнике, скопировать путь из адресной строки и вставить этот путь в поле Расположение пакета SDK для Android. Например, если расположение пакет SDK для Android находится на к:\усерс\усернаме\аппдата\локал\андроид\сдк, очистите старый путь в поле Расположение пакет SDK для Android , вставьте этот путь и нажмите кнопку ОК.
в Visual Studio для Mac перейдите к параметрам проекты > расположение пакета SDK для > Android. На странице Android перейдите на вкладку Расположения, чтобы просмотреть и задать расположение пакета SDK:
Расположение по умолчанию для каждого пути выглядит следующим образом:
Расположение пакета SDK для Android
Расположение пакета Android NDK:
Расположение пакета SDK для Java (JDK):
/usr
Обратите внимание, что номер версии NDK может отличаться. Например, вместо android-ndk-r14b может быть более ранняя версия, например android-ndk-r10e.
Чтобы задать расположение пакета SDK для Android, введите полный путь к каталогу пакета SDK для Android в поле Расположение пакета SDK для Android. Можно выбрать папку пакет SDK для Android в Finder, нажать клавиши CTRL + ⌘ + I , чтобы просмотреть сведения о папке, щелкнуть и перетащить путь справа от раздела :, скопировать, а затем вставить его в поле Расположение пакет SDK для Android на вкладке расположения . Например, если расположение пакет SDK для Android находится в папке
/либрари/девелопер/андроид/СДК, очистите старый путь в поле Расположение пакет SDK для Android , вставьте этот путь и нажмите кнопку ОК.
Источник
Как установить Android SDK на Windows, Mac и Linux
22 октября 2008 года в Android появился магазин приложений Play Market. С тех пор прошло больше 10 лет и сегодня Google Play насчитывает почти 3 миллиона приложений в их числе Telegram с каналом AndroidInsider. Как же разработчикам со всего мира удается создавать качественные продукты? Они используют Android SDK. Чтобы получить все инструменты и средства разработки приложений, необходимо скачать среду разработки Android Studio. Но что, если вы хотите воспользоваться Android SDK с командной строкой без Android Studio и ненужных средств? В этом материале мы подскажем, как правильно установить и настроить Software Development Kit.
Ручная установка
Переходим по этой ссылке, находим раздел «Command line tools only» и скачиваем нужную версию в зависимости от вашей системы.
Создайте папку Android в корневой папке системы. В случае с Windows это локальный диск «С», а в OS X и Linux — домашняя папка пользователя. Распакуйте скачанный архив в папку Android. Для дальнейшей работы необходим установленный пакет Java на компьютере. OS X из коробки его поддерживает, чтобы проверить это, в терминале вбейте «which java», система должна выдать расположение пакета. На Windows и Linux устанавливаем JDK по этой ссылке.
Если вы используете Linux, вам понадобится установить еще несколько пакетов с помощью этой команды «sudo apt-get install lib32ncurses5 lib32stdc++6». Для других версий Linux необходимо найти подходящие пакеты ncurses5 и stdc++6.
Установка компонентов
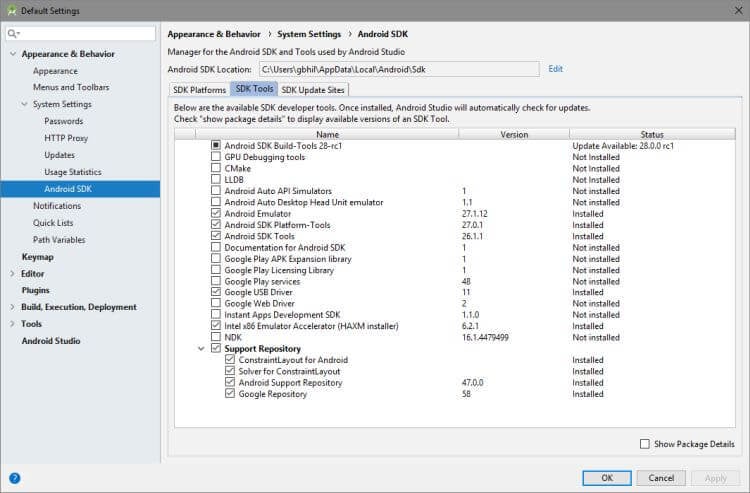
Переходим в папку «Android/bin», находим исполняемый файл sdkmanager и запускаем, откроется следующее окно:
Выбираем «Android SDK Tools» и «Android SDK Platform-Tools», на Windows необходимо выбрать еще и «Google USB Driver». После этого подтвердите условия лицензионного соглашения, и начнется установка инструментов. В Windows они расположатся в папке «Windows\users\Имя пользователя\AppData\Local\Android», а на Linux и Mac в папке «.Android».
Ссылки
Теперь давайте создадим символическую ссылку на эти папки, чтобы можно было быстро запустить инструменты через командную строку.
В Windows переходим в «Этот компьютер → Свойства → Дополнительные параметры системы → Дополнительно → Переменные среды». В «Переменные среды для пользователя» находим строку «Path» и кликаем по ней 2 раза. Откроется окно, в нём нажимаем «Создать» и вставляем полный путь к инструментам через точку с запятой. Должно выглядеть примерно так «C:\Android\tools;C:\Android\platform-tools».
На Mac в домашней папке находим скрытый файл «.bash_profile» или просто «.profile». Открываем его командой «nano
/.profile» и добавляем путь до инструментов:
export PATH=»$HOME/Android/tools:$PATH»
export PATH=»$HOME/Android/platform-tools:$PATH»Сохраняем файл комбинацией «CMD+X» и далее жмём «Y». На Linux процесс аналогичен, но нужно запускать файл .bashrc.
Вот и всё. Теперь команды Android SDK доступны через консоль. Вы сможете, например, устанавливать образы и вручную обновлять смартфон.
Источник
-


