В этой статье показано, как обновить версию пакета Java Development Kit (JDK) в Windows и Mac.
Обзор
Xamarin.Android использует Java Development Kit (JDK) для интеграции с пакетом SDK для Android в целях создания приложений Android и запуска конструктора Android. Последние версии пакетов SDK для Android (API 24 и более поздних версий) требуют JDK 8 (1.8). Кроме того, можно установить предварительную версию Microsoft Mobile OpenJDK. Microsoft Mobile OpenJDK, в конечном итоге, заменит JDK 8 для разработки Xamarin.Android.
Сведения об обновлении до Microsoft Mobile OpenJDK см. в разделе Обзор. Чтобы обновить до JDK 8, выполните приведенные ниже действия.
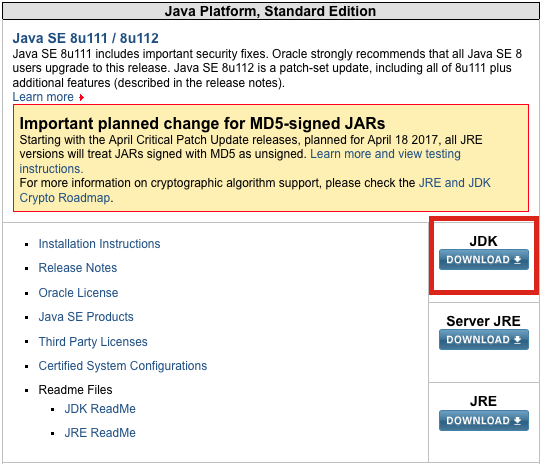
Загрузите JDK 8 (1.8) с веб-сайта Oracle:
Выберите 64-разрядную версию, чтобы разрешить рендеринг пользовательских элементов управления в конструкторе Xamarin Android:
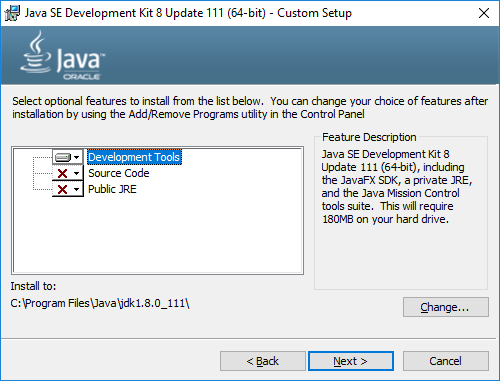
Запустите EXE-файл и установите средства разработки.
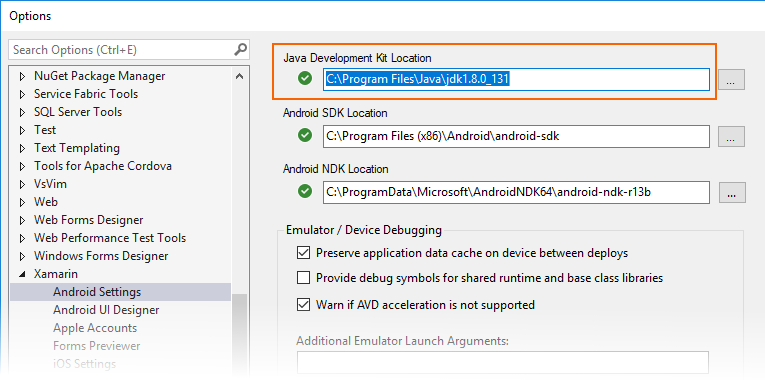
откройте Visual Studio и обновите расположение пакета средств разработки Java , чтобы оно указывало на новый JDK в разделе сервис параметры Xamarin > Android Параметры > пакет разработки java:
Не забудьте перезапустить Visual Studio после обновления расположения.
Загрузите JDK 8 (1.8) с веб-сайта Oracle:
Откройте DMG-файл и запустите установщик PKG-файлов:
Источник
Java Downloads
Looking for other Java downloads?
Java 17 available now
Java 17 LTS is the latest long-term support release for the Java SE platform. JDK 17 binaries are free to use in production and free to redistribute, at no cost, under the Oracle No-Fee Terms and Conditions.
JDK 17 will receive updates under these terms, until at least September 2024.
Java SE Development Kit 17.0.1 downloads
Thank you for downloading this release of the Java™ Platform, Standard Edition Development Kit (JDK™). The JDK is a development environment for building applications and components using the Java programming language.
The JDK includes tools for developing and testing programs written in the Java programming language and running on the Java platform.
Product/file description
File size
Download
Arm 64 Compressed Archive
171.13 MB
x64 Compressed Archive
172.35 MB
Product/file description
File size
Download
Arm 64 Compressed Archive
166.88 MB
x64 Compressed Archive
169.42 MB
Product/file description
File size
Download
x64 Compressed Archive
170.66 MB
JDK 17 Script-friendly URLs
The URLs listed above will remain the same for all JDK 17 updates to allow their use in scripts.
Release information
Protect your investment—and more
Java SE subscribers get support for JDK 17, receive updates until at least October 2029, are entitled to GraalVM Enterprise, Java Management Service, and bundled patch releases (BPRs) with fixes not yet available to nonsubscribers, and more.
Java SE subscribers have more choices
Also available for development, personal use, and to run other licensed Oracle products.
Java SE Development Kit 11.0.13
Java SE subscribers will receive JDK 11 updates until at least September of 2026.
These downloads can be used for development, personal use, or to run Oracle licensed products. Use for other purposes, including production or commercial use, requires a Java SE subscription or another Oracle license.
Product/file description
File size
Download
ARM 64 Debian Package
134.3 MB
ARM 64 Compressed Archive
156.67 MB
x64 Compressed Archive
160.53 MB
Product/file description
File size
Download
x64 DMG Installer
154.44 MB
x64 Compressed Archive
154.93 MB
Product/file description
File size
Download
SPARC Compressed Archive
184.13 MB
Product/file description
File size
Download
x64 Installer
139.83 MB
x64 Compressed Archive
157.28 MB
Release information
Java SE Development Kit 8u311
Java SE subscribers will receive JDK 8 updates until at least December of 2030.
The Oracle JDK 8 license changed in April 2019
The Oracle Technology Network License Agreement for Oracle Java SE is substantially different from prior Oracle JDK 8 licenses. This license permits certain uses, such as personal use and development use, at no cost — but other uses authorized under prior Oracle JDK licenses may no longer be available. Please review the terms carefully before downloading and using this product. FAQs are available here.
Commercial license and support are available for a low cost with Java SE Subscription.
Источник
Android Studio для NDK под Windows
На днях я обнаружил, что версия Android Studio неуклонно стремится к единице, в связи с чем задумался об изучении этого инструмента. Чтобы не было скучно, я решил поделиться своим опытом и собранными граблями в виде статьи-туториала.
Сразу хочу оговориться, что я не являюсь гуру Android-разработки, поэтому каких-либо откровений в тексте вы не найдете. Зато тут есть пошаговая инструкция по установке и настройке Android Studio под Windows и созданию простейшего проекта с использованием Android NDK.
Также заранее предупреждаю: статья получилась большой и очень подробной (честно, сам не ожидал), даже несмотря на то, что я почти все скриншоты и некоторые листинги кода спрятал под спойлеры.
На момент написания последней версией Android Studio была 0.8.1, для последующих версий необходимые действия могут отличаться от нижеописанных (очень надеюсь, что в лучшую сторону).
Установка и настройка Android Studio
1. Необходимо установить JDK (Java Development Kit) и JRE (Java Runtime Environment).
Раньше Android SDK поддерживал только JDK версии 6, но теперь это в прошлом. Поддерживается 7 и даже 8 (по крайней мере, именно 8-ю версию я указал в качестве JAVA_HOME и в настройках Android Studio, и никаких проблем не испытал). JRE же нужен для запуска самой студии. У меня она использует версию 7. Скачать JDK и JRE версий больше 6 можно с сайта Oracle.
Переменную JAVA_HOME теперь, вроде бы, можно не устанавливать, так как в Android Studio мы будем в настройках прописывать путь к JDK. Но я ее установил. Для этого нужно:
Зайти в Панель управления\Система и безопасность\Система, выбрать слева Дополнительные параметры системы, в открывшемся диалоге найти кнопку Переменные среды.
Создать системную или пользовательскую переменную JAVA_HOME и указать для нее путь к JDK. У меня указан вот такой путь: C:\Program Files\Java\jdk1.8.0_05.
2. Если у вас установлен Android SDK.
В комплекте с Android Studio идет свой Android SDK. И, если вы хотите использовать именно его, то в некоторых случаях может случиться странное. Например, у меня при обновлении SDK через SDK Manager часть файлов записывалась в старую папку, и возникли проблемы, когда я эту папку удалил. Скорее всего это произошло из-за того, что в реестре хранился ключ с путем к старой папке. Поэтому имеет смысл почистить реестр. Для этого нужно запустить regedit.exe и найти HKEY_LOCAL_MACHINE\Software\Android SDK Tools для 32-битных машин либо HKEY_LOCAL_MACHINE\Software\Wow6432Node\Android SDK Tools для 64-битных машин и удалить Android SDK Tools. Если в реестре вашей системы таких ключей нет, то все в порядке.
Если у вас установлена переменная среды ANDROID_SDK_HOME и вы хотите, чтобы она указывала на старую установку, то, по идее, это не должно стать проблемой, так как при настройке Android Studio мы укажем ей путь к SDK. Проблемы могут возникнуть, если эту переменную использует какое-либо из приложений, входящих в состав Android SDK.
3. Теперь переходим к установке Android Studio.
Нужно скачать Android Studio для вашей системы с официальной страницы и установить ее. По умолчанию, если выбрать «Установить только для меня» ставится в \Users\ \AppData\Local\Android\android-studio\, иначе ставится в \Program FIles (x86)\Android\android-studio\. Можно выбрать и другую папку.
После установки запускаем Android Studio.
Источник
Installing the Android SDK
Android Studio provides everything you need to start developing apps for Android, including the Android Studio IDE and the Android SDK tools.
If you didn’t download Android Studio, go download Android Studio now, or switch to the stand-alone SDK Tools install instructions.
Before you set up Android Studio, be sure you have installed JDK 6 or higher (the JRE alone is not sufficient)—JDK 7 is required when developing for Android 5.0 and higher. To check if you have JDK installed (and which version), open a terminal and type javac -version . If the JDK is not available or the version is lower than 6, go download JDK.
To set up Android Studio on Windows:
Launch the .exe file you just downloaded.
Follow the setup wizard to install Android Studio and any necessary SDK tools.
On some Windows systems, the launcher script does not find where Java is installed. If you encounter this problem, you need to set an environment variable indicating the correct location.
Select Start menu > Computer > System Properties > Advanced System Properties. Then open Advanced tab > Environment Variables and add a new system variable JAVA_HOME that points to your JDK folder, for example C:\Program Files\Java\jdk1.7.0_21 .
The individual tools and other SDK packages are saved outside the Android Studio application directory. If you need to access the tools directly, use a terminal to navigate to the location where they are installed. For example:
To set up Android Studio on Mac OSX:
Unzip the downloaded zip file, android-studio-ide- -mac.zip .
Drag and drop Android Studio into the Applications folder.
Open Android Studio and follow the setup wizard to install any necessary SDK tools.
Depending on your security settings, when you attempt to open Android Studio, you might see a warning that says the package is damaged and should be moved to the trash. If this happens, go to System Preferences > Security & Privacy and under Allow applications downloaded from, select Anywhere. Then open Android Studio again.
Follow the links to install the SDK outside of the Android Studio directories.
The individual tools and other SDK packages are saved outside the Android Studio application directory. If you need access the tools directly, use a terminal to navigate into the location where they are installed. For example:
To set up Android Studio on Linux:
Unpack the downloaded Tar file, android-studio-ide- -linux.zip , into an appropriate location for your applications.
To launch Android Studio, navigate to the android-studio/bin/ directory in a terminal and execute studio.sh .
You may want to add android-studio/bin/ to your PATH environmental variable so that you can start Android Studio from any directory.
If the SDK is not already installed, follow the setup wizard to install the SDK and any necessary SDK tools.
Note: You may also need to install the ia32-libs, lib32ncurses5-dev, and lib32stdc++6 packages. These packages are required to support 32-bit apps on a 64-bit machine.
Android Studio is now ready and loaded with the Android developer tools, but there are still a couple packages you should add to make your Android SDK complete.
The stand-alone SDK Tools package does not include a complete Android development environment. It includes only the core SDK tools, which you can access from a command line or with a plugin for your favorite IDE (if available).
If you didn’t download the SDK tools, go download the SDK now, or switch to the Android Studio install instructions.
To get started on Windows:
Your download package is an executable file that starts an installer. The installer checks your machine for required tools, such as the proper Java SE Development Kit (JDK) and installs it if necessary. The installer then saves the Android SDK Tools to a specified the location outside of the Android Studio directories.
Double-click the executable ( .exe file) to start the install.
Make a note of the name and location where you save the SDK on your system—you will need to refer to the SDK directory later when using the SDK tools from the command line.
Once the installation completes, the installer starts the Android SDK Manager.
To get started on Mac OSX:
Unpack the ZIP file you’ve downloaded. By default, it’s unpacked into a directory named android-sdk-mac_x86 . Move it to an appropriate location on your machine, such as a «Development» directory in your home directory.
Make a note of the name and location of the SDK directory on your system—you will need to refer to the SDK directory later when using the SDK tools from the command line.
To get started on Linux:
Unpack the .zip file you’ve downloaded. The SDK files are download separately to a user-specified directory.
Make a note of the name and location of the SDK directory on your system—you will need to refer to the SDK directory later when using the SDK tools from the command line.
Troubleshooting Ubuntu
If you need help installing and configuring Java on your development machine, you might find these resources helpful:
If you are running a 64-bit distribution on your development machine, you need to install additional packages first. For Ubuntu 13.10 (Saucy Salamander) and above, install the libncurses5:i386 , libstdc++6:i386 , and zlib1g:i386 packages using apt-get :
For earlier versions of Ubuntu, install the ia32-libs package using apt-get :
The Android SDK tools are now ready to begin developing apps, but there are still a couple packages you should add to make your Android SDK complete.
Then, select which SDK bundle you want to install: