- How to Fix “SDK location not found” in Android Studio?
- When switching from one IDE to another (Like from Eclipse to Android Studio)
- Данные о местоположении
- Примеры кода
- Работа с данными о местоположении
- Доступ к данным о местоположении
- Добавление разрешений в манифест приложения
- Запрос разрешений в среде выполнения
- Kotlin
- Слой «Мое местоположение»
- Kotlin
- Location API сервисов Google Play
- Getting Started with HERE using Kotlin and the Android SDK
- Try HERE Maps
- Creating a New Android Studio Project with Kotlin Support
- Installing and Configuring the HERE Android SDK
- Displaying an Interactive Map on the Screen with Kotlin
- Conclusion
How to Fix “SDK location not found” in Android Studio?
Google developed Android SDK which is a Software Development Kit developed by Google for the Android platform. You can create Android apps using Android SDK, and you don’t need to be an expert to use it. Android SDK and Android Studio come bundled together, with Google’s official integrated development environment (IDE) for the Android operating system.
In this article, we see how to fix an error that is related to the main Android building component of Android Studio that is the Android SDK. The most common error related to Android SDK is “SDK location not found“. This message pops up stating that the location of Android SDK was not detected when the path of SDK is assigned incorrectly. There can also be other reasons for this error message as well and we will see ways to get rid of this error.
When switching from one IDE to another (Like from Eclipse to Android Studio)
Method 1
In this case, follow the below steps:
Method 2
In case the above procedure doesn’t work then add the ANDROID_HOME variable in “Environment Variables” as C:\Users\Username\AppData\Local\Android\Sdk.
Method 3
In case it does not work even then, then you need to change the directory path on Project Structure as well.
- Close the current project and you’ll see a pop-up with a dialog which will then proceed to Configure option.
- Configure -> Project Defaults -> Project Structure -> SDKs on left column -> Android SDK Home Path -> give the exact path as you did on local.properties and select Valid Target.
Method 4
A settings.gradle file might be missing from the project. Make sure that the file exists from the project you are importing. If not add the settings.gradle file with the following:
Save the file and put it in the top-level folder in your project.
Источник
Данные о местоположении
В приложениях для мобильных устройств особенно важную роль играют данные о местоположении, применение которых способно обеспечить пользователю дополнительное удобство, где бы он ни находился.
Примеры кода
Хранилище ApiDemos на сайте GitHub содержит пример, который демонстрирует использование данных о местоположении на карте.
Java
- MyLocationDemoActivity: использование слоя «Мое местоположение», включая динамические разрешения.
- LocationSourceDemoActivity: использование собственного источника LocationSource .
- CurrentPlaceDetailsOnMap: определение текущего местоположения устройства Android и отображение сведений об организации или другом объекте, который там находится. Ознакомьтесь с руководством по отображению сведений о месте на карте.
Kotlin
- MyLocationDemoActivity: использование слоя «Мое местоположение», включая динамические разрешения.
- CurrentPlaceDetailsOnMap: определение текущего местоположения устройства Android и отображение сведений об организации или другом объекте, который там находится. Ознакомьтесь с руководством по отображению сведений о месте на карте.
Работа с данными о местоположении
Устройствам Android могут быть доступны данные о текущем местоположении (для их сбора используется комбинация нескольких технологий), о направлении и способе движения, а также о том, покинуло ли устройство геозону, т. е. пересекло ли оно заданную географическую границу. Работать с данными о местоположении можно несколькими способами в зависимости от задач конкретного приложения.
- Слой Мое местоположение представляет собой простой способ отобразить местонахождение устройства на карте. Он не возвращает никаких данных.
- Для всех программных запросов данных о местоположении рекомендуется использовать Location API сервисов Google Play.
- Интерфейс LocationSource позволяет использовать собственный источник данных о местоположении.
Доступ к данным о местоположении
Если приложению требуется доступ к данным о местоположении пользователя, вы должны запросить разрешение, добавив в приложение соответствующие настройки.
Android предлагает два разрешения на использование данных о местоположении: ACCESS_COARSE_LOCATION и ACCESS_FINE_LOCATION . От вашего выбора зависит, насколько точную информацию будет предоставлять API. Вам необходимо запросить только одно из разрешений на использование данных о местоположении Android в зависимости от требуемого уровня точности:
- android.permission.ACCESS_COARSE_LOCATION позволяет использовать точки доступа Wi-Fi и/или мобильные данные, чтобы определять приблизительное местоположение устройства. API предоставляет информацию о местоположении с точностью примерно до городского квартала.
- android.permission.ACCESS_FINE_LOCATION позволяет API максимально точно определять местоположение на основании информации, предоставляемой поставщиками данных о местоположении, включая глобальную систему позиционирования (GPS), сеть Wi-Fi и мобильные данные.
Добавление разрешений в манифест приложения
Добавьте одно из следующих разрешений в качестве дочернего для элемента в манифесте Android. Укажите разрешение для данных о приблизительном местоположении:
Или разрешение для данных о точном местоположении:
Запрос разрешений в среде выполнения
В Android 6.0 (Marshmallow) представлена новая модель работы с разрешениями, которая оптимизирует процесс установки и обновления приложений пользователями. Если ваше приложение предназначено для API уровня 23 или более позднего, вы можете использовать новую модель разрешений.
Если приложение поддерживает новую модель разрешений, а на устройстве используется Android 6.0 (Marshmallow) или более новая версия, пользователю не нужно предоставлять какие-либо разрешения при установке приложения или его обновлении. Пользователь увидит диалоговое окно с просьбой предоставить соответствующее разрешение.
Чтобы обеспечить удобство для пользователя, важно запрашивать доступ в контексте. Если эта информация необходима для работы приложения, запрашивайте разрешение при запуске. Для этого рекомендуется использовать экран приветствия или мастер с объяснением причины запроса.
Если доступ к данным о местоположении необходим приложению лишь для некоторых функций, то запрос следует показывать лишь при выполнении действия, требующего такого разрешения.
Приложение должно корректно продолжить работу, если пользователь откажется предоставить доступ. Например, если разрешение требуется лишь для определенной функции, приложение может просто отключить ее. Если же приложение неспособно работать без этих данных, в нем могут отключиться функциональные возможности. При этом следует проинформировать пользователя о том, что для дальнейшей работы нужен доступ к данным о местоположении.
В следующем примере кода проверка разрешения выполняется с использованием библиотеки поддержки перед включением слоя «Мое местоположение»: Затем результат запроса разрешения обрабатывается путем реализации ActivityCompat.OnRequestPermissionsResultCallback из библиотеки поддержки.
Kotlin
Слой «Мое местоположение»
Слой «Мое местоположение» и одноименная кнопка позволяют пользователям видеть свое актуальное местоположение на карте. Чтобы включить слой «Мое местоположение», вызовите метод mMap.setMyLocationEnabled() .
Простой пример использования слоя «Мое местоположение»:
Kotlin
Если включен слой «Мое местоположение», соответствующая кнопка отображается в правом верхнем углу экрана. При нажатии этой кнопки камера центрирует карту по текущему местоположению устройства, если оно известно. На карте местоположение обозначается маленькой синей точкой, если устройство неподвижно, или значком шеврона, если устройство находится в движении.
На скриншоте ниже вы можете увидеть кнопку «Мое местоположение» справа вверху и синюю точку в центре карты.
Чтобы предотвратить показ кнопки «Мое местоположение», вызовите UiSettings.setMyLocationButtonEnabled(false) .
Ваше приложение может реагировать на следующие события:
- Если пользователь нажимает кнопку «Мое местоположение», ваше приложение получает обратный вызов onMyLocationButtonClick() от прослушивателя GoogleMap.OnMyLocationButtonClickListener .
- Если пользователь нажимает на синюю точку «Мое местоположение», ваше приложение получает обратный вызов onMyLocationClick() от прослушивателя GoogleMap.OnMyLocationClickListener .
Важный пункт Условий использования
Обеспечивайте конфиденциальность пользователей,
информируйте их о том, что происходит в приложении.
Всегда сообщайте пользователям, как вы собираетесь применять их данные. Препятствуйте персональной идентификации пользователей по их данным. Перед применением данных о местоположении обязательно получите разрешение. Дайте пользователям возможность в любое время отозвать его.

Location API сервисов Google Play
Данные о местоположении в приложениях для Android лучше всего обрабатывать с помощью Location API сервисов Google Play. Он позволяет выполнять следующие задачи:
- определять местоположение устройства;
- отслеживать изменение местоположения с помощью прослушивателей;
- определять способ движения, если местоположение устройства меняется;
- создавать геозоны и отслеживать пересечение их границ.
Location API упрощает создание приложений, работающих с данными о текущем местоположении пользователя и эффективно расходующих ресурс аккумулятора устройства. Как и Maps SDK for Android, Location API распространяется как часть SDK сервисов Google Play. Дополнительную информацию вы можете найти в учебном материале об использовании в приложении данных о местоположении, а также в документации по Location API. Примеры кода содержатся в SDK сервисов Google Play.
Except as otherwise noted, the content of this page is licensed under the Creative Commons Attribution 4.0 License, and code samples are licensed under the Apache 2.0 License. For details, see the Google Developers Site Policies. Java is a registered trademark of Oracle and/or its affiliates.
Источник
Getting Started with HERE using Kotlin and the Android SDK
Try HERE Maps
Create a free API key to build location-aware apps and services.
About a month or so ago I had written a tutorial for getting started with HERE using Java and the Android SDK. Even though documentation for the job already existed, I wanted to put my own spin on the process to try to make it a little easier.
While Java is great, it is becoming a relic of time and slowly being replaced with Kotlin, which is considered to be the new hotness. Kotlin can compile to bytecode for the JVM and in these circumstances we can reproduce all of our Java applications with Kotlin, an entirely different, but increasingly popular language.
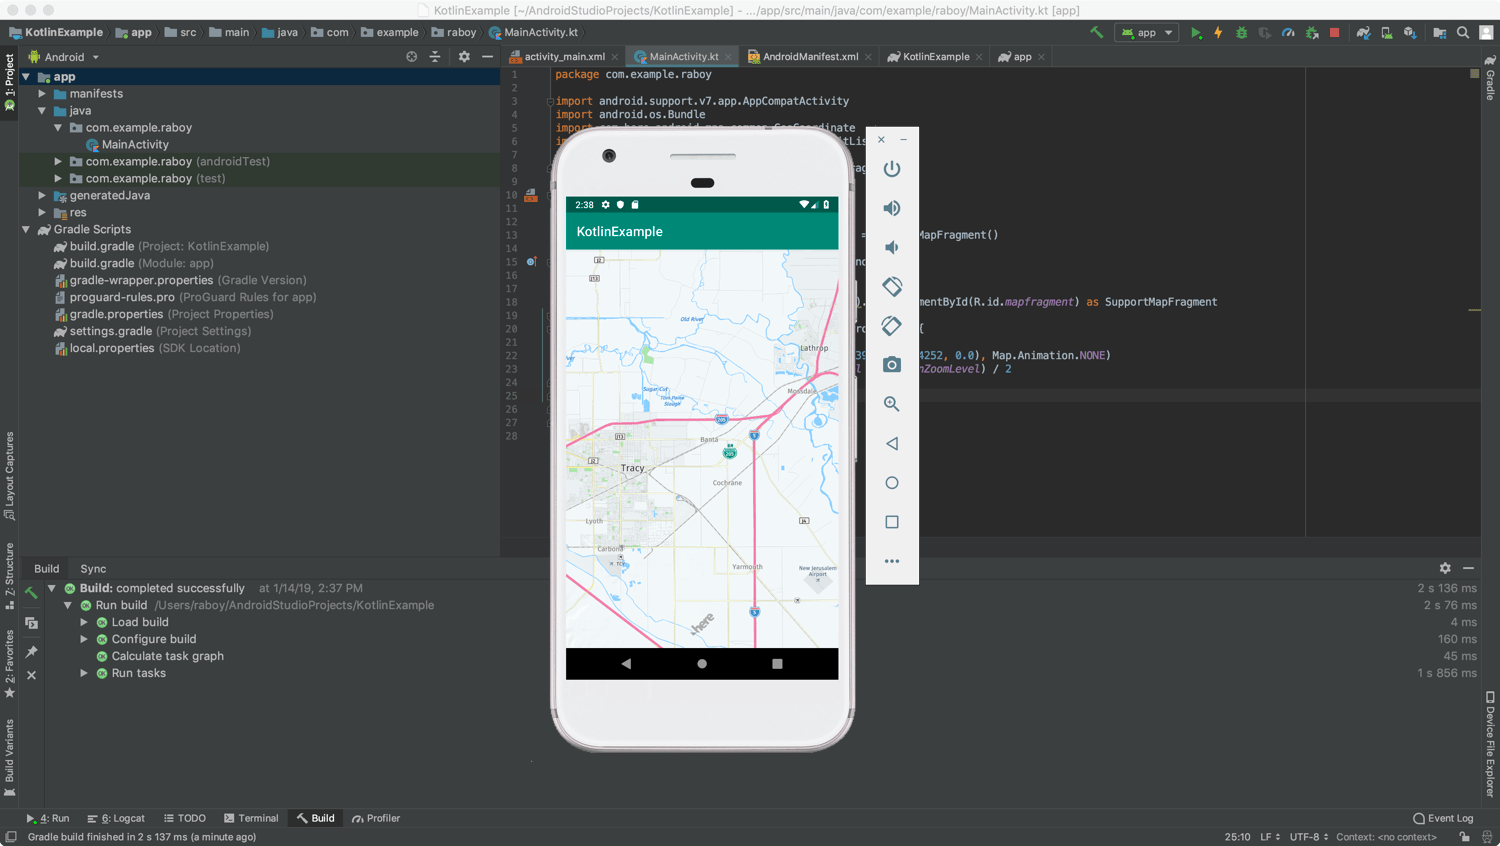
In this tutorial, we’re going to see how to build an Android application using Kotlin that displays a HERE map.
To get some perspective, we’re going to try to accomplish the following:
If you think the above image looks familiar, it is because it is the same example I used in my previous tutorial. We are literally just going to be displaying an interactive map. While it might sound easy, there is some configuration that must be done to make it possible.
Creating a New Android Studio Project with Kotlin Support
You don’t need Android Studio to work with Kotlin or to build Android applications, but it makes life a whole lot easier. For this reason, Android Studio will be the focus for our example.
I’m using Android Studio 3.3, so if you’re using a different version you might have to fill in the gaps.
To start things off, choose to create a new project.
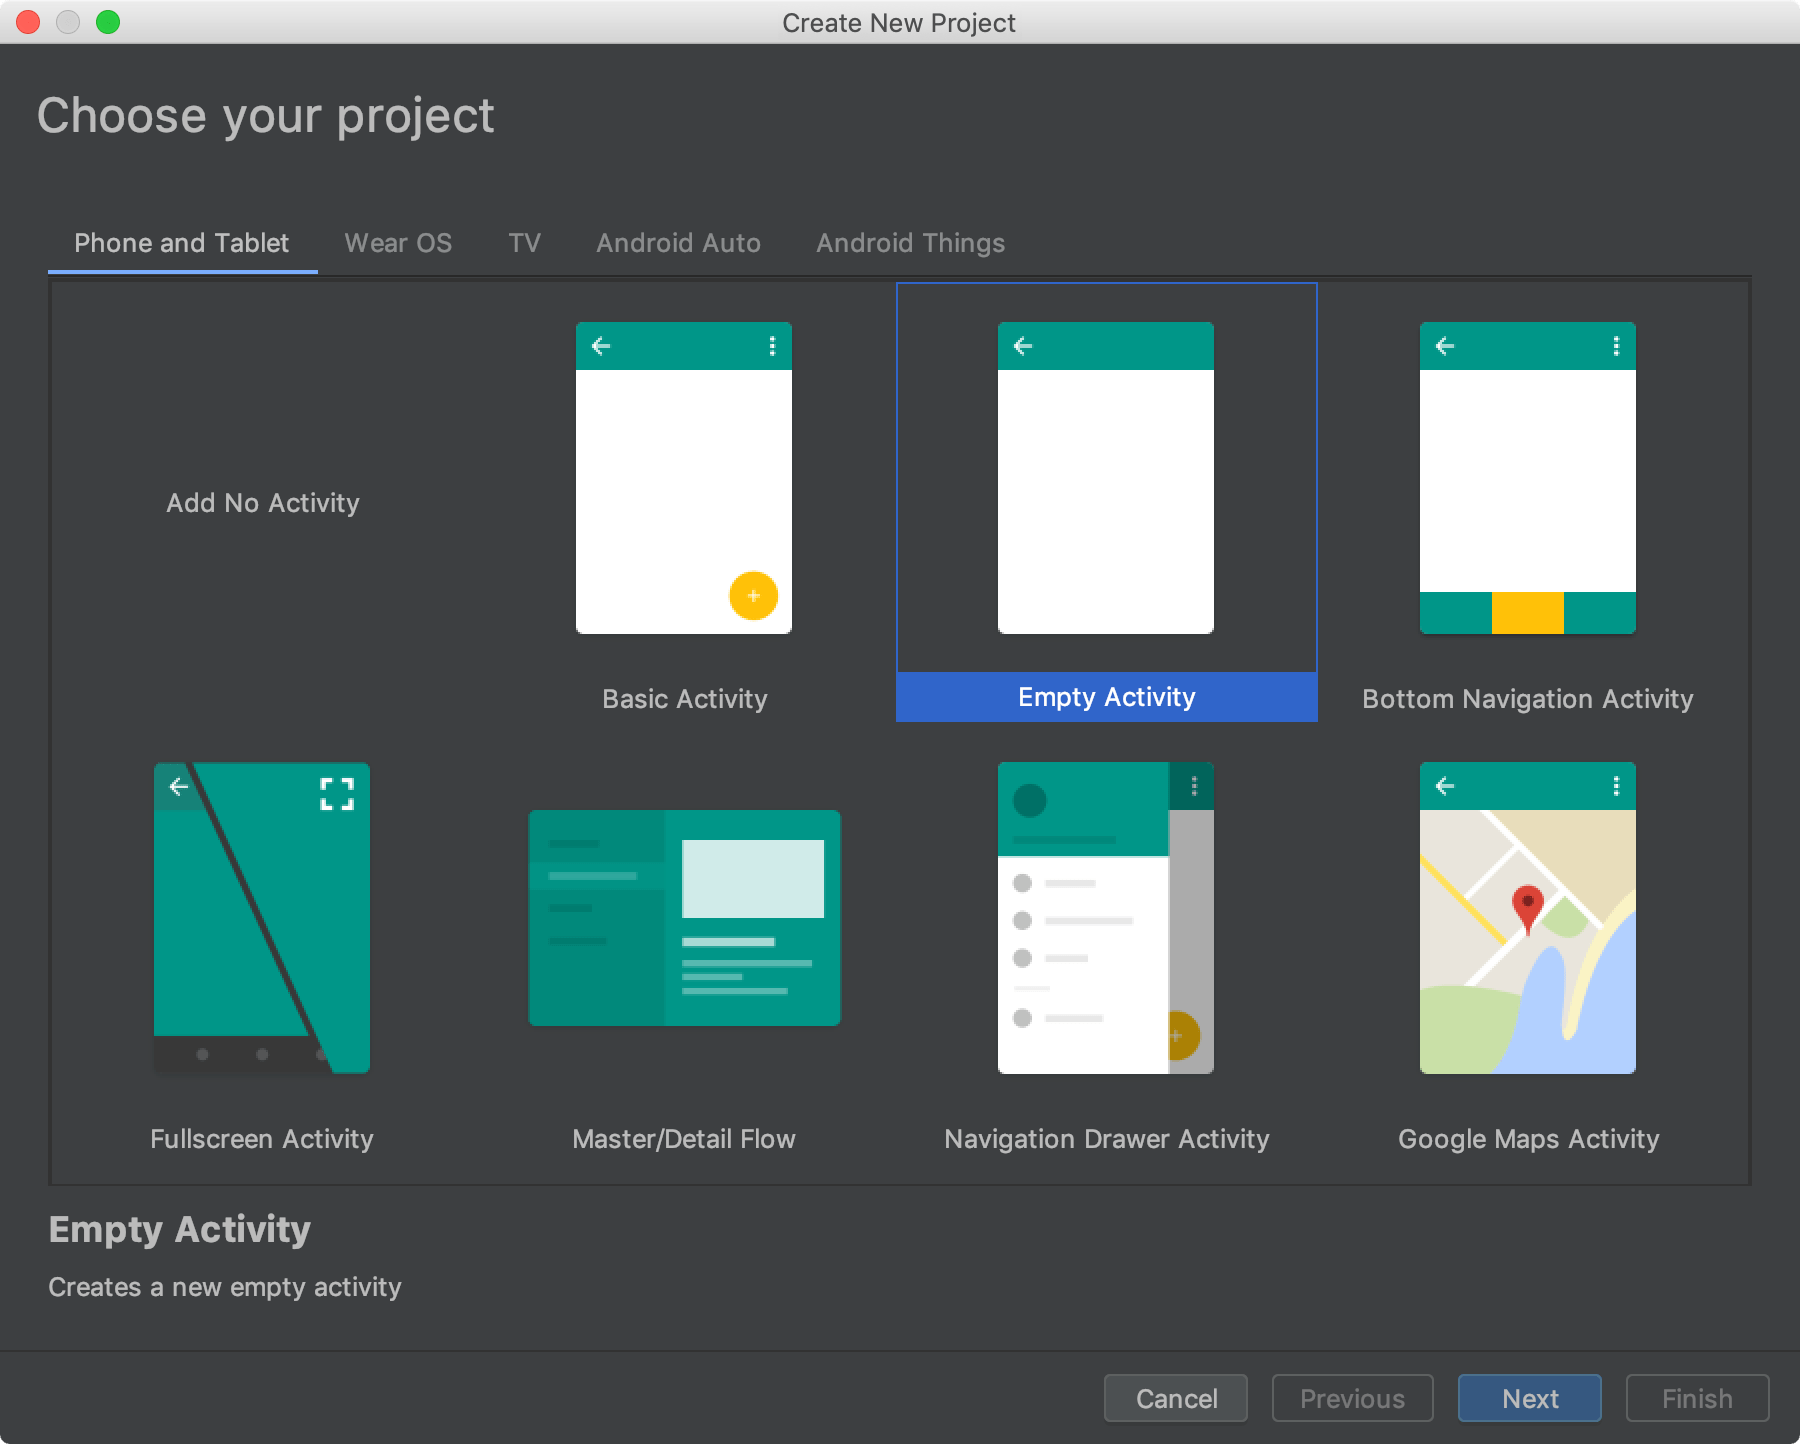
Because this is a very basic example, make sure to create a project with an empty activity. If you’re feeling adventurous, pick what you feel is the most appropriate or make an attempt to use your existing project.
After choosing to use an empty activity, we need to define our API versions, package naming, and language.
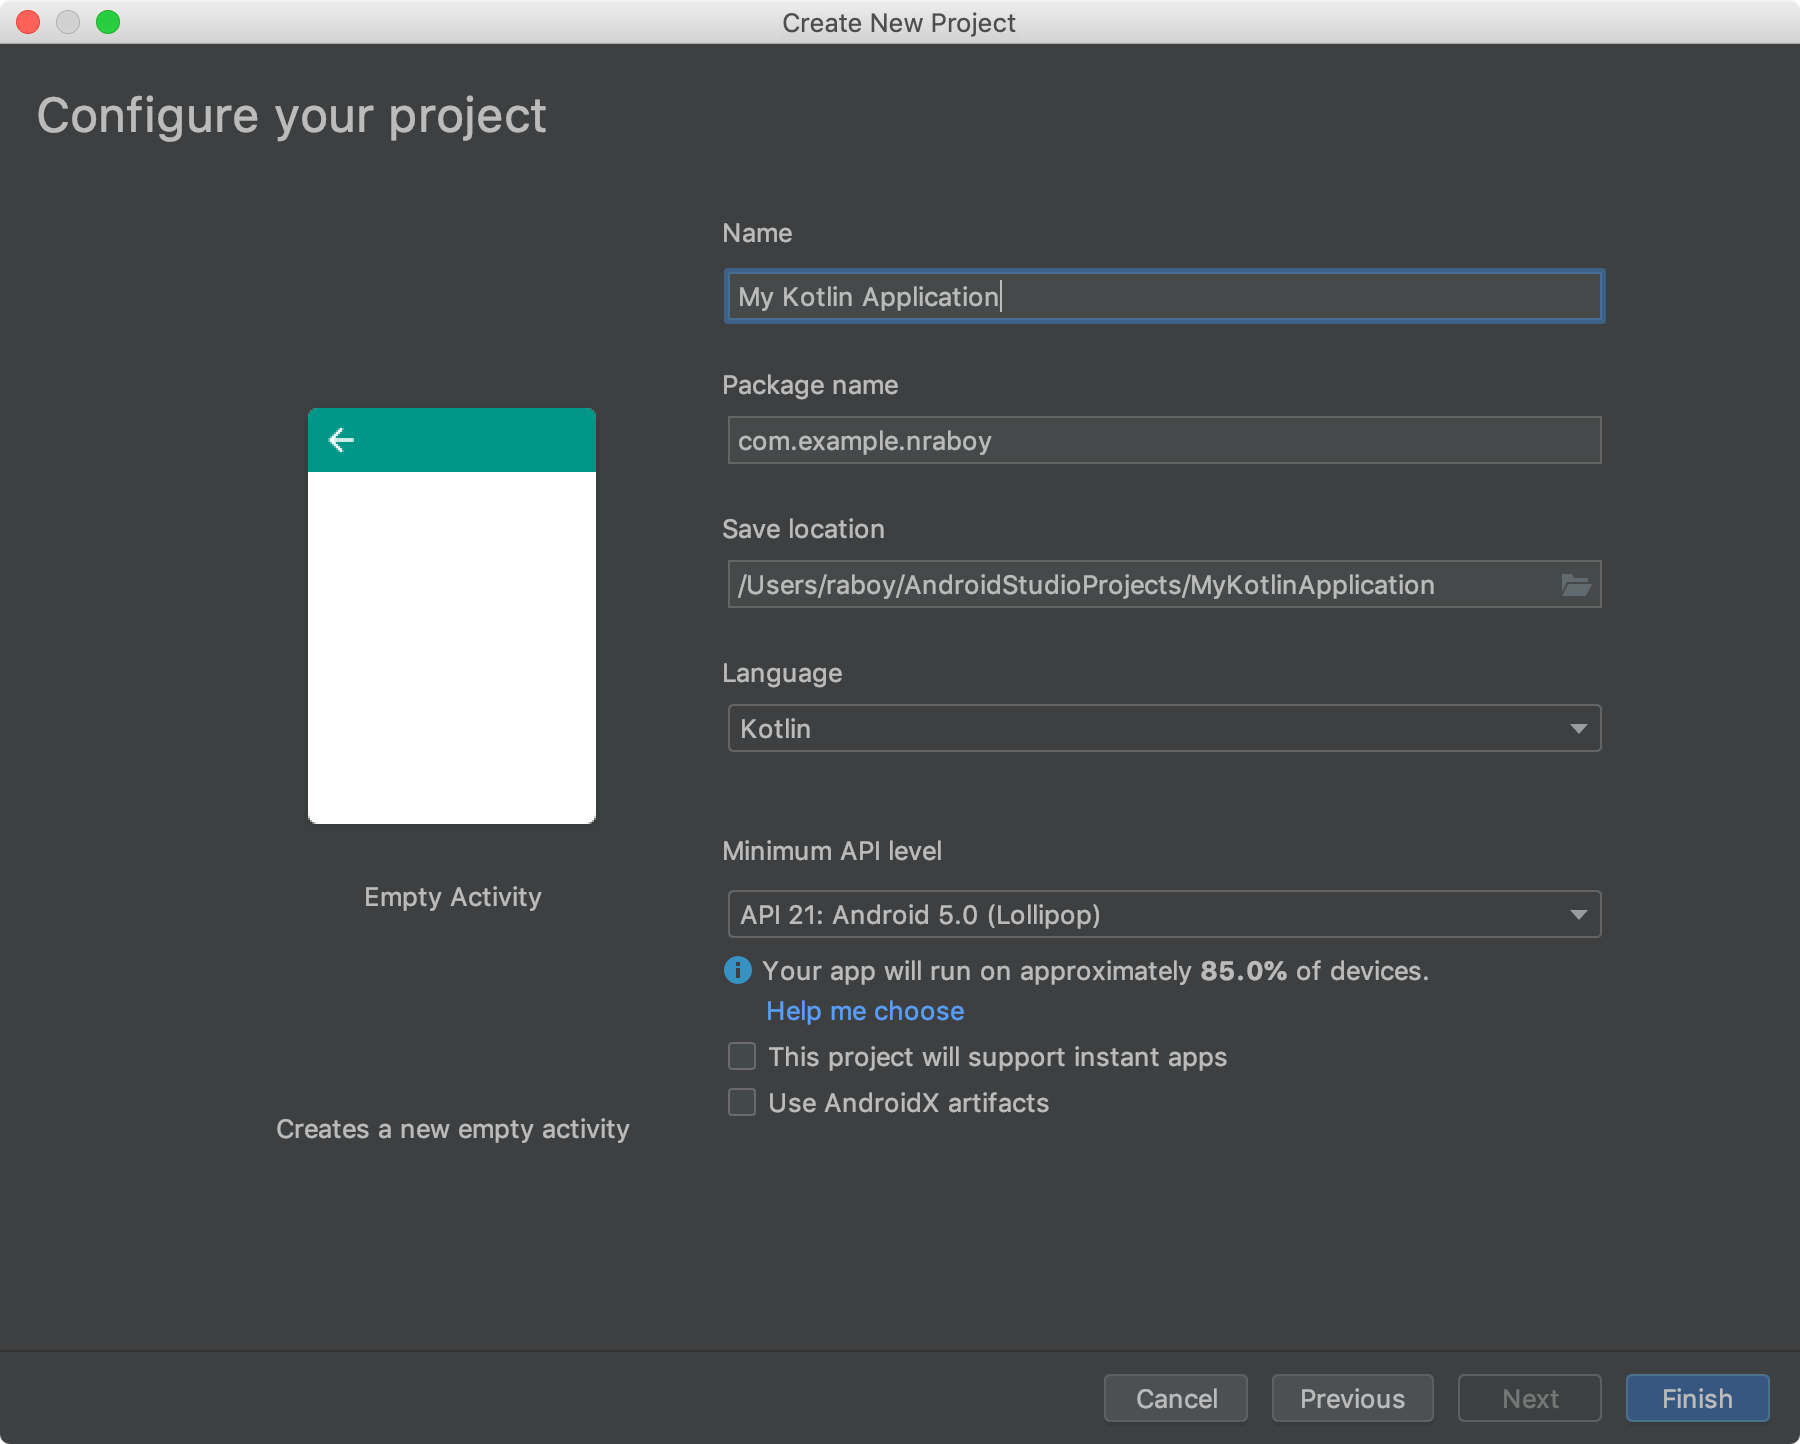
There are two very important things to take note of at this step. You need to carefully pick your package name and make note of it because this package name will need to be used in your HERE Developer Portal. Mismatching the package will cause your API keys to not work. You’ll also need to choose Kotlin as the language rather than Java.
At this point your project should be created. Android Studio will probably spend a bit of time synchronizing your dependencies.
Installing and Configuring the HERE Android SDK
This is where we start integrating the HERE Android SDK so it can be used in development. If you don’t already have a HERE developer account, make sure you create one here. Don’t worry, developer accounts are free and you don’t even need to provide a credit card.
You’ll want to create a new project in your developer account and generate a new Android SDK Starter.
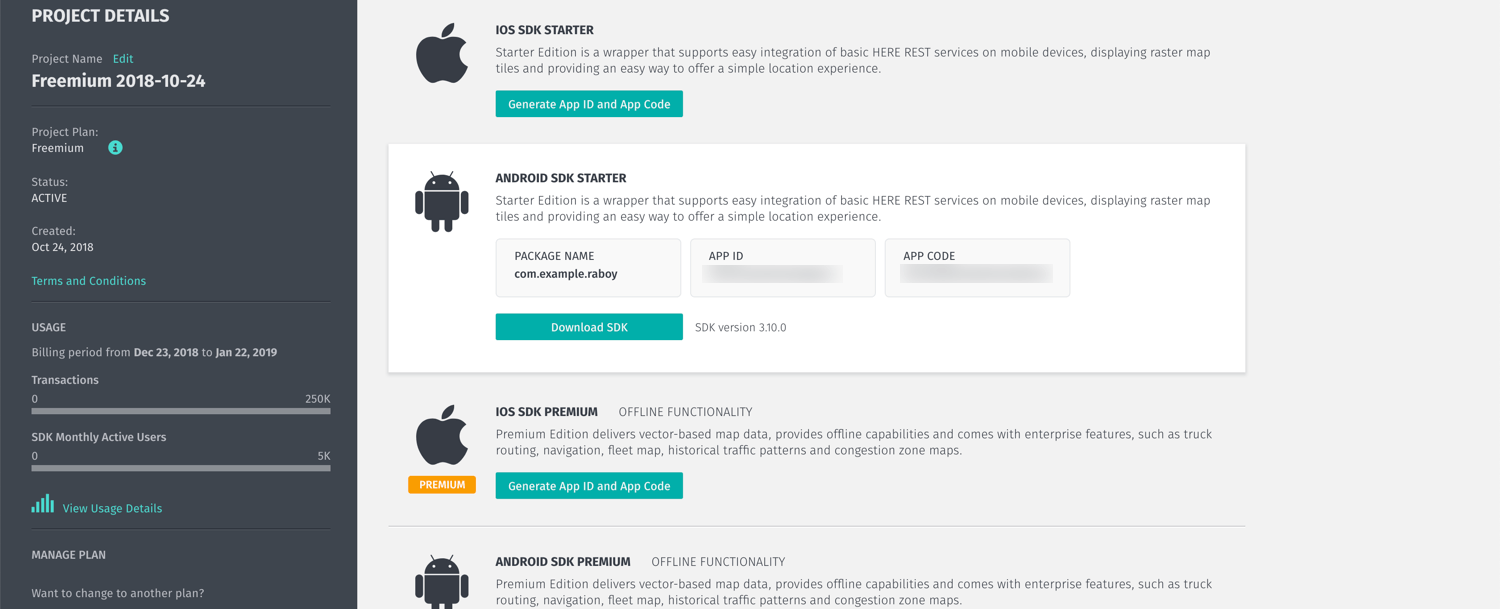
Remember to provide your Android package when generating your API tokens. After generating a new Android application in the portal, you’ll need to download the SDK.
After downloading the SDK, locate the HERE-sdk.aar file and place it in your project’s app/libs directory.
Within Android Studio, open the project’s build.gradle file and include the following:
Most of the above configuration already existed in our build.gradle file. We added the following so that we can use local libraries:
After including our local libraries, we need to use them as dependencies, hence the following implementation lines:
As of now the HERE Android SDK has been included for use in our project, but not yet configured. The rest of the configuration will happen in the project’s AndroidManifest.xml file. Open the project’s AndroidManifest.xml file and include the following:
There are a few things that we added to make using the HERE Android SDK possible. First we needed to define permissions so the application could use various location features on the device. These permissions are seen below:
After adding the appropriate permissions, we need to link our application to the credentials found in our HERE Developer Portal. This is where the app id and app code become important.
Make sure that you use the tokens found in your account, otherwise the map will not display and you won’t have all the great features that HERE has to offer.
Finally, you’ll notice that we have enabled hardware acceleration through the android:hardwareAccelerated=»true» line.
We can start using the HERE Android SDK for development as of now. To be honest, most of the above configuration and setup was the same as the Java version found in my previous tutorial.
Displaying an Interactive Map on the Screen with Kotlin
Kotlin is great, but I’m far more fluent in Java and other programming languages. While everything you see next will work, go easy on me because I’m not a Kotlin professional and power user. I’m learning like everyone else, so if you find something that can be optimized, let me know.
We’re going to start by creating our simple UI. Open the project’s activity_main.xml and include the following:
Take note of the mapfragment fragment id because it will be used in our Kotlin code. With our super simple UI out of the way, let’s get into the bulk of our code.
Open the project’s MainActivity.kt file and include the following:
In the above code we are defining two private variables. The mapFragment variable will be tied to our UI component while the map variable will allow us to interact with the map component residing in the UI component.
After the activity is created, we get our fragment and initialize it. If there are no errors, we can center the map and set the zoom level. Of course we could do other things such as find places, but this is a simple example.
Run the application and see all of its simplistic glory!
Conclusion
You just saw how to use Kotlin and the HERE Android SDK to create an Android application with maps and location services support. For this particular example, most of the tutorial was preparation and it really wasn’t too different than the Java version that I had written about previously. However, the core application logic used Kotlin instead of Java.
Nic Raboy is an advocate of modern web and mobile development technologies. He has experience in Java, JavaScript, Golang and a variety of frameworks such as Angular, NativeScript, and Apache Cordova. Nic writes about his development experiences related to making web and mobile development easier to understand.
Источник


