- How To Set Android SDK Path In Windows And Mac
- 1. Configure Android SDK Variable In Windows.
- 1.1 Get Android SDK Install Directory Path.
- 1.2 Set %ANDROID_HOME% and %Path% System Environment Variable.
- 2. Configure Android SDK Variable In macOS.
- Where can I set my Android SDK locations?
- Где можно задать свои расположения пакета SDK для Android?
- Android environment setup
- 1. Download the Android SDK
- 1a. Install the Android SDK using the command line tools
- 1b. Install the SDK using Android Studio
- 2. Enable USB debugging on your device
- 3. Configure the Android SDK path in Unity
- 4. Download and set up the Android NDK
- Using an alternate Java Development Kit
How To Set Android SDK Path In Windows And Mac
After you installed android studio, you still need to configure some android SDK environment variables then you can use it easily. This article will tell you how to correctly configure Android SDK environment variables such as ANDROID_HOME, PATH on Windows and macOS.
1. Configure Android SDK Variable In Windows.
1.1 Get Android SDK Install Directory Path.
Before you can configure it, you should first get the android SDK install directory follow below steps.
- Open android studio, click File —> Settings menu item in the top men bar.
- Expand Appearance & Behavior —>System Settings —>Android SDK menu item on the left side of the popup window. Then you can find the Android SDK Location directory path on the right side ( in this example, the Android SDK location path is C:\Users\Jerry\AppData\Local\Android\Sdk ), remember it.
1.2 Set %ANDROID_HOME% and %Path% System Environment Variable.
- Right-click the computer icon in Windows file explorer left side, click Properties menu item in the popup menu list. This will open the windows system configuration window.
- Click the Advanced system settings link on left panel, it will popup the System Properties window, click the Environment Variables button to open Environment Variables window.
- Click the New… button to add a new system variable, input ANDROID_HOME as the variable name, and input the Android SDK location directory path ( such as C:\Users\Administrator\AppData\Local\Android\Sdk ) as the variable value.
- Select variable Path and click Edit button and add ;%ANDROID_HOME%\tools;%ANDROID_HOME%\tools\bin;%ANDROID_HOME%\platform-tools at the end of its value. Please note the ; must be English character otherwise it will not take effect .
- Click OK to close the system environment variables settings window, open a dos window, type command adb in it. If you see output like below that means the android SDK path variable has been configured successfully.
2. Configure Android SDK Variable In macOS.
- Open Android Studio on macOS, then click Android Studio —> Preferences menu item at the left top toolbar.
- Input search keyword sdk in the search box of the popup Preferences dialog window left side.
- It will focus on the Android SDK menu item on the left side, and you can get the Android SDK Location directory path value on the right side Android SDK Location text box.
- Generally, the Android SDK is installed in the /Users/user-name/Library/Android/sdk folder on macOS.
- If you can not find the above folder in macOS finder or terminal, this is because the Library folder is a hidden folder by default, you should make the hidden folder visible by executing the command $ defaults write com. apple . finder AppleShowAllFiles TRUE in a macOS terminal window ( please read article How To Show Hidden Files In Mac OS Finder And Select Hidden Files In Html Upload File Form ).
- You can also see the hidden Library folder by opening a macOS Finder window, then click Go —> Go to Folder… menu item, and input
/Library in the popup dialog input text box, then click Go button.
Источник
Where can I set my Android SDK locations?
In Visual Studio, navigate to Tools > Options > Xamarin > Android Settings to view and set the Android SDK location:
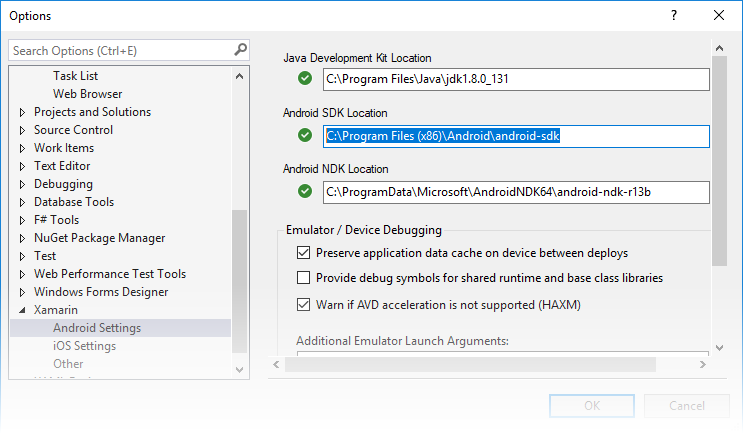
The default location for each path is as follows:
Java Development Kit Location:
C:\Program Files\Java\jdk1.8.0_131
Android SDK Location:
C:\Program Files (x86)\Android\android-sdk
Android NDK Location:
C:\ProgramData\Microsoft\AndroidNDK64\android-ndk-r13b
Note that the version number of the NDK may vary. For example, instead of android-ndk-r13b, it could be an earlier version such as android-ndk-r10e.
To set the Android SDK location, enter the full path of the Android SDK directory into the Android SDK Location box. You can navigate to the Android SDK location in File Explorer, copy the path from the address bar, and paste this path into the Android SDK Location box. For example, if your Android SDK location is at C:\Users\username\AppData\Local\Android\Sdk, clear the old path in the Android SDK Location box, paste in this path, and click OK.
In Visual Studio for Mac, navigate to Preferences > Projects > SDK Locations > Android. In the Android page, click the Locations tab to view and set the SDK location:
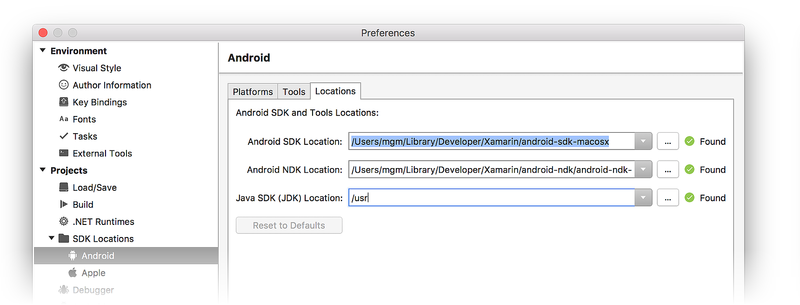
The default location for each path is as follows:
Android SDK Location:
Android NDK Location:
Java SDK (JDK) Location:
/usr
Note that the version number of the NDK may vary. For example, instead of android-ndk-r14b, it could be an earlier version such as android-ndk-r10e.
To set the Android SDK location, enter the full path of the Android SDK directory into the Android SDK Location box. You can select the Android SDK folder in the Finder, press CTRL+вЊ+I to view folder info, click and drag the path to the right of Where:, copy, then paste it to the Android SDK Location box in the Locations tab. For example, if your Android SDK location is at
/Library/Developer/Android/Sdk, clear the old path in the Android SDK Location box, paste in this path, and click OK.
Источник
Где можно задать свои расположения пакета SDK для Android?
в Visual Studio перейдите в меню сервис параметры > Xamarin > Android Параметры , чтобы просмотреть и задать расположение пакет SDK для Android:

Расположение по умолчанию для каждого пути выглядит следующим образом:
Расположение пакета средств разработки Java:
C:\Program Филес\жава\ jdk1.8.0_131
Расположение пакета SDK для Android
C:\Program Files (x86) \Андроид\андроид-СДК
Расположение пакета Android NDK:
C:\ProgramData\Microsoft\AndroidNDK64\android-ndk-r13b
Обратите внимание, что номер версии NDK может отличаться. Например, вместо android-ndk-r13b может быть более ранняя версия, например android-ndk-r10e.
Чтобы задать расположение пакета SDK для Android, введите полный путь к каталогу пакета SDK для Android в поле Расположение пакета SDK для Android. Вы можете перейти к расположению пакета SDK для Android в проводнике, скопировать путь из адресной строки и вставить этот путь в поле Расположение пакета SDK для Android. Например, если расположение пакет SDK для Android находится на к:\усерс\усернаме\аппдата\локал\андроид\сдк, очистите старый путь в поле Расположение пакет SDK для Android , вставьте этот путь и нажмите кнопку ОК.
в Visual Studio для Mac перейдите к параметрам проекты > расположение пакета SDK для > Android. На странице Android перейдите на вкладку Расположения, чтобы просмотреть и задать расположение пакета SDK:

Расположение по умолчанию для каждого пути выглядит следующим образом:
Расположение пакета SDK для Android
Расположение пакета Android NDK:
Расположение пакета SDK для Java (JDK):
/usr
Обратите внимание, что номер версии NDK может отличаться. Например, вместо android-ndk-r14b может быть более ранняя версия, например android-ndk-r10e.
Чтобы задать расположение пакета SDK для Android, введите полный путь к каталогу пакета SDK для Android в поле Расположение пакета SDK для Android. Можно выбрать папку пакет SDK для Android в Finder, нажать клавиши CTRL + ⌘ + I , чтобы просмотреть сведения о папке, щелкнуть и перетащить путь справа от раздела :, скопировать, а затем вставить его в поле Расположение пакет SDK для Android на вкладке расположения . Например, если расположение пакет SDK для Android находится в папке
/либрари/девелопер/андроид/СДК, очистите старый путь в поле Расположение пакет SDK для Android , вставьте этот путь и нажмите кнопку ОК.
Источник
Android environment setup
Whether you’re building an Android application in Unity or programming it from scratch, you must set up the Android Software Development Kit (SDK) before you can build and run any code on your Android device. By default, Unity installs a Java Development Kit based on OpenJDK.
1. Download the Android SDK
You can install the Android SDK using command line tools or through Android Studio. Android Studio provides an easy to use GUI based tool but installs additional software on your computer. Using the command line tools is a smaller download and does not install additional software, but it can be more challenging to use.
1a. Install the Android SDK using the command line tools
Install or unpack the Android SDK. After installing, open the Android SDK Manager and add at least one Android SDK Platform, the Platform Tools, the Build Tools, and the USB drivers if you’re using Windows.
To install an Android platform SDK and the associated tools:
Unzip the tools folder to a location on your hard drive.
Open a command-prompt window.
Navigate to the bin folder in the location where you unzipped the tools folder:
install folder > tools > bin
Use the sdkmanager command line tool to retrieve the list of packages that you can install. The installable packages include the Platform SDKs, Build Tools, Platform tools, and other tools.
Select a version of the Platform SDK to install. Platform SDKs take the following form in the list: platforms;android-xx. The xx indicates the SDK level. The larger the number, the newer the package. Typically, you can install the latest available version. However, there might be cases where Google has released a new version of the SDK that causes errors when you build your Unity Project. In that case, you must uninstall the SDK and install an earlier version. The general format of the command for package installation is sdkmanager
. You can install the corresponding Platform Tools and Build Tools at the same time.
Example: sdkmanager “platform-tools” “platforms;android–27” “build-tools;27.0.3”
- If you are running on Windows, install the USB device drivers:
This installs the SDK to a directory named platforms in the same directory you unzipped the tools folder to.
c: \platforms
1b. Install the SDK using Android Studio
Install Android studio from the Android developer portal. The Android developer portal provides detailed installation instructions.
Note: Android Studio provides some ease of use benefits, but it is not fully tested for compatibility with Unity installs. If you encounter errors, Unity recommends using the command line method.
When installing the Android platform SDK and other tools, you can typically install the latest available version. There might be cases in which Google has released a new version of the SDK that causes errors when you build your Unity Project. In that case, uninstall the SDK and install an earlier version.
Install the associated Platform and Build tools at the same time. If you are running on Windows, install the USB device drivers.
2. Enable USB debugging on your device
To enable USB debugging, you must first enable Developer options on your device. To do this, find the build number in your device’s Settings menu. The location of the build number varies between devices; for stock Android, it’s usually in Settings > About phone > Build number. For specific information on your device and Android version, refer to your hardware manufacturer.
After you navigate to the build number using the instructions above, tap on the build number seven times. A pop-up notification saying “You are now X steps away from being a developer” appears, with “X” being a number that counts down with every additional tap. On the seventh tap, Developer options are unlocked.
Note: On Android versions prior to 4.2 (Jelly Bean), the Developer options are enabled by default.
Go to Settings > Developer options, then enable USB debugging. Android now enters debug mode when it is connected to a computer via USB.
Connect your device to your computer using a USB cable. If you are developing on a Windows computer, you might need to install the device-specific USB driver. See the manufacture website for your device for additional information.
The setup process differs for Windows and macOS and is explained in detail on the Android developer website. For more information on connecting your Android device to the SDK, refer to the Running Your App section of the Android Developer documentation.
3. Configure the Android SDK path in Unity
The first time you create a Project for Android (or if Unity later fails to locate the SDK), Unity asks you to locate the folder in which you installed the Android SDK.
If you installed the SDK using the sdkmanager, you can find the folder in \platforms .
If you installed the SDK when you installed Android Studio, you can find the location in the Android Studio SDK Manager. To open the SDK Manager from Android Studio, go to Tools > Android > SDK Manager or select SDK Manager in the toolbar.
To change the location of the Android SDK, in the Unity menu bar go to Unity > Preferences > External Tools.
4. Download and set up the Android NDK
If you are using the IL2CPP A Unity-developed scripting back-end which you can use as an alternative to Mono when building Projects for some platforms. More info
See in Glossary scripting backend A framework that powers scripting in Unity. Unity supports three different scripting backends depending on target platform: Mono, .NET and IL2CPP. Universal Windows Platform, however, supports only two: .NET and IL2CPP. More info
See in Glossary for Android, you need the Android Native Development Kit (NDK). It contains the toolchains (such as compiler and linker) needed to build the necessary libraries and produce the output package (APK). If you are not targeting the IL2CPP backend, you can skip this step.
Download Android NDK version r16b (64-bit) from the NDK Downloads web page. Extract the android-ndk-r16b folder to a directory on your computer and note the location.
The first time you build a Project for Android using IL2CPP, Unity asks you to locate the folder in which you installed the Android NDK. Select the root folder of your NDK installation. To change the location of the Android NDK, in the Unity Editor, navigate to the menu: Unity > Preferences to display the Unity Preferences dialog box. Here, click External Tools.
Using an alternate Java Development Kit
Unity recommends that you use the JDK installed with the Android build tools, to ensure that you receive the correct version and configuration.
If you have manually installed the JDK and do not want to duplicate the installation, you can specify the location in the Unity Preferences window. To do this, go to Preferences > External tools and enter the directory path in the JDK field:
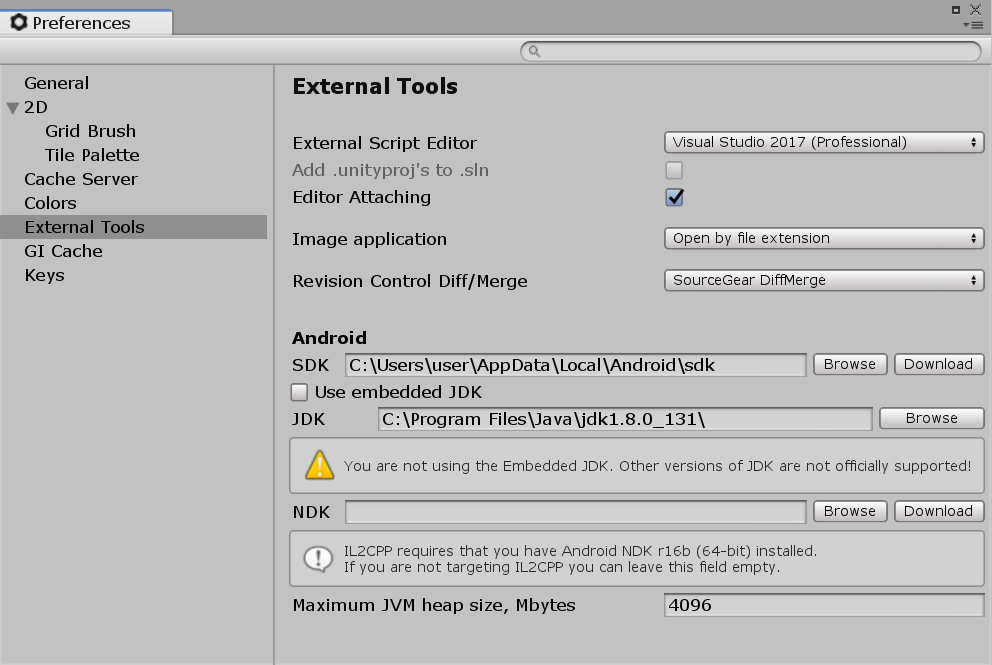 Preferences for Android external tools
Warning: The Android tools do not support JDK 9 or later; an alternate JDK must be version 8. Unity does not officially support versions of the JDK other than the one embedded in the Android Build Tools.
To change the JDK that Unity uses to build Android apps:
Open the Project.
In the left navigation column, select External Tools.
Uncheck JDK Installed with Unity (recommended).
In the JDK field enter the path to the JDK or use the Browse button to locate it.
2018–11–21 Page amended with editorial review
Did you find this page useful? Please give it a rating:
Источник


