- Google USB Driver
- In this document
- See also
- Revisions
- Downloading the Google USB Driver
- Installing the USB Driver
- Windows 7
- Windows XP
- Windows Vista
- Download Google USB Drivers for Windows
- Download Google USB Drivers
- 1. Direct ZIP Package Download
- 2. Download with SDK Manager in Android Studio
- How to Install Android USB Drivers
- On Windows 10:
- On Windows 7 / Windows 8.1:
Google USB Driver
In this document
See also
The Google USB driver is a downloadable component for Windows developers, available for download from the AVD and SDK Manager.
The Google USB Driver is only for Android Developer Phones (ADP), Nexus One, and Nexus S. If you’re using a different Android-powered device, then you need to get a USB driver from the device OEM. For help finding the appropriate driver, see the list of OEM USB Drivers.
The Google USB driver for Windows provides support for the following Android-powered devices:
- ADP1 / T-Mobile G1*
- ADP2 / Google Ion / T-Mobile myTouch 3G*
- Verizon Droid*
- Nexus One
- Nexus S
* Or similar hardware on other carriers
Any additional devices will require Windows drivers provided by the hardware manufacturer. See OEM USB Drivers.
Note: If you’re developing on Mac OS X or Linux, then you do not need to install a USB driver. Refer to Setting up a Device to start development with a device.
The sections below provide instructions on how to download the USB Driver for Windows and install it on your development computer.
Revisions
The sections below provide notes about successive revisions of the USB Driver for Windows, as denoted by revision number. To determine what revision of the USB Driver for Windows you are using, refer to the «Installed Packages» listing in the Android SDK and AVD Manager.
Adds support for the Nexus S.
Adds support for the Nexus One.
Adds support for the Verizon Droid (or similar hardware on other carriers).
Initial release of the WinUsb-based driver, with support for the T-Mobile G1 and myTouch 3G (and similar devices).
Downloading the Google USB Driver
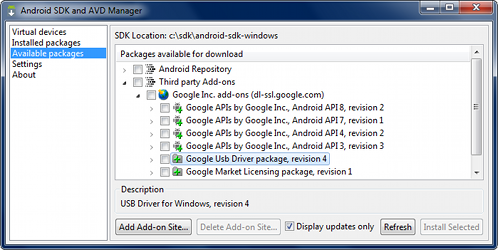
Figure 1. The SDK and AVD Manager with the Google USB Driver selected.
The USB Driver for Windows is available for download as an optional SDK component. You need the driver only if you are developing on Windows and want to connect an Android-powered device (ADP, Nexus One, or Nexus S) to your development environment over USB.
To download the driver, use the Android SDK and AVD Manager tool that is included with the Android SDK:
- Launch the SDK and AVD Manager by double-clicking SDK Manager.exe , at the root of your SDK directory.
- Expand the Third party Add-ons and Google Inc. add-ons.
- Check Google Usb Driver package and click Install selected.
- Proceed to install the package. When done, the driver files are downloaded into the \google-usb_driver\ directory.
Installing the USB Driver
Once you’ve downloaded your USB driver, follow the instructions below to install or upgrade the driver, based on your version of Windows and whether you’re installing for the first time or upgrading an existing driver.
Tip: When you finish the USB driver installation, see Developing on a Device for other important information about using an Android-powered device for development.
Caution: You may make changes to android_winusb.inf file found inside usb_driver\ (for example, to add support for other devices), however, this will lead to security warnings when you install or upgrade the driver. Making any other changes to the driver files may break the installation process.
Windows 7
To install the Android USB driver on Windows 7 for the first time:
- Connect your Android-powered device to your computer’s USB port.
- Right-click on Computer from your desktop or Windows Explorer, and select Manage.
- Select Devices in the left pane.
- Locate and expand Other device in the right pane.
- Right-click the device name (such as Nexus S) and select Update Driver Software. This will launch the Hardware Update Wizard.
- Select Browse my computer for driver software and click Next.
- Click Browse and locate the USB driver folder. (The Google USB Driver is located in \google-usb_driver\ .)
- Click Next to install the driver.
Or, to upgrade an existing Android USB driver on Windows 7 with the new driver:
- Connect your Android-powered device to your computer’s USB port.
- Right-click on Computer from your desktop or Windows Explorer, and select Manage.
- Select Device Manager in the left pane of the Computer Management window.
- Locate and expand Android Phone in the right pane.
- Right-click Android Composite ADB Interface and select Update Driver. This will launch the Hardware Update Wizard.
- Select Install from a list or specific location and click Next.
- Select Search for the best driver in these locations; un-check Search removable media; and check Include this location in the search.
- Click Browse and locate the USB driver folder. (The Google USB Driver is located in \google-usb_driver\ .)
- Click Next to upgrade the driver.
Windows XP
To install the Android USB driver on Windows XP for the first time:
- Connect your Android-powered device to your computer’s USB port. Windows will detect the device and launch the Hardware Update Wizard.
- Select Install from a list or specific location and click Next.
- Select Search for the best driver in these locations; un-check Search removable media; and check Include this location in the search.
- Click Browse and locate the USB driver folder. (The Google USB Driver is located in \google-usb_driver\ .)
- Click Next to install the driver.
Or, to upgrade an existing Android USB driver on Windows XP with the new driver:
- Connect your Android-powered device to your computer’s USB port.
- Right-click on My Computer from your desktop or Windows Explorer, and select Manage.
- Select Device Manager in the left pane.
- Locate and expand Android Phone in the right pane.
- Right-click Android Composite ADB Interface and select Update Driver. This will launch the Hardware Update Wizard.
- Select Install from a list or specific location and click Next.
- Select Search for the best driver in these locations; un-check Search removable media; and check Include this location in the search.
- Click Browse and locate the USB driver folder. (The Google USB Driver is located in \google-usb_driver\ .)
- Click Next to upgrade the driver.
Windows Vista
To install the Android USB driver on Windows Vista for the first time:
- Connect your Android-powered device to your computer’s USB port. Windows will detect the device and launch the Found New Hardware wizard.
- Select Locate and install driver software.
- Select Don’t search online.
- Select I don’t have the disk. Show me other options.
- Select Browse my computer for driver software.
- Click Browse and locate the USB driver folder. (The Google USB Driver is located in \google-usb_driver\ .) As long as you specified the exact location of the installation package, you may leave Include subfolders checked or unchecked—it doesn’t matter.
- Click Next. Vista may prompt you to confirm the privilege elevation required for driver installation. Confirm it.
- When Vista asks if you’d like to install the Google ADB Interface device, click Install to install the driver.
Or, to upgrade an existing Android USB driver on Windows Vista with the new driver:
- Connect your Android-powered device to your computer’s USB port.
- Right-click on Computer from your desktop or Windows Explorer, and select Manage.
- Select Device Manager in the left pane.
- Locate and expand ADB Interface in the right pane.
- Right-click on HTC Dream Composite ADB Interface, and select Update Driver Software.
- When Vista starts updating the driver, a prompt will ask how you want to search for the driver software. Select Browse my computer for driver software.
- Click Browse and locate the USB driver folder. (The Google USB Driver is located in \google-usb_driver\ .) As long as you specified the exact location of the installation package, you may leave Include subfolders checked or unchecked—it doesn’t matter.
- Click Next. Vista might prompt you to confirm the privilege elevation required for driver installation. Confirm it.
- When Vista asks if you’d like to install the Google ADB Interface device, click Install to upgrade the driver.
Источник
Download Google USB Drivers for Windows
Download Google USB drivers to connect Pixel / Nexus Android device with a Windows PC. This is an optional utility provided by Google which you can use when ADB debugging your Android app on a Google Pixel or Nexus device. These drivers are also included in the Android SDK Manager when you set up Android Studio on your computer. However, Google still allows users to manually download the latest iteration of their USB drivers directly from them.
Not just for Google Pixel lineup, these USB drivers are universal to most Android devices and may be compatible with all — you will have to give them a try. You can have them installed on your computer and your PC will properly recognize any Android device connected to it. Also, if you are using ADB or Fastboot, those utilities work perfectly with these drivers. Read further to find fast download link and installation guide of android_winusb.inf Google USB Drivers.

If you have already installed Android SDK / Android Studio on your Windows 7 / Windows 10 PCs, chances are that you may already have these installed. These drivers get updated frequently but also the older ones do go on to support newer devices thanks to Android’s technology. Nonetheless, it is always a good idea to have the latest iteration running on your system.
Download Google USB Drivers
There are two methods through which you can download Google USB Driver. You can directly download the USB Driver ZIP package for Windows, or you can use the SDK Manager in Android Studio to download. We have covered both the ways below.
We’d recommend installing the drivers manually because it is much easier than going through the SDK Manager in Android Studio.
1. Direct ZIP Package Download
You can download the latest Google USB Driver package from this link below:
These drivers are not plug-n-play. You would have to manually install these drivers afterwards. This package includes the latest Google driver android_winusb.inf to work with ADB and Fastboot tools.
NOTE: Do not try to modify the android_winusb.inf driver file in any way.
2. Download with SDK Manager in Android Studio
Step 1 – In Android Studio, click Tools > Android > SDK Manager.

Step 2 – Click the SDK Tools tab.
Step 3 – Select Google USB Driver and click OK.

Step 4 – Proceed to install the package.
That’s it! Now it will download the USB Driver and also install it.
How to Install Android USB Drivers
If these Google USB drivers do not work for your Android device, you can install official USB drivers for your phone / tablet from our Android Drivers section.
Having trouble installing these drivers? We have the procedure listed below for Windows 10, Windows 8.1 and Windows 7. These drivers are compatible with 32-bit and 64-bit systems.
On Windows 10:
To install the Android USB driver on Windows 10 for the first time, do the following:
- Connect your Android device to your computer’s USB port.
- From Windows Explorer, open Computer Management.
- In the Computer Management left pane, select Device Manager.
- In the Device Manager right pane, locate and expand Portable Devices.
- In Portable Devices, right-click the name of the device you connected, and then select Update Driver Software.
- In the Hardware Update wizard, select Browse my computer for driver software and click Next.
- Click Browse and then locate the USB driver folder. For example, the Google USB Driver is located in android_sdk\extras\google\usb_driver\ .
- Click Next to install the driver.
On Windows 7 / Windows 8.1:
To install the Android USB driver on Windows 7 / Windows 8 / Windows 8.1 for the first time, do the following:
- Connect your Android device to your computer’s USB port.
- Right-click on Computer from your desktop or Windows Explorer, and select Manage.
- Select Devices in the left pane.
- Locate and expand Other device in the right pane.
- Right-click the device name (such as Nexus S) and select Update Driver Software. This will launch the Hardware Update Wizard.
- Select Browse my computer for driver software and click Next.
- Click Browse and locate the USB driver folder. (The Google USB Driver android_winusb.inf is located in \extras\google\usb_driver\ .)
- Click Next to install the driver.
Or, to upgrade an existing Android USB driver on Windows 7 and higher with the new driver:
- Connect your Android device to your computer’s USB port.
- Right-click on Computer from your desktop or Windows Explorer, and select Manage.
- Select Device Manager in the left pane of the Computer Management window.
- Locate and expand Android Phone in the right pane.
- Right-click on Android Composite ADB Interface and select Update Driver. This will launch the Hardware Update Wizard.
- Select Install from a list or specific location and click Next.
- Select Search for the best driver in these locations; uncheck Search removable media; and check Include this location in the search.
- Click Browse and locate the USB driver folder. (The Google USB Driver android_winusb.inf is located in \extras\google\usb_driver\ .)
- Click Next to upgrade the driver.
If you followed all the above steps correctly, you should now have the latest Google USB Drivers installed on your Windows PC.
It didn’t go as planned or if you run into any problems, we have got you covered. Let us know in the comments below and we will address it as soon as possible.
Источник


