- Godot 3.1 – How to export to Android in simple steps
- Installing the export templates
- Downloading Android SDK and the JDK
- Creating a key using the command line
- Navigating to the Android export editor settings
- Setting up the location for the Adb
- Setting up the location for the Jarsigner
- Setting up the location of the Debug Keystore
- Getting ready to make a build
- Making your build
- Releasing the build to Google Play Games
- How to make a release keystore?
- Set the reference in the export
- How To Set Android SDK Path In Windows And Mac
- 1. Configure Android SDK Variable In Windows.
- 1.1 Get Android SDK Install Directory Path.
- 1.2 Set %ANDROID_HOME% and %Path% System Environment Variable.
- 2. Configure Android SDK Variable In macOS.
- Creating Android modules
- Introduction
- Maybe REST?В
- Android module
- config.py
- Java singleton
Godot 3.1 – How to export to Android in simple steps

Building and setting up the export for Android in Godot can feel a bit intimidating for newcomers, however you only have to do this once. Afterwards you are able to send a build to your mobile device in a matter of seconds, by just pressing a button and having a mobile device attached through USB.
The first thing you have to do in Godot is ensure you have the Export Templates setup. You can do this by going to Editor/Manage Export Templates in Godot. Afterwards you click on the download button. Afterwards you go to Editor/Editor Settings select the Export tab, and Android. From there you can set the locations for the Adb, Debug Keystore and Jarsigner locations. You can get the Adb from the Android SDK, the debug keystore is made using the JDK keytool which is downloadable through Github or Oracle.
Installing the export templates
In order to install the export templates, navigate to the top window and select Editor. From there you can select Manage Export Templates. Afterwards you click on the download button like the image below. And you then select Official 3.1.2 [HTTPS]. Note that this can change based on the version you are currently using of Godot. Sometimes when the link is not available, you have the option to install a template through a file. You can find older export templates and releases here. You can also get the latest Github release with export templates on the Unofficial Godot Engine builds site by Hugo Locurcio. Do note tough that the export template needs to match the current Godot version.
The images below show you how to do it visually.
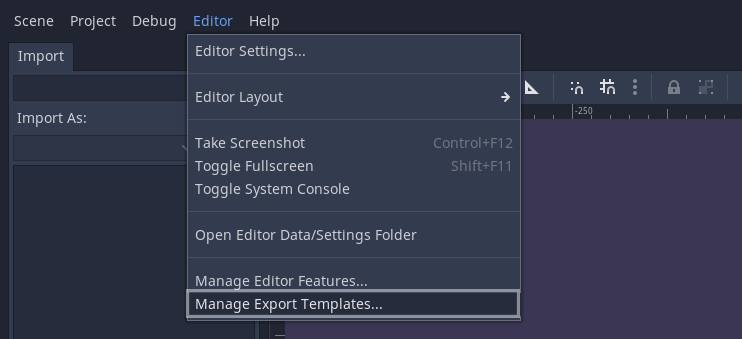 Here you can see how to navigate to the Manage Export Templates selection
 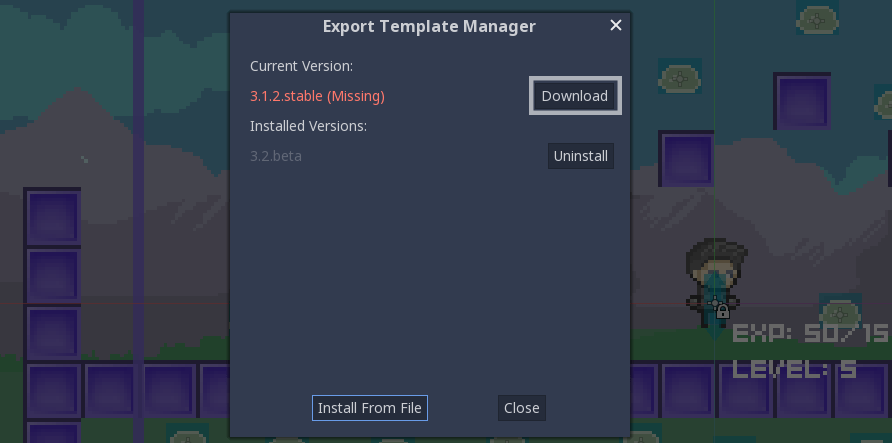 After opening the Export Template Manager menu, click on Download
 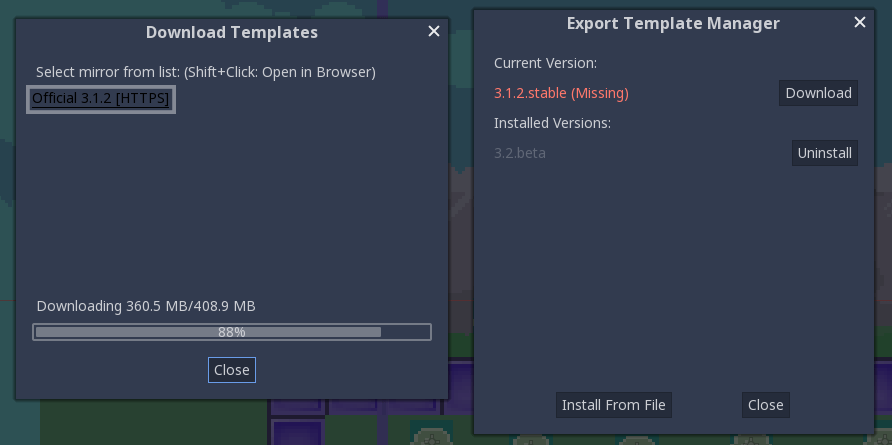 Installing the export templates using the official link
After the download is done, the export templates get installed automatically. Kind in mind that you will have to repeat this process for each new version you have to install. This step is fairly easy tough, I think we can manage this.
Downloading Android SDK and the JDK
In order to setup these things you have to download the Android SDK and you have to download OpenJDK or OracleJDK. It is recommended to stay at JDK version 8 or higher, as lower versions may have issues. I personally installed java-1.8.0-openjdk, the third option on the OpenJDK github page.
Creating a key using the command line
After you have installed both the SDK and OpenJDK. You should be able to use this command with the command line. For windows you can go to the command like by opening the search bar (pressing the windows button) and searching for CMD and pressing enter. You can then copy the following command into the command line.
For Windows 10, you can then find the keystore in “C:\Users\YourUserName”, it is named “debug.keystore”. Make sure to keep the folder to this location available, since we will need it later on.
If you are certain you have installed both the JDK and SDK and the command does not work due to it not being recognized, then there is a chance the system variables are not setup properly. You can find a guide here that shows you how to point the system variables to the JDK folder.
Navigating to the Android export editor settings
In order to start setting up the references, you have to navigate to Editor/Editor Settings
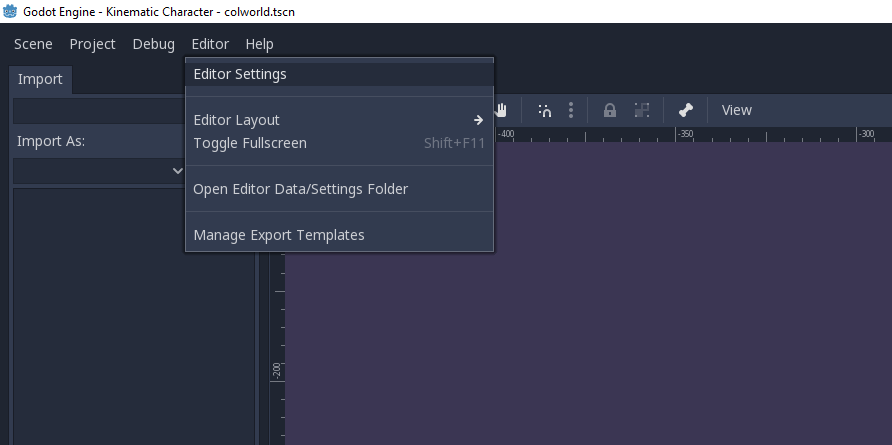 As you can see, the Editor Settings is located under the Editor tab
Afterwards, you scroll down on the left side until you get to the Export tab, and you select Android
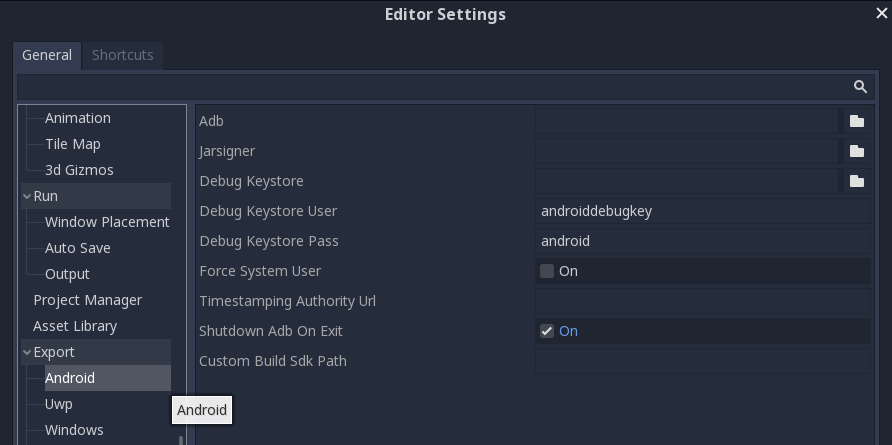 All the settings for the Android Export
Setting up the location for the Adb
For Adb you have to go to the SDK folder and then into the “platform-tools” folder. For windows 10 this is generally located at:
If you are unsure where to find the Sdk folder, open up the Android SDK and navigate to the new project settings like the image below.
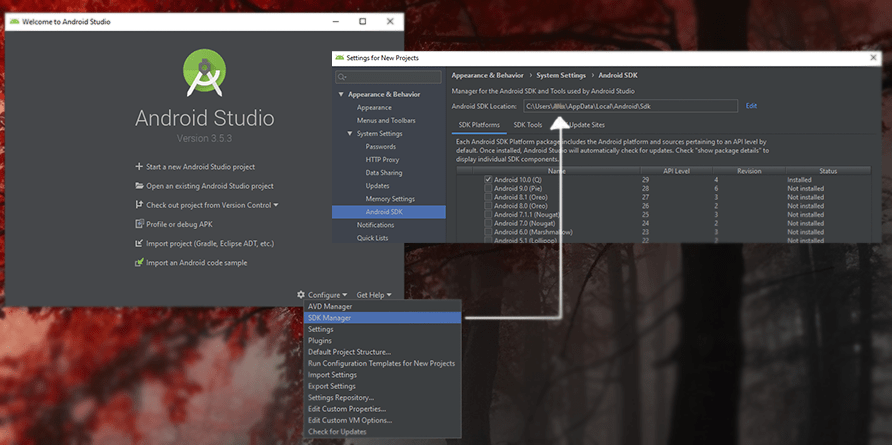 Example of how to find the android Sdk location on your computer using Android Studio
Setting up the location for the Jarsigner
The Jarsigner is located in the OpenJDK or OracleJDK folder you have unpacked previously.
When installing the OpenJDK on my device it was located at:
Setting up the location of the Debug Keystore
This keystore was made earlier in this article, once created, it gets placed in the User folder:
Getting ready to make a build
Navigate to Project/Export to go to the export window

Add a new export preset by pressing the Add… button and selecting Android
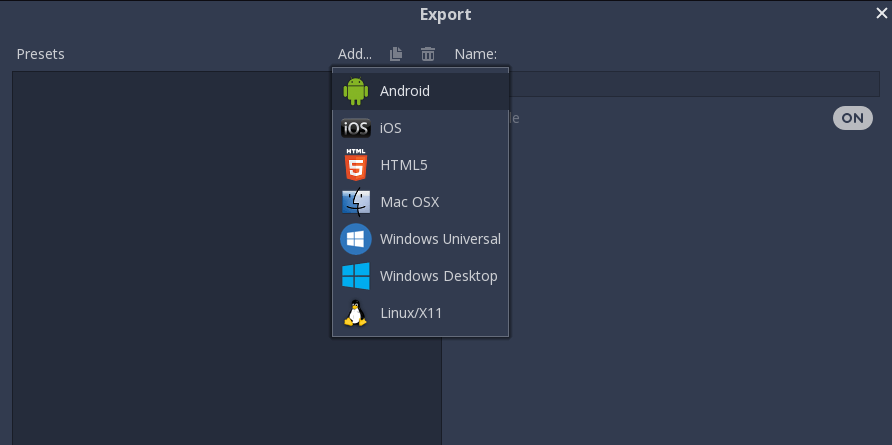 How to add a new present in the export options
Now finally, set the Unique name and name of the package.
How I generally name the Unique name is com.myComp.ProductName and the name is what will be displayed on your android device. So that should be equal to your product name. Spaces are allowed.
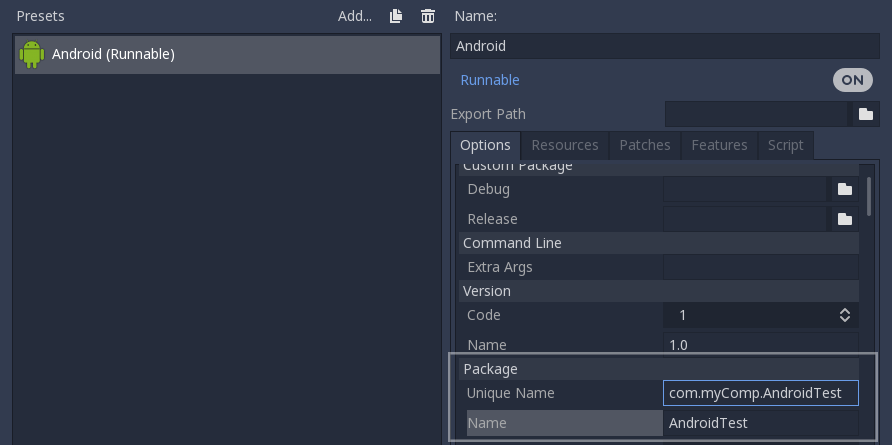 How to setup the package Unique name and general name
Making your build
There are two ways to make a build. One is to press the Export Project button in the export window. The other option is to use the icon that is available in the editor window. Personally I prefer using the icon, as this will automatically install the build to the phone. Just make sure it is connected to your computer using USB with USB Logging on, using developer mode. If you are unsure how to enable developer mode. Then you have to google “How to enable developer mode ”.
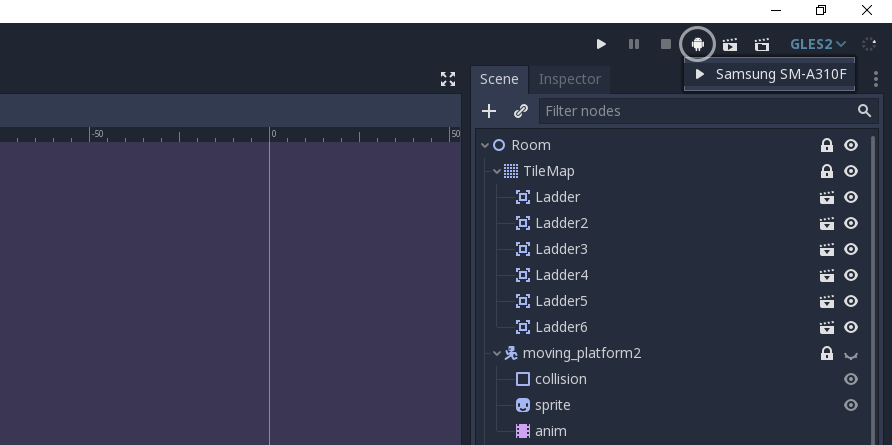 How to quickly build the project to your device
After pressing the button above, you will have the game running in no time on your device.
Releasing the build to Google Play Games
When exporting a build to Google Play Games, it is important to use a release keystore. This is because the debug keystore is merely meant for development and testing purposes. It is also not advised to release games using a debug keystore.
Signing a keystore is like branding the application with your credentials. And it is possible to assign the same keystore to multiple applications. The debug keystore has base credentials.
Eventually when you want to release to the play store you use a Release keystore. It is important that you keep this key safe, since you will only be able to push updates if you sign the application with the initial key. Preventing malicious users from pushing harmful code in case the account gets stolen.
How to make a release keystore?
Again, like the steps above to create a debug key, there is a parameter to create a release key. Make sure to set yourKeyAlias to an alias of your choice.
After doing this, you will get the question for a password. Make sure to note it down, because losing it means losing your key. And it has happens to people before that they had to republish a game on Google Play due to this.
After entering the password twice, you will get a lot of questions such as first/last name. Organisational unit, etc. You can leave these blank. At the end you get a question asking if it is all correct, you then type in yes. After creating the key, you may get this message:
Doing this will change the keystore into a file with the “.pfx” extention, from what I’ve seen godot only accepts the .keystore format. So we can ignore this for now.
Set the reference in the export
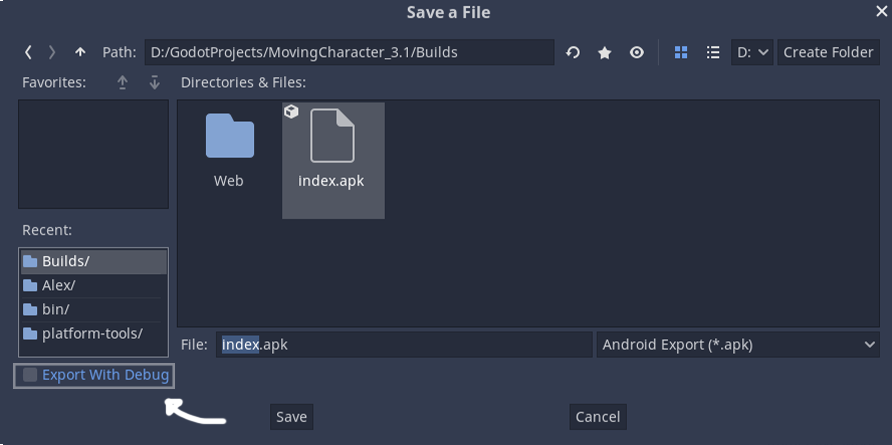
Finally we set the reference to our release key in the export like the image below.
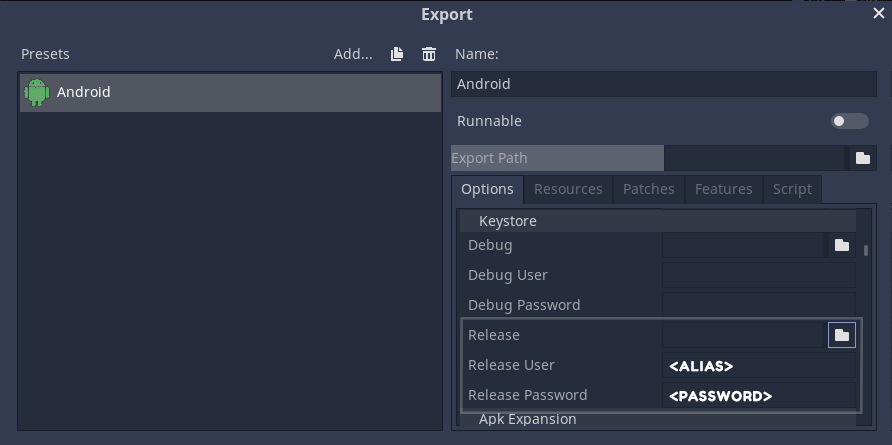
Also, when you have pressed export, do not forget to toggle this off, else it will still sign it using the debug key!
Thank you for reading, and I hope it has helped you. If you have interest in implementing ads into your game and you happen to be using Godot 3.2, then I recommend reading “How to integrate Google Ads (Admob) for Android”
Источник
How To Set Android SDK Path In Windows And Mac
After you installed android studio, you still need to configure some android SDK environment variables then you can use it easily. This article will tell you how to correctly configure Android SDK environment variables such as ANDROID_HOME, PATH on Windows and macOS.
1. Configure Android SDK Variable In Windows.
1.1 Get Android SDK Install Directory Path.
Before you can configure it, you should first get the android SDK install directory follow below steps.
- Open android studio, click File —> Settings menu item in the top men bar.
- Expand Appearance & Behavior —>System Settings —>Android SDK menu item on the left side of the popup window. Then you can find the Android SDK Location directory path on the right side ( in this example, the Android SDK location path is C:\Users\Jerry\AppData\Local\Android\Sdk ), remember it.
1.2 Set %ANDROID_HOME% and %Path% System Environment Variable.
- Right-click the computer icon in Windows file explorer left side, click Properties menu item in the popup menu list. This will open the windows system configuration window.
- Click the Advanced system settings link on left panel, it will popup the System Properties window, click the Environment Variables button to open Environment Variables window.
- Click the New… button to add a new system variable, input ANDROID_HOME as the variable name, and input the Android SDK location directory path ( such as C:\Users\Administrator\AppData\Local\Android\Sdk ) as the variable value.
- Select variable Path and click Edit button and add ;%ANDROID_HOME%\tools;%ANDROID_HOME%\tools\bin;%ANDROID_HOME%\platform-tools at the end of its value. Please note the ; must be English character otherwise it will not take effect .
- Click OK to close the system environment variables settings window, open a dos window, type command adb in it. If you see output like below that means the android SDK path variable has been configured successfully.
2. Configure Android SDK Variable In macOS.
- Open Android Studio on macOS, then click Android Studio —> Preferences menu item at the left top toolbar.
- Input search keyword sdk in the search box of the popup Preferences dialog window left side.
- It will focus on the Android SDK menu item on the left side, and you can get the Android SDK Location directory path value on the right side Android SDK Location text box.
- Generally, the Android SDK is installed in the /Users/user-name/Library/Android/sdk folder on macOS.
- If you can not find the above folder in macOS finder or terminal, this is because the Library folder is a hidden folder by default, you should make the hidden folder visible by executing the command $ defaults write com. apple . finder AppleShowAllFiles TRUE in a macOS terminal window ( please read article How To Show Hidden Files In Mac OS Finder And Select Hidden Files In Html Upload File Form ).
- You can also see the hidden Library folder by opening a macOS Finder window, then click Go —> Go to Folder… menu item, and input
/Library in the popup dialog input text box, then click Go button.
Источник
Creating Android modules
Introduction
Making video games portable is all fine and dandy, until mobile gaming monetization shows up.
This area is complex, usually a mobile game that monetizes needs special connections to a server for stuff such as:
- Analytics
- In-app purchases
- Receipt validation
- Install tracking
- Ads
- Video ads
- Cross-promotion
- In-game soft & hard currencies
- Promo codes
- A/B testing
- Login
- Cloud saves
- Leaderboards and scores
- User support & feedback
- Posting to Facebook, Twitter, etc.
- Push notifications
Oh yeah, developing for mobile is a lot of work. On iOS, you can just write a C++ module and take advantage of the C++/ObjC intercommunication, so this is rather easy.
For C++ developers Java is a pain, the build system is severely bloated and interfacing it with C++ through JNI (Java Native Interface) is more pain that you don’t want even for your worst enemy.
Maybe REST?В
Most of these APIs allow communication via REST+JSON APIs. Godot has great support for HTTP, HTTPS and JSON, so consider this as an option that works in every platform. Only write the code once and you are set to go.
Popular engines that have half the share of apps published on mobile get special plugins written just for them. Godot does not have that luxury yet. So, if you write a REST implementation of a SDK for Godot, please share it with the community.
Android module
Writing an Android module is similar to Custom modules in C++ , but needs a few more steps.
Make sure you are familiar with building your own Android export templates , as well as creating Custom modules in C++ .
config.py
In the config.py for the module, some extra functions are provided for convenience. First, it’s often wise to detect if android is being built and only enable building in this case:
If more than one platform can be built (typical if implementing the module also for iOS), check manually for Android in the configure functions:
Java singleton
An android module will usually have a singleton class that will load it, this class inherits from Godot.SingletonBase . A singleton object template follows:
Calling back to Godot from Java is a little more difficult. The instance ID of the script must be known first, this is obtained by calling get_instance_ID() on the script. This returns an integer that can be passed to Java.
From Java, use the calldeferred function to communicate back with Godot. Java will most likely run in a separate thread, so calls are deferred:
Источник


