- Running Your Android Application on an Android Device
- Running Your Application with Clean Data and Cache Folders
- Troubleshooting
- Stuck at «Uninstalling» on the Run Dialog Box
- What Is the Android SDK and How to Start Using It
- What Is the Android SDK?
- How to Install the Android SDK
- What Is the SDK Manager?
- What Are the Components of the Android SDK?
- Android SDK Tools
- SDK Build Tools
- SDK Platform-Tools
- SDK Platform
- Google APIs
- Android Emulator
- Conclusion
- Premium Android App Templates From CodeCanyon
Running Your Android Application on an Android Device
After you prepare your development system for Android development, enable USB debugging in your Android device and configure your system to detect your Android device, you can run a FireMonkey mobile application on a connected Android device.
- Connect your Android device to your development system using your device’s USB cable. You should see your Android device listed under Portable Devices in the Device Manager (available from the Control Panel). For more information, see Configuring Your System to Detect Your Android Device.
- In RAD Studio, select either File > New >FireMonkey Mobile Application — Delphi or File > New >FireMonkey Mobile Application — C++Builder .
- In the Project Manager, activate (double-click) the Android target platform.
- Enable the Android SDK for your device:
- In the Project Manager, right-click the Android node and select Properties.
- In Platform Properties, click the down-arrow in the SDK (Software Development Kit) field and select either:
- Your installed Android SDK version, if it is displayed
- Add New
- In the Add a New SDK dialog box, click the down-arrow in the Select an SDK version field and select your installed Android SDK.
- Complete the fields in the Create a New Android SDK wizard. Most of the fields are completed automatically by the wizard.
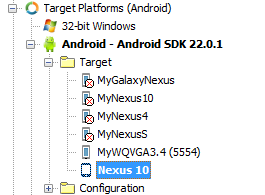
- Enable your Android device as the target platform: In the Android target platform in the Project Manager, open the Target node and double-click your Android device. When your Android device is correctly installed, the SDK version number appears after the Android target name; for example: Android — Android SDK 22.0.1Tips: If your device is not shown, try these steps:
- In the IDE, right-click the Target node and select Refresh.
- In the Control Panel, open the Device Manager:
- Verify that your Android device is listed, typically under Portable Devices.
- If your device is not listed, right-click any node and select Scan for hardware changes.
- If necessary, use the Android SDK Manager to uninstall and then reinstall the device driver for your Android device. Select Start | All Programs | Embarcadero RAD Studio XE6 | Android Tools .
The following image shows a populated Android Target node displaying the Nexus 10 device, one emulator that is running, and several emulators that are not running:

- If you selected the Application Store platform configuration on the Configuration node of the Project Manager, you must have a signing certificate configured for the Application Store platform configuration on the Provisioning page. The Debug platform configuration does not require a signing certificate.
- Run your application:
- Run with debugging ( Run >Run or F9 )
- Run without debugging ( Run >Run Without Debugging or Shift+Ctrl+F9 ).
RAD Studio builds your application for Android and runs your application on the selected Android device. If your Android device screen is locked, unlock it to access your application.
Running Your Application with Clean Data and Cache Folders
When you run an application on an Android device, RAD Studio installs your application on your device using the package name that you defined in the Version Info options page to uniquely identify your application. By default, the package name is «com.embarcadero.$(ModuleName)», where $(ModuleName) is the name of your project, such as «Project1».
If you run your application on a device that already contains a previously-installed application with the same package name as the application that you want to run, the Run command reinstalls your application, but only updates the application executable; your application’s data and cache folders are not updated.
To configure RAD Studio so that the Run Without Debugging and Run actions completely uninstall any previously-installed version of your application, including the data and cache folders, before installing the newer version:
- Select Run >Parameters .
- Enter «-cleaninstall» in the Parameters field:
- Click OK to save your changes.

Troubleshooting
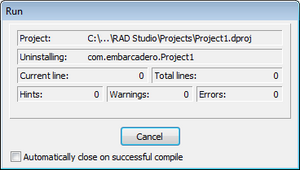
Stuck at «Uninstalling» on the Run Dialog Box
You might need to enable USB debugging specifically for your computer if you are running Android 4.2.2 or later and when you click Run or Run Without Debug, RAD Studio does not go beyond the following screen:
You might also need to enable the general USB debugging setting in your device. If this is the case, your device should show a dialog box asking you to allow USB debugging:
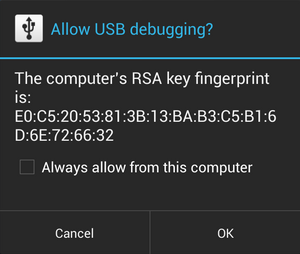
Click OK to allow USB debugging.
If you accidentally click Cancel, disconnect your device from your PC and then reconnect it to make the dialog box reappear on your device.
Источник
What Is the Android SDK and How to Start Using It
Android SDK is a software development kit developed by Google for the Android platform. The Android SDK allows you to create Android apps, and you don’t need to be an expert to use it. In this tutorial, I’ll explain what the Android SDK is and how to get started with it.
Android SDK comes bundled with Android Studio, Google’s official integrated development environment (IDE) for the Android operating system. You can learn about Android Studio and the Android App Development Kit in another of my articles.


In this post, we’ll look at:
- What is the Android SDK?
- How to install the Android SDK
- What is the Android SDK Manager?
- What are the components of the Android SDK?
What Is the Android SDK?


The Android SDK is a collection of software development tools and libraries required to develop Android applications. Every time Google releases a new version of Android or an update, a corresponding SDK is also released which developers must download and install. It is worth noting that you can also download and use the Android SDK independently of Android Studio, but typically you’ll be working through Android Studio for any Android development.
The Android SDK comprises all the tools necessary to code programs from scratch and even test them. These tools provide a smooth flow of the development process from developing and debugging, through to packaging.
The Android SDK is compatible with Windows, macOS, and Linux, so you can develop on any of those platforms.
How to Install the Android SDK
The Android SDK is optimized for Android Studio, and hence to effectively reap its benefits, you will need to install Android Studio. Having the Android SDK managed from within Android Studio is easier since support for languages like Java, Kotlin, and C++ is handled automatically. Not only that, but updates to the Android SDK are handled automatically by Android Studio.
To install the Android SDK from within Android Studio, first start Android Studio.
- From the Android Studio start page, select Configure > SDK Manager.


- If you already have Android Studio open, the SDK Manager icon is found on the top right corner, as shown below.


Install the required Android SDK platform packages and developer tools. A good start is to install:
- Android SDK Build-Tools
- Android Emulator
- Android SDK Platform-Tools
- Android SDK Tools
- Documentation for Android SDK


Click Apply, and Android Studio will install the selected tools and packages.
What Is the SDK Manager?
The Android SDK is composed of modular packages that you can download, install, and update separately using the Android SDK Manager. The SDK Manager helps to update new SDK releases and updates whenever a new Android platform is released. The SDK manager can be found in the top-right corner of the Android Studio screen, as shown below.
All that is required to follow the instructions provided, and the updates will be immediately downloaded to your environment.
What Are the Components of the Android SDK?
The Android SDK consists of an emulator, development tools, sample projects with source code, and the required libraries to build Android applications. Let’s look at the key components one by one.
Android SDK Tools
Android SDK Tools is a component of the Android SDK. It includes a complete set of development and debugging tools for Android, and is included with Android Studio. The SDK Tools also consist of testing tools and other utilities required to develop an app.
SDK Build Tools
Build tools are required for building components for building the actual binaries for your Android app. Always ensure your build tools component is up to date by downloading the latest version in the Android SDK Manager.
SDK Platform-Tools
Android Platform-Tools are used to support the features for the current Android platform and are necessary for Android app development. These tools interface with the Android platform on the device you use for testing. They include:
- Android Debug Bridge (adb): This is a handy command-line tool that lets you communicate with a device. The adb command allows you to perform device actions, such as installing and debugging apps. It also provides access to a Unix shell that you can use to run a variety of commands on a device.
- fastboot: This lets you flash a device with a new system image.
- systrace: This tool helps collect and inspect timing information across all processes running on your device at the system level. It’s crucial for debugging app performance.
SDK Platform-Tools are backward compatible, so you need only one version of the SDK Platform-Tools.
SDK Platform
For each version of Android, there’s one SDK Platform available. These are numbered according to the Android version (e.g. Android 7 Nougat) and an API version (e.g. API Level 24). Before you build an Android app, you must specify an SDK Platform as your build target. Newer SDK Platform versions have more features for developers, but older devices may not be compatible with the newer platform versions.
Google APIs
Google provides a number of exclusive Google APIs to make developing your app easier. They also offer a system image for the emulator so you can test your app using the Google APIs.
Android Emulator
The Android Emulator is a QEMU-based device-emulation tool that simulates Android devices on your computer, allowing developers to test applications on different devices and Android API levels, without needing to have physical devices for each. The emulator comes with configurations for various Android phones, tablets, Wear OS, and Android TV devices.
The Android emulator provides almost all of the capabilities of a real Android device. You can perform the following activities:
- simulate phone calls and text messages
- simulate different network speeds
- specify the location of the device
- simulate hardware sensors such as rotation
- access Google Play Store and much more
Often it is faster and easier to test your app with an emulator instead of using a physical device.
Conclusion
In this post, we looked at some of the basics of the Android SDK. The Android SDK is the only way to develop for Android devices. Fortunately, it contains extensive documentation, tutorials, samples, best practice guidance, and an array of tools for many different development tasks.
Premium Android App Templates From CodeCanyon
Android Studio comes with some default templates to help start an app, but these are very basic and provide minimal, generic functionality.
CodeCanyon is an online marketplace that has hundreds of additional templates, which are way more feature-rich and domain-specific too. You can save days, even months, of effort by using one of them.


An Android app template is a great way to jump-start your app project or to learn some new skills by exploring the source code of a professionally made app.
Take a look at some of our roundups of the best Android app templates:
Источник


