- Howto Install and Run the Android Emulator
- Step 1 — Download the Android SDK
- Step 2 — Optional Add to System Path
- Step 3 — Install Android Platforms
- Step 4 — Create a Virtual Device
- Step 5 — Run the emulator
- Like this? Follow me ↯
- If you like reading about android, emulator, mobile, or google then you might also like:
- Comments
- Creating an Android Emulator
- Minimum Requirements for an Android Emulator
- Android Emulators Require a Separate GPU
- Creating an Android Emulator Is Optional
- Installing an Android System Image (Required)
- Creating an Android Emulator Using the Android Virtual Device Manager
- Creating an Android Emulator Using the Command Line
- Starting an Android Emulator
- Android
- Contents
- Transferring files
- App development
- Android Studio
- SDK packages
- Android Emulator
- Other SDK packages in the AUR
- Making /opt/android-sdk group-writeable
- Other IDEs
- Netbeans
- Vim / Neovim
- Emacs
- Other Tools
- Marvin
- Building
- Required packages
- Java Development Kit
- Setting up the build environment
- Downloading the source code
- Building the code
- Testing the build
- Creating a flashable Image
- Flashing
- Fastboot
- Samsung devices
- samloader
- Heimdall
- Odin (Virtualbox)
- Use Android on GNU/Linux
- Troubleshooting
- Android Studio: Android Virtual Devices show ‘failed to load’.
- Android Studio: ‘failed to create the SD card’
- Eclipse: During Debugging «Source not found»
- ValueError: unsupported pickle protocol
- libGL error: failed to load driver: swrast OR AVD does not load and no error message displayed
- sh: glxinfo: command not found
- Android Emulator: no keyboard input in xfwm4
- Android Emulator: Window is shaking and blinking when used in WM tiled mode
- Android Emulator: Segmentation fault (core dumped)
- adb: sideload connection failed: insufficient permissions for device
Howto Install and Run the Android Emulator

I am in the process of building some mobile apps for one of my clients, and while I’m pretty familiar with running the iPhone simulator and building iPhone apps, I’m pretty new to the Android development tools at this point. So I thought I would give a quick and easy guide for folks to follow, that might be interested in getting started with Android Development and running the Android Emulator.
I should mention that there is also an Eclipse Plugin for Android Development as well that you can use instead. Also, I’m using a Mac, but I think the steps should be pretty close if you are running Windows or Linux.
Step 1 — Download the Android SDK
Download the Android SDK, and unzip it somewhere. I placed the android-sdk-mac_86 folder in my /Applications/ folder, but you can put it wherever you want.
Step 2 — Optional Add to System Path
Since we are using the command line you might find it useful to add the android-sdk-platform/tools folder to your system path so you can run the android commands from any folder.
Step 3 — Install Android Platforms
At this point, I tried running the emulator command, but the SDK doesn’t contain any Android Platforms, the Android platform is essentially Android OS, you need to install at least one version (eg 1.6, 2.1, 2.2, etc) to run the emulator.
To install platforms run the android command located in the tools folder of the SDK (use Terminal.app on a Mac, or the Command Prompt on Windows, Linux folks you know what to do :). This will pop up a window. Select Available Packages, pick some platform versions and install.
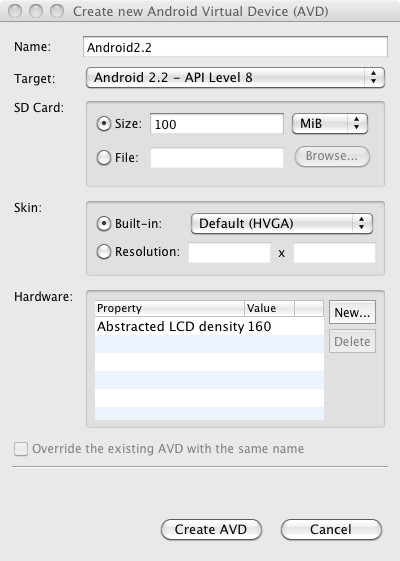
Step 4 — Create a Virtual Device
Still in the android tool, click on Virtual Devices on the left, and then click New. Here’s an example of the settings for the new device:
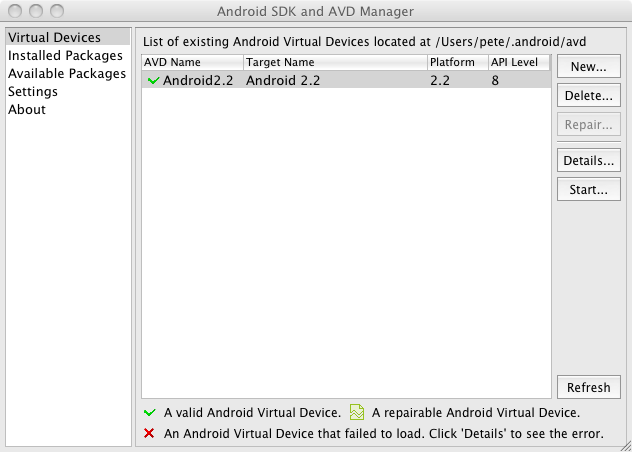
Once you create the avd file, it should show up in the listing of Android Virtual Devices:
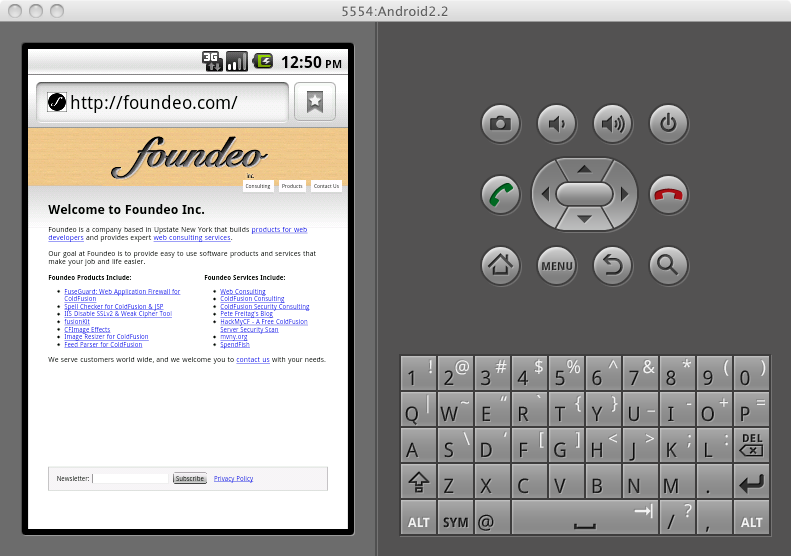
Step 5 — Run the emulator
Now select the virtual device you just created and click Start on the right, and the emulator should start running:
Like this? Follow me ↯
Howto Install and Run the Android Emulator was first published on August 20, 2010.
If you like reading about android, emulator, mobile, or google then you might also like:
Comments
When I first installed Android SDK on Windows it refused to work and no meaningful error message was displayed. Resorting to tools like SysInternals ProcMon I was able to figure out Android SDK depended on Java. I had Java JRE, but its path was not set on the PATH environment variable.
So if you happen to see similar behaviour when you first install Android SDK, check Java JRE/JDK is installed and the directory it was installed in is included on the PATH environment variable.
Step 1 — Download the Android SKD
Download the Android SDK,
PROOFREAD!
I am getting the following message:-
Starting emulator for AVD ’40And4′
Failed to create Context 0x3005
emulator: WARNING: Could not initialize OpenglES emulation, using software renderer.
could not get wglGetExtensionsStringARB
could not get wglGetExtensionsStringARB
could not get wglGetExtensionsStringARB
could not get wglGetExtensionsStringARB
could not get wglGetExtensionsStringARB
could not get wglGetExtensionsStringARB
could not get wglGetExtensionsStringARB
could not get wglGetExtensionsStringARB
emulator: emulator window was out of view and was recentered
Источник
Creating an Android Emulator
An Android emulator is an Android Virtual Device (AVD) that represents a specific Android device. You can use an Android emulator as a target platform to run and test your Android applications on your PC.
 Caution: Android emulators are extremely slow and do not support the same feature set as real devices.
We do not recommend that you attempt to use an Android emulator:
- If you have an Android device, use your Android device instead.
- You can also use Mobile Preview to do initial debugging of an Android app.
Minimum Requirements for an Android Emulator
To create an Android emulator (made available by Google as part of the Android SDK), we recommend using at least the following:
- Intel Core i5 CPU
- 4GB of RAM
- GPU emulation must be listed in the hardware list of the emulator image, as explained in Running Your Android Application on an Android Emulator.
We do not recommend using an Android emulator on a virtual machine (VM), because GPU support for the emulator is generally not available on VMs. However, if you are running Delphi on a VM on a Mac OS X computer, you can consider using a remote emulator on the Mac, given that the emulator does not work on VMs. For more information, see http://delphi.org/2013/09/debugging-against-a-remote-android-emulator/.
RAD Studio supports the emulator for Android versions 4.x.
We do not support emulators for the 2.x version (Gingerbread) because emulators for Android versions 2.x target an ARMv6 CPU, which Delphi does not support.
Android Emulators Require a Separate GPU
Android emulators are heavily hardware-dependent, and this includes the hardware being emulated as well as the hardware on which the emulator runs.
For this reason, we recommend that you verify the presence of a suitable graphics card on your development system.
- Open Control Panel\Appearance and Personalization\Display\Screen Resolution.
- Click Advanced Settings.
- Take a look at the displayed properties of your graphics card.
- If you do not have a suitable GPU, it is probably not worth your time to create and attempt to run an Android emulator. Find another development system that does have a suitable GPU.
- We do not recommend Intel GPUs.
- If you receive error messages about OpenGL ES when you try to run your Android emulator, this means that your GPU is probably not suitable.
Creating an Android Emulator Is Optional
If you decide to create your own Android emulator, consider creating an emulator for each Android device you want to support. Keep in mind that Android emulators often run so slow that some people consider them unusable.
RAD Studio supports the following targets:
- Android emulators that are version 4.0 or newer
- Android devices that are ARM version 7 or newer
Android emulators cannot be run on a Virtual Machine (VM). Although an emulator might run on a VM, the emulator will not actually run an application.
Note: It is a well-known performance issue that Android emulators are extremely slow.
Installing an Android System Image (Required)
Before you create an Android emulator, you need to install an Android system image that your emulators can use.
Note: If you installed the Android SDK and NDK during RAD Studio installation, a valid Android system image (such as Android 4.2.2 API 17) should already be shown as Installed in the Android SDK Manager. In this case, you do not need to install another Android system image.
Follow these steps:
- Start the Android Virtual Device Manager (select Start > All Programs > Embarcadero RAD Studio XE6 > Android SDKs > Android AVD Manager ).
- In the packages tree, locate and check the ARM EABI v7a System Image node within the first Android node in the list. For example: Android 4.2.2 (API 17) or Android 4.3 (API 18)

- Click Install 1 package. (Clear any checkboxes that were auto-selected.)
- In the Choose Packages to Install page, click Accept License, and then click Install to install the system image.


Creating an Android Emulator Using the Android Virtual Device Manager
To create an Android emulator on your system, follow these steps:
- Start the Android SDK Manager (select Start > All Programs > Embarcadero RAD Studio XE6 > Android SDKs > Android AVD Manager ).

In the Android Virtual Device Manager, click the New button to create a new virtual device. 
- In Target, select an Android SDK with an API level that is 17 or higher. The drop-down list contains your installed versions of the Android SDK.
- Under Emulation Options, check Use Host GPU.
- In Device, select the Android device to emulate.
Tip: Emulating an older Android device like the Nexus S might be faster than emulating a newer, larger device like the Nexus 10.

RAD Studio lists your Android emulators in the Project Manager, within the Target node of the Android target platform node. See Using the Target Node.
Note: As reference, here are the default installed locations of the Android development tools as installed by the RAD Studio installer:
- If you need to start the Android SDK Manager directly, here is its location:
C:\Users\Public\Documents\Embarcadero\Studio\14.0\PlatformSDKs\adt-bundle-windows-x86-20131030
- If SDK Manager.exe does not start, use Android.bat, which is located here:
C:\Users\Public\Documents\Embarcadero\Studio\14.0\PlatformSDKs\adt-bundle-windows-x86-20131030\sdk
Creating an Android Emulator Using the Command Line
You can create an Android emulator in the command window by entering a command such as this:
For the skin, you might want to add this option:
Starting an Android Emulator
When the emulator is the current target platform, you do not have to start the emulator before running your Android app on the emulator. However, we recommend that you start your Android emulator separately, perhaps before you start RAD Studio. Emulators are notoriously slow to start and to run, so starting the emulator beforehand means that your app can get to the emulator more quickly.
The recommended way to start an Android emulator is by using the Android Virtual Device Manager, which can be started from the Android SDK Manager.
To start an Android emulator such as the default emulator installed in RAD Studio:
- Start the Android Virtual Device Manager (select Start > All Programs > Embarcadero RAD Studio XE6 > Android SDKs > Android AVD Manager ).
- Select the emulator and click Start.


In the Project Manager, your emulator should appear in the Target node of the Android target platform, with its assigned port (such as (5554)): 
Tip: If the Project Manager does not show your running Android emulator as running, with the same icon as in the screenshot above, see Using the Target Node.
Your next step is to run an Android app on your emulator. In the Project Manager, ensure that the emulator’s name is in boldface and the port number is indicated in parentheses (such as (5554)), indicating that the emulator is running and is the current selected target platform.
Источник
Android
Contents
Transferring files
There are various ways to transfer files between a computer and an Android device:
- USB cable
- Media Transfer Protocol for modern Android devices
- USB mass storage for older devices
- Android Debug Bridge
- special USB sticks / regular USB stick with adapter
- Bluetooth
- Arch Linux software with Android counterparts
- client or server for protocols that can be used to transfer files (eg. SSH, FTP, Samba or HTTP)
- KDE Connect ( kdeconnect ) – integrates your Android device with the KDE or Gnome desktop (featuring synced notifications & clipboard, multimedia control, and file/URL sharing).
- cloud synchronization clients
- Syncthing
- sendanywhereAUR – cross-platform file sharing
- qrcpAUR – transfer files over wifi from your computer to your mobile device by scanning a QR code
App development
The officially supported way to build Android apps is to use #Android Studio.[1]
Android Studio
Android Studio is the official Android development environment based on IntelliJ IDEA. It provides integrated Android developer tools for development and debugging.
Android Studio creates a .android directory in home directory. To reset Android Studio, this directory can be removed.
The Android Studio Setup Wizard installs the required #SDK packages and places the SDK by default in
To build apps from the command-line (using e.g. ./gradlew assembleDebug ) set the ANDROID_SDK_ROOT environment variable to your SDK location.
SDK packages
Android SDK packages can be installed directly from upstream using #Android Studio’s SDK Manager or the sdkmanager command line tool (part of the Android SDK Tools). Some Android SDK packages are also available as AUR packages, they generally install to /opt/android-sdk/ .
| Android SDK Package | SDK-style path | AUR package | AUR dummy | CLI tools |
|---|---|---|---|---|
| Command-Line Tools | tools | android-sdk-cmdline-tools-latest AUR | android-sdk-cmdline-tools-latest-dummy AUR | apkanalyzer, avdmanager, lint, retrace, screenshot2, sdkmanager |
| SDK Build-Tools | build-tools;version | android-sdk-build-tools AUR | android-sdk-build-tools-dummy AUR | aapt, aapt2, aidl, apksigner, bcc_compat, d8, dexdump, dx, lld, llvm-rs-cc, mainDexClases, split-select, zipalign |
| SDK Platform-Tools | platform-tools | android-sdk-platform-tools AUR | android-sdk-platform-tools-dummy AUR | adb, dmtracedump, e2fsdroid, etc1tool, #fastboot, hprof-conv, make_f2fs, make_f2fs_casefold, mke2fs, sload_f2fs, sqlite3, systrace |
| SDK Platform | platforms;android-level | android-platform AUR , older versions | android-platform-dummy AUR (unnecessary) |
The android-tools package provides adb, #fastboot, e2fsdroid and mke2fs.android from the SDK Platform-Tools along with mkbootimg and ext2simg .
Android Emulator
The Android Emulator is available as the emulator SDK package, the android-emulator AUR package, and there is also a dummy package for it: android-emulator-dummy AUR .
To run the Android Emulator you need an Intel or ARM System Image. You can install them through the AUR[2], with the sdkmanager or using Android Studio’s AVD Manager.
Other SDK packages in the AUR
The Android Support Library is now available online from Google’s Maven repository. You can also install it offline through the extras;android;m2repository SDK package (also available as android-support-repository AUR ).
Making /opt/android-sdk group-writeable
 The factual accuracy of this article or section is disputed.
The AUR packages install the SDK in /opt/android-sdk/ . This directory has root permissions, so keep in mind to run sdk manager as root. If you intend to use it as a regular user, create the android-sdk users group, add your user.
Set an access control list to let members of the newly created group write into the android-sdk folder. As running sdkmanager can also create new files, set the ACL as default ACL. the X in the default group entry means «allow execution if executable by the owner (or anyone else)»
Re-login or as log your terminal in to the newly created group:
Other IDEs
Android Studio is the official Android development environment based on IntelliJ IDEA. Alternatively, you can use Netbeans with the NBAndroid-V2. All are described below.
Netbeans
If you prefer using Netbeans as your IDE and want to develop Android applications, use NBAndroid-V2 .
Install android-sdk AUR package and follow the instructions from the NBANDROID README.
Vim / Neovim
It is possible to write flutter applications for Android and iOS using (Neo)vim like an IDE. Install coc using a Vim plugin manager. Also install the coc-flutter extension for autocompletion (like in Android Studio) and to load the code into an Android emulator.
Emacs
To develop a mobile flutter application using Emacs, as the the official instruction at flutter.dev suggests, install lsp-dart.
Other Tools
Marvin
Marvin is a tool which helps beginners set up an Android development environment. Installing marvin_dsc AUR helps you set up the following things: JDK, Android SDK, IDE(s), and AVD.
Building
Please note that these instructions are based on the official AOSP build instructions. Other Android-derived systems such as LineageOS will often require extra steps.
Required packages
As of 2020/April, to build either AOSP 10 or LineageOS 17.1 you need (possibly a subset of) base-devel , multilib-devel , gcc , repo , git , gnupg , gperf , sdl , wxgtk2 , squashfs-tools , curl , ncurses , zlib , schedtool , perl-switch , zip , unzip , libxslt , bc , rsync , ccache , lib32-zlib , lib32-ncurses , lib32-readline , ncurses5-compat-libs AUR , lib32-ncurses5-compat-libs AUR , and a TTF font installed (e.g. ttf-dejavu ). In particular, no Python2 or Java are required, as they are provided by AOSP/Lineage. The aosp-devel AUR metapackage provides them all for simple installation.
Additionally, LineageOS requires the following packages: xml2 AUR , lzop , pngcrush , imagemagick . They can be installed with the lineageos-devel AUR metapackage.
The factual accuracy of this article or section is disputed.
Java Development Kit
The required JDK version depends on the Android version you are building:
- For Android 9 (Pie) and up, Java is included with the Android source and no separate installation is needed.
- For Android 7 and 8 (Nougat and Oreo), OpenJDK 8 is required, which is available with the jdk8-openjdk package.
- For Android 5 and 6 (Lollipop and Marshmallow), OpenJDK 7 is required, which is available with the jdk7-openjdk package.
Set JAVA_HOME to avoid this requirement and match the Arch Linux installation path. Example:
This change will be valid only for the current terminal session.
Setting up the build environment
Create a directory to build.
The Android build process expects python to be python2. Prepend it to the PATH :
Alternatively, create a python2 virtual environment and activate it:
/android to reflect your build directory if different than above).
or (assuming build directory Data/Android_Build):
Downloading the source code
This will clone the repositories. You only need to do this the first time you build Android, or if you want to switch branches.
- The repo has a -j switch that operates similarly to the one used with make . Since it controls the number of simultaneous downloads, you should adjust the value depending on downstream network bandwidth.
- You will need to specify a branch (list of branches) to check out with the -b switch. If you leave the switch out, you will get the so-called master branch.
The -c switch will only sync the branch which is specified in the manifest, which in turn is determined by the branch specified with the -b switch, or the default branch set by the repository maintainer.
Wait a long time. Just the uncompiled source code, along with the .repo and .git directories that are used to keep track of it, are very large. As of Android 10, at least 250 GB of free disk space is required.
Building the code
This should do what you need for AOSP:
If you run lunch without arguments, it will ask what build you want to create. Use -j with a number between one and two times number of cores/threads.
The build takes a very long time.
Testing the build
When finished, run/test the final image(s).
Creating a flashable Image
To create an image that can be flashed it is necessary to:
This will create a zip image under out/target/product/hammerhead (hammerhead being the device name) that can be flashed.
Flashing
In some cases, you want to return to the stock Android after flashing custom ROMs to your Android mobile device. For flashing instructions of your device, please use XDA forums.
Fastboot
Fastboot (as well as ADB) is included in the android-tools package.
Samsung devices
Samsung devices cannot be flashed using Fastboot tool. Alternatives are Heimdall and Odin (by using Windows and VirtualBox).
samloader
To download original Samsung firmware, a platform independent script, samloader can be used.
Heimdall
Heimdall is a cross-platform open-source tool suite used to flash firmware (also known as ROMs) onto Samsung mobile devices and is also known as an alternative to Odin. It can be installed as heimdall .
The flashing instructions can be found on Heimdall’s GitHub repository or on XDA forums.
Odin (Virtualbox)
It is also possible to restore firmware (Android) on the Samsung devices using Odin, but inside the VirtualBox.
Arch Linux (host) preparation:
- Install VirtualBox together with its extension pack and guest additions.
- Install your preferred, but compatible with Odin, Windows operating system (with VirtualBox guest additions) into a virtual hard drive using VirtualBox.
- Open VirtualBox settings of your Windows operating system, navigate to USB, then tick (or make sure it is ticked) Enable USB 2.0 (EHCI) Controller.
- At VirtualBox running Windows operating system, click in the menu bar Devices > USB Devices, then click on your Samsung mobile device from the list, which is connected to your computer via USB.
Windows (guest) preparation:
Check if configuration is working:
- Turn your device into Download mode and connect to your Linux machine.
- In virtual machine toolbar, select Devices > USB > . Samsung. device.
- Open Odin. The white box (a big one at the bottom-left side) named Message, should print a line similar to this:
which means that your device is visible to Odin & Windows operating system and is ready to be flashed.
Use Android on GNU/Linux
There are several projects and methods which support running Android on GNU/Linux:
- Anbox: container-based software to run Android on Linux kernels
- Android-x86: a direct port of Android for the x86 architecture
Troubleshooting
Android Studio: Android Virtual Devices show ‘failed to load’.
Make sure you have exported the variable ANDROID_HOME as explained in #Android Studio.
Android Studio: ‘failed to create the SD card’
If you try to run an AVD (Android Virtual Device) under x86_64 Arch and get the error above, install the lib32-gcc-libs package from the multilib repository.
Eclipse: During Debugging «Source not found»
Most probably the debugger wants to step into the Java code. As the source code of Android does not come with the Android SDK, this leads to an error. The best solution is to use step filters to not jump into the Java source code. Step filters are not activated by default. To activate them: Window > Preferences > Java > Debug > Step Filtering. Consider to select them all. If appropriate you can add the android.* package. See the forum post for more information: http://www.eclipsezone.com/eclipse/forums/t83338.rhtml
ValueError: unsupported pickle protocol
One fix is to issue:
If that does not work, then try this:
libGL error: failed to load driver: swrast OR AVD does not load and no error message displayed
Sometimes, beginning to load an AVD will cause an error message similar to this to be displayed, or the loading process will appear to finish but no AVD will load and no error message will be displayed.
The AVD loads an incorrect version of libstdc++, you can remove the folder libstdc++ from
/.android-sdk/emulator/lib64 (for 64-bit) or
/.android-sdk/emulator/lib (for 32-bit) , e.g.:
Note that in versions before Android Studio 3.0, this directory was in a different location:
Alternatively you can set and export ANDROID_EMULATOR_USE_SYSTEM_LIBS in
Fix for the .desktop file might be achieved by using env command, prefixing the Exec line Desktop entries#Modify environment variables
sh: glxinfo: command not found
Here is the full error:
You can try to install glxinfo ( mesa-utils ) but if your computer has enough power you could simply use software to render graphics. To do so, go to Tools > Android > AVD Manager, edit the AVD (click the pencil icon), then select Software — GLES 2.0 for Emulated Performance > Graphics.
Android Emulator: no keyboard input in xfwm4
In xfwm4, the vertical toolbar buttons window that is on the right of the emulator takes focus from the emulator and consumes keyboard events. (bug report)
You can use the workaround described in [3]:
- Open the xfwm4 settings.
- Switch to the Focus tab.
- Change the Focus Model to «Focus follow mouse».
- Disable Automatically raise windows when they receive focus option below.\
Android Emulator: Window is shaking and blinking when used in WM tiled mode
When using Tiled Window Manager like dwm, Android Emulator will shake and blink. You can use the workaround described in krohnkite issue 72 (window floating is induced by Alt+f in dwm).
Android Emulator: Segmentation fault (core dumped)
When using Nouveau drivers try to disable gpu hardware acceleration.
In some devices it can only be done by editing $HOME/.avd/device_name.avd/config.ini .[4]
- Set hw.gpu.enabled=no
- Set hw.gpu.mode=off
adb: sideload connection failed: insufficient permissions for device
If you get the error:
you might solve it by restarting the adb server:
Источник


