- Installing the Android Development Tools
- You Need to Install Part of the Android SDK Yourself
- Separate Install Required for Several Elements of the Android SDK
- Installing the Android Development Tools Without the RAD Studio Installer
- Installing the Android Development Tools
- Installing the JDK/SDK/NDK
- Handling an Android SDK Manager Issue on Windows 8
- Configuring RAD Studio to Work with Your Installed SDK
- Adding Java as a User Override to Your System Path
- Adding an Android SDK
- Проблема с «Android SDK tools are required» и её решение
Installing the Android Development Tools
You need the following third-party development tools for Android development using RAD Studio:
To develop Android applications using RAD Studio, you must have the Android development tools installed on your development system and have an Android SDK in the RAD Studio SDK Manager.
You Need to Install Part of the Android SDK Yourself
The installer for RAD Studio installs the current recommended and tested versions of the Android development tools during the RAD Studio installation by default, and adds an Android SDK to the RAD Studio SDK Manager.
The following section, #Separate Install Required for Several Elements of the Android SDK, describes the steps for installing the additional required elements of the Android SDK that are not installed by the RAD Studio installer.
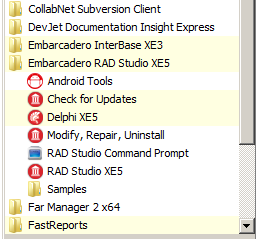
The Android development tools («Android SDKs»), as installed, are accessible using Start | All Programs | Embarcadero RAD Studio 10 Seattle | Android SDKs , as shown here:

Here are the default installed locations of the Android development tools as installed by the RAD Studio installer:
- Java Development Kit (JDK): C:\Program Files\Java\jdk1.7.0_25
- Android Software Development Kit (SDK): C:\Users\Public\Documents\Embarcadero\Studio\17.0\PlatformSDKs\android-sdk-windows
- Android SDK 5.1.1 (API 22)
- Android Native Development Kit (NDK): C:\Users\Public\Documents\Embarcadero\Studio\17.0\PlatformSDKs\android-ndk-r9c
- Android NDK (android-ndk-r9c)
Separate Install Required for Several Elements of the Android SDK
The first time you attempt to compile an Android application, RAD Studio prompts you to install the missing components of the Android SDK, Android NDK and Android development tools if some required components have not been installed during RAD Studio installation.
To install the required components of the Android SDK, you should only accept a standard license agreement.
Note: As a rule, RAD Studio prompts you to install only the Android development tools.
Here are the required components of the Android SDK that are installed:
- platform-tools (version 22)
- build-tools (version 22.0.1)
- platforms (version android-22)
Installing the Android Development Tools Without the RAD Studio Installer
The installer for RAD Studio gives you the option to not install the Android development tools. If you opt out in the installer, do the following to install the Android development tools on your development system:
- The first time you attempt to compile an Android application, RAD Studio will fetch and set up all required packages (Android SDK, Android NDK, and Android development tools).
- Install the Android development tools manually and add an Android SDK to RAD Studio that points to them.
- If you have a previously-installed Android SDK and NDK and you want to use them, add an Android SDK to RAD Studio that points to them.
Note: You need to use the recommended versions of the Android development tools. RAD Studio might not support changes that alternative versions introduce.
Источник
Installing the Android Development Tools
Important: You do not need to install the Android tools yourself.
- The installer for RAD Studio installs the current recommended and tested versions of the Android development tools during the RAD Studio product installation.
- The Android development tools are conveniently accessible using Start > All Programs > Embarcadero RAD Studio > Android Tools, as shown here:

- The Android Tools menu item opens the Android SDK Manager, from which you can start the Android Virtual Device Manager.
- The installer gives you the option to not install the Android SDK and NDK. If you opt out in the installer, you can either:
- Use a previously installed Android SDK and NDK.
- Install the Android development tools yourself, following the steps in this topic.
Be aware that you need to use the recommended versions of the Android development tools; alternate versions might introduce changes that cannot be supported by RAD Studio. Note: The JDK is installed if you do not have the recommended version of Java (1.6 or 1.7), regardless of whether the Android development tools are installed for you during product installation.
Having the Android development tools installed on your development system is required for developing Android apps using RAD Studio. To build mobile apps for the Android target platform, you also need to add an Android SDK to the RAD Studio SDK Manager.
Here are the default installed locations of the Android development tools as installed by the RAD Studio installer:
- Java Development Kit (JDK): C:\Program Files\Java\jdk1.7.0_25
- Android Software Development Kit (SDK): C:\Users\Public\Documents\RAD Studio\12.0\PlatformSDKs\adt-bundle-windows-x86-20130522\sdk
- Android Native Development Kit (NDK): C:\Users\Public\Documents\RAD Studio\12.0\PlatformSDKs\android-ndk-r8e
Installing the JDK/SDK/NDK
- Install the JDK (Java development kit):
- On the PC, download and run the JDK installer, which is available here: http://www.oracle.com/technetwork/java/javase/downloads/index.html
- Install the Android SDK (software development kit):
- In your browser on the PC, open the Android SDK download page and click Download the SDK Tools ADT Bundle for Windows.
- On the Get the Android SDK page, you can select either 32-bit or 64-bit, according to your Windows platform.
- This download includes the SDK tools and the Eclipse IDE. After the download completes, you can safely delete the SDK\adt-bundle-windows-x86_64-20130522\eclipse folder, unless you want to use the Eclipse IDE.
- From your directory, run SDK Manager.exe. Tips: If the Android SDK Manager does not start, try these suggestions:
- Right-click SDK Manager.exe and choose Run As Administrator.
- Run android.bat from the \tools directory inside your directory.
- In the Android SDK Manager tree, check (enable) the following nodes:
- Tools node
- SDK Platform node within the Android (API ) node, where must be 9 or a higher value (for example, «18»). Note: RAD Studio supports Android 2.3 and later versions regardless of which SDK Platform you download. Android SDK platforms are backward compatible.
- Click Install packages, click Accept License to accept the required licenses, and click Install to install the required software.
- You can close the Android SDK Manager when the installation finishes.
- In your browser on the PC, open the Android SDK download page and click Download the SDK Tools ADT Bundle for Windows.
- Install the Android NDK (native development kit):
- On the PC, download and unzip the NDK for your Windows version (32-bit or 64-bit), available here: http://developer.android.com/tools/sdk/ndk/index.html.
After installing these tools, you need to add an Android SDK to RAD Studio, as described in the next section, and then you can start building mobile applications for the Android platform.
Handling an Android SDK Manager Issue on Windows 8
On Windows 8, you might see errors when you start the Android SDK Manager. If this happens, you might not be able to download any additional SDKs.
The solution is to edit the android.bat file and change the line that launches the Android SDK Manager. Add -Djava.net.preferIPv4Stack=true to the call to Java, as follows:
call %java_exe% -Djava.net.preferIPv4Stack=true %REMOTE_DEBUG% -Dcom.android.sdkmanager.toolsdir=»%tools_dir%» -Dcom.android.sdkmanager.workdir=%work_dir% -classpath «%jar_path%;%swt_path%\swt.jar» com.android.sdkmanager.Main %*
This issue seems to be related to Windows 8 wanting to use Internet Protocol V6.
Configuring RAD Studio to Work with Your Installed SDK
You can use specific versions of the Android SDK simply by pointing the RAD Studio SDK Manager to your installed location.
- Open the Create a New Android SDK wizard by using either Tools Options or Project Manager:
- Choose Tools > Options > Environment Options >SDK Manager | Add | Add new.
- In the Project Manager:
- Right-click the Android target platform and select Properties from the context menu.
- In the SDK field on the Platform Properties dialog box, click Add new in the dropdown list.
- On the Add a New SDK dialog, click Add new in the dropdown list.
- In the Android SDK Base Path and the Android NDK Base Path fields, browse to and select your installed and locations, respectively.
- The Create a new Android SDK wizard now populates the rest of the fields here and on the Android tools locations page. Allow a moment for this process to complete.
- For any fields that are not auto-populated or are marked with , click the entry field and browse to the installed location of that library on your system.
 , click the entry field and browse to the installed location of that library on your system.
Adding Java as a User Override to Your System Path
If you installed the JDK yourself, Java might not be in your system path. For example, if Java is not in your system path, you must use android.bat to start the Android SDK Manager (instead of SDK Manager.exe). If you want to optimize for Android development, you should add Java to your system path environment variable.
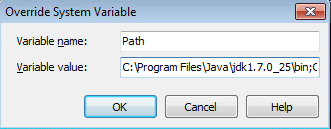
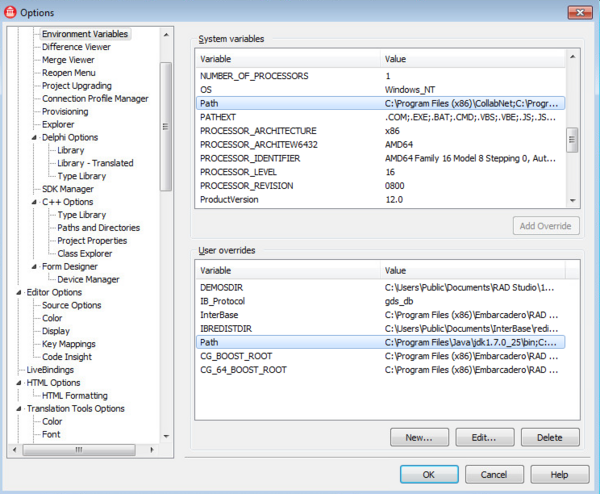
- Choose Tools > Options > Environment Options >Environment Variables .
- In the System variables pane, double-click the Path item.
- In the Override System Variable dialog box, click the Home button on your keyboard to bring the focus to the beginning of the path.
- Add the path to Java at the beginning of your system path (it must precede all references to System32). For example, the default installed path to java.exe in RAD Studio is: C:\Program Files\Java\jdk1.7.0_25\bin Note that you should only need to add an override if your Java installation is different from this. End your path entry with a semicolon (;):
- Click OK on the Override dialog box, and click Yes on the Confirm dialog box that follows.
- Verify that you see the path to Java shown at the start of the Path field in the User overrides pane:
- Click OK to close the Tools Options Dialog Box.
Источник
Adding an Android SDK
A software development kit (SDK) provides a set of files that are used to build applications for a target platform. When you develop applications for Android, the Android SDK and Android NDK are required on your development system, and they both need to be known to the SDK Manager.
When you install RAD Studio, the installer gives you the option of installing the recommended versions of the Android SDK and NDK. If you install these recommended versions during product installation , the SDK Manager detects their presence and sets the default paths and locations for you, as shown in this screenshot:
In this case, when the recommended versions of the Android SDK and NDK are installed by default, you do not need to add an Android SDK, because the default location is known to the SDK Manager, and so the libraries are automatically detected.
If you want to install the Android SDK and NDK yourself, even in alternate locations, or if you want to use an existing installation of the Android SDK and NDK, you must add your Android SDK to the RAD Studio SDK Manager. See Installing the Android Development Tools if you do not have the Android SDK or NDK installed yet and you want to install them yourself.
Caution: Versions of the Android SDK and NDK libraries that differ from those installed with RAD Studio might not work as expected.
To add an Android SDK to RAD Studio:
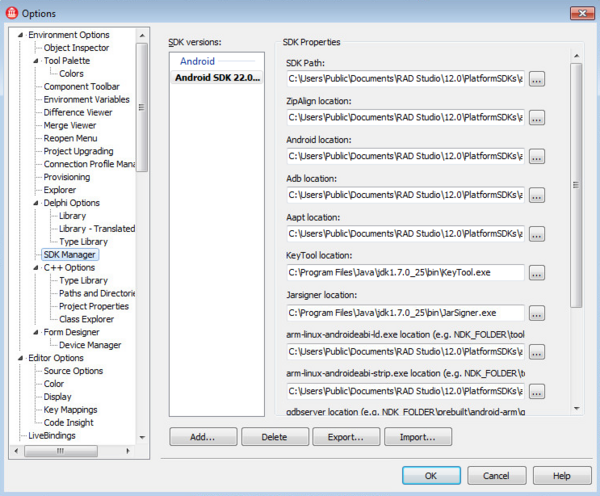
- Select Tools > Options > Environment Options >SDK Manager .
- Click the Add button.
- On the Add a New SDK dialog box, select Android from the Select a platform drop-down list. RAD Studio detects the Android SDKs installed in your system and populates the Select an SDK version drop-down list for you.
- Select an SDK from the Select an SDK version drop-down list. For details and troubleshooting, see SDK Manager.
- Check Make the selected SDK active if you want the new SDK to be the default SDK for Android.
- Click OK to continue. The Create a New Android SDK wizard opens.
- In the Android NDK Base path field on the first page of the wizard, enter the path to your installed NDK folder, and click Next.
- On the next page, wait for RAD Studio to automatically detect the paths of the required tools, and then click Finish.
Your Android SDK version is now listed in the SDK Manager:

The Android SDK version should now be included in your Android target platform in the Project Manager:
Источник
Проблема с «Android SDK tools are required» и её решение
Многие программисты, использующие для разработки под Android на Delphi и C++ Builder, часто сталкиваются со следующей проблемой.
После установки RAD Studio при попытке скомпилировать приложение или назначить устройство для его выполнения на экран выводится следующее сообщение:

В этом сообщении предлагается скачать и установить Android SDK tools, хотя на самом деле решить данную проблему можно гораздо проще. Но, вначале разберёмся в причине её возникновения.
Причина
Дело в том, что в последних версиях средства для разработки под Android изначально устанавливаются не полностью. В этом можно убедиться, если открыть соответствующий раздел в настройках («Tools» – «Options» – «SDK Manager»).
Там будет отображено несколько компонентов из-за отсутствия которых компиляция для Android не будет работать.

Решение проблемы
Для решения данной проблема нужно воспользоваться программой SDK Manager из того дистрибутива Android SDK, что входит в комплект поставки RAD Studio.
После её запуска необходимо:
- Выполнить установку всех пакетов, которые потребует программа после автоматической проверки при запуске. А, после перезапуститьSDKManager.
- Установить вuild-tools версии 22.0.1
После этого останется только один недостающий компонент. - Установить поддержкуAndroid 5.1 (API 22)
Теперь проблема решена окончательно.


Данный пример приведён для RAD Studio 10.1 Berlin. Для других версий принцип тот же самый, но могут меняться версии build-tools и API. Поэтому пример подробно проиллюстрирован скриншотами, чтобы показать какие из недостающих компонентов в какие пакеты Android SDK входят.
Что касается версий build-tools и API, то их можно очень легко определить на основании путей по умолчанию к соответствующим компонентам.
Для build-tools, по номеру версии названа папка, в которой расположен ZipAlign.exe:
C:\Users\Public\Documents\Embarcadero\Studio\18.0\PlatformSDKs\android-sdk-windows\build-tools\ 22.0.1 \ZipAlign.exe
Для API, это две последние цифры:
C:\Users\Public\Documents\Embarcadero\Studio\18.0\PlatformSDKs\android-sdk-windows\platforms\android- 22
Таким нехитрым способом можно добавить недостающие компоненты для компиляции Android приложений, не прибегая к скачиванию и установке Android SDK tools целиком.
Источник


