- Android — Sending SMS
- Example
- Using Built-in Intent to send SMS
- Intent Object — Action to send SMS
- Intent Object — Data/Type to send SMS
- Intent Object — Extra to send SMS
- Example
- Sending SMS in Android Programmatically
- Android send sms programmatically
- Отправка и получение SMS сообщений в Android
- Отправка SMS сообщений в Android
- Получение SMS сообщений в Android
- Заключение
Android — Sending SMS
In Android, you can use SmsManager API or devices Built-in SMS application to send SMS’s. In this tutorial, we shows you two basic examples to send SMS message −
Built-in SMS application
Of course, both need SEND_SMS permission.
Apart from the above method, there are few other important functions available in SmsManager class. These methods are listed below −
| Sr.No. | Method & Description | |||||||||||||||||||||||||||
|---|---|---|---|---|---|---|---|---|---|---|---|---|---|---|---|---|---|---|---|---|---|---|---|---|---|---|---|---|
| 1 |
| Step | Description |
|---|---|
| 1 | You will use Android Studio IDE to create an Android application and name it as tutorialspoint under a package com.example.tutorialspoint. |
| 2 | Modify src/MainActivity.java file and add required code to take care of sending sms. |
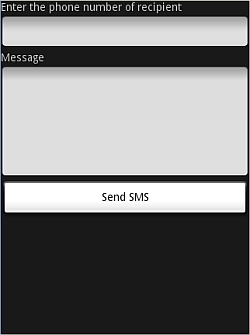
| 3 | Modify layout XML file res/layout/activity_main.xml add any GUI component if required. I’m adding a simple GUI to take mobile number and SMS text to be sent and a simple button to send SMS. |
| 4 | No need to define default string constants at res/values/strings.xml. Android studio takes care of default constants. |
| 5 | Modify AndroidManifest.xml as shown below |
| 6 | Run the application to launch Android emulator and verify the result of the changes done in the application. |
Following is the content of the modified main activity file src/com.example.tutorialspoint/MainActivity.java.
Following will be the content of res/layout/activity_main.xml file −
Here abc indicates about tutorialspoint logo
Following will be the content of res/values/strings.xml to define two new constants −
Following is the default content of AndroidManifest.xml −
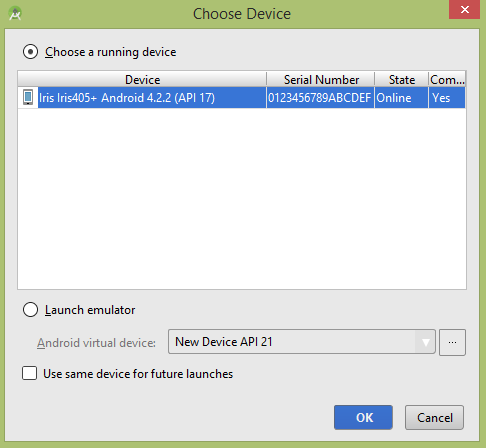
Let’s try to run your tutorialspoint application. I assume you have connected your actual Android Mobile device with your computer. To run the app from Android studio, open one of your project’s activity files and click Run  icon from the toolbar. Before starting your application, Android studio installer will display following window to select an option where you want to run your Android application.

Now you can enter a desired mobile number and a text message to be sent on that number. Finally click on Send SMS button to send your SMS. Make sure your GSM/CDMA connection is working fine to deliver your SMS to its recipient.
You can take a number of SMS separated by comma and then inside your program you will have to parse them into an array string and finally you can use a loop to send message to all the given numbers. That’s how you can write your own SMS client. Next section will show you how to use existing SMS client to send SMS.
Using Built-in Intent to send SMS
You can use Android Intent to send SMS by calling built-in SMS functionality of the Android. Following section explains different parts of our Intent object required to send an SMS.
Intent Object — Action to send SMS
You will use ACTION_VIEW action to launch an SMS client installed on your Android device. Following is simple syntax to create an intent with ACTION_VIEW action.
Intent Object — Data/Type to send SMS
To send an SMS you need to specify smsto: as URI using setData() method and data type will be to vnd.android-dir/mms-sms using setType() method as follows −
Intent Object — Extra to send SMS
Android has built-in support to add phone number and text message to send an SMS as follows −
Here address and sms_body are case sensitive and should be specified in small characters only. You can specify more than one number in single string but separated by semi-colon (;).
Example
Following example shows you in practical how to use Intent object to launch SMS client to send an SMS to the given recipients.
To experiment with this example, you will need actual Mobile device equipped with latest Android OS, otherwise you will have to struggle with emulator which may not work.
| Step | Description |
|---|---|
| 1 | You will use Android studio IDE to create an Android application and name it as tutorialspoint under a package com.example.tutorialspoint. |
| 2 | Modify src/MainActivity.java file and add required code to take care of sending SMS. |
| 3 | Modify layout XML file res/layout/activity_main.xml add any GUI component if required. I’m adding a simple button to launch SMS Client. |
| 4 | No need to define default constants.Android studio takes care of default constants. |
| 5 | Modify AndroidManifest.xml as shown below |
| 6 | Run the application to launch Android emulator and verify the result of the changes done in the application. |
Following is the content of the modified main activity file src/com.example.tutorialspoint/MainActivity.java.
Following will be the content of res/layout/activity_main.xml file −
Here abc indicates about tutorialspoint logo
Following will be the content of res/values/strings.xml to define two new constants −
Following is the default content of AndroidManifest.xml −
Let’s try to run your tutorialspoint application. I assume you have connected your actual Android Mobile device with your computer. To run the app from Android studio, open one of your project’s activity files and click Run icon from the toolbar. Before starting your application, Android studio will display following window to select an option where you want to run your Android application.
Select your mobile device as an option and then check your mobile device which will display following screen −
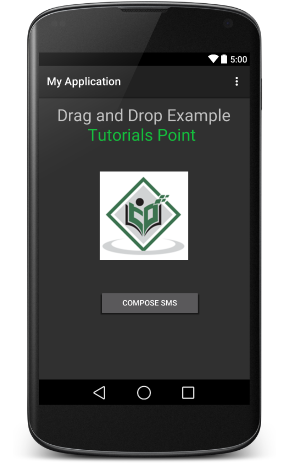
Now use Compose SMS button to launch Android built-in SMS clients which is shown below −
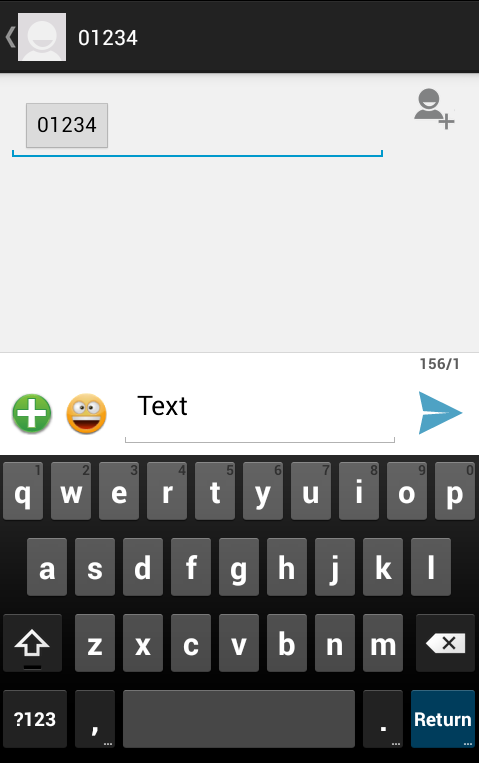
You can modify either of the given default fields and finally use send SMS button to send your SMS to the mentioned recipient.
Источник
Sending SMS in Android Programmatically

Jul 12, 2017 · 2 min read
Here we will discuss about how to send SMS from an Android application Programmatically in a very simple way
SMS messaging has become an integral part of every mobile phone and for the past decade every mobile device be it a smartphone or a simple mobile phone has come with an sms messaging feature.
In this article, we will be having two text view one for entering number and one for text or message and one send button. On the tap of it, the message will send to number entered number.
Steps for Sending SMS in Android Programmatically
St e p 1 : create a layout in the project in layout folder
Step 2:- create a MainActivity.java
public class MainActivity extends Activity implements OnClickListener <
EditText phone_Number, message;
protected void onCreate(Bundle savedInstanceState) <
send = (Button) findViewById(R.id.Send_msg_Btn);
phone_Number = (EditText) findViewById(R.id.EditText_PhoneNumber);
message = (EditText) findViewById(R.id.MainActivity_Message);
public void onClick(View v) <
String phone_Num = phone_Number.getText().toString();
String send_msg = message.getText().toString();
SmsManager sms = SmsManager.getDefault(); // using android SmsManager sms.sendTextMessage(phone_Num, null, send_msg, null, null); // adding number and text
> catch (Exception e) <
Toast.makeText(this, “Sms not Send”, Toast.LENGTH_SHORT).show();
Step 3:- AndroidManifest
To send the sms in android you need to add one permission mentioned below.
Источник
Android send sms programmatically

In Android, we can send SMS from an application in two ways. If we use SmsManager api, it will directly send SMS from our application. In case if we use Intent with proper action ( ACTION_VIEW ), it will invoke built-in SMS app to send SMS from our application.
Any SMS sending requires add android.permission.SEND_SMS permission to the manifest:
Check if device can send SMS
We can use TelephonyManager to check if device can send SMS
Sending SMS by invoking Built-in SMS application
To send SMS using Intent object, we need to write the code like as shown below.
Android has built-in support to add phone number and text message to send an SMS as follows
Here address and sms_body are case sensitive and should be specified in small characters only. You can specify more than one number in single string but separated by semi-colon (;).
Sending SMS using SmsManager API
To send SMS programmatically in Android, we need to get an instance of the SmsManager class using the static getDefault() method.
The first argument passed to sendTextMessage() is the destination address to which the message has to be sent and the second argument is the SMSC address (it’s also like a phone number generally) to which if you pass null , the default service center of the device’s carrier will be used. Third argument is the text message to be sent in the SMS. The fourth and fifth arguments if not null must be pending intents performing broadcasts when the message is successfully sent (or failed) and delivered to the recipient.
Let’s see an example where we set broadcast receivers for when the message is sent successfully and is also delivered (or not).
Following is the MainActivity with full code. For permission check I use EasyPermissions.
Divide and Send Multipart Text Messages
Generally an SMS is restricted to 160 (7 bit) characters or 140 (8 bit) characters. So if your message is longer than that, then you’ll have to divide it into multiple parts using divideMessage() and then send with the sendMultipartTextMessage() method. It’s fairly simple, let’s see an example.
Receive SMS Text Messages
Now that we know how to send SMS messages, it’s time to see how to receive them using broadcast receivers as soon as the recipient device receives it.
Firstly, you’ll need the RECEIVE_SMS permission, so put this in your manifest:
Next we’ll create a broadcast receiver class called SmsReceiver.java to listen for any incoming SMS. So create the file and put this code into it:
It’ll loop through all the PDUs (one for each message in a multipart text message) and form a big string with the sender phone number and the messages. Finally it logs the entire string formed. This reception technique will work for both single and multipart messages. You’ll also need create an entry for the receiver in the manifest file with an SMS_RECEIVED_ACTION intent filter.
We registered our broadcast receiver in the manifest file (statically). Alternatively, we can also dynamically register it in the code itself.
Источник
Отправка и получение SMS сообщений в Android
 Как это ни удивительно, SMS сообщений сегодня остаются одним из самых востребованных сервисов, что вполне объясняет интерес, проявляемый Android разработчики к этой тема. Из данного урока Вы узнаете, как программно отправлять и получать SMS сообщения. Будет показано, как провести тестирование приложения на эмуляторе.
Отправка SMS сообщений в Android
Создайте в Eclipse новый проект со следующими параметрами:
- Project Name: SMSMessaging
- Package name: net.learn2develop.SMSMessaging
- Activity Name: SMS
- Application Name: SMS App
Для того, чтобы наше прилоение могло работать с SMS, ему необходимо дать соответствующие разрешения: SEND_SMS для отправки и RECEIVE_SMS — для получения. Откройте файл AndroidManifest.xml и приведите его к виду:
Настроим шаблон дизайна приложения. Откройте файл res/layout/main.xml и приведите его к виду
В результате у Вас должен получиться следующий шаблон:
Перейдем к редактированию кода. В SMS activity напишем обработчик нажатия на кнопку. После щелчка мы должны проверить введен ли номер телефона и текстовое сообщение. Если все в порядке, мы вызываем функцию sendSMS(), которая отправляет сообщение.
Напишем реализацию функции sendSMS()
Для отправки SMS сообщения в Android используется класс SmsManager. в отличии от друих классов, мы не можем получить экземпляр SmsManager напрямую. Для решения этой задачи необходимо вызвать статический метод getDefault(), который возвращает требуемый объект класса SmsManager. Метод sendTextMessage() отправляет sms сообщение с помощью PendingIntent. Объект PendingIntent используется для определения activity, которая будет вызвана после отправки сообщения. В приведенном выше коде объект pi ссылается на ту же activity из которой он вызывается, то есть после отправки SMS сообщения activity не поменяется.
Если Вы хотите отслеживать состояние процесса отправки сообщения, вам понадобится два объекта PendingIntent и два объекта BroadcastReceiver
В приведенном выше листинге объект sentPI используется для отслеживания процесса отправки. Когда SMS сообщение отправлено, генерируется первое событие onReceive для BroadcastReceiver. Именно здесь можно проверить статус процесса отправки. Объект PendingIntent (deliveredPI) используется для мониторинга доставки. Когда сообщение успешно доставлено, генерируется еще одно событие onReceive для BroadcastReceiver.
Теперь можно провести тесстирование приложения. При отладке на компьютере можно посылать сообщения от одного эмулятора другому. Для этого просто запустите два эмулятора (в папке android SDK зайдите в каталог Tools Emulator.exe). В качестве номера, куда вы отправляете SMS, нужно указать номер порта эмулятора. Его можно увидеть в загаловке окна эмулятора в круглых скобках. На рисунке показан пример отправки сообщения с эмултора 5554 на эмулятор 5556.
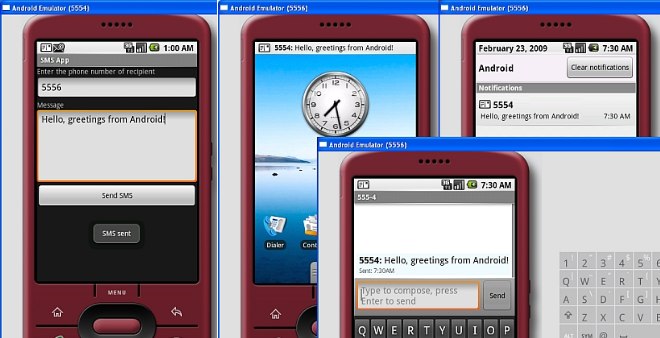
После успешной отправки SMS пользователю будет показано сообщение «SMS sent». После того, как сообщение будет принято на другом устройстве, пользователь увидит «SMS delivered». К сожалению, в случае тестирования на эмуляторе Вы не увидите этого сообщения. Возможность проверять успешность доставки доступна только на реальных устройствах.
Если Вы не хотите разбираться в тонкостях отправки SMS сообщений, то можете воспользоваться встроенным в Android стандартным приложением, дав ему задание через интент.
Получение SMS сообщений в Android
Помимо отправки SMS вы также можете организовать перехват входящих SMS сообщений. Делается это с помощью все того же объекта BroadcastReceiver.
Чтобы Ваше приложение могло перехватывать SMS-ки, нужно в файле AndroidManifest.xml добавить элемент . В приведенном ниже примере для получения сообщений будет использоваться класс SmsReceiver.
Теперь нужно добавить в проект новый класс SmsReceiver.java, который является наследником BroadcastReceiver. Внутри SmsReceiver нужно написать собственную реализацию метода onReceive()
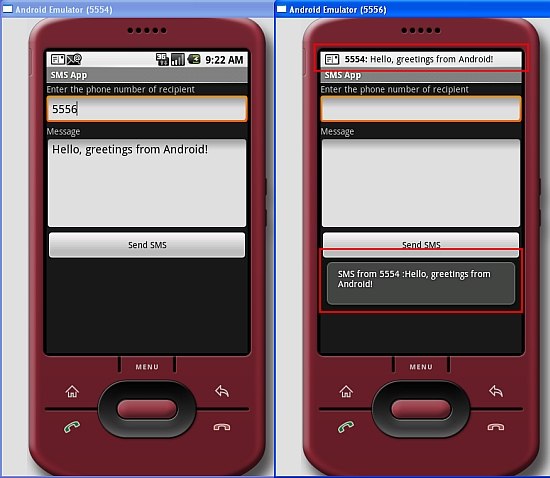
При получении SMS сообщения вызывается метод onReceive. SMS сообщение упаковывается и присоединяется к объекту intent (второй параметр метода onReceive). SMS сохраняется в массиве Object в PDU формате. Чтобы распаковать SMS сообщение нужно воспользоваться методом createFromPdu() класса SmsMessage. После этого можно отобразить сообщения с помощью класса Toast
Вот, собственно, и все! Можете запускать эмуляторы и тестировать приложение. На приведенном ниже рисунке с помощью класса Toast показано полученное сообщение.
Заключение
В этой небольшой статье было показано, как можно отправлять и получать SMS сообщения в Android. Это очень интересная и нужная возможность. Например, вы можете написать приложение, которое будет отслеживать положение телефона. Вы можете отправлять зашифрованные SMS сообщения этому приложению, и оно будет отправлять вам ответ с координатами аппарата.
Исходный код примера можно скачатьздесь.
Источник


