- Intent отправки Email
- Определение uses-permission в манифесте AndroidManifest.xml
- Описание интерфейса
- Код активности EmailActivity
- Типы действий Action
- MIME Type
- Extra данные
- Android: Sending Email using Intents
- ACTION_SENDTO
- EmailIntentBuilder — Making life easier
- What about Attachments?
- Отправка E-Mail средствами Android
- Часть 1. Mail, просто Mail
- Часть 2. Mail, анонимус Mail
- Android — Sending Email
- Intent Object — Action to send Email
- Intent Object — Data/Type to send Email
- Intent Object — Extra to send Email
- Email Example
- Example
Intent отправки Email
В данной статье рассматривается пример использования неявного намерения Intent для отправки Email сообщения. Для реализации данной функции в приложении необходимо определить доступ (uses-permission) в манифесте приложения, сформировать и вызвать неявное намерение отправки сообщения в активности.
Примечание :
1. В примере отправки Email-сообщения система android под управлением AVD (Android Virtual Device) реально запросит адрес и пароль отправителя;
2. Сообщения в примере будут реально отправлены по указанным адресам, даже если будет использован AVD.
Определение uses-permission в манифесте AndroidManifest.xml
Для использования неявного намерения для отправки Email-сообщений следует в манифесте примера AndroidManifest.xml указать разрешения на доступ к определенным функциям, как это представлено в следующем коде :
Описание интерфейса
При описании интерфейса примера в файле «res/layout/activity_main.xml» (наименование может отличаться) используем шаблон типа RelativeLayout с кнопкой отправки Email сообщения.
Код активности EmailActivity
Активность EmailActivity реализует интерфейс View.OnClickListener, согласно которому переопределяется метод onClick. Вызов данного метода подключен к кнопке.
В методе onClick определяется неявное намерение типа Intent.ACTION_SENDTO. Возможно использовать один из 3-х вариантов :
Типы действий Action
- ACTION_SENDTO (без вложений);
- ACTION_SEND (одно вложение);
- ACTION_SEND_MULTIPLE (множество вложений);
MIME Type
При определении типа mime используйте следующие варианты :
Пример определения типа mime в фильтре намерения :
Extra данные
При определении типа данных возможны следующие варианты :
Источник
Android: Sending Email using Intents

Jan 8, 2016 · 3 min read
Many things on Android are as easy as starting an Activity using the right Intent. Sending an email to a specific recipient is one of those things.
Sadly, there is much bad advice out there on how to send emails using Intents. Because I write an open source email app I have a pretty good understanding of what goes on behind the scenes. That’s why I believe I know better than all those other people 🙂
ACTION_SENDTO
To start the Activity to compose an email in your user’s favorite email app you use an Intent with the ACTION_SENDTO action. Unfortunately, the documentation is very sparse. It simply states:
Activity Action: Send a message to someone specified by the data.
Input: getData() is URI describing the target.
This doesn’t mention email at all because ACTION_SENDTO is very generic and can also be used to send e.g. SMS, MMS or XMPP messages.
To send an email we have to use a mailto URI as defined by RFC 6068. In its simplest form such a URI consists of “mailto:” followed by an email address, e.g. mailto:alice@example.org. You might recognize this syntax from email links in HTML documents.
Creating such an Intent might look like this:
Most of the time you want to provide more data than just a recipient. And the mailto specification allows us to also specify CC and BCC recipients, a subject, and even text for the email body.
Generating such a mailto URI is a bit tedious because you have to percent-encode certain characters as you can see in the example above.
Android’s Uri.Builder class would be the perfect fit since it makes it easy to add query parameters while taking care of the encoding. Unfortunately, building Uri instances doesn’t work very well for non-hierarchical URIs like mailto URIs. One way to work around that is to manually construct the URI and dealing with the encoding.
Some code samples advocate the use of EXTRA_SUBJECT, EXTRA_TEXT, etc. Those are certainly easier to use. However, the Android API reference only mentions them in connection with ACTION_SEND and ACTION_SEND_MULTIPLE. Those are more general Intents for sharing content to nobody in particular.
The fact that the Extras also work with ACTION_SENDTO was an undocumented “feature” of AOSP Email and the Gmail app. That functionality then had to be copied by all other Android email clients because apps were and are using those Extras.
But since all major email clients support the use of query parameters in mailto URIs I see no reason to use an undocumented feature and advice against it.
It is also worth mentioning that you shouldn’t use Intent.createChooser() to launch an email Intent. Users most likely have a preferred email app that they want to be able to select as default app. The standard behavior when resolving an Intent deals with that just fine.

There are a couple of other things that need to be considered. Line breaks in the body, for example, need to be encoded as %0D%0A (CRLF).
Because it’s no fun to deal with all of that when all you want to do is send an email, I wrote a small library to take care of the dirty details for you.
EmailIntentBuilder — Making life easier
The goal of the Email Intent Builder library is to make creating email Intents as easy as possible.
You can find it on Maven Central, the source code on GitHub.
Building an email Intent is a simple matter of calling some methods on the builder:
Most of the time you also want to launch the Intent. The start() method will do that for you while also taking care of not throwing an exception if no app could be found to handle the Intent.
What about Attachments?
Unfortunately, the ACTION_SENDTO Intent doesn’t support attachments. If you need to send an email containing one or more attachments you should use Android’s more generic share mechanism, i.e. ACTION_SEND or ACTION_SEND_MULTIPLE.
A lot of people have realized that this leads to quite a few more than just email apps showing up in the app chooser dialog. How to properly deal with that is material for another post.
I’d love to hear about your experiences dealing with email on Android. Let me know on Twitter.
Источник
Отправка E-Mail средствами Android
Привет хабр и привет всем!
В данной статье я покажу как реализуется отправка писем средствами самого Android, а также ещё один более интересный способ, но уже с применением внешней библиотеки, которая позволяет нам отсылать письма более приемлимыми для программиста способами.
Часть 1. Mail, просто Mail
- public class SimpleEMail extends Activity <
- Button send;
- EditText address, subject, emailtext;
- @Override
- public void onCreate(Bundle savedInstanceState) <
- super.onCreate(savedInstanceState);
- setContentView(R.layout.simple_email);
- // Наши поля и кнопка
- send = (Button) findViewById(R.id.emailsendbutton);
- address = (EditText) findViewById(R.id.emailaddress);
- subject = (EditText) findViewById(R.id.emailsubject);
- emailtext = (EditText) findViewById(R.id.emailtext);
- send.setOnClickListener( new OnClickListener() <
- @Override
- public void onClick(View v) <
- final Intent emailIntent = new Intent(android.content.Intent.ACTION_SEND);
- emailIntent.setType( «plain/text» );
- // Кому
- emailIntent.putExtra(android.content.Intent.EXTRA_EMAIL,
- new String [] < address.getText().toString() >);
- // Зачем
- emailIntent.putExtra(android.content.Intent.EXTRA_SUBJECT,
- subject.getText().toString());
- // О чём
- emailIntent.putExtra(android.content.Intent.EXTRA_TEXT,
- emailtext.getText().toString());
- // С чем
- emailIntent.putExtra(
- android.content.Intent.EXTRA_STREAM,
- Uri .parse( «file://»
- + Environment.getExternalStorageDirectory()
- + «/Клипы/SOTY_ATHD.mp4» ));
- emailIntent.setType( «text/video» );
- // Поехали!
- SimpleEMail. this .startActivity(Intent.createChooser(emailIntent,
- «Отправка письма. » ));
- >
- >);
- >
- >
* This source code was highlighted with Source Code Highlighter .
Вот, код до безобразия прост. Правда можно еще проще: если нам лень создавать дополнительное Activity для ввода наших полей, то можно было бы просто запустить наш Intent.
Плюсы: Простая реализация, достаточно удобно для обратной связи.
Минусы: У пользователя должна быть настроенная программа приёма-передачи почтовых сообщений, без неё обрабатывать данный Intent будет некому.
Часть 2. Mail, анонимус Mail
Данный метод я использовал в своём проекте, обозначим для начала плюсы:
- Не требует от пользователя настроенного клиента
- Может быть полностью анонимным
- Можно передавать все (в пределах разумного, конечно)
Для работы необходимы дополнительные библиотеки javamail-android.
Качаем их, и встраиваем в проект: Контекстное меню проекта > «Build Path» > «Add External Archives. » > «Наши файлы additional, mail, activation»
Для настройки нам также понадобится почтовый ящик зарегистрированный на gmail.com (или любом другом yandex, mail и.т.п.) настройки вы можете посмотреть здесь. В данном случае он будет выступать в виде шлюза через которые будут проходить наши письма.
Начинаем настраивать:
MailSenderClass.java
В данном классе записаны настройки того сервера, через который будет передаваться ваше сообщение. Здесь у нас есть несколько методов:
- public MailSenderClass(String user, String password) — Конструктор. В качестве аргументов передаются логин и пароль от нашего промежуточного ящика на gmail.com. Здесь же прописываются параметры smtp-подключения к серверу.
- protected PasswordAuthentication getPasswordAuthentication() — Аутентификация для сервера.
- public synchronized void sendMail(String subject, String body, String sender, String recipients, String filename) — Основной метод, в который передаются наши данные для отправки.
Рассмотрим код последнего метода чуть ближе:
- public synchronized void sendMail( String subject, String body, String sender, String recipients, String filename) throws Exception <
- try <
- MimeMessage message = new MimeMessage(session);
- // Кто
- message.setSender( new InternetAddress(sender));
- // О чем
- message.setSubject(subject);
- // Кому
- if (recipients.indexOf( ‘,’ ) > 0)
- message.setRecipients(Message.RecipientType.TO,
- InternetAddress.parse(recipients));
- else
- message.setRecipient(Message.RecipientType.TO,
- new InternetAddress(recipients));
- // Хочет сказать
- BodyPart messageBodyPart = new MimeBodyPart();
- messageBodyPart.setText(body);
- _multipart.addBodyPart(messageBodyPart);
- // И что показать
- if (!filename.equalsIgnoreCase( «» )) <
- BodyPart attachBodyPart = new MimeBodyPart();
- DataSource source = new FileDataSource(filename);
- attachBodyPart.setDataHandler( new DataHandler(source));
- attachBodyPart.setFileName(filename);
- _multipart.addBodyPart(attachBodyPart);
- >
- message.setContent(_multipart);
- Transport.send(message);
- > catch (Exception e) <
- Log.e( «sendMail» , «Ошибка отправки функцией sendMail! » );
- >
- >
* This source code was highlighted with Source Code Highlighter .
Метод также прост. Используя объект класса MimeMessage составляем наше письмо и для отправки передаём методу send, класса Transport.
JSSEProvider.java
Провайдер протокола безопасности для нашей почты. Линк.
VideoSelect.java
Код был взят из ApiDemos, которые поставляются в комплекте с Android SDK, и был чуть подправлен для выполнения с помощью метода startActivityForResult.
После выполнения возвращается строка, содержащая путь к файлу на карте памяти. Код можно будет посмотреть в проекте, он в конце статьи.
ExtendedMail.java
Основной метод отправления сообщения выполняется в функции sitv_sender_mail_async, представляющей класс AsyncTask:
- private class sender_mail_async extends AsyncTask String , Boolean><
- ProgressDialog WaitingDialog;
- @Override
- protected void onPreExecute() <
- // Выводим пользователю процесс загрузки
- WaitingDialog = ProgressDialog.show(ExtendedMail. this , «Отправка данных» , «Отправляем сообщение. » , true );
- >
- @Override
- protected void onPostExecute(Boolean result) <
- // Прячем процесс загрузки
- WaitingDialog.dismiss();
- Toast.makeText(mainContext, «Отправка завершена. » , Toast.LENGTH_LONG).show();
- ((Activity)mainContext).finish();
- >
- @Override
- protected Boolean doInBackground(Object. params ) <
- try <
- // Получаем данные с наших полей
- title = ((EditText)findViewById(R.id.screen_sendnews_et_title)).getText().toString();
- text = ((EditText)findViewById(R.id.screen_sendnews_et_text)).getText().toString();
- from = «from_post_msg@gmail.com» ;
- where = «where_post_msg@yandex.ru» ;
- // Вызываем конструктор и передаём в него наши логин и пароль от ящика на gmail.com
- MailSenderClass sender = new MailSenderClass( «mypostmail@gmail.com» , «password» );
- // И вызываем наш метод отправки
- sender.sendMail(title, text, from , where , attach);
- > catch (Exception e) <
- Toast.makeText(mainContext, «Ошибка отправки сообщения!» , Toast.LENGTH_SHORT).show();
- >
- return false ;
- >
- >
* This source code was highlighted with Source Code Highlighter .
- public void onClick(View v) <
- sender_mail_async async_sending = new sender_mail_async();
- async_sending.execute();
- >
* This source code was highlighted with Source Code Highlighter .
Таким образом создав небольшой класс-поток, можно спокойно слать необходимую информацию от клиента к себе на ящик.
Источник
Android — Sending Email
Email is messages distributed by electronic means from one system user to one or more recipients via a network.
Before starting Email Activity, You must know Email functionality with intent, Intent is carrying data from one component to another component with-in the application or outside the application.
To send an email from your application, you don’t have to implement an email client from the beginning, but you can use an existing one like the default Email app provided from Android, Gmail, Outlook, K-9 Mail etc. For this purpose, we need to write an Activity that launches an email client, using an implicit Intent with the right action and data. In this example, we are going to send an email from our app by using an Intent object that launches existing email clients.
Following section explains different parts of our Intent object required to send an email.
Intent Object — Action to send Email
You will use ACTION_SEND action to launch an email client installed on your Android device. Following is simple syntax to create an intent with ACTION_SEND action.
Intent Object — Data/Type to send Email
To send an email you need to specify mailto: as URI using setData() method and data type will be to text/plain using setType() method as follows −
Intent Object — Extra to send Email
Android has built-in support to add TO, SUBJECT, CC, TEXT etc. fields which can be attached to the intent before sending the intent to a target email client. You can use following extra fields in your email −
| Sr.No. | Extra Data & Description | |||||||||||||
|---|---|---|---|---|---|---|---|---|---|---|---|---|---|---|
| 1 |

| Step | Description |
|---|---|
| 1 | You will use Android studio to create an Android application and name it as Tutorialspoint under a package com.example.tutorialspoint. |
| 2 | Modify src/MainActivity.java file and add required code to take care of sending email. |
| 3 | Modify layout XML file res/layout/activity_main.xml add any GUI component if required. I’m adding a simple button to launch Email Client. |
| 4 | Modify res/values/strings.xml to define required constant values |
| 5 | Modify AndroidManifest.xml as shown below |
| 6 | Run the application to launch Android emulator and verify the result of the changes done in the application. |
Following is the content of the modified main activity file src/com.example.Tutorialspoint/MainActivity.java.
Following will be the content of res/layout/activity_main.xml file −
Here abc indicates about tutorialspoint logo
Following will be the content of res/values/strings.xml to define two new constants −
Following is the default content of AndroidManifest.xml −
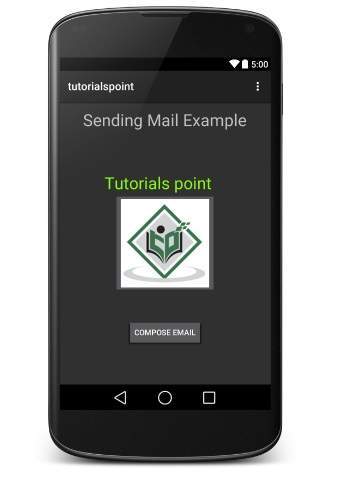
Let’s try to run your tutorialspoint application. I assume you have connected your actual Android Mobile device with your computer. To run the app from Android Studio, open one of your project’s activity files and click Run  icon from the toolbar. Before starting your application, Android studio installer will display following window to select an option where you want to run your Android application.Select your mobile device as an option and then check your mobile device which will display following screen −
Now use Compose Email button to list down all the installed email clients. From the list, you can choose one of email clients to send your email. I’m going to use Gmail client to send my email which will have all the provided defaults fields available as shown below. Here From: will be default email ID you have registered for your Android device.
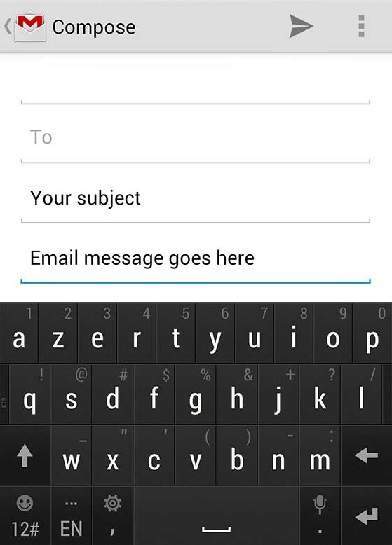
You can modify either of the given default fields and finally use send email button to send your email to the mentioned recipients.
Источник


