- Полный список
- IntentService
- Foreground
- Автозагрузка
- Работа с фоновыми задачами в Android 12: переезжаем с foreground service на expedited jobs
- WorkManager и foreground service
- Expedited jobs
- Миграция foreground service на expedited job
- Вместо заключения
- Foreground services
- Services that show a notification immediately
- Request the foreground service permission
- Start a foreground service
- Kotlin
- Kotlin
- Restrictions on background starts
- Check whether your app performs background starts
- Update your app’s logic
- Exemptions from background start restrictions
- Remove a service from the foreground
- Declare foreground service types
- Example using location and camera
- Kotlin
- Example using location, camera, and microphone
- Kotlin
- Add foreground service types of Work Manager workers
- Restricted access to location, camera, and microphone
- Exemptions from the restrictions
- Determine which services are affected in your app
Полный список
— изучаем IntentService
— включаем режим Foreground для сервиса
— помещаем сервис в автозагрузку
Строили мы, строили, и, наконец, построили. Урок номер 100, с чем всех нас и поздравляю )
В этом уроке рассмотрим еще несколько полезных вещей про сервисы. Выносить каждую из них в отдельный урок я не стал, вполне можно в одном все рассмотреть. Проекты здесь тоже создавать не будем, чтобы урок не получился слишком громоздким. Я просто приведу некоторые куски кода и скрины для наглядности своих рассуждений. А если у вас будет желание, вы по этим наработкам сами можете создать проекты-примеры.
IntentService
Это подкласс обычного Service. Он используется, если вам в сервисе надо выполнять какие-то тяжелые задачи, и вы не хотите сами возиться с асинхронностью. Принцип работы этого вида сервиса прост. Он создает новый поток для своей работы. Затем берет все Intent пришедшие ему в onStartCommand и отправляет их на обработку в этот поток. Как именно обрабатываются Intent – зависит от нас, т.к. мы сами кодим это в методе onHandleIntent.
Т.е. приложение сыпет в сервис вызовами startService, в которых передает Intent-ы. IntentService принимает эти вызовы в onStartCommand, берет Intent-ы и отправляет их в очередь на обработку. И далее они поочередно обрабатываются в отдельном потоке методом onHandleIntent. Когда последний Intent из очереди обработан, сервис сам завершает свою работу.
В приложении делаем три вызова:
Где time – это время паузы, которую будем делать в сервисе, а label – просто метка, чтобы отличать вызовы.
Здесь необходим конструктор, в котором вызываем конструктор супер-класса и указываем какое-нить имя. Оно будет использовано для наименования потока.
В методе onHandleIntent кодим обработку Intent-ов. Достаем из них time и label, запускаем паузу на time секунд и выводим в лог label в начале и в конце.
В итоге, при запуске в логах видим:
11:07:37.880: D/myLogs(4137): onCreate
11:07:37.880: D/myLogs(4137): onHandleIntent start Call 1
11:07:40.880: D/myLogs(4137): onHandleIntent end Call 1
11:07:40.880: D/myLogs(4137): onHandleIntent start Call 2
11:07:41.880: D/myLogs(4137): onHandleIntent end Call 2
11:07:41.880: D/myLogs(4137): onHandleIntent start Call 3
11:07:45.890: D/myLogs(4137): onHandleIntent end Call 3
11:07:45.890: D/myLogs(4137): onDestroy
Сервис создался, вызовы выполнились по очереди и сервис завершил работу. От нас понадобилось только накодить обработку.
Foreground
Вы можете сказать системе, что ваш сервис очень важен для пользователя и его нельзя грохать при нехватке памяти. Это актуально, например, для музыкального плеера. В статус-бар при этом будет помещено уведомление.
На вход он принимает те же параметры, что и NotificationManager.notify – ID и Notification.
Т.е. вы создаете уведомление, назначаете ему ID и передаете это в startForeground. Сервис переходит в режим IDDQD :), а в статус-баре появилось уведомление.
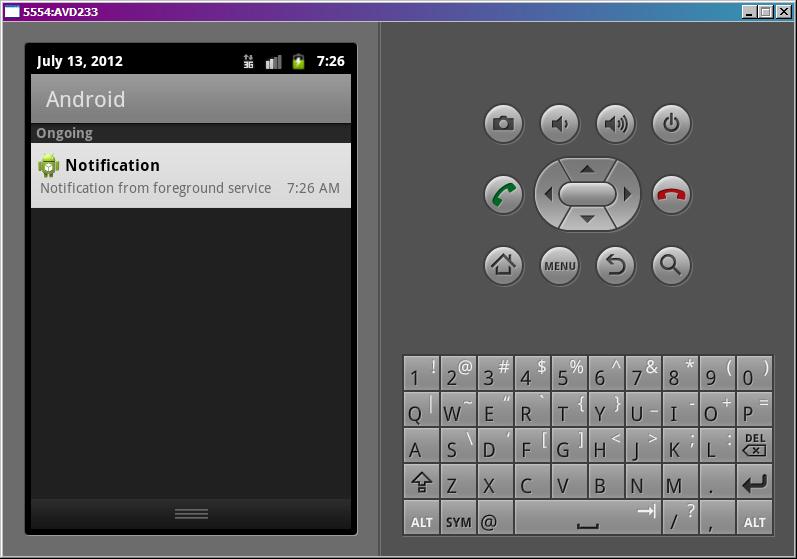
Оно появилось в разделе для постоянных уведомлений (Ongoing).
Метод stopForeground (boolean removeNotification) — возвращает сервису способность быть убитым системой в случае острой нехватки памяти. А на вход он принимает boolean-значение – удалять уведомление из статус-бара или нет.
Уведомление также пропадет, когда сервис будет остановлен.
Эти методы работают, начиная с Android 2.0. Пример реализации для более ранних версий есть в хелпе.
Напомню, что уведомления мы научились создавать на прошлом уроке.
Автозагрузка
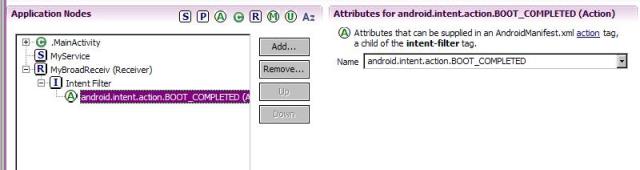
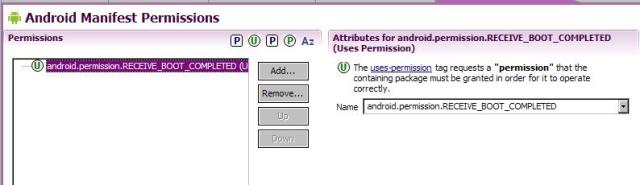
Сервисы для получения погоды или почты имеет смысл помещать в автозагрузку. Для этого нам надо создать BroadcastReceiver, настроить его IntentFilter на Action = android.intent.action.BOOT_COMPLETED, и добавить права android.permission.RECEIVE_BOOT_COMPLETED. Этот BroadcastReceiver будет вызван системой при старте системы и в нем мы кодим запуск сервиса.
Допустим, есть проект с сервисом MyService.
Создаем в проекте класс MyBroadReceiv
В манифесте добавляем его как Receiver и настраиваем фильтр
Добавляем права на получение сообщения о загрузке
Инсталлим проект на AVD. Закрываем AVD. Запускаем через меню в Eclipse: Window > AVD Manager. Находим там наш эмулятор и запускаем вручную.
Когда он запустился, смотрим логи
onReceive android.intent.action.BOOT_COMPLETED
MyService onCreate
MyService onStartCommand
Сработал BroadcastReceiver и запустил сервис.
Если после запуска AVD логи не отображаются, то откройте DDMS и во вкладке Devices явно выберите ваш AVD.
P.S. Я уже писал об этом, но напишу еще раз. Последующие уроки будут выходить по более свободному графику. Следите за обновлениями.
На следующем уроке:
— создаем свой ContentProvider
Присоединяйтесь к нам в Telegram:
— в канале StartAndroid публикуются ссылки на новые статьи с сайта startandroid.ru и интересные материалы с хабра, medium.com и т.п.
— в чатах решаем возникающие вопросы и проблемы по различным темам: Android, Kotlin, RxJava, Dagger, Тестирование
— ну и если просто хочется поговорить с коллегами по разработке, то есть чат Флудильня
— новый чат Performance для обсуждения проблем производительности и для ваших пожеланий по содержанию курса по этой теме
Источник
Работа с фоновыми задачами в Android 12: переезжаем с foreground service на expedited jobs
С релизом Android 12 приложения, где новая версия операционки будет указана в targetSdkVersion, получат запрет на запуск foreground-сервисов в бэкграунде. В качестве альтернативы Google предлагает WorkManager, который с появлением expedited jobs станет предпочтительным вариантом для запуска высокоприоритетных фоновых задач.
О нём и пойдёт речь в статье — под катом обсудим новые возможности инструмента, подключим его к приложению и реализуем миграцию с foreground-сервиса.
WorkManager и foreground service
Foreground service — это какой-либо сервис, о котором знает пользователь через нотификацию в статус-баре. Например, воспроизведение музыки или работа GPS в картах.
WorkManager — это API для планирования задач, которые будут выполняться, даже если выйти из приложения или перезагрузить устройство.
WorkManager уже давно является приоритетным способом выполнения длительных фоновых задач. К таким относятся синхронизация данных с бэкендом, отправка аналитики, периодическая проверка свободного места в системе с помощью PeriodicWork и так далее.
Но в WorkManager присутствовал и недостаток — не было никаких гарантий, что джоба начнётся незамедлительно после создания. В версии 2.3.0 разработчики добавили для воркеров метод setForegroundAsync(), который, по сути, превращал фоновую задачу в foreground-сервис и позволял немедленно приступить к её выполнению.
Такой подход ничем особо не отличался от разработки foreground-сервиса вручную, когда необходимо создавать объекты Notification и NotificationChannel при таргете выше, чем на Android Nougat.
Сейчас setForegroundAsync() объявлен устаревшим, а при попытке запустить сервис из бэкграунда на выходе будет ForegroundServiceStartNotAllowedException.
Expedited jobs
Этот тип джобов позволяет приложениям выполнять короткие и важные задачи, давая системе больше контроля над доступом к ресурсам. Он находится где-то между foreground-сервисами и привычными джобами WorkManager. От последних их отличает:
минимально отложенное время запуска;
обход ограничений Doze-mode на использование сети;
меньшая вероятность быть «убитыми» системой.
А ещё в них не поддерживаются ограничения по заряду батареи и режиму работы девайса:
У expedited job больший приоритет на ускоренный запуск, поэтому операционная система строже регулирует их количество. Например, если попытаться запланировать джобу при исчерпаном лимите, то сразу вернётся JobScheduler#RESULT_FAILURE.
Если же ограничения по квоте, сети и памяти устройства выполнены, то у джобы будет около минуты на выполнение своих функций. Иногда больше, но это сильно зависит от лимита и общей загруженности системы.
Миграция foreground service на expedited job
Стандартный сервис для выполнения фоновых задач обычно выглядит примерно так:
А запускается так:
Поговорим о том, как перевести этот сервис на expedited job. Происходит это буквально в три простых шага.
1. Подключаем WorkManager к проекту:
2. Создаём класс, наследующийся от Worker (он будет выполнять задачу, которую раньше делал сервис):
3. Создаём WorkRequest и передаём его для запуска в WorkManager:
Здесь есть важный параметр OutOfQuotaPolicy, который отвечает за поведение при невозможности запустить джобу немедленно. Он существует в двух вариантах:
RUN_AS_NON_EXPEDITED_WORK_REQUEST — при заполненной квоте запустится обычная джоба, не expedited.
DROP_WORK_REQUEST — при заполненной квоте запрос на выполнение сразу зафейлится.
На этом, собственно, базовая миграция заканчивается.
Вместо заключения
Переехать на expedited job довольно легко, особенно, если в проекте уже подключен WorkManager.
Сейчас пропала необходимость держать нотификацию в статус-баре, а в условиях выполнения задачи появилась дополнительная гибкость благодаря возможностям WorkManager. Например, теперь можно пережить «смерть» процесса, тонко настраивать ретраи, периодичность выполнения задач и многое другое.
Источник
Foreground services
Foreground services perform operations that are noticeable to the user.
Foreground services show a status bar notification, so that users are actively aware that your app is performing a task in the foreground and is consuming system resources. The notification cannot be dismissed unless the service is either stopped or removed from the foreground.
Devices that run Android 12 (API level 31) or higher provide a streamlined experience for short-running foreground services. On these devices, the system waits 10 seconds before showing the notification associated with a foreground service. There are a few exceptions; several types of services always display a notification immediately.
Examples of apps that would use foreground services include the following:
- A music player app that plays music in a foreground service. The notification might show the current song that is being played.
- A fitness app that records a user’s run in a foreground service, after receiving permission from the user. The notification might show the distance that the user has traveled during the current fitness session.
You should only use a foreground service when your app needs to perform a task that is noticeable by the user even when they’re not directly interacting with the app. If the action is of low enough importance that you want to use a minimum-priority notification, create a background task instead.
This document describes the required permission for using foreground services, how to start a foreground service and remove it from the background, how to associate certain use cases with foreground service types, and the access restrictions that take effect when you start a foreground service from an app that’s running in the background.
Services that show a notification immediately
If a foreground service has at least one of the following characteristics, the system shows the associated notification immediately after the service starts, even on devices that run Android 12 or higher:
- The service is associated with a notification that includes action buttons.
- The service has a foregroundServiceType of mediaPlayback , mediaProjection , or phoneCall .
- The service provides a use case related to phone calls, navigation, or media playback, as defined in the notification’s category attribute.
- The service has opted out of the behavior change by passing FOREGROUND_SERVICE_IMMEDIATE into setForegroundServiceBehavior() when setting up the notification.
Request the foreground service permission
Apps that target Android 9 (API level 28) or higher and use foreground services must request the FOREGROUND_SERVICE permission, as shown in the following code snippet. This is a normal permission, so the system automatically grants it to the requesting app.
Start a foreground service
Before you request the system to run a service as a foreground service, start the service itself:
Kotlin
Inside the service, usually in onStartCommand() , you can request that your service run in the foreground. To do so, call startForeground() . This method takes two parameters: a positive integer that uniquely identifies the notification in the status bar and the Notification object itself.
Note: The status bar notification must use a priority of PRIORITY_LOW or higher. If your app attempts to use a notification that has a lower priority, the system adds a message to the notification drawer, alerting the user to the app’s use of a foreground service.
Here is an example:
Kotlin
Restrictions on background starts
Apps that target Android 12 (API level 31) or higher can’t start foreground services while running in the background, except for a few special cases. If an app tries to start a foreground service while the app is running in the background, and the foreground service doesn’t satisfy one of the exceptional cases, the system throws a ForegroundServiceStartNotAllowedException .
Check whether your app performs background starts
To better understand when your app attempts to launch a foreground service while running in the background, you can enable notifications that appear each time this behavior occurs. To do so, execute the following ADB command on the development machine connected to your test device or emulator:
Update your app’s logic
If you discover that your app starts foreground services while running from the background, update your app’s logic to use WorkManager. To view an example of how to update your app, look through the WorkManagerSample on GitHub.
Exemptions from background start restrictions
In the following situations, your app can start foreground services even while your app is running in the background:
- Your app transitions from a user-visible state, such as an activity.
- Your app can start an activity from the background, except for the case where the app has an activity in the back stack of an existing task.
Your app receives a high-priority message using Firebase Cloud Messaging.
Note: When your app is in the frequent bucket or a more restrictive bucket, your high-priority FCM messages might be downgraded to normal priority. If the message’s priority is downgraded, your app can’t start a foreground service. To check the priority of an FCM message that your app receives, call getPriority() .
The user performs an action on a UI element related to your app. For example, they might interact with a bubble, notification, widget, or activity.
Your app invokes an exact alarm to complete an action that the user requests.
Your app is the device’s current input method.
Your app receives an event that’s related to geofencing or activity recognition transition.
Your app receives the ACTION_TIMEZONE_CHANGED , ACTION_TIME_CHANGED , or ACTION_LOCALE_CHANGED intent action in a broadcast receiver.
Your app receives a Bluetooth broadcast that requires the BLUETOOTH_CONNECT or BLUETOOTH_SCAN permissions.
Apps with certain system roles or permission, such as device owners and profile owners.
Your app uses the Companion Device Manager and declares the REQUEST_COMPANION_START_FOREGROUND_SERVICES_FROM_BACKGROUND permission or the REQUEST_COMPANION_RUN_IN_BACKGROUND permission. Whenever possible, use REQUEST_COMPANION_START_FOREGROUND_SERVICES_FROM_BACKGROUND .
The user turns off battery optimizations for your app. You can help users find this option by sending them to your app’s App info page in system settings. To do so, invoke an intent that contains the ACTION_IGNORE_BATTERY_OPTIMIZATION_SETTINGS intent action.
Remove a service from the foreground
To remove the service from the foreground, call stopForeground() . This method takes a boolean, which indicates whether to remove the status bar notification as well. Note that the service continues to run.
If you stop the service while it’s running in the foreground, its notification is removed.
Declare foreground service types
If your app targets Android 10 (API level 29) or higher and accesses location information in a foreground service, declare the location foreground service type as an attribute of your component.
If your app targets Android 11 (API level 30) or higher and accesses the camera or microphone in a foreground service, declare the camera or microphone foreground service types, respectively, as attributes of your component.
By default, when you call startForeground() at runtime, the system allows access to each of the service types that you declare in the app manifest. You can choose to limit access to a subset of the declared service types, as shown in the code snippets within the following sections.
Example using location and camera
If a foreground service in your app needs to access the device’s location and camera, declare the service as shown in the following snippet:
At runtime, if the foreground service only needs access to a subset of the types declared in the manifest, you can limit the service’s access using the logic in the following code snippet:
Kotlin
Example using location, camera, and microphone
If a foreground service needs to access location, the camera, and the microphone, declare the service as shown in the following snippet:
At runtime, if the foreground service only needs access to a subset of the types declared in the manifest, you can limit the service’s access using the logic in the following code snippet:
Kotlin
Add foreground service types of Work Manager workers
If your app uses Work Manager and has a long-running worker that requires access to location, camera, or microphone, follow the steps to add a foreground service type to a long-running worker, and specify the additional or alternative foreground service types that your worker uses. You can choose from the following foreground service types:
Restricted access to location, camera, and microphone
To help protect user privacy, Android 11 (API level 30) introduces limitations to when a foreground service can access the device’s location, camera, or microphone. When your app starts a foreground service while the app is running in the background, the foreground service has the following limitations:
- Unless the user has granted the ACCESS_BACKGROUND_LOCATION permission to your app, the foreground service cannot access location.
- The foreground service cannot access the microphone or camera.
Exemptions from the restrictions
In some situations, even if a foreground service is started while the app is running in the background, it can still access location, camera, and microphone information while the app is running in the foreground («while-in-use»). In these same situations, if the service declares a foreground service type of location and is started by an app that has the ACCESS_BACKGROUND_LOCATION permission, this service can access location information all the time, even when the app is running in the background.
The following list contains these situations:
- The service is started by a system component.
- The service is started by interacting with app widgets.
- The service is started by interacting with a notification.
- The service is started as a PendingIntent that is sent from a different, visible app.
- The service is started by an app that is a device policy controller that is running in device owner mode.
- The service is started by an app which provides the VoiceInteractionService .
- The service is started by an app that has the START_ACTIVITIES_FROM_BACKGROUND privileged permission.
Determine which services are affected in your app
When testing your app, start its foreground services. If a started service has restricted access to location, microphone, and camera, the following message appears in Logcat:
Content and code samples on this page are subject to the licenses described in the Content License. Java is a registered trademark of Oracle and/or its affiliates.
Источник


