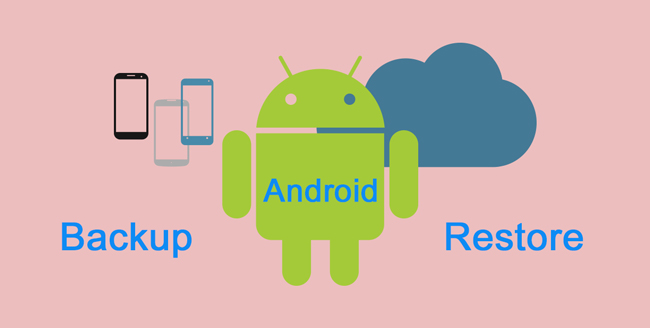
- How to fully backup and restore your Android device without root
- How to fully backup your Android smartphone or tablet without root |
- How to enable USB debugging |
- How to backup your Android device’s data |
- How to restore your Android device’s data |
- How to Restore Android phone from Google Backup
- Part 1: Reasons to Why We Need to Backup Android Phone
- Part 2: How to Restore Android Phone from Google Backup
- How to enable the Android backup service
- How to restore Android from Google Backup
- Part 3: The Best way to Backup and Restore Android Phone
- Wondershare TunesGo
- Android Backup
- Part 4: How to Backup and Restore your Android Phone
- ANDROID BACKUP & RESTORE: полное руководство
- 1. Резервное копирование и восстановление данных Android с помощью FoneLab
- 2. Резервное копирование и восстановление данных Android вручную
- 3. Резервное копирование и восстановление данных Android от Google.
- 4. Резервное копирование и восстановление данных Android от Google.
- 5. Резервное копирование и восстановление фотографий через Google Фото.
- 6. Резервное копирование и восстановление Android через Google Диск.
How to fully backup and restore your Android device without root
— Nov. 4th 2017 11:06 am PT
One of Android’s little-known tricks is its built-in backup and restore process that allows users to save their private data as well as the different installed applications. The process is pretty simple but it isn’t always full-proof. But unlike other backup and restore processes, this one doesn’t require your device to be rooted. Here’s how to access the tool…
As I touched on above, this isn’t a backup and restore process that will transfer every single thing on your Android device. In my experience, I recommend running two to three backups just to make sure you have everything saved. Things like SMS messages don’t get backed up so if you have anything valuable on your phone or tablet, it’s recommended that you transfer those individually.
You will need to download and set up the Android SDK on your computer. This will be used to initiate the backup and restore process on your Android devices. It’s also recommended that you set your device’s display sleep timer to a time that will disable it from turning off during the process. To do this go to Settings>Display>Sleep and choose the longest time period as possible.
How to fully backup your Android smartphone or tablet without root |
How to enable USB debugging |
- Go to your Settings menu
- Scroll down and tap on System
- Select About phone
- Tap on the device’s Build number multiple times until it enables Developer options. Newer devices will require you to enter your PIN/password/pattern
- Hit the back button and select Developer options within the System menu
- Make sure Developer options is toggled on. Scroll down and toggle USB debugging on
How to backup your Android device’s data |
- Plug your Android device into your computer
- Using either Command Prompt or Terminal, navigate to the folder in which the ADB tools are located and type in “ADB devices“. A pop-up on the Android device will appear if you need to grant your computer permission to interact with the phone or tablet. You will know if the command worked on your computer if it returns with the connected device’s identification number
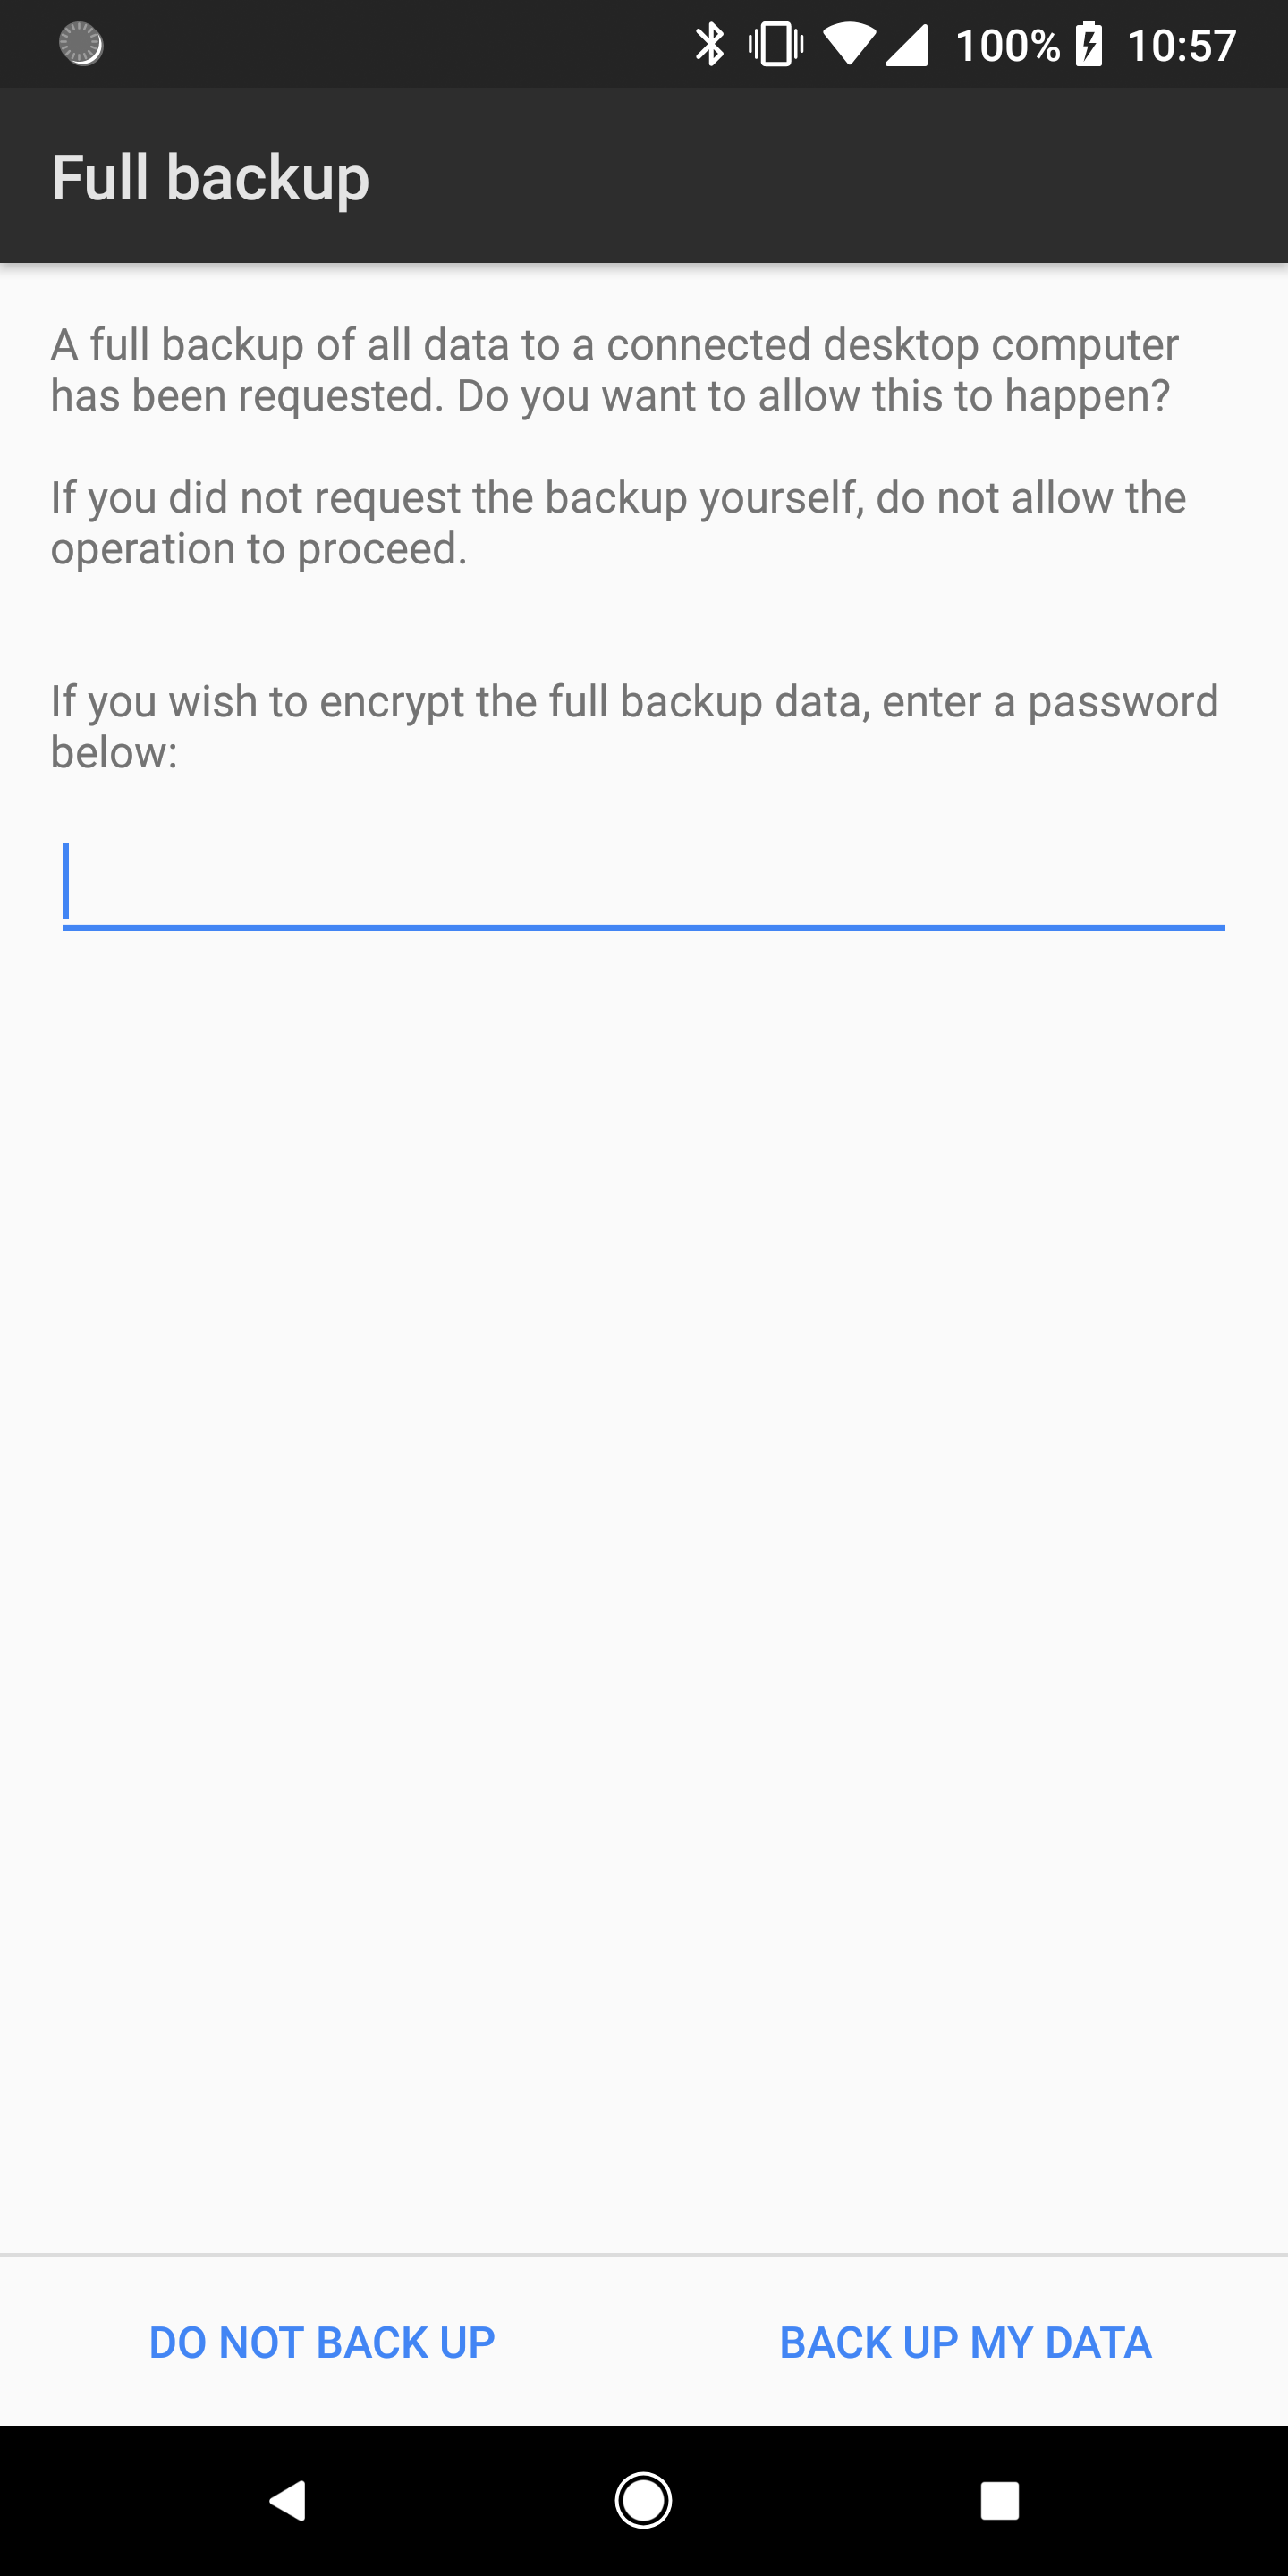
- Type in “adb backup -apk -shared -all -f /backup.ab“
- Your Android device will now show the full backup window. Here you can encrypt your backup with a password (which is recommended)
- Tap on Back up my data
- This process can take several minutes and when completed, a new file will be placed on your computer
How to restore your Android device’s data |
- Plug your Android device into your computer
- Using either Command Prompt or Terminal, navigate to the folder in which the ADB tools are located and type in “ADB devices“. A pop-up on the Android device will appear if you need to grant your computer permission to interact with the phone or tablet. You will know if the command worked on your computer if it returns with the connected device’s identification number
- Type in “adb restore /backup.ab“
- Your Android device will now show the full restore window. If you added a password to your backup file, enter it in the space given
- Tap on Restore my data
- This process can take several minutes and when completed, most if not all of your previously installed applications will be present on your device as well as photos and other data
FTC: We use income earning auto affiliate links. More.
Источник
How to Restore Android phone from Google Backup
Mobile phones are almost become a basic need in this digital world. We use them to store files and other things important to us such as photos, music, documents, information and videos. Sometimes your mobile phone gets lost or damaged which is a common habit among many people. This can be a big problem when you think of the data that you have lost .The good is that you can be able to restore your Android phone from google backup. From this you can be happy to recover all the data you thought had lost from your Android phone. With this article you will know how to restore Android phone from google backup and why and when to backup your Android phone.
Part 1: Reasons to Why We Need to Backup Android Phone
Information you store on your mobile phone are very important. They could be important files, photo, videos and other important information. Circumstances where you need backup your Android phone are:
- When there is unexpected loss of data through a dead battery, you need to back so as to keep your data always safe and secure.
- Sometimes you loose your phone accidentally or it is stolen. In such situations you loose data on your phone that is of great use to you. You need to backup in order to recover any important file or data in case something like this happens.
- Due to virus attack such as Trojans or viruses where you can recover any lost or damaged files and data.
- USB shown on the system but it does not allow opening it
- A times while using your phone you accidentally delete some data that you would not wish to loose them. This the time you realize you need to have a backup for your Android phone. You need to back up to ensure that you can always recover any data if you delete them accidentally.
Part 2: How to Restore Android Phone from Google Backup
An easy way to restore Android phone from Google backup. Google backup is a service that uses Google drive to back up your information onto Google’s online server. After you have backed up your data to your Google account then you can restore it easily. This made easy when you add your Google account to a device then the data that you backed up is restored to your device. Using Google backup to backup and restore your Android phone is a fast and easy procedure.
Below is how you can restore your apps and settings when moving to a new Android phone from Google backup.
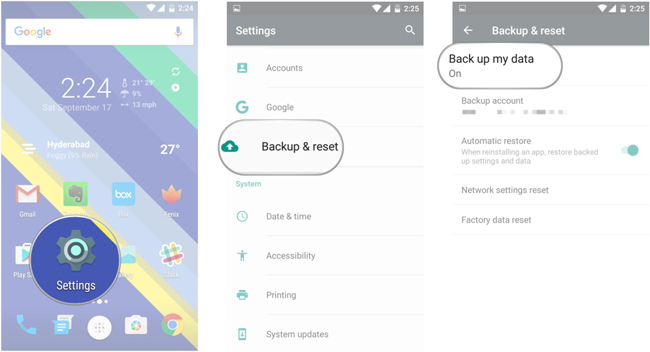
How to enable the Android backup service
First, make sure you have the backup service running on your current phone.
Step 1 Open Settings from the home screen or app drawer. Navigate to Backup & reset. Then select Back up my data.
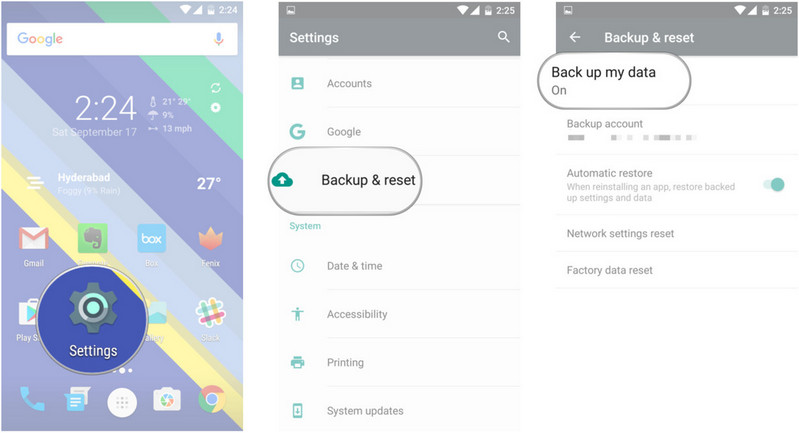
Step 2 Toggle Back up my data to On. Select Back to go back to Backup & reset. Check that your Google account is associated in Backup account. Toggle Automatic restore to On to restore settings and data when installing an app.
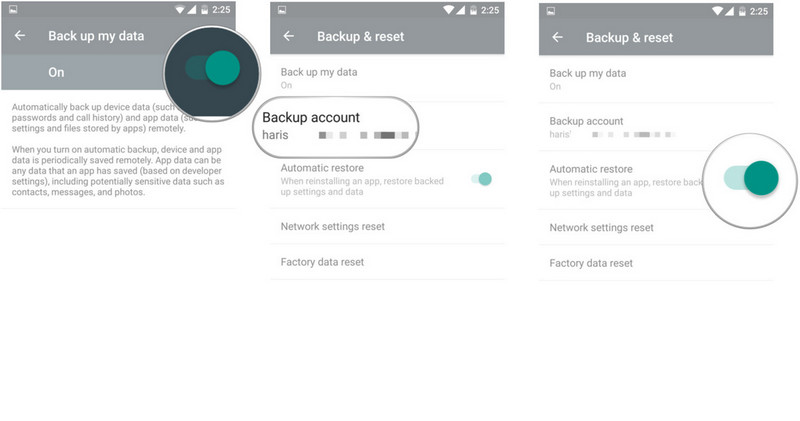
Now that you’ve enabled the Android backup service, your system settings and app data will be automatically saved to Drive. When you’re switching to a new phone, you can rely on the service to restore your settings, apps, and associated data from Google backup easily.
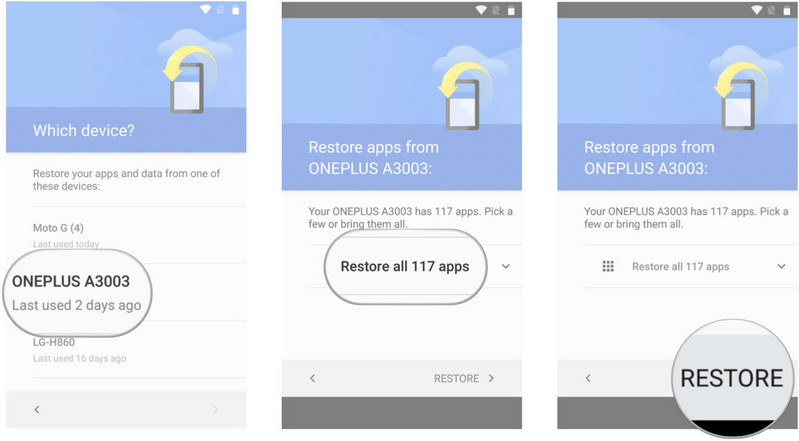
How to restore Android from Google Backup
You can always restore any lost or deleted data of your Android phone from Google backup. Immediately when you reinstall any application, the settings or any data backed up on your Google backup is automatically restored. Restoring apps is straightforward if you’re using a handset running Lollipop and above. This setting is available to phones as they’re booting up for the first time, or after they’ve been factory reset.
Step 1 When you got your new Android phone, log in to your Google account. You’ll see a list of all your previous devices, and when you’ve last used them. Select a device to see all the apps available for restore.
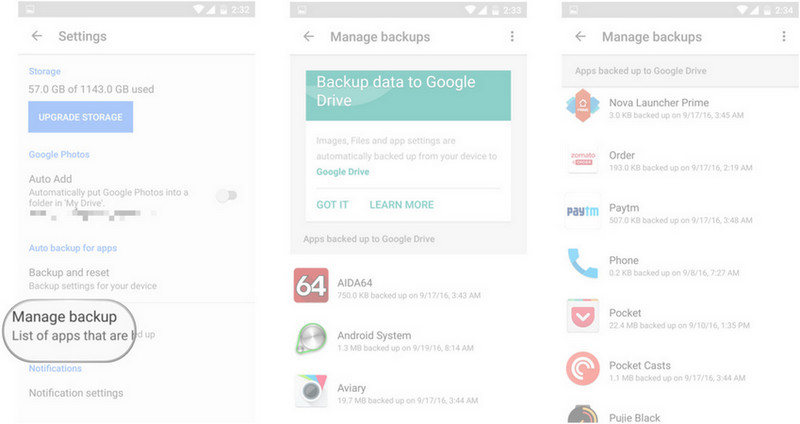
You can take a look at the amount of app data that’s being stored. Here’s how you can find out:
Step 1 Open Google Drive from the home screen or app drawer. In My Drive, select the hamburger menu from the top left corner. Navigate to Settings.
Step 2 Tap Manage backup. You’ll see a list of all the apps that are using the backup service.
Part 3: The Best way to Backup and Restore Android Phone
Wondershare TunesGo
Wondershare TunesGo is one of the best powerful software tools to backup and restore Android phones’ data such as music, pictures, documents, apps and other useful information. It is an effective multi-files manager that allows you to easily backup and restore your media files and apps. It helps you manage your Android device as it allows you to backup and restore important data and send messages between computers.
Android Backup
One Stop Solution to Backup and Restore Android Phone
- Backup your music, photos, videos, contacts, SMS, Apps etc. to computer and restore them easily.
- Manage, export/import your music, photos, videos, contacts, SMS, Apps etc.
- Phone to Phone Transfer — Transfer everything between two mobiles.
- Highlighted features such as 1-click root, gif maker, ringtone maker.
- Fully compatible with 3000+ Android devices (Android 2.2 — Android 8.0) from Samsung, LG, HTC, Huawei, Motorola, Sony etc.
Part 4: How to Backup and Restore your Android Phone
As above mentioned Wondershare TunesGo can one step to backup your Android mobile phone,let see the detail tutorial steps as below:
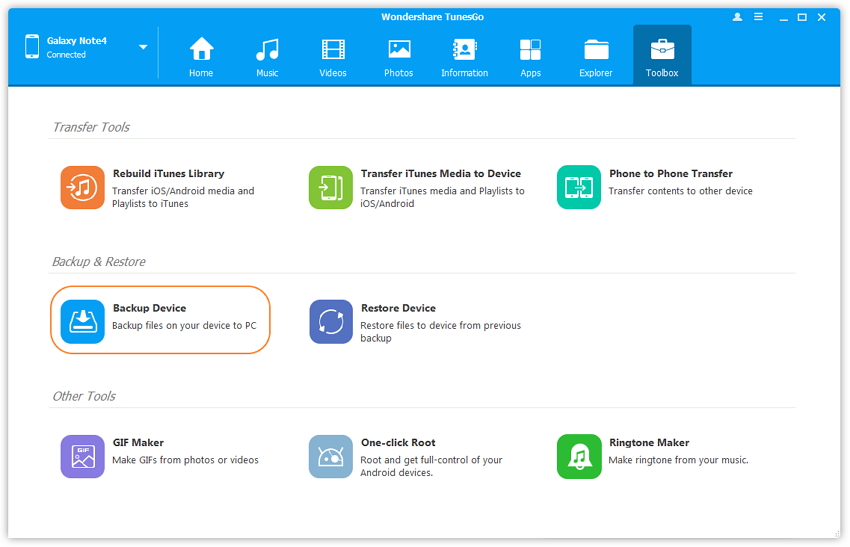
Step 1 Download and launch Wondershare TunesGo on you computer and connect your Android phone.
![]()
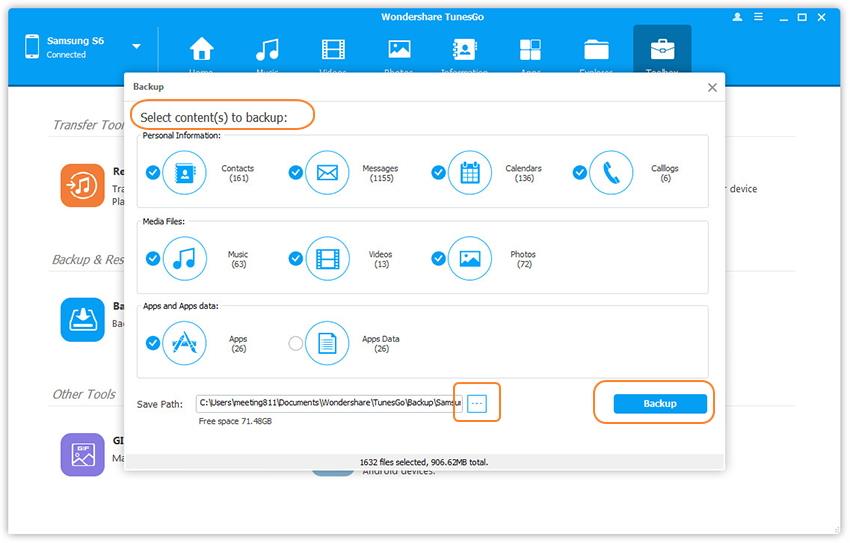
Step 2 TunesGo could help you backup Android contacts, photos, music, messages, call logs, apps and app data to PC with one click.
eg:Transfer music from your Android phone to cpmputer
Step 3 So that you can restore contacts, music, photos, messages, call logs, apps, app data back to Android phone fast.
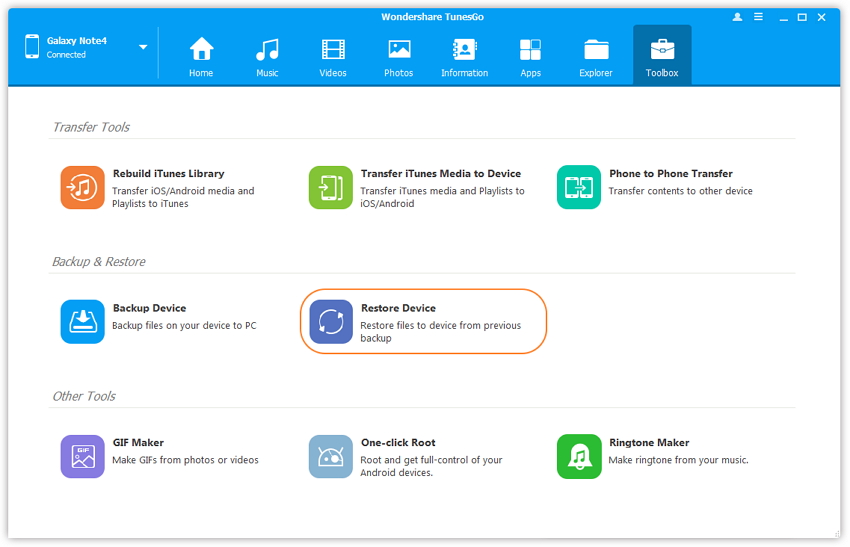
Select backup files to restore Android phone.
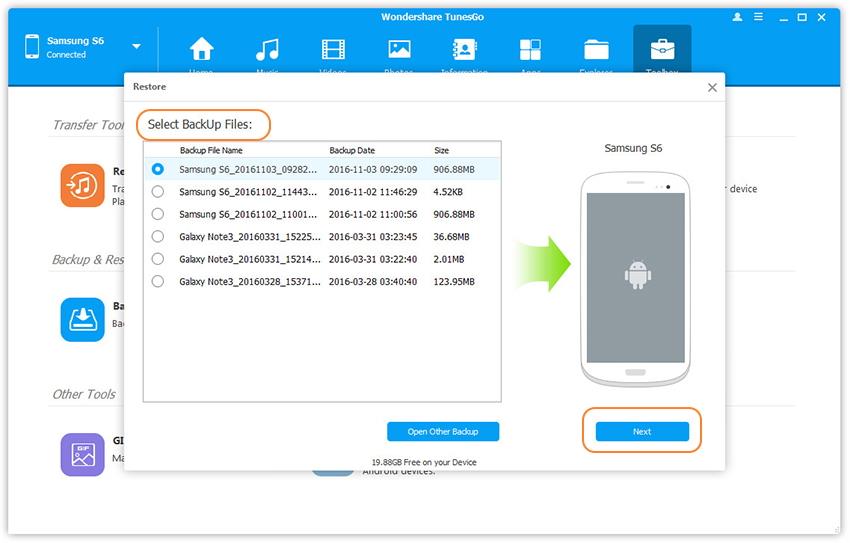
If you want restore contacts, SMS, videos, photos and more from backup on PC to Android or other devices. By default, all data that can be restored to device are ticked. Click Restore to get the contents back to your Android device.
Источник
ANDROID BACKUP & RESTORE: полное руководство
У меня новый Samsung Galaxy S8, и я хочу синхронизировать данные со старого на этот. Я слышал, что я должен регулярно делать файл резервной копии, чтобы я мог восстановить данные согласно требованиям. Я понятия не имею об этих сложных проблемах. Как мне сделать резервную копию моего телефона? Более того, как восстановить приложение на Android? Пожалуйста, помогает, спасибо!
Мобильные телефоны отличаются от многих лет назад, мы используем их для телефонных звонков, фотографирования, прослушивания музыки и т. Д.
Как вы знаете, нам понадобится специальный инструмент для передачи данных между устройствами iOS и ПК.
Но устройство Android отличается от продуктов Apple.
Они могут просто подключить устройство к компьютеру, а затем легко передавать файлы.
Так просто, не правда ли?

Большинство пользователей телефонов Android даже используют свой мобильный телефон или планшет в качестве внешнего жесткого диска.
![]()
Облачный сервис предлагает бесплатное пространство с ограничением для сохранения и восстановления данных независимо от того, где и когда вы находитесь. Нет сомнений, что это удобный инструмент для мобильных пользователей.
Некоторые осторожные пользователи беспокоятся о раскрытии данных.
Они предпочитают сохранять данные на компьютере, чем облачные сервисы.
1. Резервное копирование и восстановление данных Android с помощью FoneLab
FoneLab Android Data Backup & Restore предлагает удобные способы резервное копирование и восстановление данных Android.
Он предназначен для пользователей всех возрастов с простым управлением.
Для завершения процесса не потребуются профессиональные знания или специальные навыки, просто следуйте простой инструкции на экране, как показано ниже. резервный телефон Android.
Шаг 1 Загрузите и установите программное обеспечение на свой компьютер, а затем запустите его.
Шаг 2 Подключите устройство к компьютеру с помощью USB-кабеля, нажмите «Доверять», если оно появится.
Шаг 3 Нажмите Android Data Backup & Restore> Device Data Backup в интерфейсе.
Шаг 4 Выберите данные, которые вы хотите сделать резервную копию, и установите флажок внизу, чтобы добавить пароль, если хотите.
Шаг 5 Щелкните Пуск> ОК.
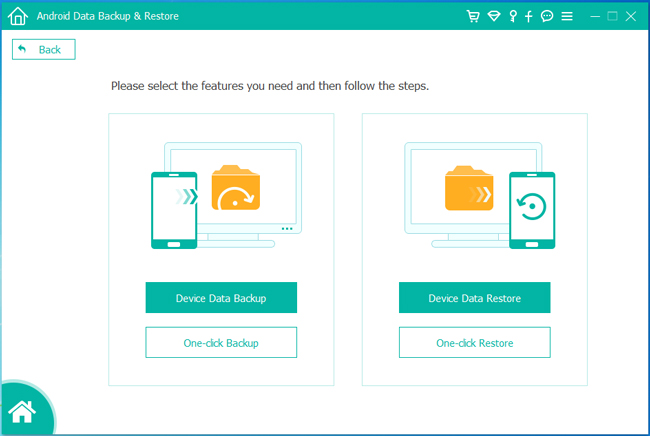
Если вы хотите восстановить файлы из резервной копии на компьютере, который вы сделали ранее, ниже приведены подробные шаги.
Шаг 1 Выберите Восстановление данных устройства.
Шаг 2 Выберите правильный файл резервной копии, из которого вы хотите восстановить.
Шаг 3 Проверьте элементы, которые вы хотите.
Шаг 4 Нажмите Восстановить.

Существует другой способ перемещения данных, который не поддерживает данные, кроме контактов, сообщений и т. Д.
2. Резервное копирование и восстановление данных Android вручную
Самый простой способ для каждого пользователя телефона Android для перемещения данных между устройством и компьютером — это USB-соединение.
Пожалуйста, имейте в виду, что,
Этот метод позволяет передавать только фотографии, видео, песни и файлы.
Ниже приведен процесс с четкими инструкциями.
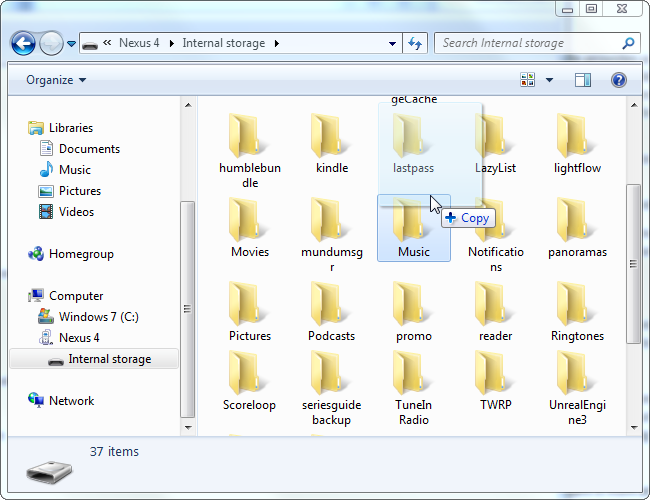
Шаг 1 Подключите телефон Android с помощью USB-кабеля к компьютеру, нажмите «Доверие» на экране устройства, когда оно появится.
Шаг 2 Нажмите Передать файлы на вашем устройстве.
Шаг 3 Дважды щелкните, чтобы открыть папку, из которой вы хотите перейти.
Шаг 4 Перетащите предметы, которые вы хотите. Если вы хотите сделать резервную копию данных на компьютер, перенесите данные с устройства на компьютер. В противном случае перенесите их с компьютера на устройство.
3. Резервное копирование и восстановление данных Android от Google.
Android-телефон позволяет дать ему разрешение на резервное копирование данных.
Ниже приведена пошаговая демонстрация на телефоне Android.
Шаг 1 Запустите приложение «Настройки» на устройстве.
Шаг 2 Прокрутите вниз, найдите Резервное копирование и сброс и коснитесь его.
Шаг 3 Установите флажки рядом с резервным копированием моих данных и автоматическим восстановлением.
После этого данные будут автоматически восстановлены, если вы войдете в учетную запись Google, которую вы использовали для резервного копирования данных.
Он охватывает следующие предметы:
Настройки Календаря Google, сети и пароли Wi-Fi, обои, настройки Gmail, приложения, сохраненные в Google Play, яркость и сон, язык и ввод, дата и время, настройки и данные сторонних приложений.
Есть еще некоторые проблемы, если вы хотите сделать резервную копию полных данных Android.
Существуют методы, специализирующиеся на резервном копировании или восстановлении определенных данных.
4. Резервное копирование и восстановление данных Android от Google.
Gmail будет первым вариантом для отправки и получения электронных писем. Это взаимосвязанный продукт Google, который можно использовать в качестве инструмента резервного копирования контактов Google для управления контактами Android.
Шаг 1 Перейдите в Настройки> Учетные записи и синхронизация> Google> Добавить учетную запись> Google> Далее> Войти.
Шаг 2 Войдите в свою учетную запись Gmail или создайте ее, если у вас ее нет.
Шаг 3 Нажмите Войти> Синхронизировать контакты> Готово.
После этого контакты будут синхронизированы после входа в учетную запись Gmail на новом устройстве.

Резервное копирование и восстановление не только контактов Android, но также заметок, календарей и почты.
Если вам нравится фотографировать и сохранять их на своем мобильном телефоне, ваш мобильный телефон будет уведомлять о том, что свободного места на мобильном устройстве заканчивается, вам будет предложено удалить некоторые видео, фотографии или другие данные, чтобы освободить место.
Фотографии занимают большую часть памяти мобильного телефона, удаление фотографий будет хорошим выбором для освобождения места на телефоне Android.
Существуют различные инструменты, которые вы должны использовать, такие как OneDrive, Dropbox и т. Д.
5. Резервное копирование и восстановление фотографий через Google Фото.
Здесь мы представим инструмент, который поможет вам сделать резервную копию и восстановить фотографии Android.
Он автоматически синхронизирует фотографии на устройстве после подключения к интернету.
Шаг 1 Загрузите Google Фото в Google Play и откройте его.
Шаг 2 Войдите в свой аккаунт Google.
Шаг 3 Коснитесь значка трехстрочного меню в верхнем левом углу.
Шаг 4 Коснитесь значка настроек шестеренки.
Шаг 5 Нажмите «Резервное копирование и синхронизация», а затем переключите «Резервное копирование и синхронизация».

Конечно, у Google есть еще одна служба файлового хостинга, которая называется Google Drive, для сохранения данных для вас.
6. Резервное копирование и восстановление Android через Google Диск.
Это позволяет создавать резервные копии фотографий и видео напрямую в Google Фото. Вы можете узнать, как использовать Google Backup для Android.
Шаг 1 Загрузите Google Диск из Google Play.
Шаг 2 Введите свою учетную запись и пароль и нажмите «Войти».
Шаг 3 Нажмите синий значок загрузки + в правом нижнем углу.
Шаг 4 Коснитесь Загрузить.
Шаг 5 Следуйте инструкциям на экране, чтобы выбрать нужные элементы, а затем нажмите ЗАГРУЗИТЬ в правом верхнем углу.
Есть и другие способы резервного копирования и восстановления данных Android, вы можете попробовать, но я уверен, что вы вернетесь сюда из-за удобства и безопасности FoneLab.
Почему бы не скачать и попробовать прямо сейчас!
Источник


