- How to stop apps from running in the background on Android
- Jump to
- Why stop background apps on Android?
- Update your phone to the newest Android version
- Analyze battery consumption statistics
- Control your background processes
- I’m in! But I don’t know which apps to stop
- Task killers and RAM optimizers: the great debate
- Настройки в Android-приложениях
- Running Apps on Your Device
How to stop apps from running in the background on Android

Android smartphones have gotten very powerful over the years and are great at multitasking. Over time, however, you might have seen smartphones degrade in performance and become sluggish. You may also notice that the battery life is also adversely affected. What if we tell you that on most phones, these issues can be fixed by simply optimizing the background apps? Read on to find out how!
Jump to
Why stop background apps on Android?
For those of you who chanced upon this article without actually facing an issue with their phone, you might wonder why would someone even consider to stop background apps. Here’s an explanation.
As you keep using your Android phone, you tend to install several apps on your device. Over time, chances become high that at least some of them aren’t well optimized for your phone or may have a bug. Some of these apps may even contain malware – especially the ones you did not download from trusted sources.
Oftentimes, these apps may keep running in the background even after you thought you closed them. The result is sluggish performance and a marked reduction in battery life. Let us now check out the various steps that can be taken to solve this problem and stop background apps on Android.
Update your phone to the newest Android version
In case you have a relatively old phone with you, the simplest way to stop apps from running in the background is to make sure your phone runs the latest version of Android. Starting Android 10, Google has introduced several power management features that prevent errant apps from consuming too much power or hogging too much power.
 Android 11 is the latest stable version of Android and provide great battery optimization tools/ © Mr.Mikla / Shutterstock.com
If you are on a newer version of Android (the latest stable version is Android 11) you are already doing pretty good as Google has enhanced power management features even further. On phones running Android 10 and 11, it would be a good idea to turn on a feature called Adaptive Battery. On phones running stock Android, you can enable Adaptive Battery by going into Settings -> Battery -> Adaptive preferences.
Apart from optimizing errant apps, the Adaptive battery mode also optimizes the charging speed of your phone to ensure that your battery lasts a long time.
Analyze battery consumption statistics
There is no denying that Android offers a comprehensive battery statistics tool where you can see what apps are draining the battery the most. To access the battery stats page tap on Settings -> Battery ->View battery usage.
The phone will now open a page with the list of apps that are consuming power. What is helpful about this page is that it lists these apps in an order — with the ones consuming the most power placed at the top. Chances are high you will see some of your most used apps high up in the list. However, if you note some third party apps that you know you haven’t used for a long time in this list, it might be a good idea to either force stop or uninstall it.
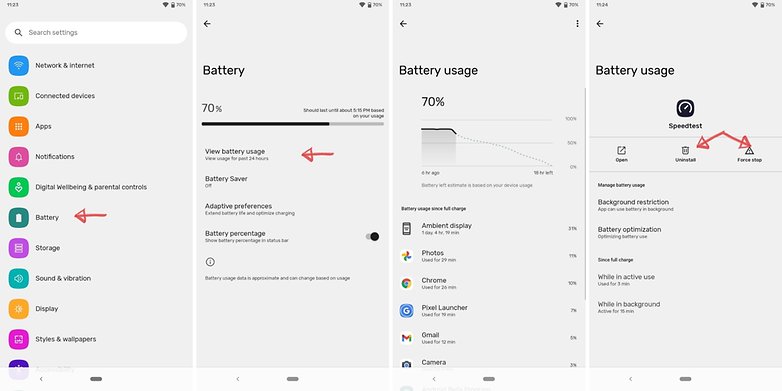 The Battery stats page is a veritable goldmine of information/ © NextPit
To force stop or uninstall an app, tap on the app and and you will see a page with both these options. Note that you may also see some apps here that are part of Android and Google Mobile Services. You can ideally leave them be since they are essential for the smooth and stable functioning of your phone.
Control your background processes
Incase you are not too happy with the results of disabling apps listed within the battery stats menu, it’s time to try out slightly advanced steps. The best way to gain control of your processes is to have a dig around under the hood using the monitoring tools built into Android.
In some cases, before you can start, you need to enable developer options.
- In most versions of Android, this involves going to Settings > About phone and then tapping Build number about seven or so times. You’ll get a notification telling you that Developer options have been unlocked once you’re done.
- For many handsets, the next thing you need to look for is a setting called Processes, Process Stats, or Running services. You can find this in Settings > System > Advanced> Developer options > Running services. That option takes you to a list of running processes showing how much RAM each is using.
- Obviously, it’ll be tempting to stop the most RAM-hungry apps from running in the background, but you’ll want to pay some attention to what you’re stopping before you go ahead. Stopping some apps might crash your phone.
- You can also tap the settings option when in the Services/Processes menu to switch between running processes and cached processes.
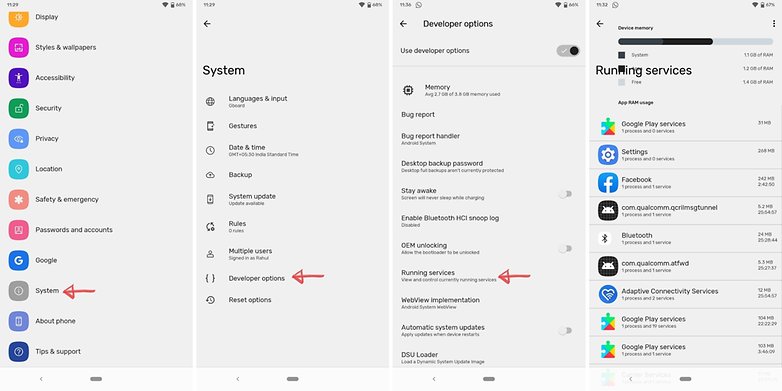 Control Android services from within Developer options / © NextPit
I’m in! But I don’t know which apps to stop
OK. If you don’t want your app/phone to crash, err on the side of caution and use some common sense. The app marked ‘Google Services‘, or pretty much any app that starts with ‘Google’ shouldn’t be manually stopped.
On the other hand, if you look through the list and see messengers and music players idly draining your battery in the background, then you can go ahead and stop them in relative safety. Truly crucial apps usually won’t allow you to force stop them anyway.
- To stop an app manually via the processes list, head to Settings > Developer Options > Processes (or Running Services) and click the Stop button. Voila!
- To Force Stop or Uninstall an app manually via the Applications list, head to Settings > Apps > All Apps and select the app you want to modify.
- Don’t delete any apps that appear when you select the Show System Apps option. You can see system apps by tapping on the three dots on the top right corner.
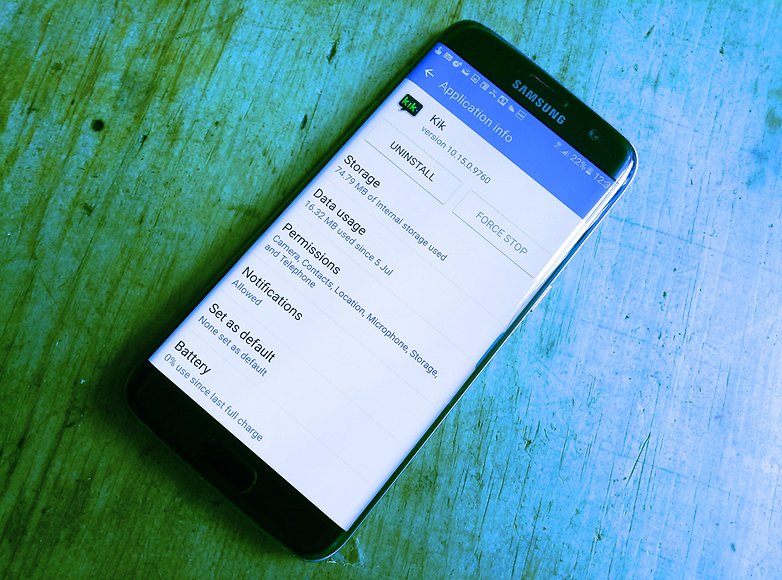 Apps that you rarely use are better off uninstalled altogether. / © NextPit
Task killers and RAM optimizers: the great debate
With Android software and hardware improving over time, some people will argue that the use of task killer apps is going to do more harm than good in terms of processing and battery life. As one of the problems you’re trying to fix is apps running in the background draining your resources, adding another one that has the purpose of doing explicitly that (it needs to monitor the services in use on your phone, therefore always needs to be running) seems a bit counter-intuitive.
A task killer that repeatedly force-closes an app in the background over and over is almost certainly going to drain your battery more as it continues the ‘restart and kill’ process. You might be better off not installing the task killer in the first place and just letting it run.
So there you have it! We have discussed several ways in which you can can stop background apps from running on Android devices. We hope the steps mentioned here proved helpful for you. In case you know if any other cooler methods that we might have missed out, share them with us in the comments below!
This article was comprehensively updated in July 2021. Older comments have been retained.
Источник
Настройки в Android-приложениях
Интересуюсь темой разработки под Android. Пишу небольшое приложение. Столкнулся с тем, что не до конца понимаю как правильно делать настройки для приложения. Немного погуглил, нашел статью, которая помогла разобраться. Решил перевести статью для русскоязычного сообщества, включив некоторые комментарии к оригиналу.
Настройки являются важной частью приложений на Android (и не только на Android — здесь и далее примечание переводчика). Это очень важно — позволять пользователям изменять настройки приложения, в зависимости от их предпочтений.
Существует два пути работы с настройками в Android — можно создать файл preferences.xml в директории res/xml, либо работать с настройками из кода. В данной статье я покажу как работать с настройками, используя preferences.xml файл.
Элементы настроек имеют следующие атрибуты:
- android:key — имя настройки, по поторому в дальнейшем можно получить ее значение
- android:title — заголовок элемента настройки
- android:summary — краткое описание элемента настройки
- android:defaultValue — значение по умолчанию
В настоящее время доступны следующие типы элементов настроек:
- CheckBoxPreference — простой чекбокс, который возвращает значения true или false.
- ListPreference — группа переключателей (radioGroup), из которых может быть выбран только один элемент. Атрибут android:entries указывает на массив со значениями в res/values/arrays.xml, а android:entryValues на массив с подписями.
- EditTextPreference — показывает диалоговое окно с полем ввода. Возвращает строку в качестве значения.
- RingtonePreference — группа переключателей с выбором рингтона.
- Preference — настройка, работающая как кнопка.
- PreferenceScreen — экран с настройками. Когда один PreferenceScreen вложен в другой, то открывается новый экран с настройками.
- PreferenceCategory — категория настроек.
Экран с настройками  | EditTextPreference |
| ListPreference | RingtonePreference |
| PreferenceScreen |
Скриншоты выше были сгенерированы при помощи следующего preferences.xml:
Атрибуты android:entries и android:entryValues у ListPreference ссылаются на @array/listArray и @array/listValues соответственно. Значения берутся из res/values/arrays.xml, который в нашем случае выглядит следующим образом:
Для того, чтобы показать пользователю экран с настройками, небходимо создать активити, унаследованное от PreferenceActivity. Пример активити:
А вызвать активити с настройками можно, нажав на кнопку на нашем главном активити:
Для того, чтобы использовать выставленными в настройках значениями, добавим метод getPrefs() в главное активити, который нужно вызывать на событии onStart(). Нужно использовать именно onStart(), а не onCreate(), для того, чтобы быть уверенным в том, что используются актуальные настройки, а не те, что были во время создания гланого активити. Наш метод getPrefs() может выглядеть примерно вот так:
Источник
Running Apps on Your Device
When building an Android app, it’s important that you always test your application on a real device in addition to emulators. This page describes how to set up your development environment and Android-powered device for testing and debugging on the device.
If you want an ideal SIM-unlocked phone to test on, then you might consider a Pixel phone.
Plug in your device to your computer with a USB cable. If you’re developing on Windows, you might need to install this universal ADB USB driver or find your specific USB driver for your device.
The next step is to enable USB debugging so your phone can interact with your computer in a developer mode.

The following steps are needed:
- (Windows Only) Install this ADB Driver
- Plug-in your Android Device to Computer via USB
- Open the «Settings» App on the Device
- Scroll down to bottom to find «About phone» item
- Scroll down to bottom to find «Build number» section
- Tap on «Build Number» 7 times in quick succession
- You should see the message «You are now a developer!»
- Go back to main «Settings» page
- Scroll down bottom to find «Developer options» item
- Turn on «USB Debugging» switch and hit «OK»
- Unplug and re-plug the device
- Dialog appears «Allow USB Debugging?»
- Check «Always allow from this computer» and then hit «OK»
Watch this video tutorial for a visual guide to getting USB debugging enabled.
Now, we can launch apps from Android Studio onto our device:
- Select one of your projects and click «Run» from the toolbar.
- In the «Choose Device» window that appears, select the «Choose a running device» radio button, select the device, and click OK.
Once Gradle finishes building, Android Studio should install the app on your connected device and start it.
Not seeing your device in the «Choose Device» window? Try the following:
- Unplug your device from the USB port on the computer
- Restart the device by powering off and back on
- Verify that Settings => Developer options => USB Debugging is enabled
- Quit and re-launch Android Studio
- Force restart ADB from the «Android Device Monitor»
- Plug your device back into the USB port on the computer
- Unlock the device and press «OK» on any dialog displayed
Now the phone should work as a debugging device as expected!
Still Not Working?
If after plugging the device into the computer and you don’t see any message about authorizing the device, then you may need to purchase another USB cable. Not all USB cables are enabled for data transfer. If there’s a chance that your cable may be a charging only cable, you can purchase a USB-C cable for Pixel or the micro-USB cable for Nexus 6 and prior.
Источник


