- Fragment Transitions with Shared Elements using Android Navigation
- Shared Elements
- Setup
- ChangeBounds Transition — Single View
- ChangeBounds Adjustments
- ChangeBounds Transition-Nested View
- Shared Element Transition in Android with Example
- Implementation of Shared Element Transition in Android
- Step by Step Implementation
- Shared element transition in fragments Android
- 1. Add dependencies to project
- 2. Create destination fragments
- 3. Make navigation graph and attach to activity
- 4. Connect destinations with actions
- 5. Create classes to show RecyclerView and data
- 6. With SafeArgs pass data class as argument
- 7. Show list and detail data in Fragments
- 8. Make SharedElementTransition between fragments
Fragment Transitions with Shared Elements using Android Navigation

Feb 24, 2020 · 4 min read
Anyone that isn’t using the newest Android Studio tools should definitely change that, especially if that means they aren’t using Android Jetpack’s Navigation component. This component makes maneuvering through the screens of your app a breeze and its chock full of features that can be used to make the navigation itself appear elegant. In this article I’ll be explaining how you can use the navigation component to create transitions with shared elements.
Shared Elements
What are shared elements? In the singular sense, a shared element is a pair of views that are present in two different fragments or activities. These views display the same information, such as a string or an image, but they may have different sizes or locations on screen. To give the the user the illusion that the view is being preserved during navigation, a transition is used to move and reshape the first view so that it “becomes” the second view. Since shared elements actually consist of two different views, they are technically not shared between destinations.

Setup
We’ll be creating an app that performs a simple transition from one fragment to another with multiple shared elements. In Android Studio, create a new project using the “Bottom Navigation Activity” project template.
File -> New -> New Project -> Bottom Navigation Activity
This template gets us up and running pretty quick since there is already a navigation action between HomeFragment and HomeSecondFragment.
In addition to the basic project setup, you should also verify the following items are checked off:
- Increase the minSdkVersion in build.grade(Module:app) to 21
- Implement navigation component in build.gradle (Module:app):
- Enable window content transitions in style.xml
- Create a new transition folder in app/res.
Right-click on the res folder -> New -> Android Resource Director
resource type = transition
- Create a new transition resource in the transition folder (change_bounds.xml):
ChangeBounds Transition — Single View
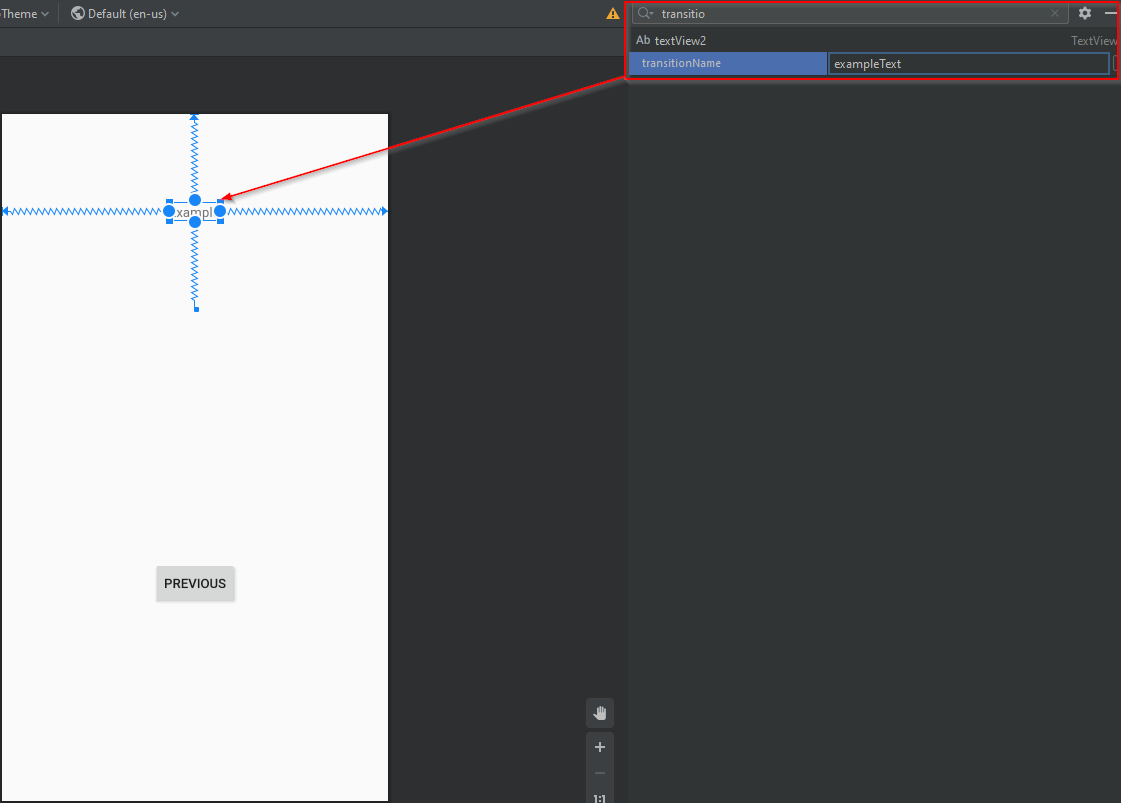
Now that everything’s set up, let’s work on executing a simple shared element transition with one TextView. Add one TextView to HomeFragment and one TextView to HomeSecondFragment. Move them to different locations on screen, constrain them each appropriately, and make them say the same thing (ex. “Example”).
If we navigate between these two fragments as is, there is no way to know that the first TextView is associated with the second TextView. For this reason, we need to add the android:transitionName property to both TextViews. All shared elements require unique transitionNames. Note that the transitionName property will not be available if windowActivityTransitions are not enable in your theme.
Now, in the onClickListener in HomeFragment, create a new val extras that maps the view in the starting fragment to the view in the destination fragment (textView to “exampleText”). Then, pass the extras argument to the navigate method of the navController.
The last step is to handle the incoming shared element in the destination fragment. To do this, we set sharedElementEnterTransition to the change_bounds.xml transition we created earlier. Add the same thing for sharedElementReturnTransition so that the transition works in the reverse direction.
With that, BAM! Transition works like a charm. You can move the TextViews anywhere on screen and it will still work fine.
Although not totally related to this tutorial, you need to add this line to MainActivity.kt to make the back button in the upper left corner work properly:
ChangeBounds Adjustments
You can also apply a ChangeBounds transition using the following code:
Using this method, you can adjust specific aspects of the transition.
- Duration (duration = ## in ms)
- Interpolator
- Propogation (CircularPropogation or SidePropogation)
ChangeBounds Transition-Nested View
A shared element nested inside another view (such as a CardView or a ConstraintLayout) will not transition properly if the parent view is not also treated as a shared element. For example, if our TextView is nested inside a ConstraintLayout in fragment 1 and we do not map the ConstraintLayout to the destination fragment, we get something super choppy like this:
To fix this, the parent View also needs to be transitioned. Using the same ConstraintLayout example, the proper way to make the transition is to map the ConstraintLayout from the first fragment to the root ConstraintLayout in the second fragment like this:

In conclusion, Shared Elements are pretty simple to use but there are a few gotchas that can make creating transitions a troubleshooting marathon. Code carefully!
Источник
Shared Element Transition in Android with Example
Shared Element Transition is one of the most seen animations in Android apps. This type of animation is used when we have to open an item from a ListView or RecyclerView. Shared Element Transition in Android determines how shared element views are animated from activity to activity or fragment to fragment. Now we will see the implementation of Shared Element Transition in our app with a simple example.
Implementation of Shared Element Transition in Android
In this example, we will create a simple app where we will create two activities with ImageView and implement transition animation between these two activities. A sample GIF is given below to get an idea about what we are going to do in this article. Note that we are going to implement this project using the Java language.
Attention reader! Don’t stop learning now. Get hold of all the important Java Foundation and Collections concepts with the Fundamentals of Java and Java Collections Course at a student-friendly price and become industry ready. To complete your preparation from learning a language to DS Algo and many more, please refer Complete Interview Preparation Course.
![]()
Step by Step Implementation
Step 1: Create a New Project
To create a new project in Android Studio please refer to How to Create/Start a New Project in Android Studio. Note that select Java as the programming language.
Step 2: Create a New Empty Activity
Navigate to the app > java > your package name > right-click > New > Activity > Empty Activity and name the activity as MainActivity2.
Источник
Shared element transition in fragments Android
Hey people! Welcome to my blog on shared element transition using fragments with navigation component.
Before we begin with the implementation it is important to understand the difference between element transition and other such as container transforms.
Container transforms opens a View from a ViewGroup into a fragment or activity as a whole. Whereas, element or shared element transition only moves the views from one place to other.
1. Add dependencies to project
Start with new android studio project choosing Empty Activity.
Give project and package name and select language Kotlin.
Minimum SDK as API 21: Lollipop and finish
gradle.build(Module: app)
2. Create destination fragments
We need two fragments for shared element transition to take place. First fragment has RecyclerView list data and Second fragment has detail for each item from the list.
So create two blank fragments with names as follows and leave them empty for now:
ListFragment .kt with fragment_list.xml
DetailFragment.kt with fragment_detail.xml
If you are unsure of this, take this as reference. BlankFragment and fragment_blank.xml
3. Make navigation graph and attach to activity
Let’s create a graph to connect all destinations in our app with actions. In our case we connect previously created empty fragments.
Right click on res —> New —> Android Resource File
In the dialog section:
File name —> nav_graph
Resource type —> Navigation and then click Ok.
Attach graph to Activity :
Let’s make our MainActivity class as default navigation host for all fragments by attaching our navigation graph.
activity_main.xml:
Let’s set NavController with ActionBar using NavigationUI to the activity class
MainActivity.kt:
4. Connect destinations with actions
Open nav_graph.xml file that you have created earlier, in that file from the toolbar go to Design section.
Click the New Destination icon to see available destinations to add.
Locate fragment_list and then click to insert, similarly add fragment_detail to the graph.
Now arrange the layouts properly. Select listFragment and drag the connection to detailFragment.
Here’s the xml layout for what we did.
nav_graph.xml:
Now run the app and you will be able to see blank screen with no views to make sure everything is working.
5. Create classes to show RecyclerView and data
We need data such as text string resources to show in layout, let’s copy the strings for showing titles and other data, colors, drawables and styles for the app.
Get all the strings and paste into your strings.xml file .
Get all the colors and paste into your colors.xml file .
Get all the styles and paste into your styles.xml file .
Get all drawables and paste into your drawables folder.
Now let’s create a data model class Sports.kt which helps in making a list.
Sports.kt:
Create item_sports layout file to show each item in list.
item_sports.xml:
Finally create an RecyclerView adapter for fragment to show a list.
SportsAdapter.kt:
6. With SafeArgs pass data class as argument
We have to pass our data class Sports.kt as argument from ListFragment to DetailFragment, and we will do this from nav_graph file.
In nav_graph.xml file go to design section from toolbar.
Select detailFragment, to the right side Attributes section, click plus(+) button to add new arguments to that fragment.
In Add Arguments section dialog :
Name —> sportsArgs
Type —> Custom Parcelable —> Sports.kt
Continue by clicking OK and then again select Add to finish.
Now Rebuild the project for android studio to auto generate the classes required for this.
Note: If build is not successful or android studio cannot build at this point, try cleaning the project and Rebuilding it from
Build —> Clean Project.
7. Show list and detail data in Fragments
Now we have data and arguments ready to be passed let’s populate the data inside fragments.
Add RecyclerView to ListFragment.kt and layout. Replace the code inside the layout with below one.
fragment_list.xml:
ListFragment.kt:
Our ListFragment is ready to show the RecyclerView, let’s complete DetailFragment to show each list item which user is selected.
fragment_detail.xml:
FragmentDetail.kt:
Now run the app, ListFragment will be able to show list of Cards and when you click single item you will be navigated to DetailFragment with no errors.
Now let’s see how we can add shared element transitions between these fragments.
8. Make SharedElementTransition between fragments
To perform any transition between views first we need to identity those views from both layouts. So in our case we are performing transition between two layouts which are item_sports.xml to fragment_detail.xml. See the image below.
Since our item views are created by the adapter let’s make changes to those. Open SportsAdapter.kt file and scroll down below to class which implements OnClickListener, this takes single argument which is data class but now change that to take two more arguments which are ImageView(banner) and TextView(title).
These are the changes you need to make:
Now for views which we are passing needs unique transition names while transition occurs, if all views have same transition name then transition won’t take place.
So the best way to do this is by giving each view transition name from it’s data class itself which must be of the type String.
We have access to both banner, title view with data in SportsViewHolder class.
These are the changes you need to make:
Inside SportsViewHolder
Since ListFragment.kt implements OnClickListener it takes extra parameters after changes which needs ImageView and TextView, so we will pass that which shown below.
Let’s use FragmentNavigatorExtras which builds pair of view with string value. We can pass as many as pairs we want for transition to take place. In our case we are going to pass two pairs a ImageView for banner and TextView for title.
After with an assigned value we pass that inside navigate along with directions and extras.
After all the required changes this is how your code should look like.
ListFragment.kt:
We have to specify what kind of transition should take place from the leaving fragment and for that we have inflate a transition type using TransitionInflater in our fragment OnCreateView before returning.
So let’s inflate the transition with type move effect, see those changes below.
onCreateView ListFragment
With this we will be able to perform moving transition but when user clicks back button we must be able to perform return transition, so we will this changes inside OnViewCreated after all views have been ready.
This gives fragment the ability to delay fragment animations until all data is being loaded.
With these changes you can get backward transition taking place.
onViewCreated at the end
But enter transition on any view should happen while it’s been drawn. So kotlin has a way of doing this by calling doOnPreDraw for view for transition.
In our case we have to call this on RecyclerView while being drawn or laid out.
onViewCreated after enter transition
If you get an error at doOnPreDraw which means you have to specify proper jvm target version. So here’s the fix for it.
build.gradle(Module:app) after build types
Now Sync the project to fix this.
With all the changes being made to ListFragment. This is how it should look like.
ListFragment.kt:
One last thing remaining to do is to apply these transition names in DetailFragment for transition to occur correctly.
Just like ListFragment one same thing we have to do is to inflate transition same way.
Optionally you can delay the transition from leaving fragment at certain duration and let the transition take place.
onCreateView
DetailsFragment.kt:
Now run the app check how transitions takes place between them. For your better understanding experiment by removing code where transition changes or doesn’t work at any point.
You will find this example wrote completely with BindingAdapters in my GitHub repository in different branch, so make sure to check that too.
Источник


