- Hidden mistakes with Shared Element Transitions
- Get started
- Mistake #1. Static transitionNames (half a day wasted)
- Mistake #2. Not considering parent fragment (1.5 days wasted)
- Mistake #3. Underestimating Glide (2 days wasted)
- Mistake #4. Incorrectly managing postPostponeTransition()
- Putting all together
- Fragment Transitions with Shared Elements using Android Navigation
- Shared Elements
- Setup
- ChangeBounds Transition — Single View
- ChangeBounds Adjustments
- ChangeBounds Transition-Nested View
- Как я боролся с Shared Element Transition и написал свою первую opensource библиотeку
- Куда приводит бекенд
- ViewPager и Shared Element Transition. Ищем пути примирения
- ViewPager: Первая кровь
- Как сделать Shared Element Transition в Viewpager правильно
- Пробуем PageTransformer
- Выбираем страницы для рисования анимации
Hidden mistakes with Shared Element Transitions

There is a good practice to make your application beautiful and live, and nowadays there are a lot of tools and ways to achieve this. One of them is Shared Element Transition.
In this article I’ll cover a few mistakes which have cost me a lot of time; I’ll show how to avoid them if you decide to implement this kind of transitions with Fragments on application.
Get started
Before making the animation I’ve read dozens of articles but most of them were about Activity Transition. However, I came across a really good ones about Fragments and I want to give a little recap on how to create Shared Element Transition.
Here are main steps to create animation:
- Enable setReorderingAllowed(true) . It allows to reorder a calling the lifecycle methods and your animation will be displayed correctly.
- Call addSharedElement() and add the views that will be shared between screens
- Add unique android:transitionName on each view in transition
- Add sharedElementEnterTransition/sharedElementReturnTransition in destination fragment. Optionally: for better effect we can also set enterTransition/exitTransition .
- Add postponeEnterTransition/startPostponedEnterTransition to define the moment when the data is loaded and UI is ready to be drawn
Seems like that’s enough to build animation and make your designers and users happy. BUT there are always some accidents. Let’s take a look what we’ll have if we take the steps listed above:
That’s not what we expected. Let’s figure it out.
Mistake #1. Static transitionNames (half a day wasted)
As I said before, our Views should have unique transition names — otherwise the transition framework won’t be able to recognize which View take part with transition and will make it without them. So where is a problem?
The thing is RecyclerView. That’s it.
If there is RecyclerView and an animating view is a part of RecyclerView item, you should build and set transitionName dynamically (forget about XML). Besides, you should do it in both fragments even if the second one doesn’t have RecyclerView.
You might have noticed I put «title» as an argument to get a unique name. It’s better to use domain model instead of, for instance, item position on the screen, because there is no need to pass these names as arguments to Bundle and parse them from the second Fragment.
Mistake #2. Not considering parent fragment (1.5 days wasted)
I know, you might ask «How come?». But when I was reading the articles about shared animation, no one considered an example in complex fragment’s hierarchy. That’s why you might sometimes not pay attention to it.
So, my first fragment was a child of fragment’s container and no wonder that postponeEnterTransition()/startPostponedEnterTransition() had no effect.
What you need to do here is to call these methods from parent fragment.
Mistake #3. Underestimating Glide (2 days wasted)
«Ok, I’ve learnt how to make shared transition, when to call required methods regarding the lifecycle and the loading. This time it’s gonna work!»
Well I was wrong. This is perhaps the trickiest mistake I’ve faced. Let’s take a look at what we have so far:
You may notice there is a weird glitch with enter transition. When it starts, the image has already changed matrix and then just move to the final position.
I don’t want to describe the whole investigation here. Long story short, I was lucky to stumble across a nice article.
Where I found solution. Here it is:
“We have this glitch because Glide tries to optimize image loading. By default, Glide is resizing and trimming images to match the target view.”
In order to fix it, I added, no jokes, a single line of code like this to initialization Glide’s chain:
So, you should disable any Glide’s transformations on images if they’re involved in a shared transition.
Mistake #4. Incorrectly managing postPostponeTransition()
Honestly, it’s not exactly a mistake but still I assume it would be good to mention.
When it comes to manage postPostponeTransition() and startPostponedEnterTransition() methods, you should select the right moment. The moment is when the UI is already to be drawn.
There are two main points we should know before calling the methods:
- on the one hand, when images with transition are loaded and ready
- on the other hand, the views hierarchy are measured and laid out
For images usually we use Glide and it has a fancy listener:
Note that we call startPostponedEnterTransition() in both cases: success and error. It’s vital because if we don’t make it your application will freeze.
In cases when transition comes without any images you may use doOnPreDraw() extension method from ktx on the root layout and do startPostponedEnterTransition() over there.
BONUS: Speaking of RecyclerView, it’s not enough to simply add a listener for images. We should retain an item position of RecyclerView where transition starts from. When the user goes back to the previous screen, we should compare image loaded position with the retained position at the listener and start transition only when they are matched.
Putting all together
In this article, I’ve showed some gotchas you might face implementing a shared transition with fragments and the ways to deal with them.
Briefly, here they are:
- Keep in mind fragments hierarchy (don’t forget about parent fragment)
- In case with RecyclerView, always build transition names dynamically (source + destination)
- Disable any Glide transformations
- Do calls postPostponeTransition() and startPostponedEnterTransition() correctly regarding your logic.
Thank you for reading and see you next time!
Источник
Fragment Transitions with Shared Elements using Android Navigation

Feb 24, 2020 · 4 min read
Anyone that isn’t using the newest Android Studio tools should definitely change that, especially if that means they aren’t using Android Jetpack’s Navigation component. This component makes maneuvering through the screens of your app a breeze and its chock full of features that can be used to make the navigation itself appear elegant. In this article I’ll be explaining how you can use the navigation component to create transitions with shared elements.
Shared Elements
What are shared elements? In the singular sense, a shared element is a pair of views that are present in two different fragments or activities. These views display the same information, such as a string or an image, but they may have different sizes or locations on screen. To give the the user the illusion that the view is being preserved during navigation, a transition is used to move and reshape the first view so that it “becomes” the second view. Since shared elements actually consist of two different views, they are technically not shared between destinations.

Setup
We’ll be creating an app that performs a simple transition from one fragment to another with multiple shared elements. In Android Studio, create a new project using the “Bottom Navigation Activity” project template.
File -> New -> New Project -> Bottom Navigation Activity
This template gets us up and running pretty quick since there is already a navigation action between HomeFragment and HomeSecondFragment.
In addition to the basic project setup, you should also verify the following items are checked off:
- Increase the minSdkVersion in build.grade(Module:app) to 21
- Implement navigation component in build.gradle (Module:app):
- Enable window content transitions in style.xml
- Create a new transition folder in app/res.
Right-click on the res folder -> New -> Android Resource Director
resource type = transition
- Create a new transition resource in the transition folder (change_bounds.xml):
ChangeBounds Transition — Single View
Now that everything’s set up, let’s work on executing a simple shared element transition with one TextView. Add one TextView to HomeFragment and one TextView to HomeSecondFragment. Move them to different locations on screen, constrain them each appropriately, and make them say the same thing (ex. “Example”).
If we navigate between these two fragments as is, there is no way to know that the first TextView is associated with the second TextView. For this reason, we need to add the android:transitionName property to both TextViews. All shared elements require unique transitionNames. Note that the transitionName property will not be available if windowActivityTransitions are not enable in your theme.
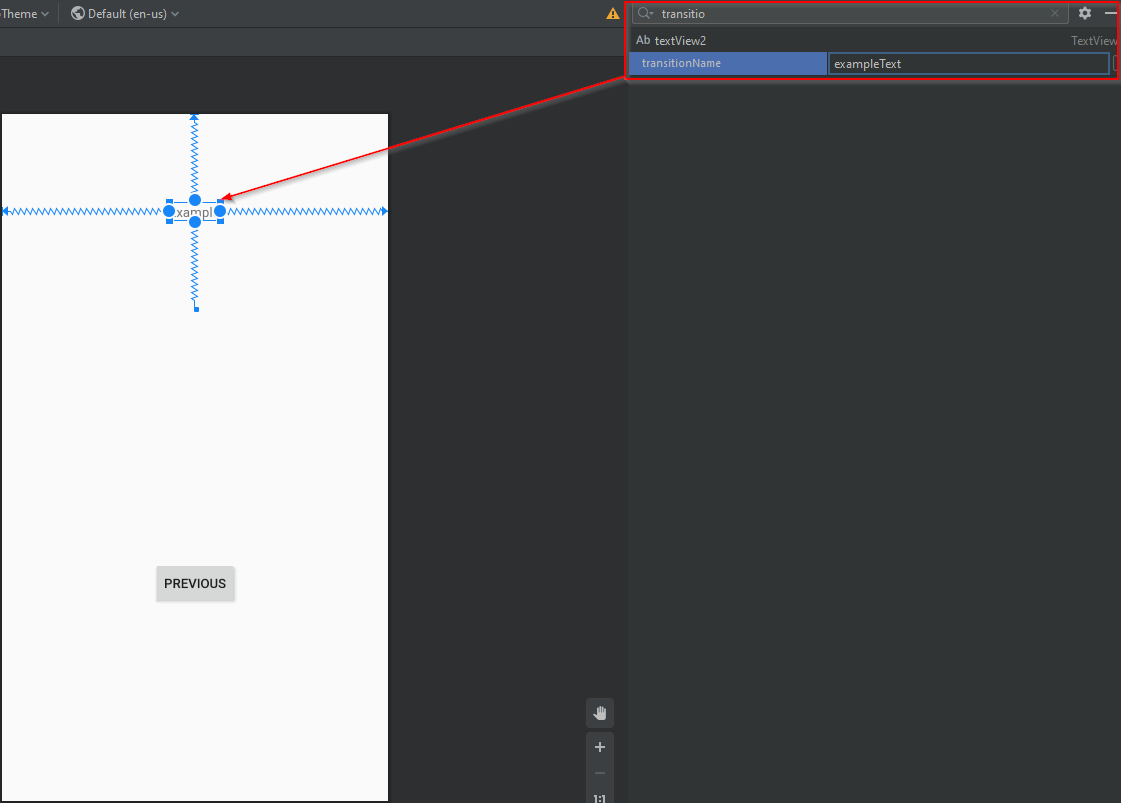
Now, in the onClickListener in HomeFragment, create a new val extras that maps the view in the starting fragment to the view in the destination fragment (textView to “exampleText”). Then, pass the extras argument to the navigate method of the navController.
The last step is to handle the incoming shared element in the destination fragment. To do this, we set sharedElementEnterTransition to the change_bounds.xml transition we created earlier. Add the same thing for sharedElementReturnTransition so that the transition works in the reverse direction.
With that, BAM! Transition works like a charm. You can move the TextViews anywhere on screen and it will still work fine.
Although not totally related to this tutorial, you need to add this line to MainActivity.kt to make the back button in the upper left corner work properly:
ChangeBounds Adjustments
You can also apply a ChangeBounds transition using the following code:
Using this method, you can adjust specific aspects of the transition.
- Duration (duration = ## in ms)
- Interpolator
- Propogation (CircularPropogation or SidePropogation)
ChangeBounds Transition-Nested View
A shared element nested inside another view (such as a CardView or a ConstraintLayout) will not transition properly if the parent view is not also treated as a shared element. For example, if our TextView is nested inside a ConstraintLayout in fragment 1 and we do not map the ConstraintLayout to the destination fragment, we get something super choppy like this:
To fix this, the parent View also needs to be transitioned. Using the same ConstraintLayout example, the proper way to make the transition is to map the ConstraintLayout from the first fragment to the root ConstraintLayout in the second fragment like this:

In conclusion, Shared Elements are pretty simple to use but there are a few gotchas that can make creating transitions a troubleshooting marathon. Code carefully!
Источник
Как я боролся с Shared Element Transition и написал свою первую opensource библиотeку
Нет повести печальнее на свете,
чем повесть о ViewPager’e и SET’e

Хочется предупредить, что автор ‒ новичок андроид, поэтому статья содержит столько технических неточностей, что вас, скорее, нужно предупредить о том, что в статье могут встретиться технически достоверные утверждения.
Куда приводит бекенд
Всю жизнь я пилил бекенд. Начало 2019 года, за плечами уже один очень амбициозный, но недоделанный проект. Бесплодная поездка в Цюрих на собеседование в одну поисковую компанию. Зима, грязь, настроение никакое. Сил и желания тянуть проект дальше нету.
Хотелось навсегда забыть этот страшный бекенд. К счастью, судьба подкинула мне идею – это было мобильное приложение. Основной его фишкой должно было стать нестандартное использование камеры. Работа закипела. Прошло немного времени, и вот прототип готов. Релиз проекта близился и все было хорошо и стройно, пока я не решил сделать пользователю “удобно”.
ViewPager и Shared Element Transition. Ищем пути примирения
Часы изучения: десятки тем на форумах и вопросов на StackOverflow без ответа. Что бы я ни открывал, мне предлагали совершить transition из RecyclerView во ViewPager или “приложить подорожник Fragment.postponeEnterTransition() ”.
Народные средства не помогли, и я решил заняться примирением ViewPager и Shared Element Transition самостоятельно.
ViewPager: Первая кровь
Я начал размышлять: “Проблема появляется в тот момент, когда пользователь переходит с одной страницы на другую. ”. И тут меня осенило: “У тебя не будет проблем с SET во время смены страницы, если не менять страницы”.

Мы можем делать transition на одной и той же странице, а потом просто подменять в ViewPager текущую страницу на целевую.
Попробуем поменять фрагмент в текущей странице на что-то еще.
Запускаем приложение и… плавно переходим на пустой экран. В чем причина?
Оказывается, контейнером каждой из страниц является сам ViewPager , без всяких посредников вида Page1Container , Page2Container . Поэтому просто так поменять одну страницу на другую не получится, заменится весь pager .
Хорошо, чтобы изменять контент каждой страницы в отдельности, создаем несколько фрагментов-контейнеров для каждой страницы.
Что-то опять не заводится.
java.lang.IllegalStateException: Can’t change container ID of fragment BigPictureFragment<. >: was 2131165289 now 2131165290
Мы не можем прицепить фрагмент второй страницы ( BigPictureFragment ) к первой, потому что он уже прицеплен к контейнеру второй страницы.
Стиснув зубы добавляем еще фрагментов-дублеров.
Заработало! Код transition, который я когда-то скопировал с просторов GitHub, уже содержал анимации fade in и fade out. Поэтому перед transition все статические элементы с первого фрагмента исчезали, потом перемещались снимки, и только затем появлялись элементы второй страницы. Для пользователя это выглядит как настоящее перемещение между страницами.
Все анимации прошли, но есть одна проблема. Пользователь до сих пор на первой странице, а должен быть на второй.
Чтобы это исправить мы аккуратно подменяем видимую страницу ViewPager на вторую. А потом восстанавливаем содержимое первой страницы в начальное состояние.
Проект можно посмотреть на GitHub.
Подведем итоги. Код начал выглядеть гораздо солиднее: вместо 2 изначальных фрагментов у меня получилось аж 6, в нем появились инструкции, которые управляют спектаклем, подменяя фрагменты в нужное время. И это только в демо.
В настоящем же проекте в коде один за другим, начали появляться подпорки в самых неожиданных местах. Они не давали приложению развалиться, когда пользователь нажимал на кнопки с “неправильных” страниц или сдерживали фоновую работу дублирующих фрагментов.
Оказалось, что в андроиде нет коллбеков на завершение transition, а время его исполнения весьма произвольное и зависит от множества факторов (например, как быстро загрузится RecyclerView в результирующем фрагменте). Это приводило к тому, что подмена фрагментов в handler.postDelayed() часто исполнялась слишком рано или слишком поздно, что только усугубляло предыдущую проблему.
Последним гвоздем стало то, что во время анимации пользователь мог просто свайпнуть на другую страницу и наблюдать два экрана-близнеца, после чего приложение еще и одергивало его на нужный экран.
Такое положение дел меня не устроило и я, полный праведного гнева, начал поиски другого решения.
Как сделать Shared Element Transition в Viewpager правильно
Пробуем PageTransformer
В интернете ответов по-прежнему не было и я задумался: как же еще можно провернуть этот transition. Что-то на подкорке сознания шептало мне: “Используй PageTransformer , Люк”. Идея показалась мне многообещающей и я решил прислушаться.
Суть идеи в том, чтобы сделать PageTransformer , который, в отличии от Android SET, не будет требовать многократных повторений setTransitionName(transitionName) и FragmentTransaction.addSharedElement(sharedElement,name) с обеих сторон перехода. Будет перемещать элементы вслед за свайпом и иметь простой интерфейс вида:
Приступим к разработке. Данные из метода addSharedTransition(fromId, toId) я сохраню в Set из Pair и достану их в методе PageTransfomer
Внутри я пройду по всем сохраненным парам View , между которыми нужно сделать анимацию. И попытаюсь отфильтровать их, чтобы анимировались только видимые элементы.
Для начала проверим, успели ли создаться элементы, которые нужно анимировать. Мы не привередливые, и, если View не было создано до начала анимации, мы не будем ломать анимацию целиком (как Shared Element Transition), а подхватим ее, когда элемент будет создан.
Нахожу страницы, между которыми происходит перемещение (как я определяю номер страницы расскажу ниже).
Если обе страницы уже созданы, то я ищу на них пару View , которую нужно анимировать.
На данном этапе мы выбрали View, которые лежат на страницах, между которыми скролит пользователь.
Настало время завести много переменных. Вычисляю опорные точки:
В прошлом сниппете я задал slideToTheRight , и уже в этом он мне пригодится. От него зависит знак в translation , который определит полетит View на свое место или куда-то за пределы экрана.
Интересно, что формулы смещения по X и Y у обоих View , на стартовой и результирующей странице получились одинаковыми, несмотря на разные изначальные смещения.
Но с масштабом, к сожалению, такой трюк не пройдет – нужно учитывать является ли данное View начальной или конечной точкой анимации.
Для кого-то может стать неожиданностью, но transformPage(@NonNull View page, float position) вызывается много раз: для каждой кэшированной страницы (размер кэша настраивается). И, чтобы не перерисовывать анимированное View по несколько раз, на каждый вызов transformPage() , мы изменяем только те, которые находятся на текущей page .
Выбираем страницы для рисования анимации
ViewPager не спешит делиться сведениями между какими страницами идет скроллинг. Как я и обещал, сейчас расскажу как мы получаем эту информацию. В нашем PageTransformer мы реализуем еще один интерфейс ViewPager.OnPageChangeListener . Поизучав выход onPageScrolled() через System.out.println() я пришел к следующей формуле:
Вот и все. Мы сделали это! Анимация следит за жестами пользователя. Зачем выбирать между свайпами и Shared Element Transition, когда можно оставить все.
Во время написания статьи я добавил эффект исчезновения статичных элементов — он пока очень сырой, поэтому в библиотеку не добавлен.
Источник


