- Tek Eye
- Start with a Basic Hello World App
- Add Another Activity
- Add a Button to the First Screen
- Add Text to the Second Screen
- AndroidManifest.xml
- Add Code to Start Screen 2
- See Also
- Archived Comments
- Do you have a question or comment about this article?
- Запуск другой Activity — второго окна android-приложения
- В этом уроке
- Вы также должны прочитать
- Ответить на кнопку Отправить
- Создать Intent
- Отправка intent в другие приложения
- Запуск второй Activity
- Создание второй Activity
- Для создания новой Activity в Android Studio:
- Для создания новой Activity в Eclipse:
Tek Eye
If you are new to Android development it is often easier to see simple examples rather than decode the developers online documentation. Building on the simple example seen in Your First Android Java Program — Hello World! another screen containing a simple message is loaded from a button. This demonstrates the principles of starting a new User Interface (UI) screen, helping to understanding on how Android handles UI creation.
To get a screen up and running in an app the following is required:
- The definition of the screen must be composed in a layout.
- An Activity class must be defined in a Java class file to handle the screen.
- Android must be notified that the Activity exists, via the app’s manifest file.
- The app must tell Android to start the new screen.
Studio handles most of the plumbing when adding a new activity to an app, performing tasks 1 to 3 automatically when an Activity is created using Studio’s options. This leaves only a small amount of code to be written to load a second screen from the first app screen.
Start with a Basic Hello World App
Fire up Android Studio and open the Hello World project (see Your First Android Java Program — Hello World! on how to create the Hello World app).
Add Another Activity
In the Project explorer tree in the Studio select the app folder. (See the Android Project Structure article to become familiar with project files). Using the File menu or the context menu (commonly right-click) add a new Activity to the app via New and Activity. A Basic Activity can be used:
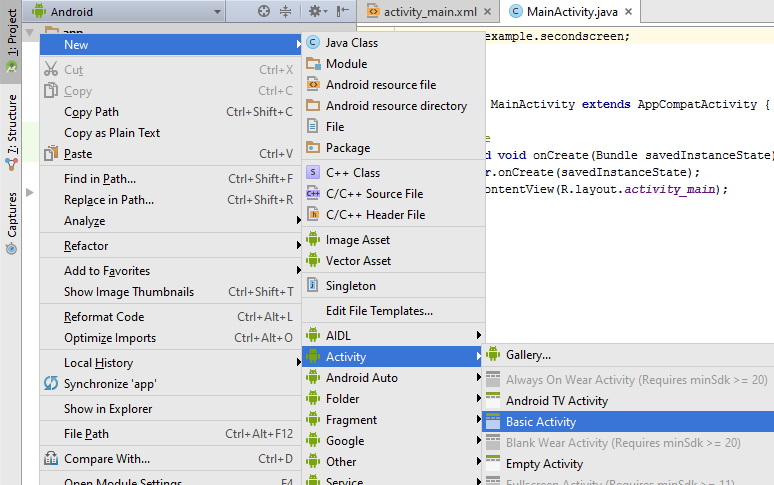
Set the properties for the new Activity, e.g.:
- Activity Name — Screen2
- Layout Name — secondscreen
- Title — Screen 2
Select the Parent to be the first Activity, com.example.helloworld.MainActivity (the parent is the screen the app returns to when the back button is pressed). All other settings remain as default (not a Launcher Activity, not a Fragment, Package set to com.example.helloworld, Target Source Set is main).
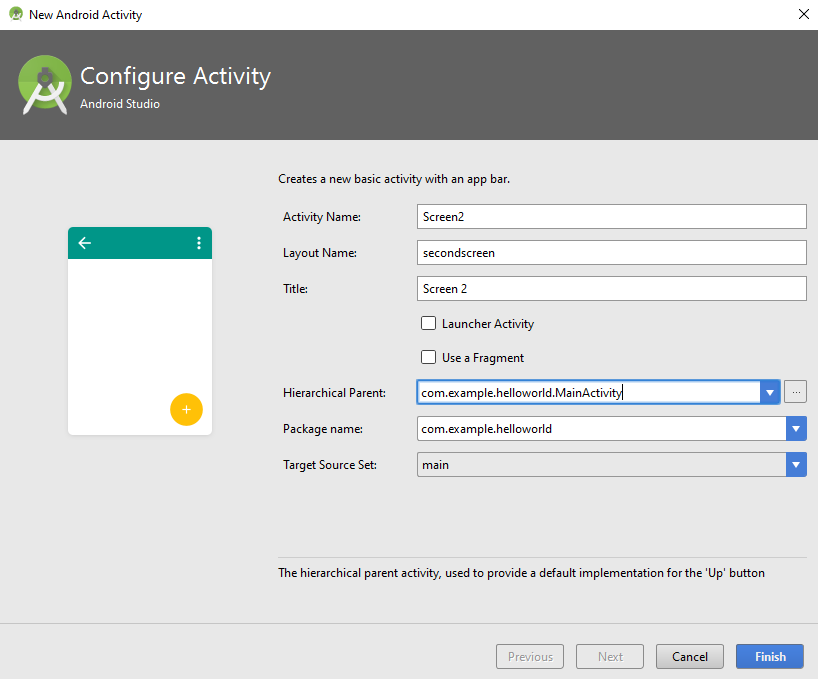
Click Finish and the Activity and associated layout is created. (If an error message is displayed on the new screen try the Invalidate Caches / Restart option on the File menu as discussed in the article Your First Android Java Program.)
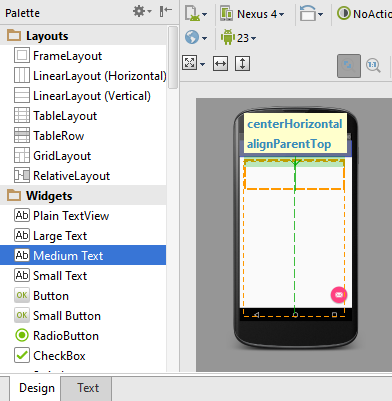
Add a Button to the First Screen
Add a Button to the first screen in the layout folder. (Tip: To find an item, e.g. layout, click the to level in the Project explorer and start typing the item’s name to start a search.) The file activity_main.xml contains the screen elements for the first screen. With the file open drag and drop a Button widget onto the screen:
Set the Button’s text to Next, use the right hand Component Tree tab to see the Properties.
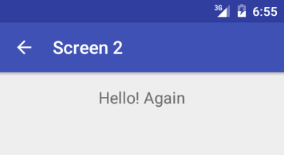
Add Text to the Second Screen
Open the content_screen2.xml file in the layout folder and drag and drop a TextView on to the screen:
As for the Button set the TextView text, e.g. to Hello! Again.
AndroidManifest.xml
When the Screen2 Activity was added to the app the correct definitions were added to the app’s manifest file, AndroidManifest.xml in app/src/main. This file must be present in an app project. It provides the Android Operating System (OS) all the information it needs to manage the application and the components it contains. If AndroidManifest.xml is opened it will be seen that both the initial screen, MainActivity and the new screen, Screen2 are defined in activity sections. The information in these sections tells Android about the screens in an app.
Add Code to Start Screen 2
The button on the first screen will tell Android of our «intention» to start the Activity that loads the new Screen 2. To do this the button runs an onClick method:
In onClick the name of the required activity, Screen2.class, is passed in an Intent object to the startActivity method. The startActivity method is available on a Context object; Context has a host of useful methods which provide access to the environment in which the app is executing. Context, and hence startActivity is always available within an Activity due to Android API subclassing.
The onClick method is connected to the button by an OnClickListener callback from a View . The following code is added to the MainActivity class, before the last closing brace (curly bracket, >) in the file MainActivity.java. Press Alt-Enter when prompted for the correct import statements to be added automatically:
The Intent object is also given a reference to the app Context, and since MainActivity is subclassed we can use this (here MainActivity.this because of the inner class for the onClick handler). The startActivity method gives Android the opportunity to perform any required housekeeping and then fire up the Activity named in the Intent (Screen2).
The findViewById method, available to activities, is used to get a reference to the button. The setOnClickListener method can then be called to link the button to the onClick code. This is done before the closing brace at the end of the onCreate method in MainActivity:
This is the full MainActivity code:
When the app runs the first screen will show:
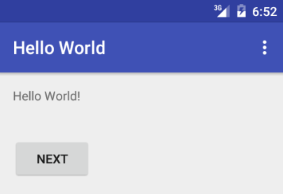
And pressing the Next button shows:
A button is not required to go back to the first screen. Android automatically provides a back button as part of the platform.
This article has shown the basics of starting another screen in an app. The code is available in a zip file, secondscreen.zip, with an instructions.txt on how to import the project into Studio. Later articles will show how data can be passed between screens.
See Also
Archived Comments
Arthur Lu in January 2018 said: For some reason, whenever I run my code, it is unable to open the second activity, and instead re-opens the main activity.
Arthur Lu in January 2018 said: OK, so it turns out I accidentally deleted some important code on the second activity.
Gili Alafia in January 2018 said: But that doesn’t answer the question of how to open the app from screen2 to mainactivity.
Dan from Tek Eye in January 2018 said: As it says in the article, use back (e.g. via the arrow on the action bar) to return to the first activity. If you want an explicit button just use the same type of code in the second screen that was used for the main activity:
Author: Daniel S. Fowler Published: 2012-01-09 Updated: 2016-01-28


Do you have a question or comment about this article?
(Alternatively, use the email address at the bottom of the web page.)
↓markdown↓ CMS is fast and simple. Build websites quickly and publish easily. For beginner to expert.
Free Android Projects and Samples:
Источник
Запуск другой Activity — второго окна android-приложения
В этом уроке
Вы также должны прочитать
После завершения предыдущего урока, у вас есть приложение, которое показывает активити (один экран) с текстовым полем и кнопкой. В этом уроке вы добавим код к MainActivity , который запустит новую активити , когда пользователь нажмет на кнопку Отправить..
Ответить на кнопку Отправить
Чтобы ответить на событие нажатия кнопки, откройте fragment_main.xml файла макета и добавьте android:onClick атрибут к элементу:
android:onClick значение атрибута, «sendMessage» , это имя метода в вашей активити , который система вызывает когда пользователь нажимает кнопку.
Откройте MainActivity класс (расположенный в каталоге проекта src/ ) и добавьте соответствующий метод:
Чтобы система смогла найти этот метод с именем, заданным в android:onClick , сигнатура должна быть именно такой, как вы видели. В частности, метод должен:
- Быть public
- Имейте void в качестве возвращаемого значения
- Иметь View в качестве единственного параметра (это будет View , на котором нажали)
Далее, вы заполните этот метод, чтобы прочитать содержимое текстового поля и доставить этот текст в другую активити .
Создать Intent
Intent это объект, который обеспечивает связывание отдельных компонент во время выполнения (например, двух активити ). Intent представляет «намерение что-то сделать». Вы можете использовать интент для широкого круга задач, но чаще всего они используются, чтобы начать другую активити .
Внутри sendMessage() метода, создайте Intent для запуска активити под названием DisplayMessageActivity :
Для этого требуется импортировать Intent класс:
Полезный совет: В Eclipse, нажмите Ctrl + Shift + O для импортирования недостающих классов (Cmd + Shift + O на Mac). В Android Studio команда для импорта Alt+Enter.
Конструктор, используемый здесь принимает два параметра:
- Context в качестве первого параметра( this используется, поскольку Activity класс является подклассом Context )
- Class компонента приложения, в который система должна доставить Intent (в данном случае активность, которая должна быть запущена)
Отправка intent в другие приложения
Intent, созданный в этом уроке считается явным, поскольку Intent указывает точный компонент приложения, в которое интент следует отправить. Тем не менее, интенты также могут быть неявными, в этом случае Intent не указывает нужный компонент, позволяя любой программе установленной на устройстве отвечать на интенты, пока она удовлетворяет спецификациям мета-данных действия, задаваемыми в различных Intent параметрах. Для получения дополнительной информации читайте курс Взаимодействие с другими приложениями.
Примечание: Ссылка на DisplayMessageActivity вызовет ошибку, если вы используете интегрированную среду разработки, такую как Eclipse например, потому что класс еще не существует. Игнорируйте ошибку на данный момент; вы скоро создадите класс.
Intent не только позволяет начать другую Activity, но также может выполнять связь данных в Activity. В sendMessage() методе, используйте findViewById() для получения EditText элемента и добавьте его текстовое значение в Intent:
Примечание: Вам необходим оператор импорта для android.widget.EditText . Вы определите EXTRA_MESSAGE константу буквально сейчас.
Intent может нести коллекцию различных типов данных в виде пары ключ-значение, называемых Extras. Метод putExtra() принимает имя ключа в первом параметре и значение во втором параметре.
Для того, чтобы Activity смогла запросить дополнительные данные, вы должны определить ключ для дополнений вашего интента, используя общедоступную константу. Так что добавьте EXTRA_MESSAGE определение в начало MainActivity класса:
Вообще это хорошая практика, определять ключи для Intent Extras используя имя пакета вашего приложения в качестве префикса. Это гарантирует, что они уникальны, в случае когда ваше приложение взаимодействует с другими приложениями.
Запуск второй Activity
Для запуска активити, вызовите startActivity() и передайте в него ваш Intent . Система получает этот вызов и запускает экземпляр Activity указанный в Intent .
С помощью этого нового кода, полный sendMessage() метод, который вызывается кнопкой Отправить теперь выглядит следующим образом:
Теперь вам нужно создать DisplayMessageActivity класс для того, чтобы это работало.
Создание второй Activity
Для создания новой Activity в Android Studio:
В главном меню выберите File>New>Activity>Blank Activity.
Заполните поля в окне мастера создания активити:
- Activity Name: DisplayMessageActivity
- Layout Name: activity_display_message
- Title: Моё сообщение
- Hierarchial Parent: com.example.myfirstapp.MainActivity
Остальные поля оставьте по умолчанию. Нажмите Finish.
Для создания новой Activity в Eclipse:
- Нажмите New
 на панели инструментов.
 - В появившемся окне, откройте Android папку и выберите Android Activity. Нажмите Next.
- Выберите BlankActivity и нажмите Next.
- Заполните информацию о Activity:
- Project: MyFirstApp
- Activity Name: DisplayMessageActivity
- Layout Name: activity_display_message
- Fragment Layout Name: fragment_display_message
- Title: Моё сообщение
- Hierarchial Parent: com.example.myfirstapp.MainActivity
- Navigation Type: None
Нажмите Finish.
 на панели инструментов.
Рисунок 1. Мастер новой активити в Eclipse.
Если вы используете инструменты командной строки, создайте новый файл с именем DisplayMessageActivity.java в проекте в src/ каталоге, рядом с оригиналом MainActivity.java файлом.
Откройте DisplayMessageActivity.java файл. Если вы использовали Android Studio или Eclipse для создания этой Activity:
- Класс уже включает в себя реализацию требуемого onCreate() метода. Вы обновите реализацию этого метода позже.
- Есть также реализация onCreateOptionsMenu() метода, но вам это не будет нужно в данном приложении, так что вы можете удалить его.
- Есть также реализация onOptionsItemSelected() , который обрабатывает поведение панели действий для кнопки Вверх . Оставьте его как есть.
- Может быть также PlaceholderFragment класс, который расширяет Fragment . Вам не нужен будет этот класс в окончательном варианте этой активити .
Фрагменты разбивают функциональность приложений и пользовательский интерфейс на модули, которые можно будет повторно использовать. Для более подробной информации о фрагментах см.Руководство по Фрагментам. Окончательный вариант этой активити не использует фрагменты.
Примечание: Ваша активити может выглядеть иначе, если вы не использовали последнюю версию ADT плагина. Убедитесь, что вы установили последнюю версию ADT плагина для завершения этого курса.
DisplayMessageActivity класс должен выглядеть следующим образом:
Источник


