- How to Receive and Handle SMS on Android
- Making an app the default SMS handler
- Developing the Android app manifest file
- Editing the ViewModel
- Encrypting and decrypting SMS messages
- Handling received SMS messages
- Reading and decrypting SMS messages
- Conclusion
- Отправка и получение SMS сообщений в Android
- Отправка SMS сообщений в Android
- Получение SMS сообщений в Android
- Заключение
How to Receive and Handle SMS on Android
Despite the popularity of social media networks and messengers, texting is still the most common way to communicate via smartphones. According to the 2020 State of Texting report by Zipwhip, 77% of people use their texting app more frequently than other messengers.
But default SMS applications aren’t always comfortable for receiving SMS on Android, so users start looking for third-party apps. Additionally, non-messenger Android applications may still need SMS handling functionality (for example to confirm SMS authentication codes). In this article, we share our experience in developing SMS (and other service) handlers. In particular, we describe how to:
- Make your application the default SMS handler
- Develop an Android SMS receiver
- Encrypt and decrypt SMS messages
- Add texts to the SMS table in a device database
This text will be useful for developers who need to add SMS handling functionality to their app or create a new SMS messaging app.

Device Programming Team
Contents:
Making an app the default SMS handler
It’s important to make your application the default for handling SMS messages because only such app can record data to the SMS database. Your app should request permission to become the default SMS app before requesting any other permissions. This is also a requirement of the Google Play Store: if an app requests SMS, MMS, or CALL LOG permissions and isn’t a default SMS or Contact app, it will be rejected by Google.
In order to become the default messaging app, your app needs to:
- Register a receiver to handle incoming SMS messages
- Register a receiver to handle incoming MMS messages
- Create an activity that allows users to send new SMS or MMS messages in the Android application
- Create a service that sends out quick response messages
In our example, we’ll focus on how to receive SMS and send new SMS and MMS messages on Android. All of this functionality must be implemented in order to make our app the default handler.
We can use this code to ask a user to make our app the default for receiving SMS messages on Android:
In the code above, REQUEST_DEFAULT_APP is the request code to store the user’s choice. If the user allows the app to be the default, implementing this choice looks as follows:
Now we can proceed to the app manifest file and app permissions.
Developing the Android app manifest file
The app manifest file is a very important part of an Android application. It contains information on the app’s:
- Package name
- Components (activities, content providers, services, broadcast receivers)
- Required permissions
- Required software and hardware features
Let’s focus on the permissions for our application.
In Android 6, Google introduced runtime permissions. They protect the privacy of user data, tell users what information will be used by the app, and make sure users understand what an app can do with their data.
The runtime permissions system defines two permission levels:
- Normal — Permissions to access data or resources that pose little to no risk to the user’s personal information (e.g. device time zone). These permissions don’t require the user’s approval.
Dangerous — Permissions to handle a user’s sensitive data (e.g. texts, messages, photos, notes, etc.). These require the user’s approval.

When an application requests permission, a system dialog appears. It contains a list of the permissions the app requires and Allow and Deny buttons.
If the user denies a permission, when the app requests it the next time, the dialog box will contain a Do not ask me again checkbox.
When developing an app, you should take into account the scenario when a user denies permissions. All logic that relies on the denied permissions should not cause the app to fail.
In our example, the app’s manifest file declares permissions to read, send, and get all SMS in Android programmatically, as well as receive MMS messages, and receive push notifications:
After the declaration, the app should get the following permissions:
And handle the result of its requests in this way:
All of these permissions are in the same group, so they’re granted all together. If you request permissions from different permission groups, you’ll need to check the grantedResults array so you don’t miss any denied permissions.
To simplify the process of acquiring permissions, you can use a library like Quick Permissions.
Now it’s time to start a standard activity. In our example, this is part of an application that decrypts an SMS and shows it to the user. But in a real messaging app, there should also be an activity that provides functionality to create and send new SMS and MMS messages.
The part of our Manifest.xml file that describes our main activity looks like this:
Now we need to create an SMS receiver:
We also need to create an MMS receiver:
Finally, we should add a service that allows the user to respond to texts:
By this stage, our app can receive, display, and respond to texts. Let’s take a look at its ViewModel file.
Editing the ViewModel
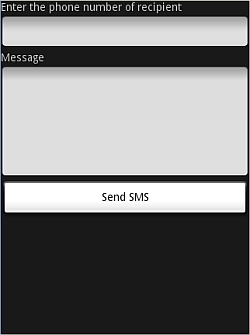
At this stage, our project contains only one Extensible Markup Language (XML) layout. There’s one button and one list. The button is used for getting SMS messages from the system inbox; the list is used for showing messages.
Here’s the XML layout code:
And here’s a screenshot of our simple user interface:

As you can see, this XML doesn’t contain any listeners. We’ll add them later. Next, we need to introduce encryption and decryption algorithms.
Encrypting and decrypting SMS messages
All texts that our app receives will be encrypted. To handle them, we need to add a class that provides encryption and decryption.
In our application, encryption is done by executing the fun encrypt(data: String): String function. It encrypts a string with a key generated using the Password-Based Key Derivation Function (PBKDF2) algorithm. The returned value is an encrypted Base64 string.
Here’s what happens when we execute this function:
After that, we need to decrypt the SMS. To do that, we use the fun decrypt(encryptedData: String): String function. It decrypts the Base64 string with a PBKDF2 algorithm.
The decryption process looks like this:
To encrypt and decrypt the given ByteArray, we can use the fun cryptoOperation(cipherMode: Int, data: ByteArray): ByteArray function. We can execute it using the following code:
Encryption algorithms such as AES, Rivest–Shamir–Adleman, MD5, etc. require a secret key in the form of a ByteArray. We can generate a secret key that uses salt with the fun generateKey(): ByteArray function. Here’s an example of how to generate a key:
After executing these functions, our app can encrypt and decrypt texts. Now we can add an SMS handler.
Handling received SMS messages
The main class that receives SMS messages is SmsReceiver. It extends the BroadcastReceiver class. Any child class of BroadcastReceiver must contain the onReceive method, which receives Context and Intent parameters.
The BroadcastReceiver class is well-described in the official documentation, which is why we won’t focus on its properties.
When we get an event upon receiving a text, we need to go to the onReceive method. First, let’s confirm that all of the received content is valid:
The next step is to check that we’ve received the SMS data by checking the action value:
Now we’re ready to receive the SMS content with the val smsMessages = Telephony.Sms.Intents.getMessagesFromIntent(intent) method. It will provide us an array of smsMessages. Here’s an example:
When the SMS list gets into Intent, then the SMS should be parsed. For this purpose, we call the getMessagesFromIntent method from the Telephony.Sms.Intents class.
Then SmsReceiver gets the SMS and can do anything with it. In our example, SMS messages are encrypted and recorded in the SMS table of the device database. We need to do this to allow the default Android SMS viewer to view encrypted SMS messages.
When our app receives an SMS, it’s displayed using the Toast class.
Reading and decrypting SMS messages
After we’ve created encryption procedures, it’s time to add functionality for reading and decrypting SMS messages. Let’s list the click listener for the button on the main screen. All texts from the inbox are read, and then the sender information and SMS text are put into the list using this code:
The SMS is obtained from the list, decrypted, and then displayed to the user. The item listener list is as follows:
After that, our application is ready to handle SMS messages!
Conclusion
An application for handling text messages is must on any device. Lots of users aren’t satisfied with their default SMS app and are looking for a more comfortable solution. But there are several tricks to making an SMS app in Android Studio. It has to:
- be the default application for SMS messages
- ask for all necessary permissions (and not crash it a user denies them)
- receive, display, and allow the user to respond to texts
- be secure
- add received texts to the device’s SMS database
In this article, we’ve shown you how to build an Android app with this functionality. Creating such applications is only the tip of the iceberg in terms of our experience in mobile app development. If you have a complex Android-related project, challenge us with it!
Источник
Отправка и получение SMS сообщений в Android
 Как это ни удивительно, SMS сообщений сегодня остаются одним из самых востребованных сервисов, что вполне объясняет интерес, проявляемый Android разработчики к этой тема. Из данного урока Вы узнаете, как программно отправлять и получать SMS сообщения. Будет показано, как провести тестирование приложения на эмуляторе.
Отправка SMS сообщений в Android
Создайте в Eclipse новый проект со следующими параметрами:
- Project Name: SMSMessaging
- Package name: net.learn2develop.SMSMessaging
- Activity Name: SMS
- Application Name: SMS App
Для того, чтобы наше прилоение могло работать с SMS, ему необходимо дать соответствующие разрешения: SEND_SMS для отправки и RECEIVE_SMS — для получения. Откройте файл AndroidManifest.xml и приведите его к виду:
Настроим шаблон дизайна приложения. Откройте файл res/layout/main.xml и приведите его к виду
В результате у Вас должен получиться следующий шаблон:
Перейдем к редактированию кода. В SMS activity напишем обработчик нажатия на кнопку. После щелчка мы должны проверить введен ли номер телефона и текстовое сообщение. Если все в порядке, мы вызываем функцию sendSMS(), которая отправляет сообщение.
Напишем реализацию функции sendSMS()
Для отправки SMS сообщения в Android используется класс SmsManager. в отличии от друих классов, мы не можем получить экземпляр SmsManager напрямую. Для решения этой задачи необходимо вызвать статический метод getDefault(), который возвращает требуемый объект класса SmsManager. Метод sendTextMessage() отправляет sms сообщение с помощью PendingIntent. Объект PendingIntent используется для определения activity, которая будет вызвана после отправки сообщения. В приведенном выше коде объект pi ссылается на ту же activity из которой он вызывается, то есть после отправки SMS сообщения activity не поменяется.
Если Вы хотите отслеживать состояние процесса отправки сообщения, вам понадобится два объекта PendingIntent и два объекта BroadcastReceiver
В приведенном выше листинге объект sentPI используется для отслеживания процесса отправки. Когда SMS сообщение отправлено, генерируется первое событие onReceive для BroadcastReceiver. Именно здесь можно проверить статус процесса отправки. Объект PendingIntent (deliveredPI) используется для мониторинга доставки. Когда сообщение успешно доставлено, генерируется еще одно событие onReceive для BroadcastReceiver.
Теперь можно провести тесстирование приложения. При отладке на компьютере можно посылать сообщения от одного эмулятора другому. Для этого просто запустите два эмулятора (в папке android SDK зайдите в каталог Tools Emulator.exe). В качестве номера, куда вы отправляете SMS, нужно указать номер порта эмулятора. Его можно увидеть в загаловке окна эмулятора в круглых скобках. На рисунке показан пример отправки сообщения с эмултора 5554 на эмулятор 5556.
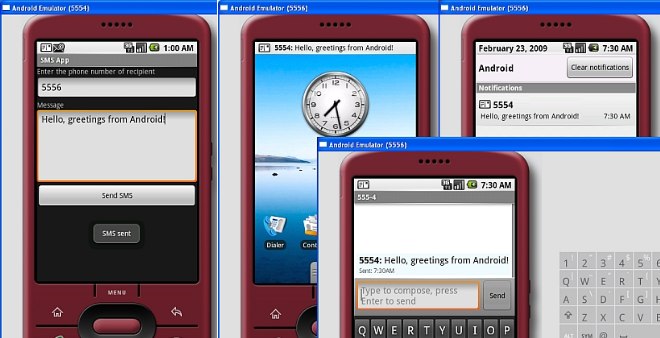
После успешной отправки SMS пользователю будет показано сообщение «SMS sent». После того, как сообщение будет принято на другом устройстве, пользователь увидит «SMS delivered». К сожалению, в случае тестирования на эмуляторе Вы не увидите этого сообщения. Возможность проверять успешность доставки доступна только на реальных устройствах.
Если Вы не хотите разбираться в тонкостях отправки SMS сообщений, то можете воспользоваться встроенным в Android стандартным приложением, дав ему задание через интент.
Получение SMS сообщений в Android
Помимо отправки SMS вы также можете организовать перехват входящих SMS сообщений. Делается это с помощью все того же объекта BroadcastReceiver.
Чтобы Ваше приложение могло перехватывать SMS-ки, нужно в файле AndroidManifest.xml добавить элемент . В приведенном ниже примере для получения сообщений будет использоваться класс SmsReceiver.
Теперь нужно добавить в проект новый класс SmsReceiver.java, который является наследником BroadcastReceiver. Внутри SmsReceiver нужно написать собственную реализацию метода onReceive()
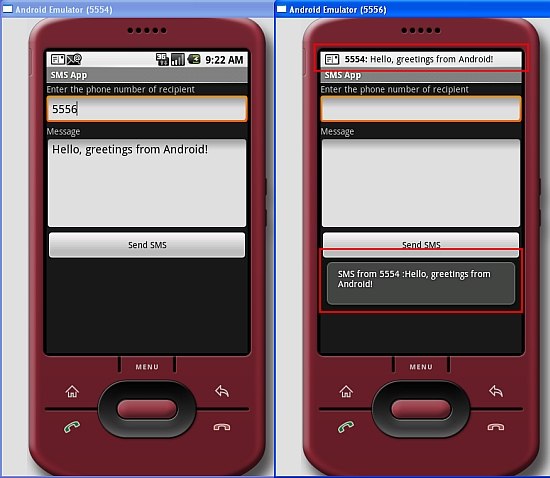
При получении SMS сообщения вызывается метод onReceive. SMS сообщение упаковывается и присоединяется к объекту intent (второй параметр метода onReceive). SMS сохраняется в массиве Object в PDU формате. Чтобы распаковать SMS сообщение нужно воспользоваться методом createFromPdu() класса SmsMessage. После этого можно отобразить сообщения с помощью класса Toast
Вот, собственно, и все! Можете запускать эмуляторы и тестировать приложение. На приведенном ниже рисунке с помощью класса Toast показано полученное сообщение.
Заключение
В этой небольшой статье было показано, как можно отправлять и получать SMS сообщения в Android. Это очень интересная и нужная возможность. Например, вы можете написать приложение, которое будет отслеживать положение телефона. Вы можете отправлять зашифрованные SMS сообщения этому приложению, и оно будет отправлять вам ответ с координатами аппарата.
Исходный код примера можно скачатьздесь.
Источник


