- Что может вызвать ошибку socket () «Permission denied»?
- Обновить
- Обновление 2
- Ошибка открытия Android 6.0: EACCES (разрешение отказано)
- 8 ответов
- Request app permissions
- Basic principles
- Workflow for requesting permissions
- Determine whether your app was already granted the permission
- Explain why your app needs the permission
- Request permissions
- Allow the system to manage the permission request code
- Kotlin
- Kotlin
- Manage the permission request code yourself
- Kotlin
- Kotlin
- Handle permission denial
- One-time permissions
- Android auto-resets permissions of unused apps
- Request to become the default handler if necessary
- Grant all runtime permissions for testing purposes
- Additional resources
Что может вызвать ошибку socket () «Permission denied»?
В Android 4 следующая простая C-строка кода C с ошибкой Permission denied не запускается с root :
У меня есть root доступ к устройству, но вы хотите запустить этот процесс как непривилегированный пользователь.
Обратите внимание, что ошибка происходит даже до привязки сокета.
Я думаю, есть некоторые настройки безопасности, которые нужно настроить? Кто-нибудь может сказать мне, где искать?
В этом случае O / S действительно Android, но я думаю, что проблема действительно связана с Linux (поскольку Android основан на ядре Linux).
Для тех, кто задается вопросом: это debootstrap программа, которая работает в полной debootstrap ( debootstrap ped) Debian Jessie, работающей в среде Android 4.
Обновить
Я узнал, что в ядре Android имеется специальное расширение CONFIG_ANDROID_PARANOID_NETWORK которое обеспечивает доступ к сети только пользователям в AID_INET и AID_NET_RAW .
Однако даже после добавления пользователя в эти группы socket() все еще отклоняется (и ping похоже, имеет ту же проблему, BTW).
Я не могу сказать, установлен ли этот флаг CONFIG_ANDROID_PARANOID_NETWORK в этом конкретном ядре, поскольку у меня нет доступа к конфигурационному файлу.
Обновление 2
Я узнал, что как root и мой непривилегированный пользовательский imp могут фактически успешно вызвать socket() – по крайней мере, с настройками групп, описанными выше.
Тем не менее, вызывая тот же процесс, что и root а затем переключается на imp с помощью системного вызова seteuid() мешает socket() преуспеть. Есть идеи?
Как оказалось, Android использует специальный патч Kernel, который активирован с помощью CONFIG_ANDROID_PARANOID_NETWORK . Этот патч позволяет сетевому доступу к пользователям системы, принадлежащим определенным специальным группам с жестко запрограммированными идентификаторами.
Это связано с тем, что Android обычно добавляет пользователей (т.е. приложений) к этим группам только тогда, когда конкретное приложение имеет сетевые разрешения.
Добавление пользователя в эти группы дает ему разрешение на использование socket() как описано в вопросе:
Однако , когда процесс использует seteuid() для переключения с root на непривилегированного пользователя (например, someuser ), то этого недостаточно (или, вероятно, не имеет значения ), что этот эффективный пользователь имеет aid_* группе aid_* . Вместо этого пользователь root должен явно быть членом этих групп:
Это решило проблему для меня.
Обратите внимание, что я также пытался играть с setegid() и аналогичным, как альтернатива, но ничто из этого не помогло …
Источник
Ошибка открытия Android 6.0: EACCES (разрешение отказано)
я добавил uses-permission в том числе WRITE_EXTERNAL_STORAGE , MOUNT_UNMOUNT_FILESYSTEMS , READ_EXTERNAL_STORAGE до AndroidManifest.xml .
когда я попытался запустить свое приложение в Nexus5 (Android 6.0), он выбросил исключение, как показано ниже:
java.io.IOException: open failed: EACCES (Permission denied)
и я попробовал другой телефон Android (Android 5.1),все было в порядке.Вот код:
имеет ли Android 6.0 разницу в разрешении?
8 ответов
Android добавлена новая модель разрешений для Android 6.0 (Зефир).
поэтому вы должны проверить Runtime Permission :
Что Такое Разрешения Времени Выполнения?
С Android 6.0 Marshmallow Google представила новую модель разрешений, которая позволяет пользователям лучше понять, почему приложение может запрашивать определенные разрешения. Вместо того чтобы слепо принимать все разрешения во время установки, пользователю теперь предлагается принимать разрешения по мере необходимости во время использования приложения.
когда реализовать новую модель?
он не требует полной поддержки, пока вы не выберете целевую версию 23 в своем приложении. Если вы нацелены на версию 22 или ниже, ваше приложение запросит все разрешения при установке время так же, как и на любом устройстве под управлением ОС ниже алтея.
информация взята отсюда :
пожалуйста, проверьте, как реализовать по этой ссылке :
на Android 6 (Зефир), даже если пользователь принял все ваши разрешения во время установки, они могут позже решить забрать некоторые из этих разрешений у вас.
быстрое решение, но не рекомендуется: возможно, если вы измените свой targetSdkVersion в gradle to 22 , проблема будет решена.
Как Реализовать?(Лучшие Практики)
сначала определите, является ли устройство пользователя зефир или нет:
если shouldAskPermission() возвращение true , спросите разрешения вам нужно:
метод requestPermissions(String[] permissions, int requestCode); является общедоступным методом, найденным внутри класса Android Activity.
вы получите результаты вашего запроса в методе onRequestPermissionResult, как показано ниже:
после получать результаты, вам будет нужно обращайтесь с ними соответствующим образом.
Предлагаемые Разрешения Потока:

Подробнее:
пользователь с устройством Marshmallow теперь будет иметь возможность отозвать опасные разрешения через настройки приложения
Android определяет некоторые права, как «опасно» и некоторые права, как «нормальный.»Оба необходимы в вашем манифест приложения, но только опасные разрешения требуют запроса среды выполнения.
если вы решили не реализовывать новую модель разрешений (запрос времени выполнения), отзыв разрешений может привести к нежелательному опыту пользователя и в некоторых случаях сбоям приложения.
в таблице ниже перечислены все текущие опасные разрешения и их соответствующие группы:
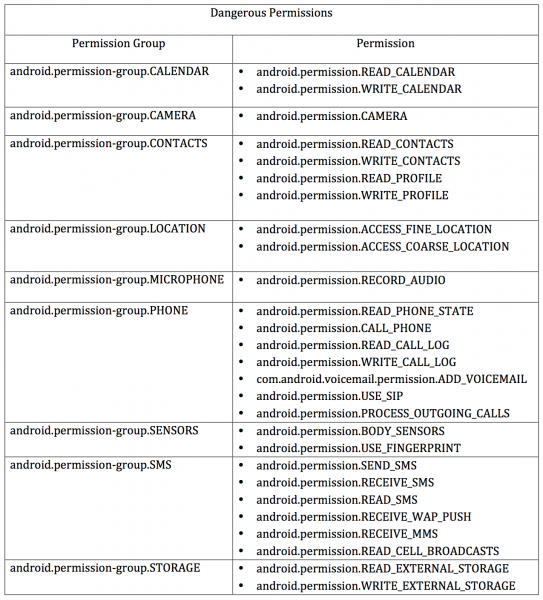
если пользователь принимает одно разрешение в группа / категория они принимают всю группу!
Использование Библиотеки Декстера:
можно использовать Декстер. Библиотека Android, которая упрощает процесс запроса разрешений во время выполнения.
Источник
Request app permissions
Every Android app runs in a limited-access sandbox. If your app needs to use resources or information outside of its own sandbox, you can declare a permission and set up a permission request that provides this access. These steps are part of the workflow for using permissions.
If you declare any dangerous permissions, and if your app is installed on a device that runs Android 6.0 (API level 23) or higher, you must request the dangerous permissions at runtime by following the steps in this guide.
If you don’t declare any dangerous permissions, or if your app is installed on a device that runs Android 5.1 (API level 22) or lower, the permissions are automatically granted, and you don’t need to complete any of the remaining steps on this page.
Basic principles
The basic principles for requesting permissions at runtime are as follows:
- Ask for permissions in context, when the user starts to interact with the feature that requires it.
- Don’t block the user. Always provide the option to cancel an educational UI flow related to permissions.
- If the user denies or revokes a permission that a feature needs, gracefully degrade your app so that the user can continue using your app, possibly by disabling the feature that requires the permission.
- Don’t assume any system behavior. For example, don’t assume that permissions appear in the same permission group. A permission group merely helps the system minimize the number of system dialogs that are presented to the user when an app requests closely-related permissions.
Workflow for requesting permissions
Before you declare and request runtime permissions in your app, evaluate whether your app needs to do so. You can fulfill many use cases in your app, such as taking photos, pausing media playback, and displaying relevant ads, without needing to declare any permissions.
If you conclude that your app needs to declare and request runtime permissions, complete these steps:
- In your app’s manifest file, declare the permissions that your app might need to request.
- Design your app’s UX so that specific actions in your app are associated with specific runtime permissions. Users should know which actions might require them to grant permission for your app to access private user data.
- Wait for the user to invoke the task or action in your app that requires access to specific private user data. At that time, your app can request the runtime permission that’s required for accessing that data.
Check whether the user has already granted the runtime permission that your app requires. If so, your app can access the private user data. If not, continue to the next step.
You must check whether you have that permission every time you perform an operation that requires that permission.
Check whether your app should show a rationale to the user, explaining why your app needs the user to grant a particular runtime permission. If the system determines that your app shouldn’t show a rationale, continue to the next step directly, without showing a UI element.
If the system determines that your app should show a rationale, however, present the rationale to the user in a UI element. This rationale should clearly explain what data your app is trying to access, and what benefits the app can provide to the user if they grant the runtime permission. After the user acknowledges the rationale, continue to the next step.
Request the runtime permission that your app requires in order to access the private user data. The system displays a runtime permission prompt, such as the one shown on the permissions overview page.
Check the user’s response, whether they chose to grant or deny the runtime permission.
If the user granted the permission to your app, you can access the private user data. If the user denied the permission instead, gracefully degrade your app experience so that it provides functionality to the user, even without the information that’s protected by that permission.
Figure 1 illustrates the workflow and set of decisions associated with this process:
 Figure 1. Diagram that shows the workflow for declaring and requesting runtime permissions on Android.
Determine whether your app was already granted the permission
To check if the user has already granted your app a particular permission, pass that permission into the ContextCompat.checkSelfPermission() method. This method returns either PERMISSION_GRANTED or PERMISSION_DENIED , depending on whether your app has the permission.
Explain why your app needs the permission
If the ContextCompat.checkSelfPermission() method returns PERMISSION_DENIED , call shouldShowRequestPermissionRationale() . If this method returns true , show an educational UI to the user. In this UI, describe why the feature, which the user wants to enable, needs a particular permission.
Additionally, if your app requests a permission related to location, microphone, or camera, consider explaining why your app needs access to this information.
Request permissions
After the user views an educational UI, or the return value of shouldShowRequestPermissionRationale() indicates that you don’t need to show an educational UI this time, request the permission. Users see a system permission dialog, where they can choose whether to grant a particular permission to your app.
Traditionally, you manage a request code yourself as part of the permission request and include this request code in your permission callback logic. Another option is to use the RequestPermission contract, included in an AndroidX library, where you allow the system to manage the permission request code for you. Because using the RequestPermission contract simplifies your logic, it’s recommended that you use it when possible.
Allow the system to manage the permission request code
To allow the system to manage the request code that’s associated with a permissions request, add dependencies on the following libraries in your module’s build.gradle file:
You can then use one of the following classes:
- To request a single permission, use RequestPermission .
- To request multiple permissions at the same time, use RequestMultiplePermissions .
The following steps show how to use the RequestPermission contract. The process is nearly the same for the RequestMultiplePermissions contract.
In your activity or fragment’s initialization logic, pass in an implementation of ActivityResultCallback into a call to registerForActivityResult() . The ActivityResultCallback defines how your app handles the user’s response to the permission request.
Keep a reference to the return value of registerForActivityResult() , which is of type ActivityResultLauncher .
To display the system permissions dialog when necessary, call the launch() method on the instance of ActivityResultLauncher that you saved in the previous step.
After launch() is called, the system permissions dialog appears. When the user makes a choice, the system asynchronously invokes your implementation of ActivityResultCallback , which you defined in the previous step.
Note: Your app cannot customize the dialog that appears when you call launch() . To provide more information or context to the user, change your app’s UI so that it’s easier for users to understand why a feature in your app needs a particular permission. For example, you might change the text in the button that enables the feature.
Also, the text in the system permission dialog references the permission group associated with the permission that you requested. This permission grouping is designed for system ease-of-use, and your app shouldn’t rely on permissions being within or outside of a specific permission group.
The following code snippet shows how to handle the permissions response:
Kotlin
And this code snippet demonstrates the recommended process of checking for a permission, and requesting a permission from the user when necessary:
Kotlin
Manage the permission request code yourself
As an alternative to allowing the system to manage the permission request code, you can manage the permission request code yourself. To do so, include the request code in a call to requestPermissions() .
Note: Your app cannot customize the dialog that appears when you call requestPermissions() . The text in the system permission dialog references a permission group, but this permission grouping is designed for system ease-of-use. Your app shouldn’t rely on permissions being within or outside of a specific permission group.
The following code snippet demonstrates how to request a permission using a request code:
Kotlin
After the user responds to the system permissions dialog, the system then invokes your app’s implementation of onRequestPermissionsResult() . The system passes in the user response to the permission dialog, as well as the request code that you defined, as shown in the following code snippet:
Kotlin
Handle permission denial
If the user denies a permission request, your app should help users understand the implications of denying the permission. In particular, your app should make users aware of the features that don’t work because of the missing permission. When you do so, keep the following best practices in mind:
Guide the user’s attention. Highlight a specific part of your app’s UI where there’s limited functionality because your app doesn’t have the necessary permission. Several examples of what you could do include the following:
- Show a message where the feature’s results or data would have appeared.
- Display a different button that contains an error icon and color.
Be specific. Don’t display a generic message; instead, mention which features are unavailable because your app doesn’t have the necessary permission.
Don’t block the user interface. In other words, don’t display a full-screen warning message that prevents users from continuing to use your app at all.
At the same time, your app should respect the user’s decision to deny a permission. Starting in Android 11 (API level 30), if the user taps Deny for a specific permission more than once during your app’s lifetime of installation on a device, the user doesn’t see the system permissions dialog if your app requests that permission again. The user’s action implies «don’t ask again.» On previous versions, users would see the system permissions dialog each time your app requested a permission, unless the user had previously selected a «don’t ask again» checkbox or option.
In certain situations, the permission might be denied automatically, without the user taking any action. (Similarly, a permission might be granted automatically as well.) It’s important to not assume anything about automatic behavior. Each time your app needs to access functionality that requires a permission, you should check that your app is still granted that permission.
To provide the best user experience when asking for app permissions, also see App permissions best practices.
One-time permissions
Starting in Android 11 (API level 30), whenever your app requests a permission related to location, microphone, or camera, the user-facing permissions dialog contains an option called Only this time, as shown in Figure 2. If the user selects this option in the dialog, your app is granted a temporary one-time permission.
Your app can then access the related data for a period of time that depends on your app’s behavior and the user’s actions:
- While your app’s activity is visible, your app can access the data.
- If the user sends your app to the background, your app can continue to access the data for a short period of time.
- If you launch a foreground service while the activity is visible, and the user then moves your app to the background, your app can continue to access the data until that foreground service stops.
- If the user revokes the one-time permission, such as in system settings, your app cannot access the data, regardless of whether you launched a foreground service. As with any permission, if the user revokes your app’s one-time permission, your app’s process terminates.
When the user next opens your app and a feature in your app requests access to location, microphone, or camera, the user is prompted for the permission again.
Android auto-resets permissions of unused apps
If your app targets Android 11 (API level 30) or higher and isn’t used for a few months, the system protects user data by automatically resetting the sensitive runtime permissions that the user had granted your app. Learn more in the guide about app hibernation.
Request to become the default handler if necessary
Some apps depend on access to sensitive user information related to call logs and SMS messages. If you want to request the permissions specific to call logs and SMS messages and publish your app to the Play Store, you must prompt the user to set your app as the default handler for a core system function before requesting these runtime permissions.
For more information on default handlers, including guidance on showing a default handler prompt to users, see the guide on permissions used only in default handlers.
Grant all runtime permissions for testing purposes
To grant all runtime permissions automatically when you install an app on an emulator or test device, use the -g option for the adb shell install command, as demonstrated in the following code snippet:
Additional resources
For additional information about permissions, read these articles:
To learn more about requesting permissions, download the following sample apps:
- Android RuntimePermissionsBasic Sample Java | Kotlin
Content and code samples on this page are subject to the licenses described in the Content License. Java is a registered trademark of Oracle and/or its affiliates.
Источник


