- Настройка Spinner
- Создаём собственный стиль для Spinner
- res/drawable/btn_dropdown.xml
- res/values/themes.xml
- Лапа вместо треугольника
- Android: Spinner customizations
- Custom Spinner
- Adjusting the Spinner widget
- Adapter
- Drawbacks
- Custom Spinner implementation
- Android spinner dropdown style
- Android Spinner Dropdown List
- Defining Spinner in Layout
- Populating Spinner from String Array Xml
- Populating Spinner from ArrayList or Programmatically or Dynamically
- Populating Spinner from Database SQLite
- Populating Spinner from JSON
- Spinner Item Selected Listener
- Spinner Mode
- Spinner Prompt
- Spinner Popup Background
- Spinner Style
- Item layout
- Drop down view
- Styles
- About
- Android Spinner (Dropdown List) with Examples
- Android Adapter
- Create Android Spinner in XML Layout File
- Populate Android Spinner with Values
- Android Spinner Example
- activity_main.xml
- MainActivity.java
- Output of Android Spinner Example
Настройка Spinner
Если хотите настроить Spinner по своему вкусу, то можете посмотреть, как выглядят системные ресурсы для этого компонента. Например, зайдите в папку . \sdk\platforms\android-18\data\res\drawable-xhdpi и поищите в нём файлы со словом spinner. Вы увидите, что ресурсы реализованы с помощью файлов NinePatch.
Создаём собственный стиль для Spinner
Вы можете создать собственные стили с помощью файлов NinePatch. Создаёте три изображения для различных состояний (можно также добавить четвёртое для состояния disabled).

Далее создаёте xml-файл, описывающий визуальные состояния элемента (normal, selected, pressed, disabled). XML-файл и графика должны находиться в одной папке drawable.
res/drawable/btn_dropdown.xml
Затем необходимо прописать новую тему (или отредактировать имеющуюся).
res/values/themes.xml
Осталось прописать в атрибуте android:spinnerStyle созданный стиль, чтобы увидеть красоту.
Лапа вместо треугольника
По умолчанию, у Spinner в правом нижнему углу используется треугольник для раскрытия списка. Покажу другой способ, использующий не файлы NinePatch, а xml-файлы и растровые изображения. Заодно поменяем и внешний вид компонента.
В файле res/values/styles.xml добавим новые строчки для компонента:
Первая строчка ссылается на ресурс gradient_spinner. Создайте новую папку res/drawable и в ней создайте файл gradient_spinner.xml:
В этом файле есть ссылка на ресурс с растровым изображением spinner_arrow. Создайте в графическом редакторе нужное изображение, которое должно заменить треугольник. В моём случае это будет кошачья лапа. Сохраните рисунок под именем spinner_arrow.png в той же папке drawable. При желании можете добавить дополнительные стили для фокуса, нажатия и т.п. (посмотрите первый пример для образца).
Подключаем созданный стиль:
Запускаем пример и любуемся эффектом. Для сравнения ниже добавил второй Spinner с обычным стилем. Мне кажется, наш вариант гораздо интереснее и его надо использовать по умолчанию во всех Android-приложениях.
Источник
Android: Spinner customizations
Implement Android dropdown just the way you want.
Custom Spinner
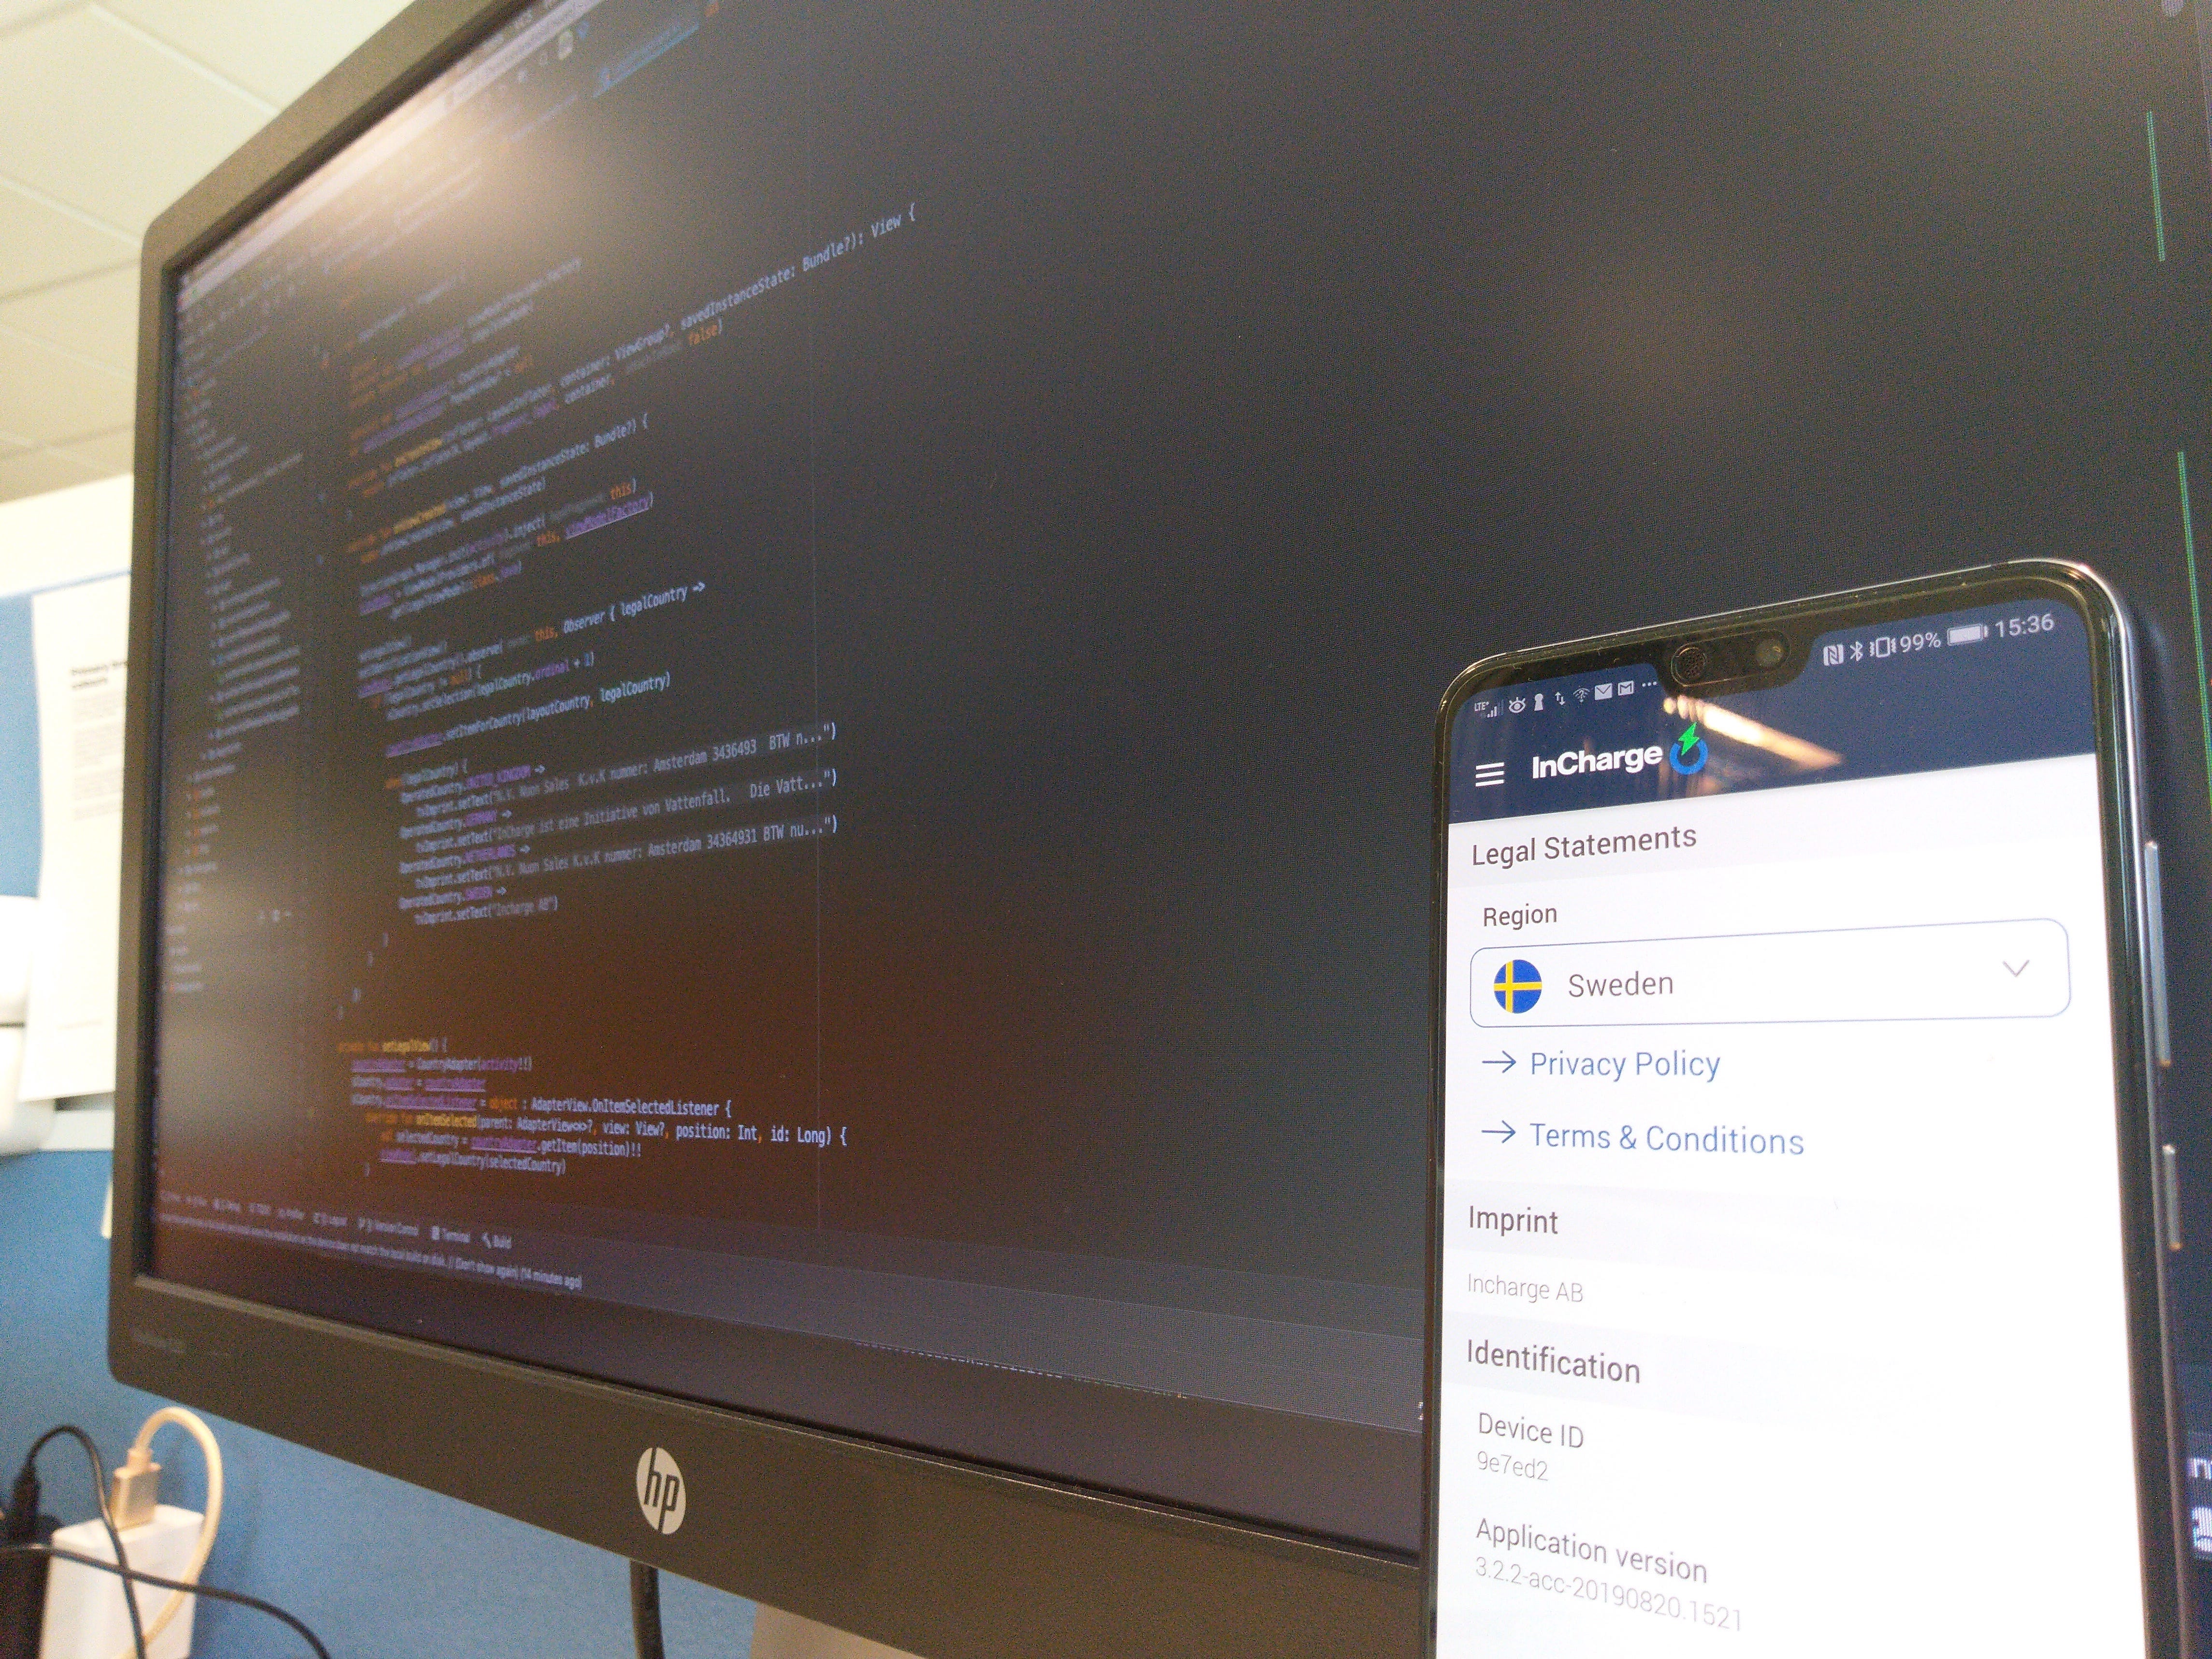
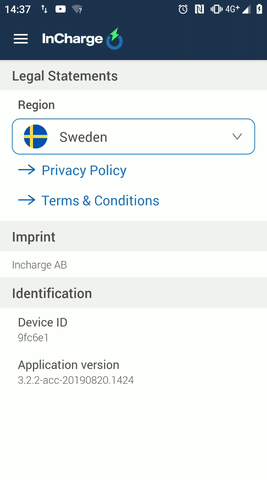
In this article, I’ll describe two ways to achieve custom spinner for country selection that I had to implement at InCharge app. We officially support now 4 countries with charging stations, each country has specific legal rules, terms & conditions, etc.
The screen mockups I received from our designer were exactly these:
So the design for selection was not looking as a default Android Spinner as it had a header included when going to dropdown mode. Is it possible to implement using Spinner Widget? Let’s see.
Adjusting the Spinner widget
OK, so let’s begin with implementing layout:
And add a Spinner widget:
In this way, we’ve just built a Spinner widget on our UI. Thanks to tools:listitem=»@layout/item_country» we can see in Android Studio Designer how the Spinner will look like and adjust paddings/margins properly 🙂
With property android:background we can add a blue outline when Spinner is in the selected state and with android:popupBackground the background of dropdown view — easy so far.
Adapter
The magic of adding header will be done in our CountryAdapter class:
And an enum for supported countries is realized like this:
There are several parts that need to be explained…
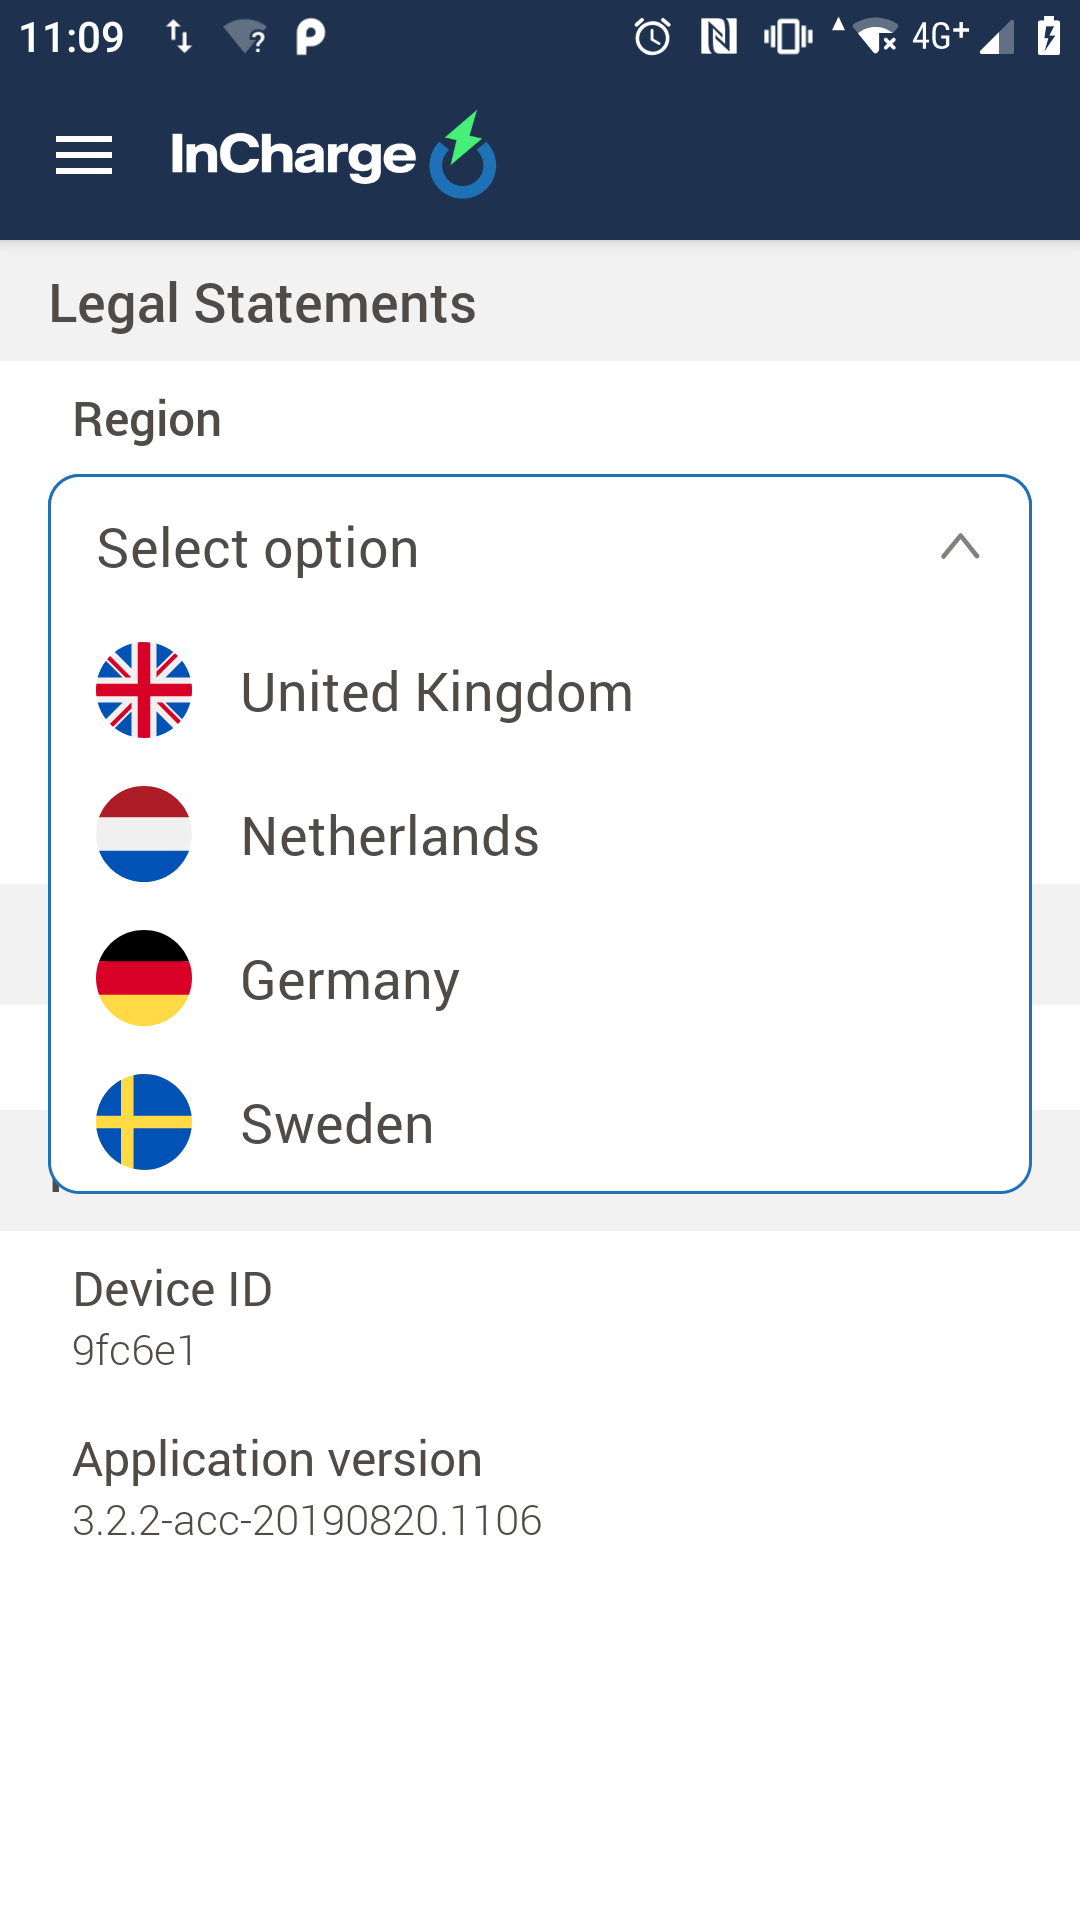
Firstly, let’s see that getView() method will build UI when Spinner is in idle state and getDropDownView() will build particular items when Spinner dropdown gets opened. This is a place where we need to expect position == 0 to build a header with «Select option».
Unfortunately, there is no Spinner public method to programmatically close the dropdown. So how could we close it, when the header item gets clicked? There are couples of hacks to overcome this problem and here is one of them:
so we pretend as if the BACK button got clicked. Yeah, hacky…
Also to prevent selections for header view and not trigger its Spinner behavior we override isEnabled method to return false in this case.
Drawbacks
So we were able to implement the expected design somehow. But is it an ultimate solution? We had to use a hack with closing dropdown and make code dirty. Also, what if the designer suddenly changes his mind and wants to apply some animation for example arrow rotation? Built-in popup has entered animation which might interrupt these animations.
Technically android:popupAnimationStyle is applicable to Spinner style but it’s from SDK 24, quite high, right?
Would there be another solution?
Custom Spinner implementation
If we look into the Android source code of Spinner, we will see that underneath a PopupWindow is used to render the dropdown. Implementing classes are private so we cannot use them. But how much work could that be to make it yourself? Let’s try!
Let’s replace Spinner widget with anything else that could include item_country.xml Now, in setOnClickListener < . >part (trying to override OnClickListener on Spinner would result in RuntimeException).
So here we handle dropdown view by ourselves. We have full control of its UI! I chose ListView, could be anything else! All rendered by layout_country_dropdown.xml .
Note that you can use the very same CountryAdapter but rename the getDropDownView() method to getView() , and get rid of existing getView() .
Thus… Not a lot of work was required to transition 8) That’s what we all love. This solution seems way cleaner, with no dirty hacks — just add popupWindow?.dismiss() when header clicked. How does it look like?
What about animation management? It’s easy. We could set custom animation for a PopupWindow or simply disable it with a parameter:
then in CountryAdapter on header item creating add something like:
And the result is:

Try writing rotation animation on dropdown close by yourself 😉
Источник
Android spinner dropdown style
Android Spinner Dropdown List
May 17, 2017 by Srinivas
Spinner widget is a drop down list in android. Using spinner, your app can display list of available choices for a particular data element and allow user to select one item from the list.
In this article, I’ll explain populating various formats of data in spinner, properties of spinner, spinner customization, and spinner listener with examples.
Defining Spinner in Layout
To use spinner, first it needs to be defined in layout using Spinner element. Below layout shows how to use spinner in constraint layout.
Populating Spinner from String Array Xml
Since spinner populates multiple items like list view, spinner can be populated using adapter. Adapter maps view and data. Below code shows how to populate spinner from string array xml using ArrayAdapter.
Layout for each item and string array, and drop down view are passed to array adapter.

Populating Spinner from ArrayList or Programmatically or Dynamically
To populate spinner with data from list of strings, you need to use ArrayAdapter constructor passing item view and ArrayList as shown below.
Populating Spinner from Database SQLite
If you want to know how to select, insert, update and delete data in SQLite, you can read my previous tutorial how to use SQLite database in android.
Here I’ll show how to convert convert cursor to string array list to populate it in spinner.
Populating Spinner from JSON
Json data can be populated in spinner by converting JSON into string array list. In this example I am going to show how to convert JSON into string array list and populate it in spinner.
Spinner Item Selected Listener
When an item is selected in spinner, spinner object receives item selected event. To handle item selected event, you need to define listener by implementing AdapterView.OnItemSelectedListener and set it to spinner object.
AdapterView.OnItemSelectedListener has two callback methods, onItemSelected and onNothingSelected. Method onItemSelected is called when an item is selected and method onNothingSelected is called when an item is unselected.
Spinner Mode
You can set spinner mode in xml and in code. In xml, you can set spinner mode using spinnerMode attribute and in code, you can pass spinner mode to one of the Spinner constructors.
Spinner mode setting defines how spinner items are shown when you click spinner to reveal spinner items. Spinner supports two modes, dialog (Spinner.MODE_DIALOG) and dropdown (Spinner.MODE_DROPDOWN) mode. By default, spinner items are shown in dropdown mode. Below screen shot show spinner in dialog mode.

Spinner Prompt
Below screen shot show spinner with prompt. You can set prompt in xml using prompt attribute and in code by calling setPrompt on spinner object. Spinner attribute prompt is applicable only when spinner is in dialog mode. Highlighted prompt with red rectangle below.

Spinner Popup Background
You can set background image for popup when spinner is in dialog mode. You can set back ground for popup by calling setPopupBackgroundResource method on spinner.

Spinner Style
To change the style of spinner, you need to create item layout and dropdown view and apply styles. In the above examples, we used android provided item layout android.R.layout.simple_spinner_item and dropdown view android.R.layout.simple_spinner_dropdown_item.
To show how to customize spinner style, we will create layouts similar to what we used and apply styles.

Item layout
Drop down view
Styles
About
Android app development tutorials and web app development tutorials with programming examples and code samples.
Источник
Android Spinner (Dropdown List) with Examples
In android, Spinner is a view that allows a user to select one value from the list of values. The spinner in android will behave same as a dropdown list in other programming languages.
Generally, the android spinners will provide a quick way to select one item from the list of values and it will show a dropdown menu with a list of all values when we click or tap on it.
By default, the android spinner will show its currently selected value and by using Adapter we can bind the items to spinner objects.
Following is the pictorial representation of using spinner in android applications.

We can populate our Spinner control with list of choices by defining an ArrayAdapter in our Activity file.
Generally, the Adapter pulls data from sources such as an array or database and converts each item into a result view and that’s placed into the list.
Android Adapter
In android, Adapter will act as an intermediate between the data sources and adapter views such as ListView, Gridview to fill the data into adapter views. The adapter will hold the data and iterates through an items in data set and generate the views for each item in the list.
Generally, in android we have a different types of adapters available to fetch the data from different data sources to fill the data into adapter views, those are
| Adapter | Description |
|---|---|
| ArrayAdapter | It will expect an Array or List as input. |
| CurosrAdapter | It will accepts an instance of a cursor as an input. |
| SimpleAdapter | It will accept a static data defined in the resources. |
| BaseAdapter | It is a generic implementation for all three adapter types and it can be used for ListView, Gridview or Spinners based on our requirements |
Now we will see how to create spinner or dropdownlist in android applications.
Create Android Spinner in XML Layout File
In android, we can create Spinner in XML layout file using element with different attributes like as shown below.
Populate Android Spinner with Values
To populate spinner with list of values, we need to specify spinner adapter, such as an ArrayAdapter in activity file like as shown below.
This is how we can define and bind data to Spinner control in android applications. Now we will see complete example of using spinner control android applications.
Android Spinner Example
Following is the example of defining a one Spinner control, one TextView control in RelativeLayout to show the list of user details in android application.
Create a new android application using android studio and give names as SpinnerExample. In case if you are not aware of creating an app in android studio check this article Android Hello World App.
Now open an activity_main.xml file from \res\layout path and write the code like as shown below
activity_main.xml
xml version= «1.0» encoding= «utf-8» ?>
RelativeLayout xmlns: android = «http://schemas.android.com/apk/res/android»
android :layout_width= «match_parent» android :layout_height= «match_parent» >
TextView
android :id= «@+id/txtVw»
android :layout_width= «wrap_content»
android :layout_height= «wrap_content»
android :layout_marginLeft= «50dp»
android :layout_marginTop= «150dp»
android :text= «Select User:»
android :textStyle= «bold»
android :textSize= «15dp»/>
Spinner
android :id= «@+id/spinner1»
android :layout_width= «wrap_content»
android :layout_height= «wrap_content»
android :layout_alignBottom= «@+id/txtVw»
android :layout_toRightOf= «@+id/txtVw»/>
RelativeLayout >
If you observe above code we created a one Spinner control and one TextView control in XML Layout file.
Once we are done with the creation of layout with required controls, we need to load the XML layout resource from our activity onCreate() callback method, for that open main activity file MainActivity.java from \java\com.tutlane.spinnerexample path and write the code like as shown below.
MainActivity.java
package com.tutlane.spinnerexample;
import android.support.v7.app.AppCompatActivity;
import android.os.Bundle;
import android.view.View;
import android.widget.AdapterView;
import android.widget.ArrayAdapter;
import android.widget.Spinner;
import android.widget.Toast;
public class MainActivity extends AppCompatActivity implements AdapterView.OnItemSelectedListener <
String[] users = < "Suresh Dasari" , "Trishika Dasari" , "Rohini Alavala" , "Praveen Kumar" , "Madhav Sai" >;
@Override
protected void onCreate(Bundle savedInstanceState) <
super .onCreate(savedInstanceState);
setContentView(R.layout. activity_main );
Spinner spin = (Spinner) findViewById(R.id. spinner1 );
ArrayAdapter adapter = new ArrayAdapter ( this , android.R.layout. simple_spinner_item , users );
adapter.setDropDownViewResource(android.R.layout. simple_spinner_dropdown_item );
spin.setAdapter(adapter);
spin.setOnItemSelectedListener( this );
>
@Override
public void onItemSelected(AdapterView arg0, View arg1, int position, long id) <
Toast.makeText(getApplicationContext(), «Selected User: » + users [position] ,Toast. LENGTH_SHORT ).show();
>
@Override
public void onNothingSelected(AdapterView arg0) <
// TODO — Custom Code
>
>
If you observe the above code we are calling our layout using the setContentView method in the form of R.layout.layout_file_name in our activity file. Here our XML file name is activity_main.xml so we used file name activity_main and binding the list of values to Spinner control using ArrayAdapter.
Generally, during the launch of our activity, the onCreate() callback method will be called by the android framework to get the required layout for an activity.
Output of Android Spinner Example
When we run the above example using an android virtual device (AVD) we will get a result like as shown below.

If you observe above result, our spinner control is like dropdown list in other programming languages and we are able to get the selected user details in android application.
This is how we can use Spinner control in android applications to allow users to select one value from the list of values based on our requirements.
Источник


