- Полный список
- Получаем результат правильно (Часть 1). Activity Result API
- Чем плох onActivityResult()?
- Используем Activity Result API
- Шаг 1. Создание контракта
- Шаг 2. Регистрация контракта
- Шаг 3. Запуск контракта
- Важно!
- Работа с runtime permissions
- Подводим итоги
- Starting Another Activity
- This lesson teaches you to
- You should also read
- Respond to the Send Button
- Build an Intent
- Sending an intent to other apps
- Start the Second Activity
- Create the Second Activity
- Add the title string
- Add it to the manifest
- Receive the Intent
- Display the Message
Полный список
— вызываем Activity с возвратом результата
Бывает необходимость вызвать Activity, выполнить на нем какое-либо действие и вернуться с результатом. Например – при создании SMS. Вы жмете кнопку «добавить адресата», система показывает экран со списком из адресной книги, вы выбираете нужного вам абонента и возвращаетесь в экран создания SMS. Т.е. вы вызвали экран выбора абонента, а он вернул вашему экрану результат.
Об этом можно почитать здесь.
Давайте посмотрим на практике. Создадим приложение с двумя экранами. С первого экрана будем вызывать второй экран, там вводить данные, нажимать кнопку и возвращаться на первый экран с введенными данными. Например, будем таким образом запрашивать имя.
Создадим проект:
Project name: P0291_SimpleActivityResult
Build Target: Android 2.3.3
Application name: SimpleActivityResult
Package name: ru.startandroid.develop.p0291simpleactivityresult
Create Activity: MainActivity
Открываем main.xml и нарисуем такой экран:
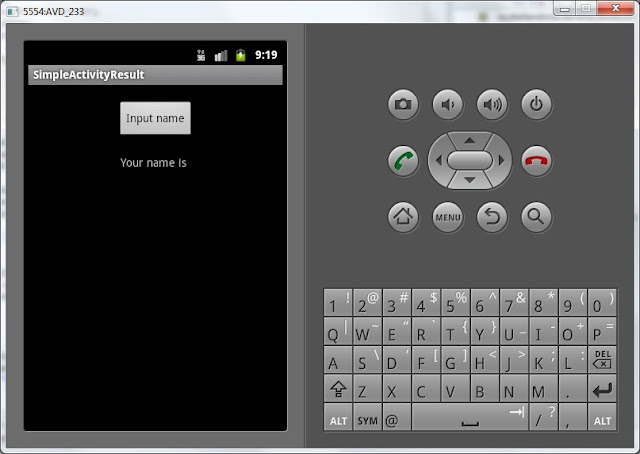
На экране TextView, который будет отображать имя, и кнопка, которая будет вызывать экран для ввода.
Определяем TextView и кнопку, настраиваем обработчик. В методе обработчика onClick создаем Intent, указываем класс второго Acivity (которое создадим чуть позже, на ошибку не обращайте внимания). Для отправки используем startActivityForResult. Отличие от обычного startActivity в том, что MainActivity становится «родителем» для NameActivity. И когда NameActivity закрывается, вызывается метод onActivityResult в MainActivity, тем самым давая нам знать, что закрылось Activity, которое мы вызывали методом startActivityForResult.
В startActivityForResult в качестве параметров мы передаем Intent и requestCode. requestCode – необходим для идентификации. В этом уроке мы его укажем, но не будем использовать по назначению. В следующем же уроке разберемся подробнее, зачем он нужен.
В onActivityResult мы видим следующие параметры:
requestCode – тот же идентификатор, что и в startActivityForResult. По нему определяем, с какого Activity пришел результат.
resultCode – код возврата. Определяет успешно прошел вызов или нет.
data – Intent, в котором возвращаются данные
requestCode и resultCode мы пока использовать не будем, подробнее рассмотрим их на следующем уроке. А из data мы будем получать объект по имени name и выводить значение в TextView.
Если мы извлекаем из Intent объект с именем name, значит надо, чтобы кто-то его туда положил. Этим займется NameActivity.
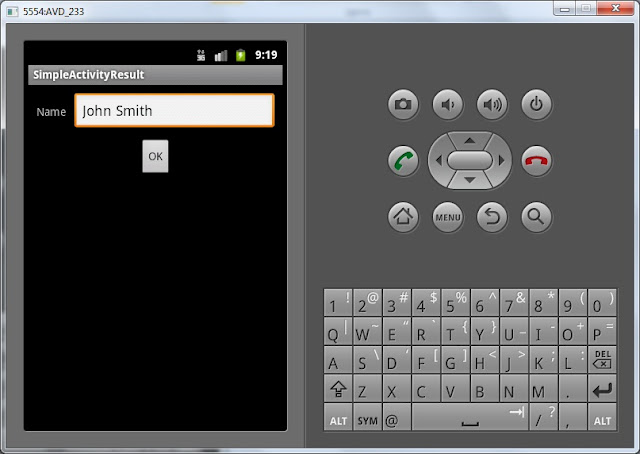
Создадим экран name.xml:
В поле ввода будем вводить имя и жать кнопку OK.
Создаем класс NameActivity и прописываем его в манифесте:
Определяем поле ввода и кнопку, прописываем обработчик. В методе onClick мы создаем Intent и помещаем в него данные из поля ввода под именем name. Обратите внимание, мы никак не адресуем этот Intent. Т.е. ни класс, ни action мы не указываем. И получается, что непонятно куда пойдет этот Intent. Но метод setResult знает, куда его адресовать — в «родительское» Activity, в котором был вызван метод startActivityForResult. Также в setResult мы передаем константу RESULT_OK, означающую успешное завершение вызова. И именно она передастся в параметр resultCode метода onActivityResult в MainActivity.java. Это мы подробнее разберем на следующем уроке. Далее методом finish мы завершаем работу NameActivity, чтобы результат ушел в MainActivity.
Все сохраним и запустим приложение.
Видим первый экран:
Жмем кнопку, чтобы попасть на экран ввода имени.
Вводим имя и жмем ОК
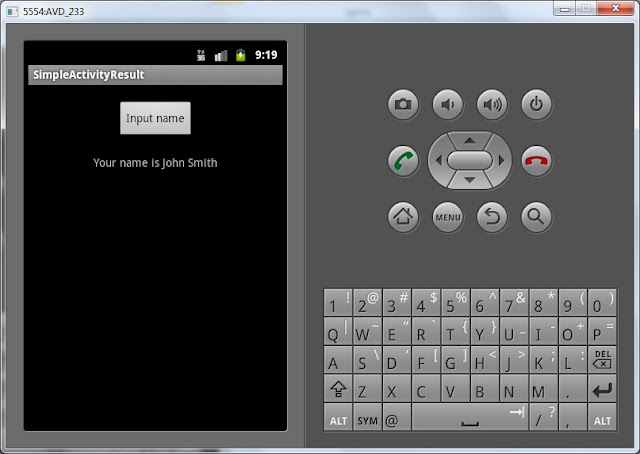
Снова первый экран, отобразивший полученные данные.
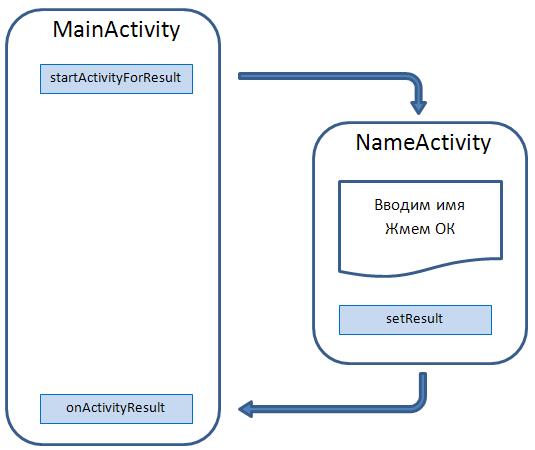
Попробуем подытожить. В MainActivity мы создали Intent с явным указанием на класс NameActivity. Запустили этот Intent с помощью метода startActivityForResult. NameActivity отобразилось, мы ввели имя и нажали кнопку. Создался Intent, в который поместилось введенное нами имя. Метод setResult знает, что Intent надо вернуть в Activity, которое выполнило вызов startActivityForResult, т.е. – MainActivity. В MainActivity за прием результатов с вызванных Activity отвечает метод onActivityResult. В нем мы распаковали Intent и отобразили полученные данные в TextView.
Пока необходимо просто понять схему вызова и возврата.
На следующем уроке мы сделаем расширенный и более показательный пример использования этой технологии.
На следующем уроке:
— разбираемся, зачем нужны requestCode и resultCode в onActivityResult
Присоединяйтесь к нам в Telegram:
— в канале StartAndroid публикуются ссылки на новые статьи с сайта startandroid.ru и интересные материалы с хабра, medium.com и т.п.
— в чатах решаем возникающие вопросы и проблемы по различным темам: Android, Kotlin, RxJava, Dagger, Тестирование
— ну и если просто хочется поговорить с коллегами по разработке, то есть чат Флудильня
— новый чат Performance для обсуждения проблем производительности и для ваших пожеланий по содержанию курса по этой теме
Источник
Получаем результат правильно (Часть 1). Activity Result API

Каждый Android-разработчик сталкивался с необходимостью передать данные из одной Activity в другую. Эта тривиальная задача зачастую вынуждает нас писать не самый элегантный код.
Наконец, в 2020 году Google представила решение старой проблемы — Activity Result API. Это мощный инструмент для обмена данными между активностями и запроса runtime permissions.
В данной статье мы разберёмся, как использовать новый API и какими преимуществами он обладает.
Чем плох onActivityResult()?
Роберт Мартин в книге “Чистый код” отмечает важность переиспользования кода — принцип DRY или Don’t repeat yourself, а также призывает проектировать компактные функции, которые выполняют лишь единственную операцию.
Проблема onActivityResult() в том, что при его использовании соблюдение подобных рекомендаций становится практически невозможным. Убедимся в этом на примере простого экрана, который запрашивает доступ к камере, делает фото и открывает второй экран — SecondActivity . Пусть в SecondActivity мы передаём строку, а назад получаем целое значение.
Очевидно, что метод onActivityResult() нарушает принцип единственной ответственности, ведь он отвечает и за обработку результата фотографирования и за получение данных от второй Activity. Да и выглядит этот метод уже довольно запутанно, хоть мы и рассмотрели простой пример и опустили часть деталей.
Кроме того, если в приложении появится другой экран со схожей функциональностью, мы не сможем переиспользовать этот код и будем вынуждены его дублировать.
Используем Activity Result API
Новый API доступен начиная с AndroidX Activity 1.2.0-alpha02 и Fragment 1.3.0-alpha02 , поэтому добавим актуальные версии соответствующих зависимостей в build.gradle:
Применение Activity Result состоит из трех шагов:

Шаг 1. Создание контракта
Контракт — это класс, реализующий интерфейс ActivityResultContract . Где I определяет тип входных данных, необходимых для запуска Activity, а O — тип возвращаемого результата.
Для типовых задач можно воспользоваться реализациями “из коробки”: PickContact , TakePicture , RequestPermission и другими. Полный список доступен тут.
При создании контракта мы обязаны реализовать два его метода:
createIntent() — принимает входные данные и создает интент, который будет в дальнейшем запущен вызовом launch()
parseResult() — отвечает за возврат результата, обработку resultCode и парсинг данных
Ещё один метод — getSynchronousResult() — можно переопределить в случае необходимости. Он позволяет сразу же, без запуска Activity, вернуть результат, например, если получены невалидные входные данные. Если подобное поведение не требуется, метод по умолчанию возвращает null .
Ниже представлен пример контракта, который принимает строку и запускает SecondActivity, ожидая от неё целое число:
Шаг 2. Регистрация контракта
Следующий этап — регистрация контракта в активности или фрагменте с помощью вызова registerForActivityResult() . В параметры необходимо передать ActivityResultContract и ActivityResultCallback . Коллбек сработает при получении результата.
Регистрация контракта не запускает новую Activity , а лишь возвращает специальный объект ActivityResultLauncher , который нам понадобится далее.
Шаг 3. Запуск контракта
Для запуска Activity остаётся вызвать launch() на объекте ActivityResultLauncher , который мы получили на предыдущем этапе.
Важно!
Отметим несколько неочевидных моментов, которые необходимо учитывать:
Регистрировать контракты можно в любой момент жизненного цикла активности или фрагмента, но вот запустить его до перехода в состояние CREATED нельзя. Общепринятый подход — регистрация контрактов как полей класса.
Не рекомендуется вызывать registerForActivityResult() внутри операторов if и when . Дело в том, что во время ожидания результата процесс приложения может быть уничтожен системой (например, при открытии камеры, которая требовательна к оперативной памяти). И если при восстановлении процесса мы не зарегистрируем контракт заново, результат будет утерян.
Если запустить неявный интент, а операционная система не сможет найти подходящую Activity, выбрасывается исключение ActivityNotFoundException: “No Activity found to handle Intent”. Чтобы избежать такой ситуации, необходимо перед вызовом launch() или в методе getSynchronousResult() выполнить проверку resolveActivity() c помощью PackageManager .
Работа с runtime permissions
Другим полезным применением Activity Result API является запрос разрешений. Теперь вместо вызовов checkSelfPermission() , requestPermissions() и onRequestPermissionsResult() , стало доступно лаконичное и удобное решение — контракты RequestPermission и RequestMultiplePermissions .
Первый служит для запроса одного разрешения, а второй — сразу нескольких. В колбеке RequestPermission возвращает true , если доступ получен, и false в противном случае. RequestMultiplePermissions вернёт Map , где ключ — это название запрошенного разрешения, а значение — результат запроса.
В реальной жизни запрос разрешений выглядит несколько сложнее. В гайдлайнах Google мы видим следующую диаграмму:
Зачастую разработчики забывают о следующих нюансах при работе с runtime permissions:
Если пользователь ранее уже отклонял наш запрос, рекомендуется дополнительно объяснить, зачем приложению понадобилось данное разрешение (пункт 5a)
При отклонении запроса на разрешение (пункт 8b), стоит не только ограничить функциональность приложения, но и учесть случай, если пользователь поставил галочку “Don’t ask again”
Обнаружить эти граничные ситуации можно при помощи вызова метода shouldShowRequestPermissionRationale() . Если он возвращает true перед запросом разрешения, то стоит рассказать пользователю, как приложение будет использовать разрешение. Если разрешение не выдано и shouldShowRequestPermissionRationale() возвращает false — была выбрана опция “Don’t ask again”, тогда стоит попросить пользователя зайти в настройки и предоставить разрешение вручную.
Реализуем запрос на доступ к камере согласно рассмотренной схеме:
Подводим итоги
Применим знания о новом API на практике и перепишем с их помощью экран из первого примера. В результате мы получим довольно компактный, легко читаемый и масштабируемый код:
Мы увидели недостатки обмена данными через onActivityResult(), узнали о преимуществах Activity Result API и научились использовать его на практике.
Новый API полностью стабилен, в то время как привычные onRequestPermissionsResult() , onActivityResult() и startActivityForResult() стали Deprecated. Самое время вносить изменения в свои проекты!
Демо-приложение с различными примерами использования Activty Result API, в том числе работу с runtime permissions, можно найти в моем Github репозитории.
Источник
Starting Another Activity
This lesson teaches you to
You should also read
After completing the previous lesson, you have an app that shows an activity (a single screen) with a text field and a button. In this lesson, you’ll add some code to MainActivity that starts a new activity when the user clicks the Send button.
Respond to the Send Button
To respond to the button’s on-click event, open the activity_main.xml layout file and add the android:onClick attribute to the element:
The android:onClick attribute’s value, «sendMessage» , is the name of a method in your activity that the system calls when the user clicks the button.
Open the MainActivity class (located in the project’s src/ directory) and add the corresponding method:
This requires that you import the View class:
Tip: In Eclipse, press Ctrl + Shift + O to import missing classes (Cmd + Shift + O on Mac).
In order for the system to match this method to the method name given to android:onClick , the signature must be exactly as shown. Specifically, the method must:
- Be public
- Have a void return value
- Have a View as the only parameter (this will be the View that was clicked)
Next, you’ll fill in this method to read the contents of the text field and deliver that text to another activity.
Build an Intent
An Intent is an object that provides runtime binding between separate components (such as two activities). The Intent represents an app’s «intent to do something.» You can use intents for a wide variety of tasks, but most often they’re used to start another activity.
Inside the sendMessage() method, create an Intent to start an activity called DisplayMessageActivity :
The constructor used here takes two parameters:
- A Context as its first parameter ( this is used because the Activity class is a subclass of Context )
- The Class of the app component to which the system should deliver the Intent (in this case, the activity that should be started)
Sending an intent to other apps
The intent created in this lesson is what’s considered an explicit intent, because the Intent specifies the exact app component to which the intent should be given. However, intents can also be implicit, in which case the Intent does not specify the desired component, but allows any app installed on the device to respond to the intent as long as it satisfies the meta-data specifications for the action that’s specified in various Intent parameters. For more information, see the class about Interacting with Other Apps.
Note: The reference to DisplayMessageActivity will raise an error if you’re using an IDE such as Eclipse because the class doesn’t exist yet. Ignore the error for now; you’ll create the class soon.
An intent not only allows you to start another activity, but it can carry a bundle of data to the activity as well. Inside the sendMessage() method, use findViewById() to get the EditText element and add its text value to the intent:
Note: You now need import statements for android.content.Intent and android.widget.EditText . You’ll define the EXTRA_MESSAGE constant in a moment.
An Intent can carry a collection of various data types as key-value pairs called extras. The putExtra() method takes the key name in the first parameter and the value in the second parameter.
In order for the next activity to query the extra data, you should define the key for your intent’s extra using a public constant. So add the EXTRA_MESSAGE definition to the top of the MainActivity class:
It’s generally a good practice to define keys for intent extras using your app’s package name as a prefix. This ensures they are unique, in case your app interacts with other apps.
Start the Second Activity
To start an activity, call startActivity() and pass it your Intent . The system receives this call and starts an instance of the Activity specified by the Intent .
With this new code, the complete sendMessage() method that’s invoked by the Send button now looks like this:
Now you need to create the DisplayMessageActivity class in order for this to work.
Create the Second Activity
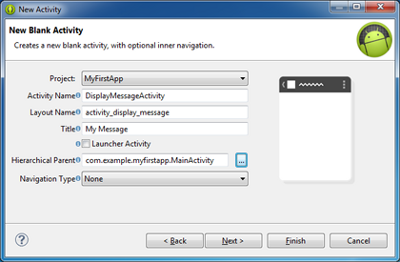
Figure 1. The new activity wizard in Eclipse.
To create a new activity using Eclipse:
- Click New
 in the toolbar.
 - In the window that appears, open the Android folder and select Android Activity. Click Next.
- Select BlankActivity and click Next.
- Fill in the activity details:
- Project: MyFirstApp
- Activity Name: DisplayMessageActivity
- Layout Name: activity_display_message
- Title: My Message
- Hierarchial Parent: com.example.myfirstapp.MainActivity
- Navigation Type: None
 in the toolbar.
Click Finish.
If you’re using a different IDE or the command line tools, create a new file named DisplayMessageActivity.java in the project’s src/ directory, next to the original MainActivity.java file.
Open the DisplayMessageActivity.java file. If you used Eclipse to create this activity:
- The class already includes an implementation of the required onCreate() method.
- There’s also an implementation of the onCreateOptionsMenu() method, but you won’t need it for this app so you can remove it.
- There’s also an implementation of onOptionsItemSelected() which handles the behavior for the action bar’s Up behavior. Keep this one the way it is.
Because the ActionBar APIs are available only on HONEYCOMB (API level 11) and higher, you must add a condition around the getActionBar() method to check the current platform version. Additionally, you must add the @SuppressLint(«NewApi») tag to the onCreate() method to avoid lint errors.
The DisplayMessageActivity class should now look like this:
If you used an IDE other than Eclipse, update your DisplayMessageActivity class with the above code.
All subclasses of Activity must implement the onCreate() method. The system calls this when creating a new instance of the activity. This method is where you must define the activity layout with the setContentView() method and is where you should perform initial setup for the activity components.
Note: If you are using an IDE other than Eclipse, your project does not contain the activity_display_message layout that’s requested by setContentView() . That’s OK because you will update this method later and won’t be using that layout.
Add the title string
If you used Eclipse, you can skip to the next section, because the template provides the title string for the new activity.
If you’re using an IDE other than Eclipse, add the new activity’s title to the strings.xml file:
Add it to the manifest
All activities must be declared in your manifest file, AndroidManifest.xml , using an element.
When you use the Eclipse tools to create the activity, it creates a default entry. If you’re using a different IDE, you need to add the manifest entry yourself. It should look like this:
The android:parentActivityName attribute declares the name of this activity’s parent activity within the app’s logical hierarchy. The system uses this value to implement default navigation behaviors, such as Up navigation on Android 4.1 (API level 16) and higher. You can provide the same navigation behaviors for older versions of Android by using the Support Library and adding the element as shown here.
Note: Your Android SDK should already include the latest Android Support Library. It’s included with the ADT Bundle but if you’re using a different IDE, you should have installed it during the Adding Platforms and Packages step. When using the templates in Eclipse, the Support Library is automatically added to your app project (you can see the library’s JAR file listed under Android Dependencies). If you’re not using Eclipse, you need to manually add the library to your project—follow the guide for setting up the Support Library then return here.
If you’re developing with Eclipse, you can run the app now, but not much happens. Clicking the Send button starts the second activity but it uses a default «Hello world» layout provided by the template. You’ll soon update the activity to instead display a custom text view, so if you’re using a different IDE, don’t worry that the app won’t yet compile.
Receive the Intent
Every Activity is invoked by an Intent , regardless of how the user navigated there. You can get the Intent that started your activity by calling getIntent() and retrieve the data contained within it.
In the DisplayMessageActivity class’s onCreate() method, get the intent and extract the message delivered by MainActivity :
Display the Message
To show the message on the screen, create a TextView widget and set the text using setText() . Then add the TextView as the root view of the activity’s layout by passing it to setContentView() .
The complete onCreate() method for DisplayMessageActivity now looks like this:
You can now run the app. When it opens, type a message in the text field, click Send, and the message appears on the second activity.
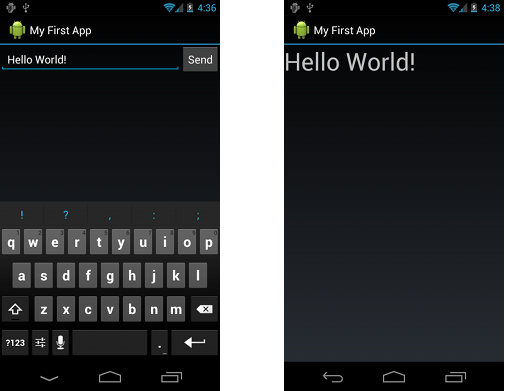
Figure 2. Both activities in the final app, running on Android 4.0.
That’s it, you’ve built your first Android app!
To learn more about building Android apps, continue to follow the basic training classes. The next class is Managing the Activity Lifecycle.
Источник


