- Полный список
- Android Application Launch explained: from Zygote to your Activity.onCreate()
- When does Android process start?
- Zygote : Spawning new life, new process
- When a user clicks an app icon in Launcher …
- There are three distinct phases of process launch :
- Thanks for reading through 🙌🏼. If you found this post useful, please applaud using the 👏 button and share it through your circles.
- Starting Another Activity
- This lesson teaches you to
- You should also read
- Respond to the Send Button
- Build an Intent
- Sending an intent to other apps
- Start the Second Activity
- Create the Second Activity
- Add the title string
- Add it to the manifest
- Receive the Intent
- Display the Message
Полный список
В этом уроке мы:
— создадим и вызовем второе Activity в приложении
Урок был обновлен 12.06.2017
Мы подобрались к очень интересной теме. На всех предыдущих уроках мы создавали приложения, которые содержали только один экран (Activity). Но если вы пользуетесь смартфоном с Android, то вы замечали, что экранов в приложении обычно больше. Если рассмотреть, например, почтовое приложение, то в нем есть следующие экраны: список аккаунтов, список писем, просмотр письма, создание письма, настройки и т.д. Пришла и нам пора научиться создавать многоэкранные приложения.
Application/Library name: TwoActivity
Module name: p0211twoactivity
Package name: ru.startandroid.p0211twoactivity
Откроем activity_main.xml и создадим такой экран:
На экране одна кнопка, по нажатию которой будем вызывать второй экран.
Открываем MainActivity.java и пишем код:
Мы определили кнопку btnActTwo и присвоили ей Activity в качестве обработчика. Реализация метода onClick для кнопки пока заполнена частично — определяем, какая кнопка была нажата. Чуть позже здесь мы будем вызывать второй экран. Но сначала этот второй экран надо создать.
Если помните, при создании проекта у нас по умолчанию создается Activity.
От нас требуется только указать имя этого Activity – обычно мы пишем здесь MainActivity. Давайте разбираться, что при этом происходит.
Мы уже знаем, что создается одноименный класс MainActivity.java – который отвечает за поведение Activity. Но, кроме этого, Activity «регистрируется» в системе с помощью манифест-файла — AndroidManifest.xml.

Давайте откроем этот файл:
Нас интересует тег application. В нем мы видим тег activity с атрибутом name = MainActivity. В activity находится тег intent-filter с определенными параметрами. Пока мы не знаем что это и зачем, сейчас нам это не нужно. Забегая вперед, скажу, что android.intent.action.MAIN показывает системе, что Activity является основной и будет первой отображаться при запуске приложения. А android.intent.category.LAUNCHER означает, что приложение будет отображено в общем списке приложений Android.
Т.е. этот манифест-файл — это что-то типа конфигурации. В нем мы можем указать различные параметры отображения и запуска Activity или целого приложения. Если в этом файле не будет информации об Activity, которое вы хотите запустить в приложении, то вы получите ошибку.
Android Studio при создании модуля создала MainActivity и поместила в манифест данные о нем. Если мы надумаем сами создать новое Activity, то студия также предоставит нам визард, который автоматически добавит создаваемое Activity в манифест.
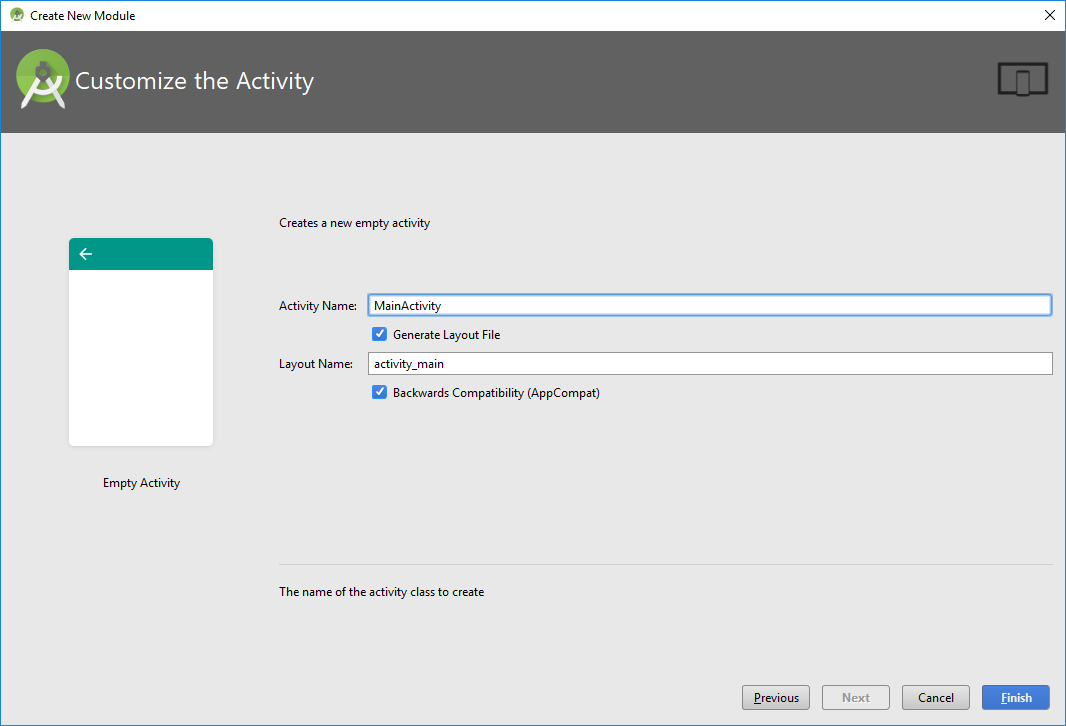
Давайте создадим новое Activity
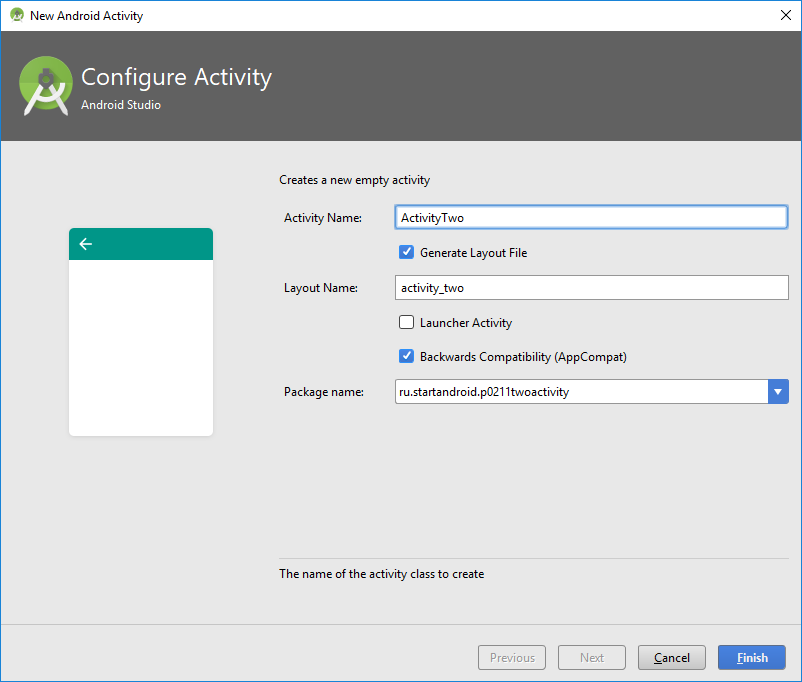
Жмем правой кнопкой на package ru.startandroid.p0211twoactivity в папке проекта и выбираем New -> Activity -> Empty Activity

В появившемся окне вводим имя класса – ActivityTwo, и layout – activity_two.
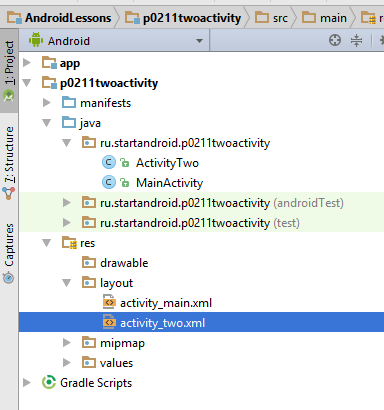
Класс ActivityTwo создан.
В setContentView сразу указан layout-файл activty_two.
Он был создан визардом
Откройте activty_two.xml и заполните следующим кодом:
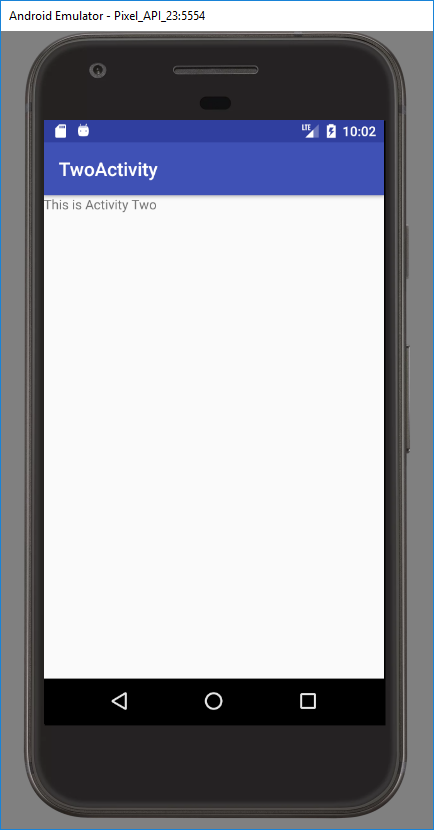
Экран будет отображать TextView с текстом «This is Activity Two».
Сохраните все. Класс ActivityTwo готов, при отображении он выведет на экран то, что мы настроили в layout-файле two.xml.
Давайте снова заглянем в файл манифеста
Появился тег activity с атрибутом name = .ActivityTwo. Этот тег совершенно пустой, без каких либо параметров и настроек. Но даже пустой, он необходим здесь.
Нам осталось вернуться в MainActivity.java и довершить реализацию метода onClick (нажатие кнопки), а именно — прописать вызов ActivityTwo. Открываем MainActivity.java и добавляем строки:
(добавляете только строки 2 и 3)
Обновите импорт, сохраните все и можем всю эту конструкцию запускать. При запуске появляется MainActivity
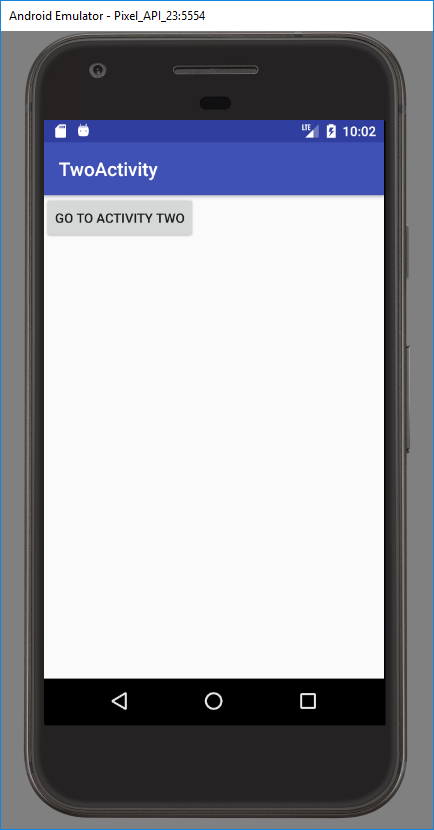
Нажимаем на кнопку и переходим на ActivityTwo
Код вызова Activity пока не объясняю и теорией не гружу, урок и так получился сложным. Получилось много текста и скриншотов, но на самом деле процедура минутная. Поначалу, возможно, будет непонятно, но постепенно втянемся. Создадим штук 5-6 новых Activity в разных проектах и тема уляжется в голове.
Пока попробуйте несколько раз пройти мысленно эту цепочку действий и усвоить, что для создания Activity необходимо создать класс (который наследует android.app.Activity) и создать соответствующую запись в манифест-файле.
На следующем уроке:
— разбираемся в коде урока 21
— теория по Intent и Intent Filter (не пропустите, тема очень важная)
— немного о Context
Присоединяйтесь к нам в Telegram:
— в канале StartAndroid публикуются ссылки на новые статьи с сайта startandroid.ru и интересные материалы с хабра, medium.com и т.п.
— в чатах решаем возникающие вопросы и проблемы по различным темам: Android, Kotlin, RxJava, Dagger, Тестирование
— ну и если просто хочется поговорить с коллегами по разработке, то есть чат Флудильня
— новый чат Performance для обсуждения проблем производительности и для ваших пожеланий по содержанию курса по этой теме
Источник
Android Application Launch explained: from Zygote to your Activity.onCreate()

Apr 30, 2018 · 6 min read
This article explains how Android launches your application when a user clicks an app icon. The Android system does a lot of heavy lifting behind the curtains to make your launch activity visible to a user. This article covers this process in detail by highlighting the important phases and call sequences.
Android applications are unique in two ways:
- Multiple Entry points: Android apps are composed of different components and they can invoke the components owned by other apps. These components roughly correspond to multiple entry points for any application. Hence, they differ from traditional applications which have a single entry point like main() method.
- Own Little World: Every Android application lives in its own world, it runs in a separate process, it has its own Dalvik VM instance and is assigned a unique user ID.
When does Android process start?
An Android process is started whenever it is required.
Any time a user or some other sys t em component requests a component (could be a service, an activity or an intent receiver) that belongs to your application be executed, the Android system spins off a new process for your app if it’s not already running. Generally processes keep running until killed by the system. Application processes are created on demand and a lot of things happen before you see your application’s launch activity up and running.
Every app runs in its own process: By default, every Android app runs in its own Android process which is nothing but a Linux process which gets one execution thread to start with. For example, when you click on a hyper-link in your e-mail, a web page opens in a browser window. Your mail client and the browser are two separate apps and they run in their two separate individual processes. The click event causes Android platform to launch a new process so that it can instantiate the browser activity in the context of its own process. The same holds good for any other component in an application.
Zygote : Spawning new life, new process
Let’s step back for a moment and have a quick look on system start-up process. Like the most Linux based systems, at startup, the boot loader loads the kernel and starts the init process. The init then spawns the low level Linux processes called “daemons” e.g. android debug daemon, USB daemon etc. These daemons typically handle the low level hardware interfaces including radio interface.
Init process then starts a very interesting process called ‘ Zygote ’.
As the name implies it’s the very beginning for the rest of the Android application. This is the process which initializes a very first instance of Dalvik virtual machine. It also pre-loads all common classes used by Android application framework and various apps installed on a system. It thus prepares itself to be replicated. It stats listening on a socket interface for future requests to spawn off new virtual machines (VM)for managing new application processes. On receiving a new request, it forks itself to create a new process which gets a pre-initialized VM instance.
After zygote, init starts the runtime process.
The zygote then forks to start a well managed process called system server. System server starts all core platform services e.g activity manager service and hardware services in its own context.
At this point the full stack is ready to launch the first app process — Home app which displays the home screen also known as Launcher application.
When a user clicks an app icon in Launcher …
The click event gets translated into startActivity(intent) and it is routed to ActivityManagerService via Binder IPC. The ActvityManagerService performs multiple steps
- The first step is to collect information about the target of the intent object. This is done by using resolveIntent() method on PackageManager object. PackageManager.MATCH_DEFAULT_ONLY and PackageManager.GET_SHARED_LIBRARY_FILES flags are used by default.
- The target information is saved back into the intent object to avoid re-doing this step.
- Next important step is to check if user has enough privileges to invoke the target component of the intent. This is done by calling grantUriPermissionLocked() method.
- If user has enough permissions, ActivityManagerService checks if the target activity requires to be launched in a new task. The task creation depends on Intent flags such as FLAG_ACTIVITY_NEW_TASK and other flags such as FLAG_ACTIVITY_CLEAR_TOP.
- Now, it’s the time to check if the ProcessRecord already exists for the process.If the ProcessRecord is null, the ActivityManager has to create a new process to instantiate the target component.
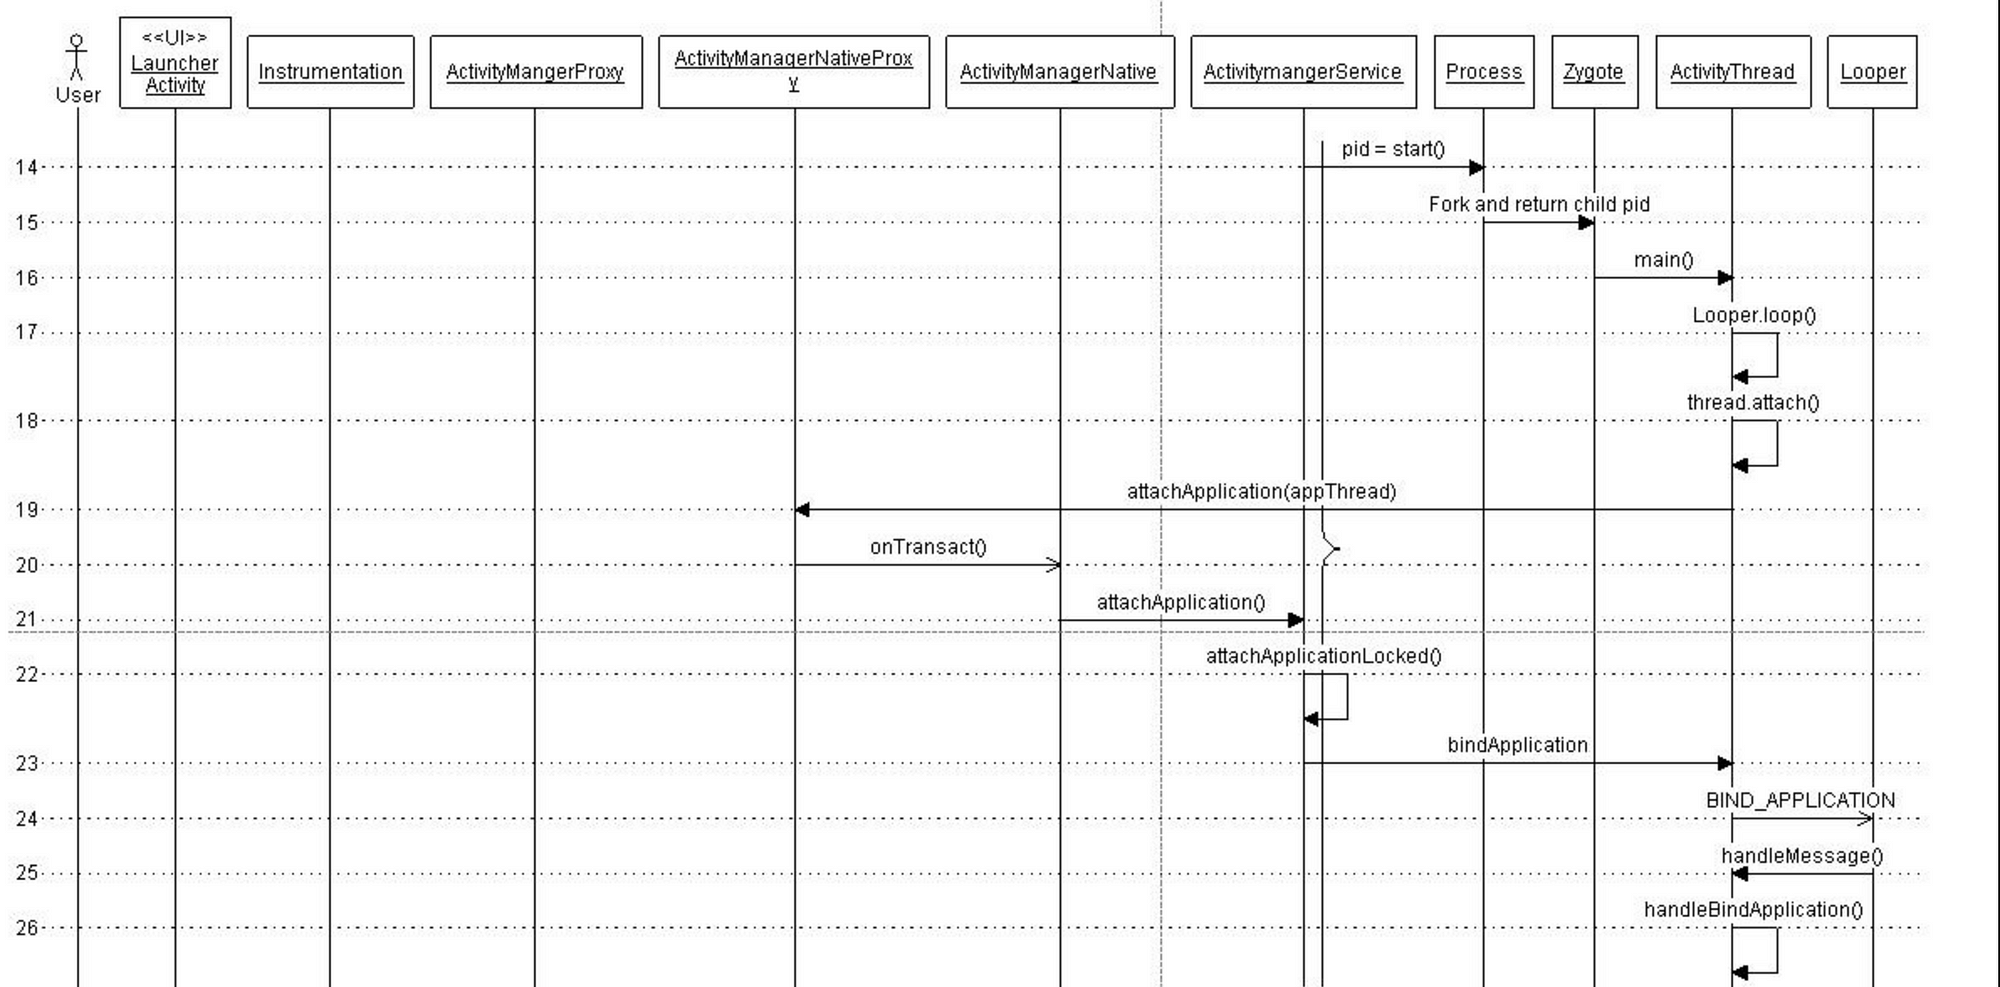
As you saw above many things happen behind the scene when a user clicks on an icon and a new application gets launched. Here is the full picture :

There are three distinct phases of process launch :
- Process Creation
- Binding Application
- Launching Activity / Starting Service / Invoking intent receiver …
ActivityManagerService creates a new process by invoking startProcessLocked() method which sends arguments to Zygote process over the socket connection. Zygote forks itself and calls ZygoteInit.main() which then instantiates ActivityThread object and returns a process id of a newly created process.
Every process gets one thread by default. The main thread has a Looper instance to handle messages from a message queue and it calls Looper.loop() in its every iteration of run() method. It’s the job of a Looper to pop off the messages from message queue and invoke the corresponding methods to handle them. ActivityThread then starts the message loop by calling Looper.prepareLoop() and Looper.loop() subsequently.
The following sequence captures the call sequence in detail —

The next step is to attach this newly created process to a specific application. This is done by calling bindApplication() on the thread object. This method sends BIND_APPLICATION message to the message queue. This message is retrieved by the Handler object which then invokes handleMessage() method to trigger the message specific action — handleBindApplication(). This method invokes makeApplication() method which loads app specific classes into memory.
This call sequence is depicted in following figure.
Launching an Activity:
After the previous step, the system contains the process responsible for the application with application classes loaded in process’s private memory. The call sequence to launch an activity is common between a newly created process and an existing process.
The actual process of launching starts in realStartActivity() method which calls sheduleLaunchActivity() on the application thread object. This method sends LAUNCH_ACTIVITY message to the message queue. The message is handled by handleLaunchActivity() method as shown below.
Assuming that user clicks on Video Browser application. the call sequence to launch the activity is as shown in the figure.
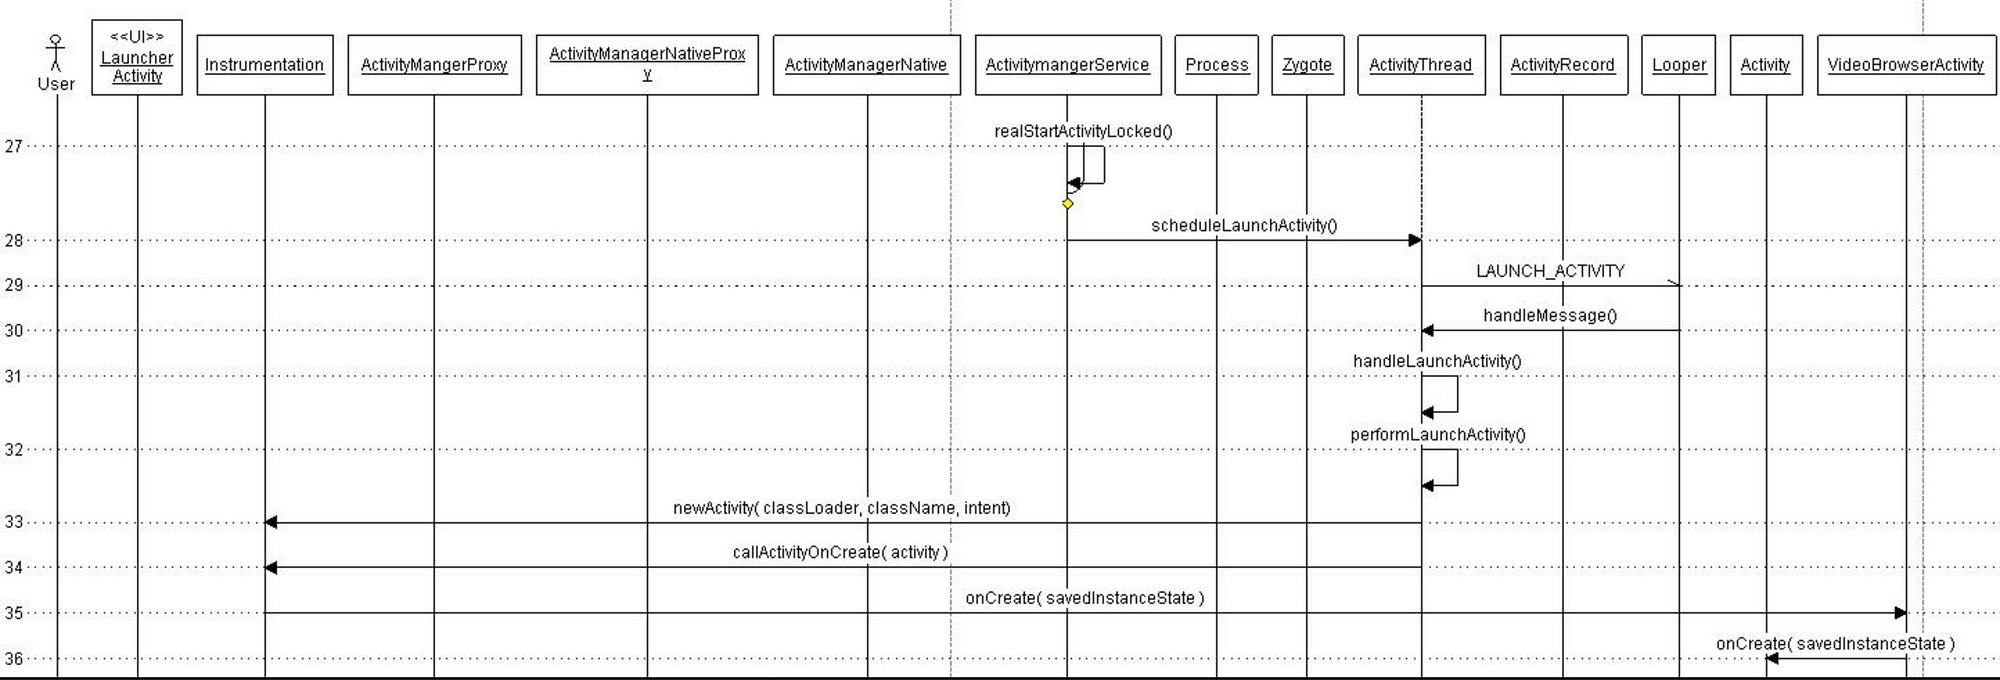
The Activity starts its managed lifecycle with onCreate() method call. The activity comes to foreground with onRestart() call and starts interacting with the user with onStart() call.
Thanks for reading through 🙌🏼. If you found this post useful, please applaud using the 👏 button and share it through your circles.
This article was initially published as two part series (Part 1 and Part 2) on my blog ./ mult-core-dump in 2010. These articles have been cited in multiple documents including the very famous Introduction to the Android Graphics Pipeline
Источник
Starting Another Activity
This lesson teaches you to
You should also read
After completing the previous lesson, you have an app that shows an activity (a single screen) with a text field and a button. In this lesson, you’ll add some code to MainActivity that starts a new activity when the user clicks the Send button.
Respond to the Send Button
To respond to the button’s on-click event, open the activity_main.xml layout file and add the android:onClick attribute to the element:
The android:onClick attribute’s value, «sendMessage» , is the name of a method in your activity that the system calls when the user clicks the button.
Open the MainActivity class (located in the project’s src/ directory) and add the corresponding method:
This requires that you import the View class:
Tip: In Eclipse, press Ctrl + Shift + O to import missing classes (Cmd + Shift + O on Mac).
In order for the system to match this method to the method name given to android:onClick , the signature must be exactly as shown. Specifically, the method must:
- Be public
- Have a void return value
- Have a View as the only parameter (this will be the View that was clicked)
Next, you’ll fill in this method to read the contents of the text field and deliver that text to another activity.
Build an Intent
An Intent is an object that provides runtime binding between separate components (such as two activities). The Intent represents an app’s «intent to do something.» You can use intents for a wide variety of tasks, but most often they’re used to start another activity.
Inside the sendMessage() method, create an Intent to start an activity called DisplayMessageActivity :
The constructor used here takes two parameters:
- A Context as its first parameter ( this is used because the Activity class is a subclass of Context )
- The Class of the app component to which the system should deliver the Intent (in this case, the activity that should be started)
Sending an intent to other apps
The intent created in this lesson is what’s considered an explicit intent, because the Intent specifies the exact app component to which the intent should be given. However, intents can also be implicit, in which case the Intent does not specify the desired component, but allows any app installed on the device to respond to the intent as long as it satisfies the meta-data specifications for the action that’s specified in various Intent parameters. For more information, see the class about Interacting with Other Apps.
Note: The reference to DisplayMessageActivity will raise an error if you’re using an IDE such as Eclipse because the class doesn’t exist yet. Ignore the error for now; you’ll create the class soon.
An intent not only allows you to start another activity, but it can carry a bundle of data to the activity as well. Inside the sendMessage() method, use findViewById() to get the EditText element and add its text value to the intent:
Note: You now need import statements for android.content.Intent and android.widget.EditText . You’ll define the EXTRA_MESSAGE constant in a moment.
An Intent can carry a collection of various data types as key-value pairs called extras. The putExtra() method takes the key name in the first parameter and the value in the second parameter.
In order for the next activity to query the extra data, you should define the key for your intent’s extra using a public constant. So add the EXTRA_MESSAGE definition to the top of the MainActivity class:
It’s generally a good practice to define keys for intent extras using your app’s package name as a prefix. This ensures they are unique, in case your app interacts with other apps.
Start the Second Activity
To start an activity, call startActivity() and pass it your Intent . The system receives this call and starts an instance of the Activity specified by the Intent .
With this new code, the complete sendMessage() method that’s invoked by the Send button now looks like this:
Now you need to create the DisplayMessageActivity class in order for this to work.
Create the Second Activity
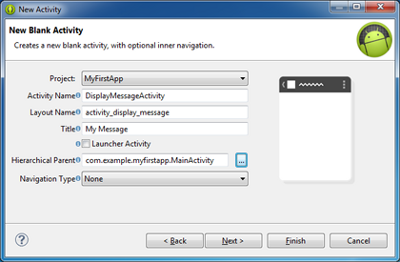
Figure 1. The new activity wizard in Eclipse.
To create a new activity using Eclipse:
- Click New
 in the toolbar.
 - In the window that appears, open the Android folder and select Android Activity. Click Next.
- Select BlankActivity and click Next.
- Fill in the activity details:
- Project: MyFirstApp
- Activity Name: DisplayMessageActivity
- Layout Name: activity_display_message
- Title: My Message
- Hierarchial Parent: com.example.myfirstapp.MainActivity
- Navigation Type: None
 in the toolbar.
Click Finish.
If you’re using a different IDE or the command line tools, create a new file named DisplayMessageActivity.java in the project’s src/ directory, next to the original MainActivity.java file.
Open the DisplayMessageActivity.java file. If you used Eclipse to create this activity:
- The class already includes an implementation of the required onCreate() method.
- There’s also an implementation of the onCreateOptionsMenu() method, but you won’t need it for this app so you can remove it.
- There’s also an implementation of onOptionsItemSelected() which handles the behavior for the action bar’s Up behavior. Keep this one the way it is.
Because the ActionBar APIs are available only on HONEYCOMB (API level 11) and higher, you must add a condition around the getActionBar() method to check the current platform version. Additionally, you must add the @SuppressLint(«NewApi») tag to the onCreate() method to avoid lint errors.
The DisplayMessageActivity class should now look like this:
If you used an IDE other than Eclipse, update your DisplayMessageActivity class with the above code.
All subclasses of Activity must implement the onCreate() method. The system calls this when creating a new instance of the activity. This method is where you must define the activity layout with the setContentView() method and is where you should perform initial setup for the activity components.
Note: If you are using an IDE other than Eclipse, your project does not contain the activity_display_message layout that’s requested by setContentView() . That’s OK because you will update this method later and won’t be using that layout.
Add the title string
If you used Eclipse, you can skip to the next section, because the template provides the title string for the new activity.
If you’re using an IDE other than Eclipse, add the new activity’s title to the strings.xml file:
Add it to the manifest
All activities must be declared in your manifest file, AndroidManifest.xml , using an element.
When you use the Eclipse tools to create the activity, it creates a default entry. If you’re using a different IDE, you need to add the manifest entry yourself. It should look like this:
The android:parentActivityName attribute declares the name of this activity’s parent activity within the app’s logical hierarchy. The system uses this value to implement default navigation behaviors, such as Up navigation on Android 4.1 (API level 16) and higher. You can provide the same navigation behaviors for older versions of Android by using the Support Library and adding the element as shown here.
Note: Your Android SDK should already include the latest Android Support Library. It’s included with the ADT Bundle but if you’re using a different IDE, you should have installed it during the Adding Platforms and Packages step. When using the templates in Eclipse, the Support Library is automatically added to your app project (you can see the library’s JAR file listed under Android Dependencies). If you’re not using Eclipse, you need to manually add the library to your project—follow the guide for setting up the Support Library then return here.
If you’re developing with Eclipse, you can run the app now, but not much happens. Clicking the Send button starts the second activity but it uses a default «Hello world» layout provided by the template. You’ll soon update the activity to instead display a custom text view, so if you’re using a different IDE, don’t worry that the app won’t yet compile.
Receive the Intent
Every Activity is invoked by an Intent , regardless of how the user navigated there. You can get the Intent that started your activity by calling getIntent() and retrieve the data contained within it.
In the DisplayMessageActivity class’s onCreate() method, get the intent and extract the message delivered by MainActivity :
Display the Message
To show the message on the screen, create a TextView widget and set the text using setText() . Then add the TextView as the root view of the activity’s layout by passing it to setContentView() .
The complete onCreate() method for DisplayMessageActivity now looks like this:
You can now run the app. When it opens, type a message in the text field, click Send, and the message appears on the second activity.
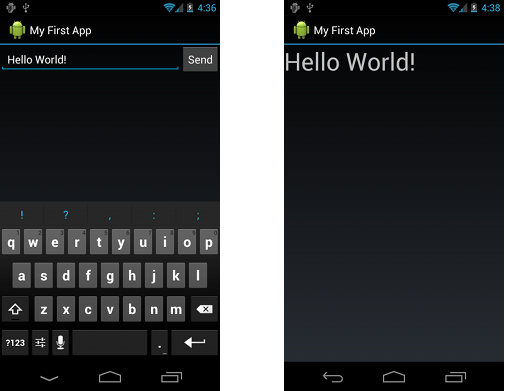
Figure 2. Both activities in the final app, running on Android 4.0.
That’s it, you’ve built your first Android app!
To learn more about building Android apps, continue to follow the basic training classes. The next class is Managing the Activity Lifecycle.
Источник


