- Файл манифеста AndroidManifest.xml
- Назначение файла
- Общая структура манифеста
- Описание
- Атрибуты
- Полный список
- Creating Android Services
- Contents
- Creating an Android Service
- Adding an Android Service to an Application
- Adding Several Android Services to an Application
- Project Dependencies
- Deleting an Android Service from an Application
- Starting a Service
- Started Service
- Sticky Start
- Bound Service
- BindService / UnBindService Methods
- OnBind Event
Файл манифеста AndroidManifest.xml
Файл манифеста AndroidManifest.xml предоставляет основную информацию о программе системе. Каждое приложение должно иметь свой файл AndroidManifest.xml. Редактировать файл манифеста можно вручную, изменяя XML-код или через визуальный редактор Manifest Editor (Редактор файла манифеста), который позволяет осуществлять визуальное и текстовое редактирование файла манифеста приложения.
Назначение файла
- объявляет имя Java-пакета приложения, который служит уникальным идентификатором;
- описывает компоненты приложения — деятельности, службы, приемники широковещательных намерений и контент-провайдеры, что позволяет вызывать классы, которые реализуют каждый из компонентов, и объявляет их намерения;
- содержит список необходимых разрешений для обращения к защищенным частям API и взаимодействия с другими приложениями;
- объявляет разрешения, которые сторонние приложения обязаны иметь для взаимодействия с компонентами данного приложения;
- объявляет минимальный уровень API Android, необходимый для работы приложения;
- перечисляет связанные библиотеки;
Общая структура манифеста
Файл манифеста инкапсулирует всю архитектуру Android-приложения, его функциональные возможности и конфигурацию. В процессе разработки приложения вам придется постоянно редактировать данный файл, изменяя его структуру и дополняя новыми элементами и атрибутами.
Корневым элементом манифеста является . Помимо данного элемента обязательными элементами является теги и . Элемент является основным элементом манифеста и содержит множество дочерних элементов, определяющих структуру и работу приложения. Порядок расположения элементов, находящихся на одном уровне, произвольный. Все значения устанавливаются через атрибуты элементов. Кроме обязательных элементов, упомянутых выше, в манифесте по мере необходимости используются другие элементы.
Описание
Элемент является корневым элементом манифеста. По умолчанию Eclipse создает элемент с четырьмя атрибутами:
Атрибуты
объявляет разрешение, которое используется для ограничения доступа к определенным компонентам или функциональности данного приложения. В этой секции описываются права, которые должны запросить другие приложения для получения доступа к вашему приложению. Приложение может также защитить свои собственные компоненты (деятельности, службы, приемники широковещательных намерений и контент-провайдеры) разрешениями. Оно может использовать любое из системных разрешений, определенных Android или объявленных другими приложениями, а также может определить свои собственные разрешения.
android:name название разрешения android:label имя разрешения, отображаемое пользователю android:description описание разрешения android:icon значок разрешения android:permissionGroup определяет принадлежность к группе разрешений android:protectionLevel уровень защиты
Элемент запрашивает разрешение, которые приложению должны быть предоставлены системой для его нормального функционирования. Разрешения предоставляются во время установки приложения, а не во время его работы.
android:name имеет единственный атрибут с именем разрешения android:name. Это может быть разрешение, определенное в элементе
данного приложения, разрешение, определенное в другом приложении или одно из стандартных системных разрешений, например: android:name=»android.permission.CAMERA» или android:name=»»android.permission.READ_CONTACTS»
Наиболее распространенные разрешения
- INTERNET — доступ к интернету
- READ_CONTACTS — чтение (но не запись) данных из адресной книги пользователя
- WRITE_CONTACTS — запись (но не чтение) данных из адресной книги пользователя
- RECEIVE_SMS — обработка входящих SMS
- ACCESS_COARSE_LOCATION — использование приблизительного определения местонахождения при помощи вышек сотовой связи или точек доступа Wi-Fi
- ACCESS_FINE_LOCATION — точное определение местонахождения при помощи GPS
объявляет базовое имя для дерева разрешений. Этот элемент объявляет не само разрешение, а только пространство имен, в которое могут быть помещены дальнейшие разрешения.
определяет имя для набора логически связанных разрешений. Это могут быть как объявленные в этом же манифесте с элементом
разрешения, так и объявленные в другом месте. Этот элемент не объявляет разрешение непосредственно, только категорию, в которую могут быть помещены разрешения. Разрешение можно поместить в группу, назначив имя группы в атрибуте permissionGroup элемента
Источник
Полный список
— создаем, запускаем и останавливаем простой сервис
Для начала надо определиться, как по-русски называть Service. Общепринятый перевод – служба. Наиболее популярный пример – службы в Windows. Но для системы Android мне привычнее использовать слово сервис. Его я и буду использовать в своих уроках для обозначения Service.
И еще один момент надо сразу прояснить. Service прописывается в манифесте рядом с Activity, и получается, что приложение (Application) содержит в себе и Activity и сервис. Предлагаю для упрощения изложения материала под словом приложение понимать все таки только Activity, которые можно запустить и увидеть на экране. Т.е. то, что мы раньше и называли приложением. А сервис считать отдельной от приложения вещью. А если надо будет обозначить приложение, как контейнер для Activity и сервиса, буду использовать слово Application.
Т.е. приложение – это набор Activity, сервис – Service. Приложение + сервис = Application. Как то так.
Итак, сервис – это некая задача, которая работает в фоне и не использует UI. Запускать и останавливать сервис можно из приложений и других сервисов. Также можно подключиться к уже работающему сервису и взаимодействовать с ним.
В качестве примера можно рассмотреть алгоритм почтовой программы. Она состоит из приложения и сервиса. Сервис работает в фоне и периодически проверяет наличие новой почты, скачивает ее и выводит уведомления. А когда вы запускаете приложение, оно отображает вам эти загруженные сервисом письма. Также приложение может подключиться к сервису и поменять в нем, например, период проверки почты или совсем закрыть сервис, если постоянная проверка почты больше не нужна.
Т.е. сервис нужен, чтобы ваша задача продолжала работать, даже когда приложение закрыто. В ближайших уроках мы разберемся, какие способы взаимодействия существуют между приложением и сервисом. В этом же уроке создадим простейший сервис, который будет выводить что-нибудь в лог. А приложение будет запускать и останавливать сервис.
Project name: P0921_ServiceSimple
Build Target: Android 2.3.3
Application name: ServiceSimple
Package name: ru.startandroid.develop.p0921servicesimple
Create Activity: MainActivity
Добавим в strings.xml строки:
Две кнопки – для запуска и остановки сервиса. И ProgressBar.
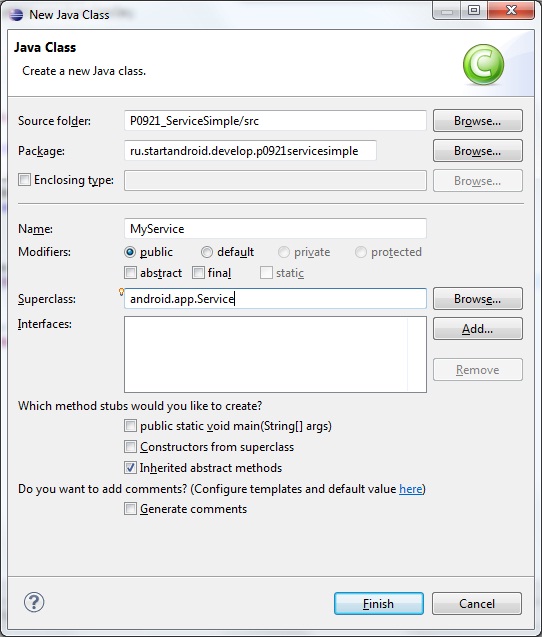
Рядом с MainActivity создайте класс MyService, наследующий android.app.Service
У сервиса так же, как и у Activity есть методы onCreate и onDestroy – которые срабатывают при создании и уничтожении сервиса.
Метод onStartCommand – срабатывает, когда сервис запущен методом startService. В нем мы запускаем наш метод someTask, который пока пуст. У onStartCommand на вход и на выход идут параметры, мы их пока не используем.
Метод onBind нам пока не интересен. Но реализовать его мы обязаны, возвращаем null.
someTask – здесь будем кодить работу для сервиса
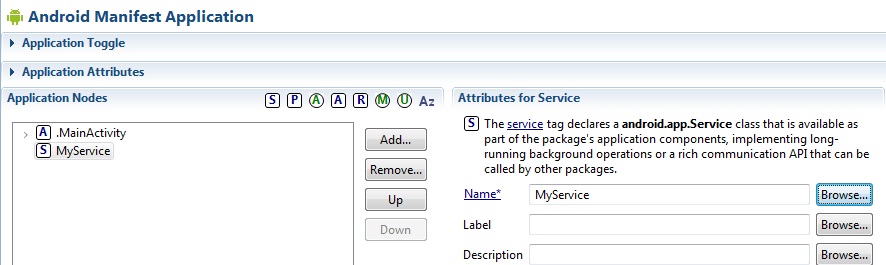
Сервис, как и новые, создаваемые Activity необходимо прописать в манифесте. Делается это полностью аналогично. Жмете Add, выбираете Service. И в поле Name выбираете MyService.
Здесь у нас два метода, которые срабатывают при нажатии на кнопки Start service и Stop service. В них мы соответственно запускаем или останавливаем сервис методами startService и stopService. На вход передаем Intent, указывающий на сервис. Это очень похоже на то, как мы вызываем Activity методом startActivity.
Давайте все сохраним и запустим приложение.
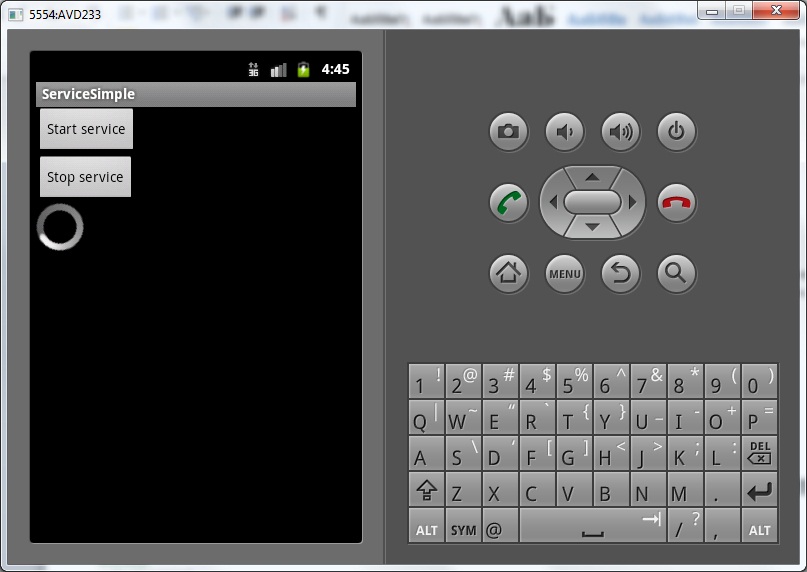
Нажмем Start service и смотрим лог:
Выполнился метод onCreate – сервис создался, и onStartCommand – сервис выполняет содержимое метода onStartCommand.
Если мы теперь еще раз нажмем Start service:
Сервис уже создан, onCreate не вызывается, выполняется только метод onStartCommand.
Жмем Stop service
Убедимся, что сервис не зависит от приложения. Жмем Start service.
Сервис запущен. Закрываем приложение кнопкой Назад. В логах тишина, onDestroy в сервисе не выполнился, сервис продолжает жить. Ему все равно, работает приложение, его запустившее или не работает.
Долгим удержанием клавиши Домой выведем список последних приложений
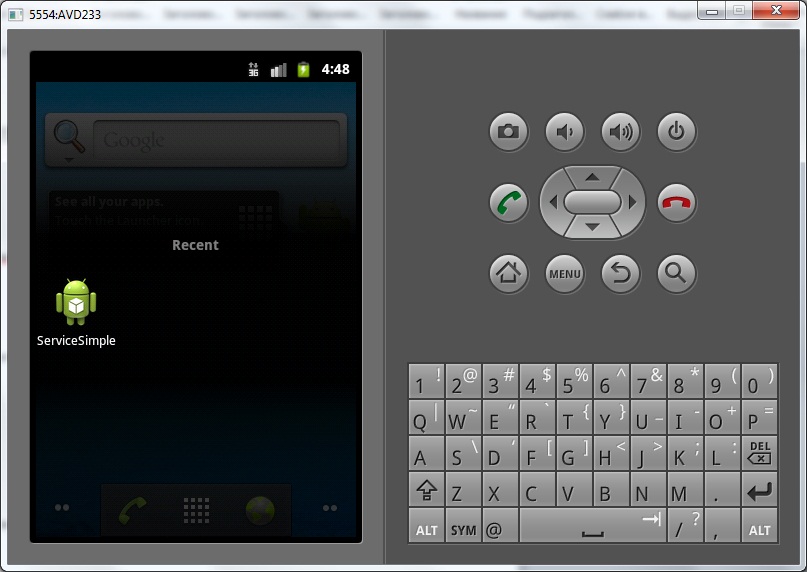
снова откроем наше приложение и нажмем Stop service. В логах:
Теперь попробуем выполнять что-нибудь осмысленное в onStartCommand. Перепишем метод someTask в MyService.java:
Будем с интервалом в 1 секунду выводить в лог записи из сервиса.
Все сохраним, запустим и нажмем Start service:
ProgressBar замер, экран стал недоступен. А логи идут:
Вывод – сервис работает в основном потоке и блокирует экран.
Вынесем цикл с паузами в отдельный поток. И чтобы два раза не бегать, давайте заодно узнаем, что делает метод stopSelf.
Перепишем метод someTask:
Мы вынесли код в отдельный поток и добавили вызов метода stopSelf – этот метод аналогичен методу stopService, он останавливает сервис, в котором был вызван.
Все сохраняем, запускаем и жмем Start service. ProgressBar крутится, экран не блокирован, логи идут:
Сервис создался, выполнил работу и сам остановился методом stopSelf.
На следующем уроке:
— передаем данные в сервис
— рассматриваем методы остановки сервиса stopSelf и stopSelfResult
Присоединяйтесь к нам в Telegram:
— в канале StartAndroid публикуются ссылки на новые статьи с сайта startandroid.ru и интересные материалы с хабра, medium.com и т.п.
— в чатах решаем возникающие вопросы и проблемы по различным темам: Android, Kotlin, RxJava, Dagger, Тестирование
— ну и если просто хочется поговорить с коллегами по разработке, то есть чат Флудильня
— новый чат Performance для обсуждения проблем производительности и для ваших пожеланий по содержанию курса по этой теме
Источник
Creating Android Services
Contents
An Android Service is an application without user interface that performs background tasks. There are essentially two types of services:
- A started service: This service is started by an Android application. The service can run in the background indefinitely, even if the application is closed. This type of service usually performs a single task and automatically stops after finishing.
- A bound service: This service only runs while it is bound to an Android application. There is an interaction between the application and the service, and it remains active until the application unbinds. More than one application can bind to the same service.
To create an Android Service project:
There are some differences between a stand-alone application and an Android Service project application:
- There are no nodes under Target Platform (Android): Target, Configuration and Libraries.
- Only Android is available as a target platform.
- The Deployment Manager is disabled.
- Options Run and Run Without Debugging are disabled.
Creating an Android Service
RAD Studio provides a wizard to create Android Service projects.
To create a new Android Service project, choose File > New > Other , then navigate to:
- Delphi Projects > Android Service
Use this wizard to specify the type of service, local or remote.
- A local service is private to an application. Access from other applications is blocked adding a line to the Android Manifest file:
- A remote service is public, and other applications can access it. Access to the service is granted adding a line to the Android Manifest file:
For more information about the different options, see Android Service.
For more information about the Android Manifest attributes, see Exported Provider Element.
Adding an Android Service to an Application
Android services are not stand-alone applications, they work together with Multi-Device applications.
Once the service is created, it appears on the Projects Window as lib
- Add all the visual components to the data module, and the functions and procedures to the code.
- Save the Android Service project. Note1: Save each Android Service project in an exclusive folder. Note2: Do not name the Android Service project as Service.
- Build the Android Service project before adding it to the application in order to generate the binary files.
- Add to the Projects Window the application to which you want to add the service:
- For an existing application, on the project group, right-click and select Add Existing Project.
- For a new Multi-Device Application, on the project group, right-click and select Add New Project, then navigate to:
- Delphi Projects > Multi-Device Application .
- On the Multi-Device Application, select the Android target platform.
- On the Android target platform, right-click and select Add Android Service.
- The Add New Android Service wizard appears. You have two options to add a new Android service. Choose one of the following:
- Search files automatically from project base path.
- Choose this option to select the folder where your Android Service project is saved. The wizard will search the required files automatically. Warning: If you have more than one Andoird service in the given folder, the wizard will select one of them randomly. If you want to add a specific Android service, use the second option.
- Click Next.
- Click
 to select the folder where your Android Service project is saved.
- I will select all required files manually.
- Choose this option to select all the required files manually. Warning: Make sure that step 3 is done. Otherwise, you will not have the binary files available.
- Click Next.
- Click to select each requested file.
- Search files automatically from project base path.
- Click Next.
- If everything is correct, then the files that are going to be added to your Multi-Device application appear listed.
- If an extra window appears requesting information about the Android Service paths, save and build the Android Service, then try it again.
- Click Finish to add the files to the application:
- The main binary file, lib
.so. The binary file is added to the Deployment Manager.
- The libProxyAndroidService.so file. This library is added to the Deployment Manager. Note: This file is shared by all the services added to the application.
- The Java archive,
.jar file. The jar file is added to the Libraries node on the Projects Window, under the Android target platform.
The data module file,.pas file. The data module is added to the Projects Window.
- The main binary file, lib
- Compile the Multi-Device Application to generate the Android Manifest file. The line that corresponds to the type of service previously selected (local or remote) is automatically added. See Creating an Android Service. Note: Each service needs a corresponding declaration in the AndroidManifest.xml. This is automatically added by the IDE.
 to select the folder where your Android Service project is saved.
Adding Several Android Services to an Application
You can add any number of services to an Android application.
Follow the steps on Adding an Android Service to an Application for each of the services to add.
Important things to take into account:
- If you have several Android Services projects in the same folder and you want to include a specific one, choose the second option in the step 5.2. Otherwise, the wizard may add an unwanted Android service.
- Name differently each project before adding it to the main application:
- The Android Service project, lib .so.
Note: Do not name the Android Service project as Service.
- The unit file.
- The Data Module, by changing the Name property on the Object Inspector.
Project Dependencies
Android Service projects added to Multi-Device Applications appear as Project Dependencies.
The Android Service projects vinculated to the host application are automatically enabled in Project Dependencies to be always build before the host application.
Deleting an Android Service from an Application
On the Multi-Device Application, select the Android target platform.
- On the Android target platform, right-click and select Remove Android Service.
- The Remove Android Services wizard appears.
- Select the services to remove from the list.
- Click Next.
- The wizard shows a list of actions to perform, such as deleting the data modules, .so extension files, and .jar extension files.
- Click Finish.
Starting a Service
Services can be started with ALocalServiceConnection.StartService(‘ ‘) and ALocalServiceConnection.BindService(‘ ‘), or ARemoteServiceConnection.StartService(‘ ‘) and ARemoteServiceConnection.BindService(‘ ‘).
You initialize the TLocalServiceConnection variable to a specific service when starting or binding to it, after that you do not need to refer to the service name for the rest of methods.
Once you add an Android Service to your Multi-Device Application:
- Include the following unit in the Uses clause of the interface:
Started Service
For a Started service, call StartService(‘ ‘) to start the service.
When using services as started, you need to manage the service process stopping the service with JavaService.stopSelf; .
Sticky Start
The OnStartCommand event for the service is defined by default as START_NOT_STICKY.
- START_STICKY is used for services that are explicitly started and stopped as needed. The system tries to re-create the service when killed.
- START_NOT_STICKY is used for services that should only remain running while processing any commands sent to them. If the process is killed, the service is not restarted automatically.
If you want to have a START_STICKY on the OnStartCommand event, you need to specify it on the service:
For more information, see Service Lifecycle.
Bound Service
For a Bound Service, call BindService(‘ ‘) , to bind to the service so that you can start interacting with it, and UnBindService to disconnect from the service.
For more information, see Bound Services.
BindService / UnBindService Methods
When the main application calls BindService(‘ ‘) , the connection variable gets a pointer to the memory address where the service is running.
After establishing the connection to a specific service, when you call UnBindService , and the application is the only one bound to the service, the service frees himself. Take into account that the connection variable of the main application remains pointing to the same memory address. Binding to the same service again can provoke a crash on the main application because the memory address to the service could be invalid.
There are two ways of handling this situation:
- Avoiding ARC using the [UnSafe] attribute.
- Assigning Nil to the variable before unbinding from the service.
Using the [Unsafe] Attribute
OnBind Event
When you call BindService(‘ ‘) on your application, the OnBind event triggers on the Android Service project. The OnBind method returns a IBinder object that is responsible of actually managing the connection with the service.
Overwriting the OnBind method causes that the event does not return the IBinder object that the main application needs to bring the Data Module from the service.
To use the OnBind method:
- On the OnBind method return the IBinder object:
Источник


