- 400+ Android & Flutter Code
- Thursday, January 15, 2015
- How to start another activity from an activity in Android
- Tek Eye
- Start with a Basic Hello World App
- Add Another Activity
- Add a Button to the First Screen
- Add Text to the Second Screen
- AndroidManifest.xml
- Add Code to Start Screen 2
- See Also
- Archived Comments
- Do you have a question or comment about this article?
- Вызов функции startActivity() извне контекста активности
- ОТВЕТЫ
- Ответ 1
- Ответ 2
- Ответ 3
- Ответ 4
- Ответ 5
- Ответ 6
- Ответ 7
- Ответ 8
- Ответ 9
- Ответ 10
- Ответ 11
- Ответ 12
- Ответ 13
- Ответ 14
- Ответ 15
- Ответ 16
- Ответ 17
- Ответ 18
- Ответ 19
- Ответ 20
- Ответ 21
- Ответ 22
- Ответ 23
- Ответ 24
400+ Android & Flutter Code
Example code for android + flutter app developers.
Thursday, January 15, 2015
How to start another activity from an activity in Android
To create this example we uses Android Studio IDE. The following android example code demonstrate us how can we start another Activity from an Activity. Activity is an Android application component that render a screen with which app users can interact to do some task such as sending or reading an email, take a photo by phone camera, navigating through a map etc. Activity generated window typically fill the full screen but it may be smaller and can be float on top of other windows.
Generally an android app consists multiple Activities. Such as an email app have one activity to send email, another activity to read email etc. So, an activity should contact other activities. Typically Activities are bound to each other. In the Activity stack, one Activity are defined as a main Activity which presented to app user when they launch the app at first time. Each Activity can then start another Activity to perform additional task. When a new Activity start, the previous Activity is stopped but Android system preserve the Activity in a stack (Back Stack). When a new Activity starts its pushed on to the back stack and got user focus.
When a new Activity is start Android system stopped the previous Activity. When an Activity stopped, the specified Activity release any large objects such as network or database connection. When the Activity resume it reacquire the necessary resources and resume specified actions.
To create an Activity, app developer must create a subclass of Activity or an existing subclass of it. Android system call onCreate() method when creating an Activity. Within this method we should initialize the essential components of this Activity. The setContentView() method allow us to define the XML layout for the Activity’s user interface.
We can start another activity from an Activity by calling startActivity() method. We just need to pass an Intent that describe the new Activity which we want to start. The Intent can specify either the exact Activity or describe the type of action we want to perform (in this situation Android system selects the appropriate Activity, which can even be from a different application). Intent also can carry (pass) small amount of data to the new Activity.
We can start an Activity within same application by using class name. Intent putExtra() method add extended data to the Intent.
An Intent is a messaging object that Android developer can use to request an action from another app component. An Intent used to start an Activity, to start a Service and to deliver a Broadcast. There are two types of Intents, those are Explicit Intents and Implicit Intents. Explicit Intents specify the component to start by name (fully-qualified class name). Typically Explicit Intents are used to start a component within same app. Implicit Intents do not name a specific component but instead declare a general action to perform such as play a video.
Источник
Tek Eye
If you are new to Android development it is often easier to see simple examples rather than decode the developers online documentation. Building on the simple example seen in Your First Android Java Program — Hello World! another screen containing a simple message is loaded from a button. This demonstrates the principles of starting a new User Interface (UI) screen, helping to understanding on how Android handles UI creation.
To get a screen up and running in an app the following is required:
- The definition of the screen must be composed in a layout.
- An Activity class must be defined in a Java class file to handle the screen.
- Android must be notified that the Activity exists, via the app’s manifest file.
- The app must tell Android to start the new screen.
Studio handles most of the plumbing when adding a new activity to an app, performing tasks 1 to 3 automatically when an Activity is created using Studio’s options. This leaves only a small amount of code to be written to load a second screen from the first app screen.
Start with a Basic Hello World App
Fire up Android Studio and open the Hello World project (see Your First Android Java Program — Hello World! on how to create the Hello World app).
Add Another Activity
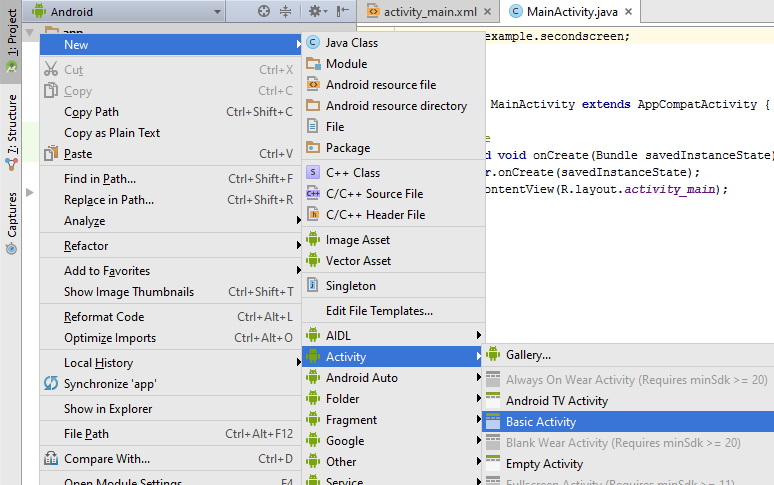
In the Project explorer tree in the Studio select the app folder. (See the Android Project Structure article to become familiar with project files). Using the File menu or the context menu (commonly right-click) add a new Activity to the app via New and Activity. A Basic Activity can be used:
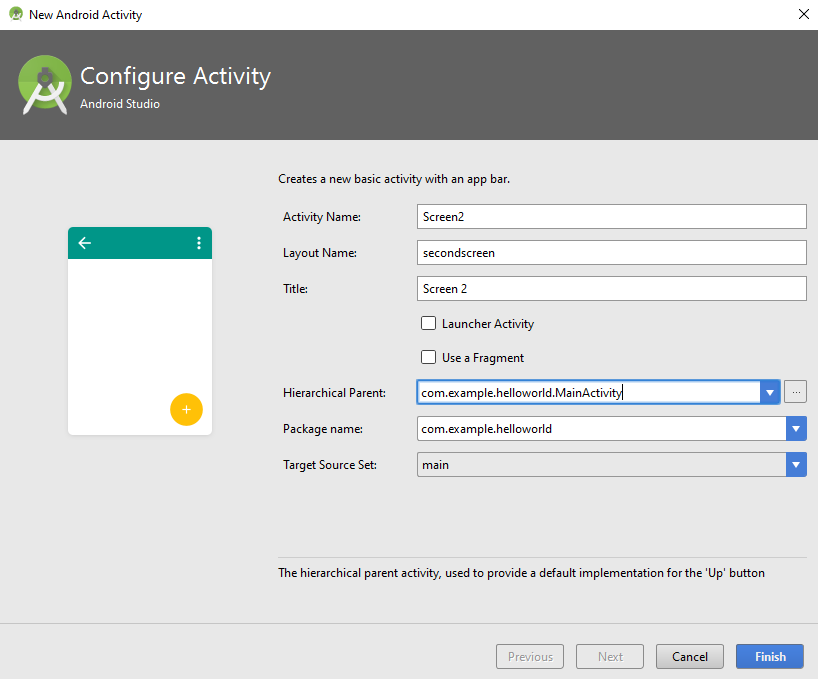
Set the properties for the new Activity, e.g.:
- Activity Name — Screen2
- Layout Name — secondscreen
- Title — Screen 2
Select the Parent to be the first Activity, com.example.helloworld.MainActivity (the parent is the screen the app returns to when the back button is pressed). All other settings remain as default (not a Launcher Activity, not a Fragment, Package set to com.example.helloworld, Target Source Set is main).
Click Finish and the Activity and associated layout is created. (If an error message is displayed on the new screen try the Invalidate Caches / Restart option on the File menu as discussed in the article Your First Android Java Program.)
Add a Button to the First Screen
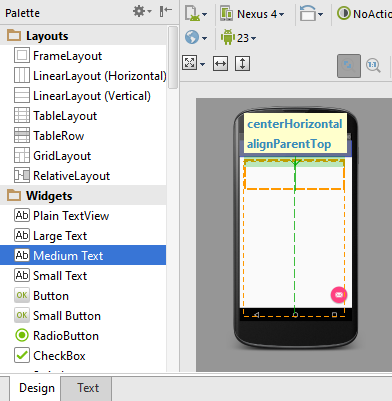
Add a Button to the first screen in the layout folder. (Tip: To find an item, e.g. layout, click the to level in the Project explorer and start typing the item’s name to start a search.) The file activity_main.xml contains the screen elements for the first screen. With the file open drag and drop a Button widget onto the screen:
Set the Button’s text to Next, use the right hand Component Tree tab to see the Properties.
Add Text to the Second Screen
Open the content_screen2.xml file in the layout folder and drag and drop a TextView on to the screen:
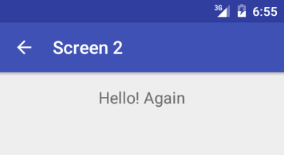
As for the Button set the TextView text, e.g. to Hello! Again.
AndroidManifest.xml
When the Screen2 Activity was added to the app the correct definitions were added to the app’s manifest file, AndroidManifest.xml in app/src/main. This file must be present in an app project. It provides the Android Operating System (OS) all the information it needs to manage the application and the components it contains. If AndroidManifest.xml is opened it will be seen that both the initial screen, MainActivity and the new screen, Screen2 are defined in activity sections. The information in these sections tells Android about the screens in an app.
Add Code to Start Screen 2
The button on the first screen will tell Android of our «intention» to start the Activity that loads the new Screen 2. To do this the button runs an onClick method:
In onClick the name of the required activity, Screen2.class, is passed in an Intent object to the startActivity method. The startActivity method is available on a Context object; Context has a host of useful methods which provide access to the environment in which the app is executing. Context, and hence startActivity is always available within an Activity due to Android API subclassing.
The onClick method is connected to the button by an OnClickListener callback from a View . The following code is added to the MainActivity class, before the last closing brace (curly bracket, >) in the file MainActivity.java. Press Alt-Enter when prompted for the correct import statements to be added automatically:
The Intent object is also given a reference to the app Context, and since MainActivity is subclassed we can use this (here MainActivity.this because of the inner class for the onClick handler). The startActivity method gives Android the opportunity to perform any required housekeeping and then fire up the Activity named in the Intent (Screen2).
The findViewById method, available to activities, is used to get a reference to the button. The setOnClickListener method can then be called to link the button to the onClick code. This is done before the closing brace at the end of the onCreate method in MainActivity:
This is the full MainActivity code:
When the app runs the first screen will show:
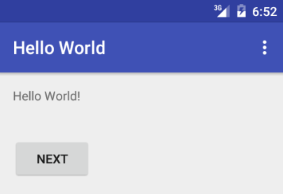
And pressing the Next button shows:
A button is not required to go back to the first screen. Android automatically provides a back button as part of the platform.
This article has shown the basics of starting another screen in an app. The code is available in a zip file, secondscreen.zip, with an instructions.txt on how to import the project into Studio. Later articles will show how data can be passed between screens.
See Also
Archived Comments
Arthur Lu in January 2018 said: For some reason, whenever I run my code, it is unable to open the second activity, and instead re-opens the main activity.
Arthur Lu in January 2018 said: OK, so it turns out I accidentally deleted some important code on the second activity.
Gili Alafia in January 2018 said: But that doesn’t answer the question of how to open the app from screen2 to mainactivity.
Dan from Tek Eye in January 2018 said: As it says in the article, use back (e.g. via the arrow on the action bar) to return to the first activity. If you want an explicit button just use the same type of code in the second screen that was used for the main activity:
Author: Daniel S. Fowler Published: 2012-01-09 Updated: 2016-01-28


Do you have a question or comment about this article?
(Alternatively, use the email address at the bottom of the web page.)
↓markdown↓ CMS is fast and simple. Build websites quickly and publish easily. For beginner to expert.
Free Android Projects and Samples:
Источник
Вызов функции startActivity() извне контекста активности
Я применил ListView в своем приложении для Android. Я привязываюсь к этому ListView с помощью пользовательского подкласса класса ArrayAdapter . Внутри переопределенного метода ArrayAdapter.getView(. ) я назначаю OnClickListener . В методе onClick OnClickListener я хочу запустить новое действие. Я получаю исключение:
Как я могу получить Context , что работает ListView (текущий Activity )?
ОТВЕТЫ
Ответ 1
- кешировать объект Context через конструктор в вашем адаптере или
- получить его из вашего представления.
Или, в крайнем случае,
- добавить флаг FLAG_ACTIVITY_NEW_TASK в свои намерения:
Изменить — я бы избегал установки флагов, поскольку это будет мешать нормальному потоку событий и стека истории.
Ответ 2
Вы можете достичь этого с помощью addFlags вместо setFlags
Согласно документации это делает:
Добавьте дополнительные флаги к цели (или с существующим значением флагов).
РЕДАКТИРОВАТЬ
Имейте в виду, что если вы используете флаги, вы меняете стек истории, как сказал Алексей Воловой:
. избегайте установки флагов, так как это будет мешать нормальному потоку событий и стека истории.
Ответ 3
Вместо использования (getApplicationContext) используйте YourActivity.this
Ответ 4
Если вы получили ошибку из-за использования create chooser, как показано ниже:
Установите флаг для создания выбора:
Ответ 5
Я думаю, что, возможно, вы внедряете OnClickListener в неподходящее место — обычно вам нужно обязательно реализовать OnItemClickListener в своей деятельности и вместо этого установить его в ListView, иначе у вас появятся проблемы с вашими событиями.
Ответ 6
Кроме того: если вы показываете ссылки в списке в фрагменте, не создавайте его так
В обоих случаях адаптер работает нормально, но ссылки работают только в последнем.
Ответ 7
изменить на ниже
Ответ 8
См., если вы создаете намерение в списке в каком-то методе
затем вызовите контекст через это представление:
Вам даже не нужны SetFlags.
Ответ 9
Для любого, кто получает это на Xamarin.Android(MonoDroid), даже когда StartActivity вызывается из активности — это на самом деле ошибка Xamarin с новым временем выполнения ART, см. https://bugzilla.xamarin.com/show_bug.cgi?id=17630
Ответ 10
Эта ошибка возникает, когда стартовая активность не знает, чем он занимается. Таким образом, вы должны добавить активность перед startActivity()
вы должны установить
Ответ 11
На мой взгляд, лучше использовать метод startActivity() только в вашем коде Activity.class . Если вы используете это в Adapter или другом классе, это приведет к этому.
Ответ 12
Разрабатывая Алекс Воловой, ответьте немного больше —
в случае, если u получает эту проблему с фрагментами, getActivity() отлично работает, чтобы получить контекст
В других случаях:
Если вы не хотите использовать —
затем создайте такую функцию в OutsideClass —
Теперь, в своем основном действии, когда вы делаете новый OutsideClass, вызывается вышеупомянутый метод сразу же после того, как вы определяете OutsideClass, предоставляя контекст активности в качестве аргумента. Также в вашем основном действии сделайте функцию —
теперь вернитесь к OutsideClass, и чтобы начать новую деятельность, сделайте что-то вроде этого —
Таким образом, вы сможете запускать различные действия, вызываемые из другого OutsideClass, не испортив флаги.
Примечание. Не пытайтесь кэшировать объект-контекст через конструктор для фрагмента (с адаптером, его тонким). У фрагмента должен быть пустой конструктор, в противном случае приложение вылетает в некоторых сценариях.
не забудьте позвонить
в функции onResume().
Ответ 13
У меня также была та же проблема. Проверьте весь контекст, который вы прошли. Для ссылок для этого требуется Контекст Контекст
Ответ 14
У меня была та же проблема. Проблема связана с контекстом. Если вы хотите открыть какие-либо ссылки (например, поделитесь любой ссылкой с помощью выбора), перейдите в контекст активности, а не в контекст приложения.
Не забудьте добавить myIntent.addFlags(Intent.FLAG_ACTIVITY_NEW_TASK) , если вы не в своей деятельности.
Ответ 15
Используйте этот код в вашей Adapter_Activity и используйте context.startActivity(intent_Object) и intent_Object.addFlags(Intent.FLAG_ACTIVITY_NEW_TASK);
Ответ 16
Надеюсь, что это сработает.
Ответ 17
Столкнулся с той же проблемой, а затем реализовал
и получил решение проблемы.
Может быть другая причина, связанная с адаптером представления списка.
Вы можете увидеть этот блог, описал его очень хорошо.
Ответ 18
Используйте этот код. У меня отлично работает. Поделитесь чем-то извне деятельности:
Ответ 19
Поскольку добавление флагов влияет на event_flow и stack_history лучше передать «контекст приложения» в stack_history из которого необходимо вызвать класс действия следующим образом:
«ActivityClassName.this» (если вы передадите контекст таким образом, он будет содержать все детали и информацию, необходимые для вызова действия из сценария бездействия)
Таким образом, нет необходимости устанавливать или добавлять флаги, это будет работать нормально в каждом случае.
Ответ 20
На Android 28(Android P) startActivity
Так что лучше всего добавить FLAG_ACTIVITY_NEW_TASK
Ответ 21
Ответ 22
Если вы вызываете share Intent в плагине Кордовы, установка флажка не поможет. Вместо этого используйте это —
Ответ 23
Моя ситуация немного отличалась, я тестирую свое приложение с помощью Espresso и мне пришлось запустить Activity с ActivityTestRule из Context инструментария (который не является результатом Activity ).
Мне пришлось изменить флаги и добавить or побитовый ( | в Java) с Intent.FLAG_ACTIVITY_NEW_TASK
Так что это приводит к:
Ответ 24
Я просто хочу заметить, что startActivity извне действия действует в некоторых версиях Android (между N и O-MR1), и интересным моментом является то, что это ошибка в исходном коде Android!
Это комментарий выше реализации startActivity . Смотрите здесь
Вызов начального действия извне действия без FLAG_ACTIVITY_NEW_TASK, как правило, не допускается, за исключением случаев, когда вызывающая сторона указывает идентификатор задачи, в котором должно быть запущено действие. Между N и O-MR1 существовала ошибка, которая позволяла этому работать.
Источник


