- Как задать статический IP для Андроид устройства в локальной сети
- Как задать статический IP Android устройству
- How to Change the IP Address on Your Android
- Tired of a random Android IP? Here’s how you can make your IP static
- What to Know
- Find a Network IP for Your Android
- What Your Results Mean
- Find a Free IP Address
- Change the IP Address on Your Android
- Manually Configure Your Android’s Network Settings
- Why Change the IP Address on Your Android?
- How to Set a Static IP-Address for Wi-Fi on Android 10, 9, 8
- Set a Static IP-Address on Stock Android
- Android 8
- Android 9 and 10
- Manually Configure a Static IP on Samsung Galaxy
- Static IP on Samsung Galaxy S20 with One UI 2.0
- Samsung Experience (Galaxy S7)
- Static IP-address assignment on Android 4.2.2 (Touchwiz)
- How to Switch Back to Automatic IP Address Obtaining
- Как на Android прописать статический IP для Wi-Fi сети?
- Прописываем IP на Android
Как задать статический IP для Андроид устройства в локальной сети
Как задать статический IP для Андроид устройства в локальной сети . Многие из нас знают, что получить доступ к ресурсам локальной сети с Android сматрфона или планшета никаких проблем не составляет: для этого, например, достаточно воспользоваться менеджером файлов ES Проводник или же — Total Commander с дополнительным плагином.

Иногда у нас возникает задача обратного порядка, а именно — обеспечить доступ к ресурсам смартфона с других устройств, имеющихся в локальной сети. В этом случае нам нужно установить на мобильное устройство FTP сервер и для того, чтобы соединение было стабильным — задать ему статический IP адрес.
Если с организацией FTP сервера обычно проблем не возникает: в Google Play Маркет имеется достаточно широкий выбор приложений подобного типа (Ftp Сервер), то как оказалось — даже достаточно опытные пользователи Android далеко не всегда знают, как задать смартфону, планшету или другому устройству статический IP адрес в локальной сети.
А сделать это, оказывается, очень просто:
Как задать статический IP Android устройству
1. Перейдите в меню общих настроек, раздел Wi-Fi
2. Нажмите и удерживайте палец на том соединении, которому нужно задать статический IP
3. В открывшемся окне выберите «Изменить сеть»
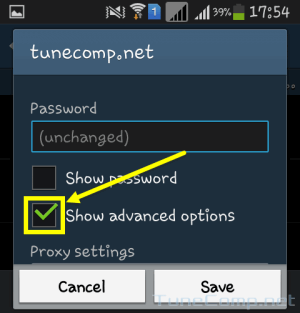
4. В следующем окне тапните по «Расширенные настройки» (или поставьте отметку напротив «Дополнительно» в Android 4.x)
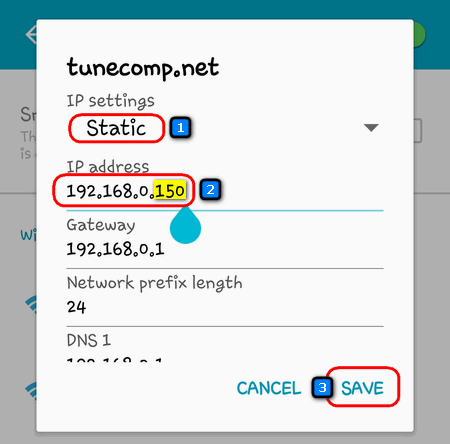
5. Выберите «Настройки IP» -> «Пользовательские»

Как видно на скриншоте выше, здесь вы можете задать IP адрес, адрес шлюза, параметры префикса сети, и адреса DNS серверов для этого WiFi подключения. Назначив нужные параметры не забудьте запомнить их, нажав на кнопку «Сохранить».
Всё, теперь ваш смартфон, планшет, медиаплеер или любое другое Android устройство в этой локальной сети будут иметь постоянный IP адрес.
Источник
How to Change the IP Address on Your Android
Tired of a random Android IP? Here’s how you can make your IP static
:max_bytes(150000):strip_icc()/RyanDube-214359-8f50cb3133cd47c7ae1f3d4f09349f4e.JPG)
What to Know
- In Windows search bar, enter cmd. In Command Prompt, enter ipconfig/all. Mac: cmd + space >terminal.Ping for IP address.
- On Android: Settings >Network & internet >Wi-Fi. Press connected Wi-Fi >Modify network >Advanced options >Static.
- Configure network settings with Gateway IP and DNS address found in Command Prompt, and with IP address found during Ping.
This article explains how to switch your Android (9.0 and up) to a static IP address on your network. The directions below should apply in general, no matter who made your Android device: Samsung, Google, Huawei, Xiaomi, etc.
Find a Network IP for Your Android
Before you can set up your Android with a static IP, you’ll need to find an available IP address on your network. You can do this from any computer that’s connected to your home network.
On a Windows PC:
Click the Start menu.
Type cmd and click on the Command Prompt desktop app.
In the command prompt window, type the command ipconfig/all and press Enter.
:max_bytes(150000):strip_icc()/how-to-change-ip-address-on-android-4588283-1-5c77295fc9e77c0001d19c87.png)
What Your Results Mean
You’ll see lots of information in the results, but you only need to be concerned with a few items.
- Default Gateway: This is the IP address of your home router and is typically the lowest IP address on the network. In the example above, this IP address is 10.0.0.1.
- IPv4 Address: This is the IP address of the device from which you’ve run the command. In the example above, this IP address is 10.0.0.158.
- DNS Servers: These are the servers your internet service provider (ISP) uses to look up domain names when you browse the internet.
Find a Free IP Address
You can find a free IP address on your network by typing a ping command starting from the router IP and working your way up.
:max_bytes(150000):strip_icc()/how-to-change-ip-address-on-android-4588283-2-5c772e3c46e0fb0001edc78a.png)
If you see a response with ping time, it means there’s a device on the network with that IP address. If the response reads «Destination host unreachable,» it means that IP address is available.
To perform the same ipconfig and ping commands on a Mac, open the terminal by pressing cmd + space and typing «terminal». In the Mac terminal, you can issue the same commands as described above.
Change the IP Address on Your Android
Now that you know what IP you can set your phone to, it’s time to switch your phone from DHCP to a static IP.
Open Settings, under Network & internet, tap on Wi-Fi.
Press and hold on the connected Wi-Fi network. You’ll see a menu pop-up. Tap Modify network.
Depending on your device’s Android implementation, you may have to «Forget» the connected network before the press-and-hold trick will work. As an added step moving forward, re-enter the network password alongside the IP address changes.
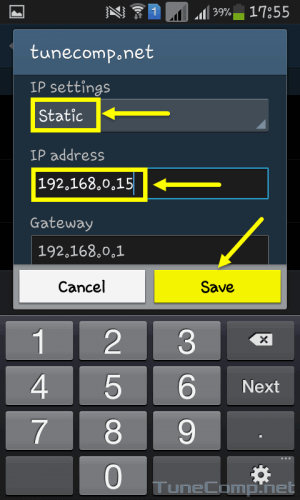
You’ll see the password change screen for that network. Tap Advanced options, and scroll down to the IP settings section. Tap DHCP and change the setting to Static.
Manually Configure Your Android’s Network Settings
Once you’ve changed the IP Setting to Static, a form will appear that will allow you to manually configure all of your Android’s network settings, including your Android’s IP.
:max_bytes(150000):strip_icc()/how-to-change-ip-address-on-android-4588283-3-5c773793c9e77c00012f8161.png)
Since your IP will be static, you’ll need to manually configure the rest of the network settings in this form as well.
- IP Address: The available IP address you discovered using the Ping command.
- Gateway: Enter the default Gateway IP address you recorded above.
- DNS 1 and DNS 2: Type the IP addresses of the DNS servers you recorded above.
You can leave any other fields in this form set as default. When you’re done changing the IP settings, tap Save.
Your Android will reconnect to your home network with its new IP. Now you can configure any software you’re using to connect to your Android using its new, static IP address.
Your Android phone will retain this static IP even after a reboot. If you want to undo the static IP and set your Android back to DHCP, just follow the steps above, but in the Advanced Options menu, set the IP Settings option back to DHCP.
Why Change the IP Address on Your Android?
Changing your IP address on your Android is simple. There is a buried setting in your Android device that lets you switch from a dynamic IP (DHCP) to a static one.
However, there are several things you should do beforehand to make sure that you’re choosing an available static IP address on your network.
There are plenty of important reasons you may need to set a static IP on your phone that doesn’t change.
A few of the most common reasons include:
- Running a mobile web server
- Sharing mobile files with FTP server software
- Using your phone as a Wi-Fi camera
- Running a mobile media server on your phone
All of these uses require your mobile phone to have a fixed IP that you can easily configure in 3rd party software running on your computer or any other device on your network.
Источник
How to Set a Static IP-Address for Wi-Fi on Android 10, 9, 8
If you encounter problems while using DHCP (auto IP obtaining) on Android you might need to manually set a static IP-address.
You may also decide to assign a static address to your Android phone if you want to use a specific IP on a Wi-Fi network but don’t want to set up the IP reservation on your access point or if you simply don’t have access to the router settings.
You can easily revert the network setting to its default state at any time and continue using DHCP.
Here is how to set a static IP-address on a phone or tablet running Android 10 and older versions.
We illustrated the article using screenshots from Samsung Galaxy One UI 2.0 (Galaxy S20, S10), One UI 1.1 (S9), Samsung Experience (S7), old Touchwiz (Ace 3) and stock Android 8 to 10 version (Google Pixel).
Set a Static IP-Address on Stock Android
Android 8
Android 9 and 10
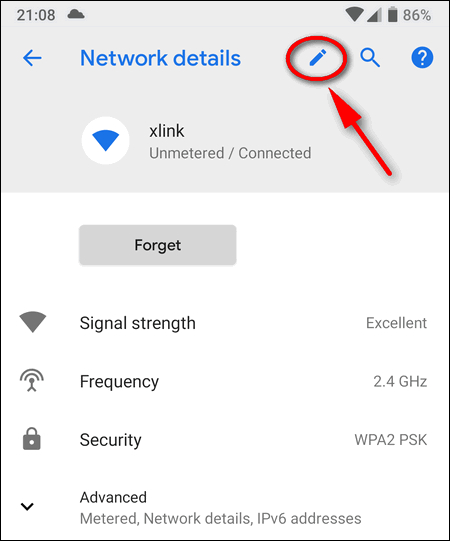
In Android 9 Pie you should tap the network name in the list (no long tap available), then select the pencil icon to modify its profile:
The remaining steps are equal to the steps from Android 8 section.
Manually Configure a Static IP on Samsung Galaxy
Static IP on Samsung Galaxy S20 with One UI 2.0
- Pull down the notification shade.
- Hold down the Wi-Fi toggle to open Wi-Fi settings.
- Make sure to connect to the right hotspot, where you are going to use a manually configured IP address.
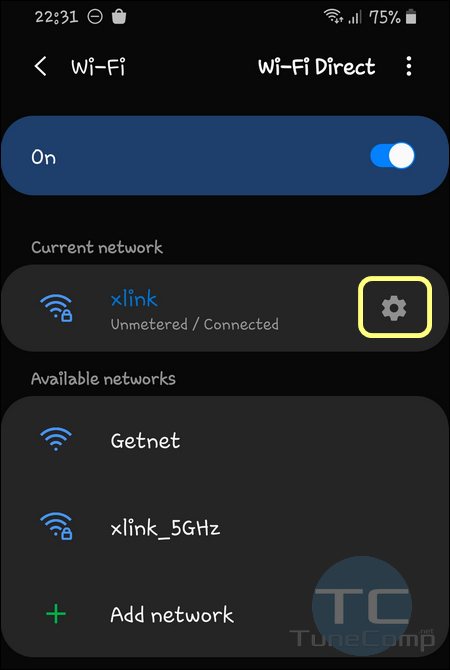
- Tap the gear icon to modify settings of your current network:

- Tap on Advanced at the very bottom:
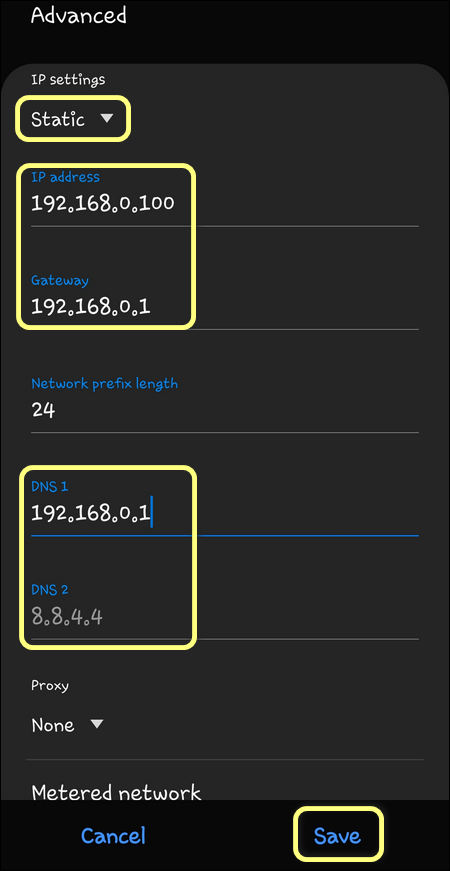
- Switch from DHCP to Static.
- Specify the IP address you want to use on your Galaxy phone.
- Type the Gateway IP and DNS.
- Finally tap Save for changes to take effect:

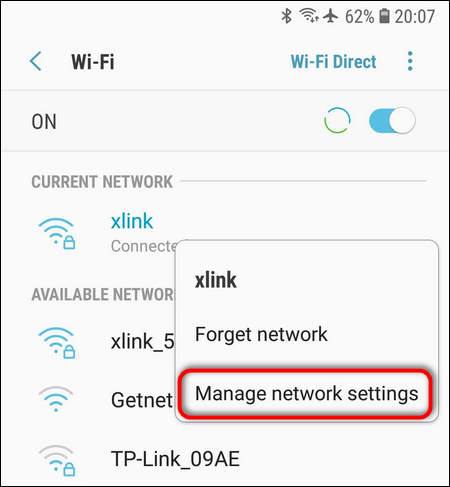
Samsung Experience (Galaxy S7)
- Hold down the Wi-Fi toggle to dive into network settings.
- Long tap on your current wireless network.
- Select Manage Network Settings:
- Set the checkbox Show advanced options.
- In the IP settings switch to the Static option.
- Now manually specify IP address, gateway IP, DNS.
- Don’t forget to tap Save for new static IP address to apply.
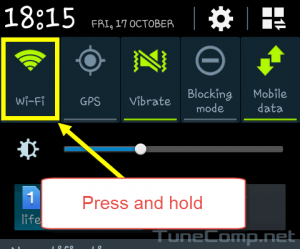
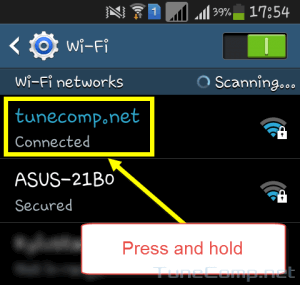
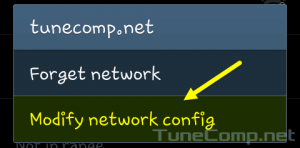
Static IP-address assignment on Android 4.2.2 (Touchwiz)
1. Pull down the status bar.
2. Press and hold the Wi-Fi icon in the quick panel:
3. Perform the long press on your network name:
4. Tap on Modify network config:
5. Set the checkbox Show advanced options:
6. In advanced options area:
- Select Static in IP settings drop-down menu .
- Specify the desired address in IP address field .
- Tap the Save button to apply new settings:
Do not forget to specify the Gateway IP address when using a static IP settings. Otherwise you won’t have the Internet connection on your Android!
How to Switch Back to Automatic IP Address Obtaining
If you wish to obtain an IP-address automatically again perform the following actions:
Go to network config again:
Make sure the checkbox Show advanced options is set.
Select DHCP in IP settings drop down menu.
Press Save:
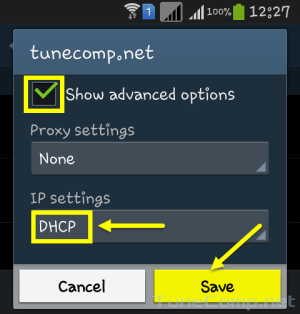
After that your device will reconnect to the network and obtain the IP from DHCP server.
Источник
Как на Android прописать статический IP для Wi-Fi сети?
Как правило, в Wi-Fi сетях, IP адреса выдаются в автоматическом режиме и это действительно самый лучший вариант. При каждом новом подключении к сети роутер предоставляет устройству подходящий IP, который не занят. Благодаря этому нет необходимости вручную указывать адрес для каждого нового устройства. Все работает на автомате и проблем обычно не возникает, по крайней мере с компьютерами.
Но с различными мобильными гаджетами иногда возникают трудности и из-за этого они ни в какую не хотят выполнять подключение к Wi-Fi. Чаще всего такие устройства работают под управлением операционной системы Android. В таких случаях может помочь ручная установка статического IP, для конкретной сети.
Это действительно помогает в большинстве случаев и данный способ стоит пробовать в первую очередь, при возникновении подобных проблем. В сегодняшней статье мы рассмотрим, как сменить автоматический IP на статический и изучим небольшие тонкости этой настройки.
Смена адреса на статический как раз помогает при возникновении трех, самых популярных, ошибок: устройство бесконечное количество раз меняет IP, неправильная аутентификация (хотя это может возникнуть и при вводе неверного пароля от сети), и «Сохранено, защита WPA\WPA2».
Прописываем IP на Android
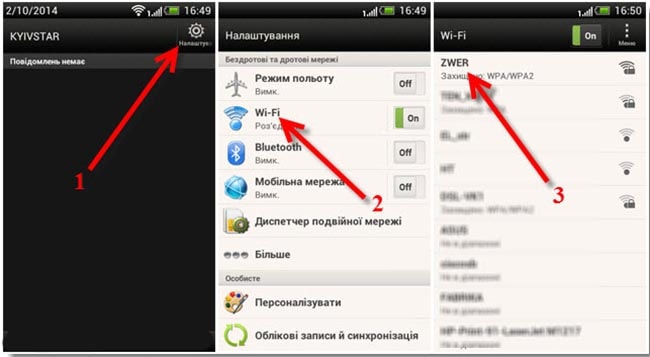
Процесс настройки IP довольно простой. Мы рассмотрим настройку на телефоне (в данном случае HTC) и планшете с ОС Android. Во всех других случаях, с данной операционной системой, настройка происходит приблизительно таким же образом.
На телефоне, открываем настройки и выбираем раздел Wi-Fi. Теперь нажмите на сеть, с которой у вас возникают проблемы. Иногда настройки могут не открываться, просто нажмите и подержите. После этого, выбираем что-то на подобии пункта «Сменить сеть».
 Попав в настройки сети, открываем расширенные параметры. Просто установите флажок напротив соответствующего пункта. Затем, нажмите на DHCP и укажите «Статическая».
Прокручиваем список ниже и в пустых полях необходимо заполнить значения IP адреса, Шлюза и Длины префикса сети. Часто, эти поля могут быть уже заполненными приблизительными значениями, в качестве примера. Но мы должны указать свои.
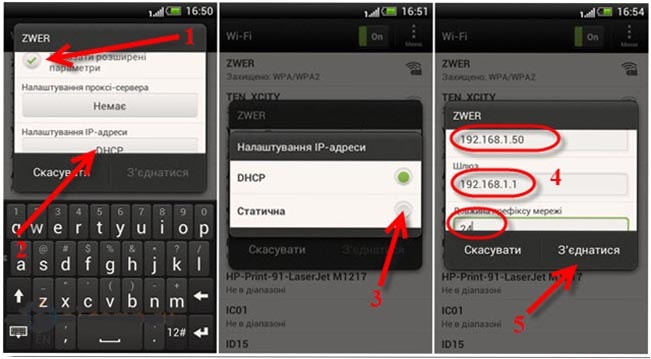 Что же там указывать? Когда в настройки вашего роутера можно попасть, перейдя по такому адресу 192.168.1.1, то в таком случае IP должен выглядеть так: 192.168.1.Х. Вместо Х указываем произвольное число от 1 до 199.
В другом случае, когда адрес, по которому открываются настройки роутера, выглядит так 192.168.0.1, статический IP приобретает подобный вид: 192.168.0.Х. Шлюз выглядит точно так же — 192.168.0.1. Вот и все, что нужно указать в настройках на телефоне. После этого сохраните выполненные изменения.
Теперь давайте взглянем, как это делается на планшете. В целом, настройки на всех современных устройствах, под управлением Android, очень похожи и все делается одинаково, есть только небольшие изменения в интерфейсе.
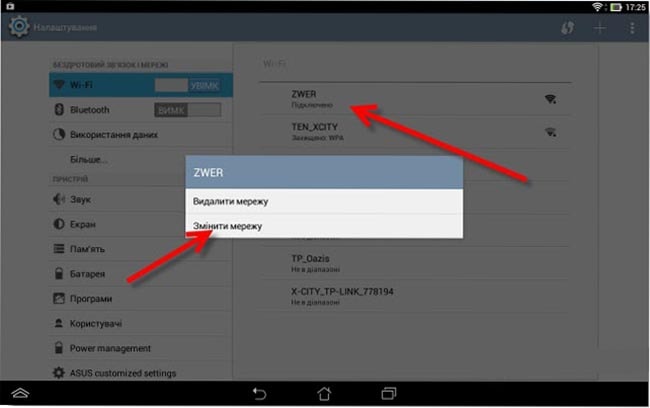 Открываем настройки, открываем раздел Wi-Fi и открываем параметры проблемной сети.
Задаем нужные значения адресов.
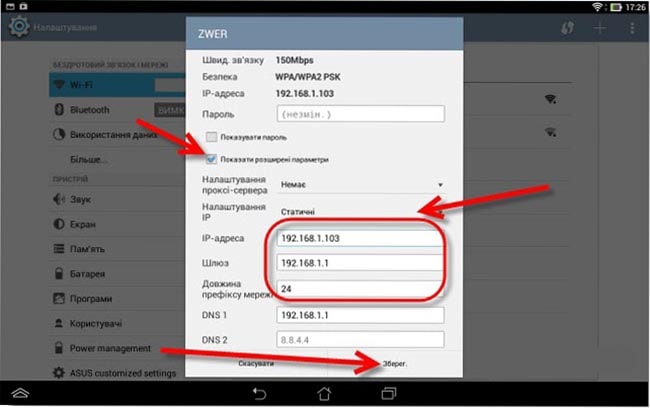 Сохраняем выполненные изменения. Этим способом можно решить самые распространенные проблемы, возникающие при подключении к сети Wi-Fi. По этому этим стоит воспользоваться. Если что-то не получается, или возникли вопросы, можете отписываться в комментариях, с радостью Вам поможем.
Источник


