- Android process death — and the (big) implications for your app
- How to test the application background kill & restore?
- Troublemakers in your app
- Know the Android platform rules
- How to stop apps from running in the background on Android
- Jump to
- Why stop background apps on Android?
- Update your phone to the newest Android version
- Analyze battery consumption statistics
- Control your background processes
- I’m in! But I don’t know which apps to stop
- Task killers and RAM optimizers: the great debate
- Android stop all processes
- Force stop and clear cache explained
- Force Stop
- Clear Cache
- Wrap-up
Android process death — and the (big) implications for your app
With more developers using Dependency Injection (e.g. Dagger) in Android and adopting patterns such MVP or MVVM, this topic is more needed than ever. There is a recent spike in use of what I would call “hidden Singletons”, the same anti-pattern just bundled differently.
Your Android application (process) can be killed at any time if it’s in paused or stopped state . The state of your Activities, Fragments and Views will be saved. When your return back to the application — the system will start the process again, recreate the top activity (the Activities in the back-stack will be recreated on demand when you go back) and you will get a Bundle with the stored state.
And here lies the issue some developers don’t fully realise — the whole process was killed. So any Singletons (or any “application scope” objects), any temporary data, any data stored in your “retained Fragments” — everything will be in a state as if you just launched the application. With one big difference — the state is restored, the user is at the point where he left the app.
Imagine, in your Activity you are depending on some shared Object, or some injected dependency where you keep recent data. Most likely the application will just crash on a NullPointerException because you didn’t expect the data to be in null.
How to test the application background kill & restore?
- Launch your application, open some new Activity, do some work.
- Hit the Home button (application will be in the background, in stopped state).
- Kill the Application — easiest way is to just click the red “stop” button in Android Studio.
- Return back to your application (launch from Recent apps).
- Crash? You are doing something wrong in your application :-).

By opening the app — the system will restore its’ state and the user will not even notice that actually the process was killed in the mean time. Well unless your application crashes because you were not prepared for it.
For this scenario it’s definitely not enough to just test your app with the “Don’t Keep Activities” options in the Debug Settings. This will just test if your activities can restore their state, but the process is never killed this way. The crashes will start coming in when you release your application, the users will open it and the leave it in background for a day and return back.
You can also set Background Process Limit to “No background processes” in Developer options. Put the application into background, launch any other application and then return back — application process will be restarted (the same as if killed due to lack of memory or battery saving).

Troublemakers in your app
- Singletons
- Any other shared instances that keep mutable data (such as injected dependencies where you keep some state)
- Data and State stored in your Application class
- Mutable static fields
- Retained fragments (state is restored, data is lost)
- Basically anything which is not stored in onSaveInstanceState and you depend on it
There is no single solution and it depends on the type of your application. Generally you should try to stay away from anything mentioned in the list, but that’s not always easy or possible.
You should be able to “reinitialise” the state — either load data from a database, SharedPreferences or reload anything needed again.
You may also have a login screen and timeout in your application — in that case it’s an acceptable approach to just detect the process kill scenario and forward the user back to the login screen.
Know the Android platform rules
Any architecture, framework or library has to play according to the Android platform rules. So anytime you see a new library or approach — think about if and how is it handling state restoration.
And as always — test your application for these cases. This particular issue is bad in the way that you will almost never see it during development and simple testing. But the end users will run into it regularly.
Follow me and read about possible solutions to this problem in the next article.
Источник
How to stop apps from running in the background on Android

Android smartphones have gotten very powerful over the years and are great at multitasking. Over time, however, you might have seen smartphones degrade in performance and become sluggish. You may also notice that the battery life is also adversely affected. What if we tell you that on most phones, these issues can be fixed by simply optimizing the background apps? Read on to find out how!
Jump to
Why stop background apps on Android?
For those of you who chanced upon this article without actually facing an issue with their phone, you might wonder why would someone even consider to stop background apps. Here’s an explanation.
As you keep using your Android phone, you tend to install several apps on your device. Over time, chances become high that at least some of them aren’t well optimized for your phone or may have a bug. Some of these apps may even contain malware – especially the ones you did not download from trusted sources.
Oftentimes, these apps may keep running in the background even after you thought you closed them. The result is sluggish performance and a marked reduction in battery life. Let us now check out the various steps that can be taken to solve this problem and stop background apps on Android.
Update your phone to the newest Android version
In case you have a relatively old phone with you, the simplest way to stop apps from running in the background is to make sure your phone runs the latest version of Android. Starting Android 10, Google has introduced several power management features that prevent errant apps from consuming too much power or hogging too much power.
 Android 11 is the latest stable version of Android and provide great battery optimization tools/ © Mr.Mikla / Shutterstock.com
If you are on a newer version of Android (the latest stable version is Android 11) you are already doing pretty good as Google has enhanced power management features even further. On phones running Android 10 and 11, it would be a good idea to turn on a feature called Adaptive Battery. On phones running stock Android, you can enable Adaptive Battery by going into Settings -> Battery -> Adaptive preferences.
Apart from optimizing errant apps, the Adaptive battery mode also optimizes the charging speed of your phone to ensure that your battery lasts a long time.
Analyze battery consumption statistics
There is no denying that Android offers a comprehensive battery statistics tool where you can see what apps are draining the battery the most. To access the battery stats page tap on Settings -> Battery ->View battery usage.
The phone will now open a page with the list of apps that are consuming power. What is helpful about this page is that it lists these apps in an order — with the ones consuming the most power placed at the top. Chances are high you will see some of your most used apps high up in the list. However, if you note some third party apps that you know you haven’t used for a long time in this list, it might be a good idea to either force stop or uninstall it.
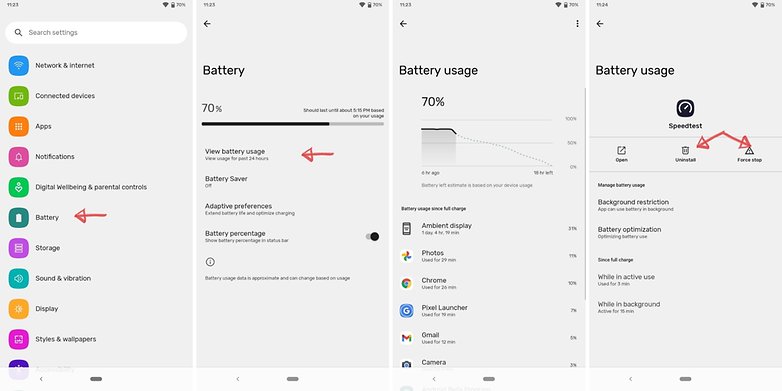 The Battery stats page is a veritable goldmine of information/ © NextPit
To force stop or uninstall an app, tap on the app and and you will see a page with both these options. Note that you may also see some apps here that are part of Android and Google Mobile Services. You can ideally leave them be since they are essential for the smooth and stable functioning of your phone.
Control your background processes
Incase you are not too happy with the results of disabling apps listed within the battery stats menu, it’s time to try out slightly advanced steps. The best way to gain control of your processes is to have a dig around under the hood using the monitoring tools built into Android.
In some cases, before you can start, you need to enable developer options.
- In most versions of Android, this involves going to Settings > About phone and then tapping Build number about seven or so times. You’ll get a notification telling you that Developer options have been unlocked once you’re done.
- For many handsets, the next thing you need to look for is a setting called Processes, Process Stats, or Running services. You can find this in Settings > System > Advanced> Developer options > Running services. That option takes you to a list of running processes showing how much RAM each is using.
- Obviously, it’ll be tempting to stop the most RAM-hungry apps from running in the background, but you’ll want to pay some attention to what you’re stopping before you go ahead. Stopping some apps might crash your phone.
- You can also tap the settings option when in the Services/Processes menu to switch between running processes and cached processes.
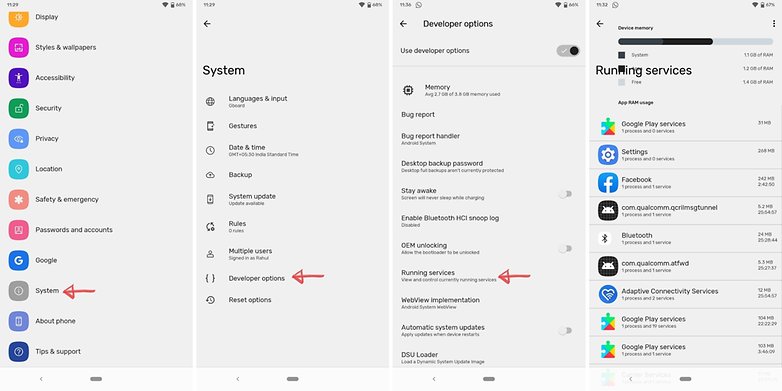 Control Android services from within Developer options / © NextPit
I’m in! But I don’t know which apps to stop
OK. If you don’t want your app/phone to crash, err on the side of caution and use some common sense. The app marked ‘Google Services‘, or pretty much any app that starts with ‘Google’ shouldn’t be manually stopped.
On the other hand, if you look through the list and see messengers and music players idly draining your battery in the background, then you can go ahead and stop them in relative safety. Truly crucial apps usually won’t allow you to force stop them anyway.
- To stop an app manually via the processes list, head to Settings > Developer Options > Processes (or Running Services) and click the Stop button. Voila!
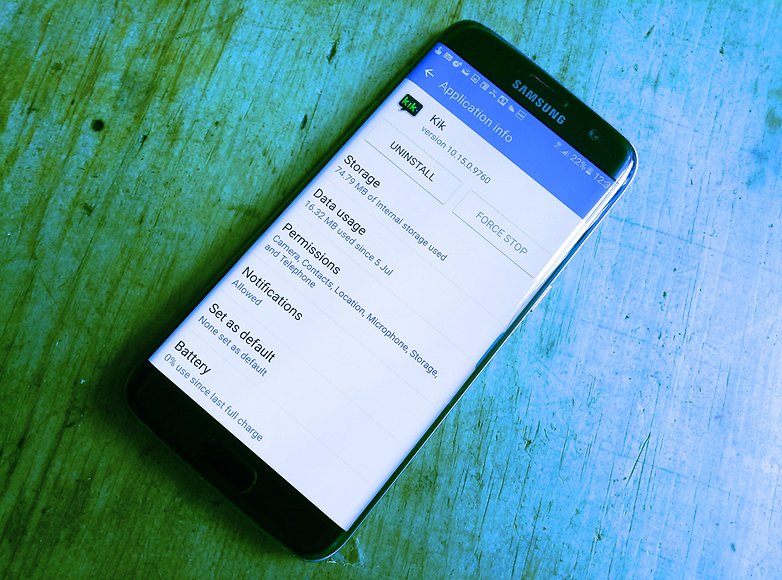
- To Force Stop or Uninstall an app manually via the Applications list, head to Settings > Apps > All Apps and select the app you want to modify.
- Don’t delete any apps that appear when you select the Show System Apps option. You can see system apps by tapping on the three dots on the top right corner.
 Apps that you rarely use are better off uninstalled altogether. / © NextPit
Task killers and RAM optimizers: the great debate
With Android software and hardware improving over time, some people will argue that the use of task killer apps is going to do more harm than good in terms of processing and battery life. As one of the problems you’re trying to fix is apps running in the background draining your resources, adding another one that has the purpose of doing explicitly that (it needs to monitor the services in use on your phone, therefore always needs to be running) seems a bit counter-intuitive.
A task killer that repeatedly force-closes an app in the background over and over is almost certainly going to drain your battery more as it continues the ‘restart and kill’ process. You might be better off not installing the task killer in the first place and just letting it run.
So there you have it! We have discussed several ways in which you can can stop background apps from running on Android devices. We hope the steps mentioned here proved helpful for you. In case you know if any other cooler methods that we might have missed out, share them with us in the comments below!
This article was comprehensively updated in July 2021. Older comments have been retained.
Источник
Android stop all processes
KillApps повышает производительность вашего телефона:
☆ Ускоряя свой телефон
☆ Освобождение памяти
☆ Сохраняя батарею
☆ При охлаждении телефона
На вашем телефоне много приложений, работающих в фоновом режиме, которые потребляют ваши системные ресурсы и, как результат, разряжают аккумулятор и уменьшают доступную память.
Особенности:
✓ Закройте все запущенные приложения за один раз одним щелчком мыши
✓ Запретить перезапуск приложений после закрытия.
✓ Список исключений: выберите приложения, которые вы хотите продолжить.
✓ Поддержка пользовательских приложений и системных приложений.
Убийца задач
KillApps — очень мощный Task Killer, который убивает задачи и процессы и не позволяет им автоматически перезапускаться.
Ускоритель скорости
KillApps позволяет ускорить работу вашего телефона, когда он работает медленно из-за множества фоновых приложений.
Очиститель RAM
KillApps оптимизирует память телефона, освобождая оперативную память и освобождая место для новых приложений.
Экономия заряда аккумулятора
Закрытие приложений помогает экономить энергию аккумулятора и продлевает срок службы батареи.
Кулер CPU
Закрытие приложений помогает охлаждать температуру вашего телефона и снижает использование ЦП.
★ Это приложение не собирает никаких данных, ваша конфиденциальность в безопасности ★
Разрешения
✓ Приложению Killapps необходимо разрешение для службы доступности для того, чтобы закрывать другие программы.
✓ Приложению Killapps необходимо разрешение на наложение поверх дркгих окон, чтобы показывать экран ожидания во время закрытия приложений
Источник
Force stop and clear cache explained
![]()
If you have a problem with an app on your Android smartphone you may have read that you should do a “Force Stop” and then “Clear Cache” to fix it. And actually, that might very well be exactly what you need to do. But why does that help? What does “Force stop” do and what is a cache? Let me explain.
Force Stop
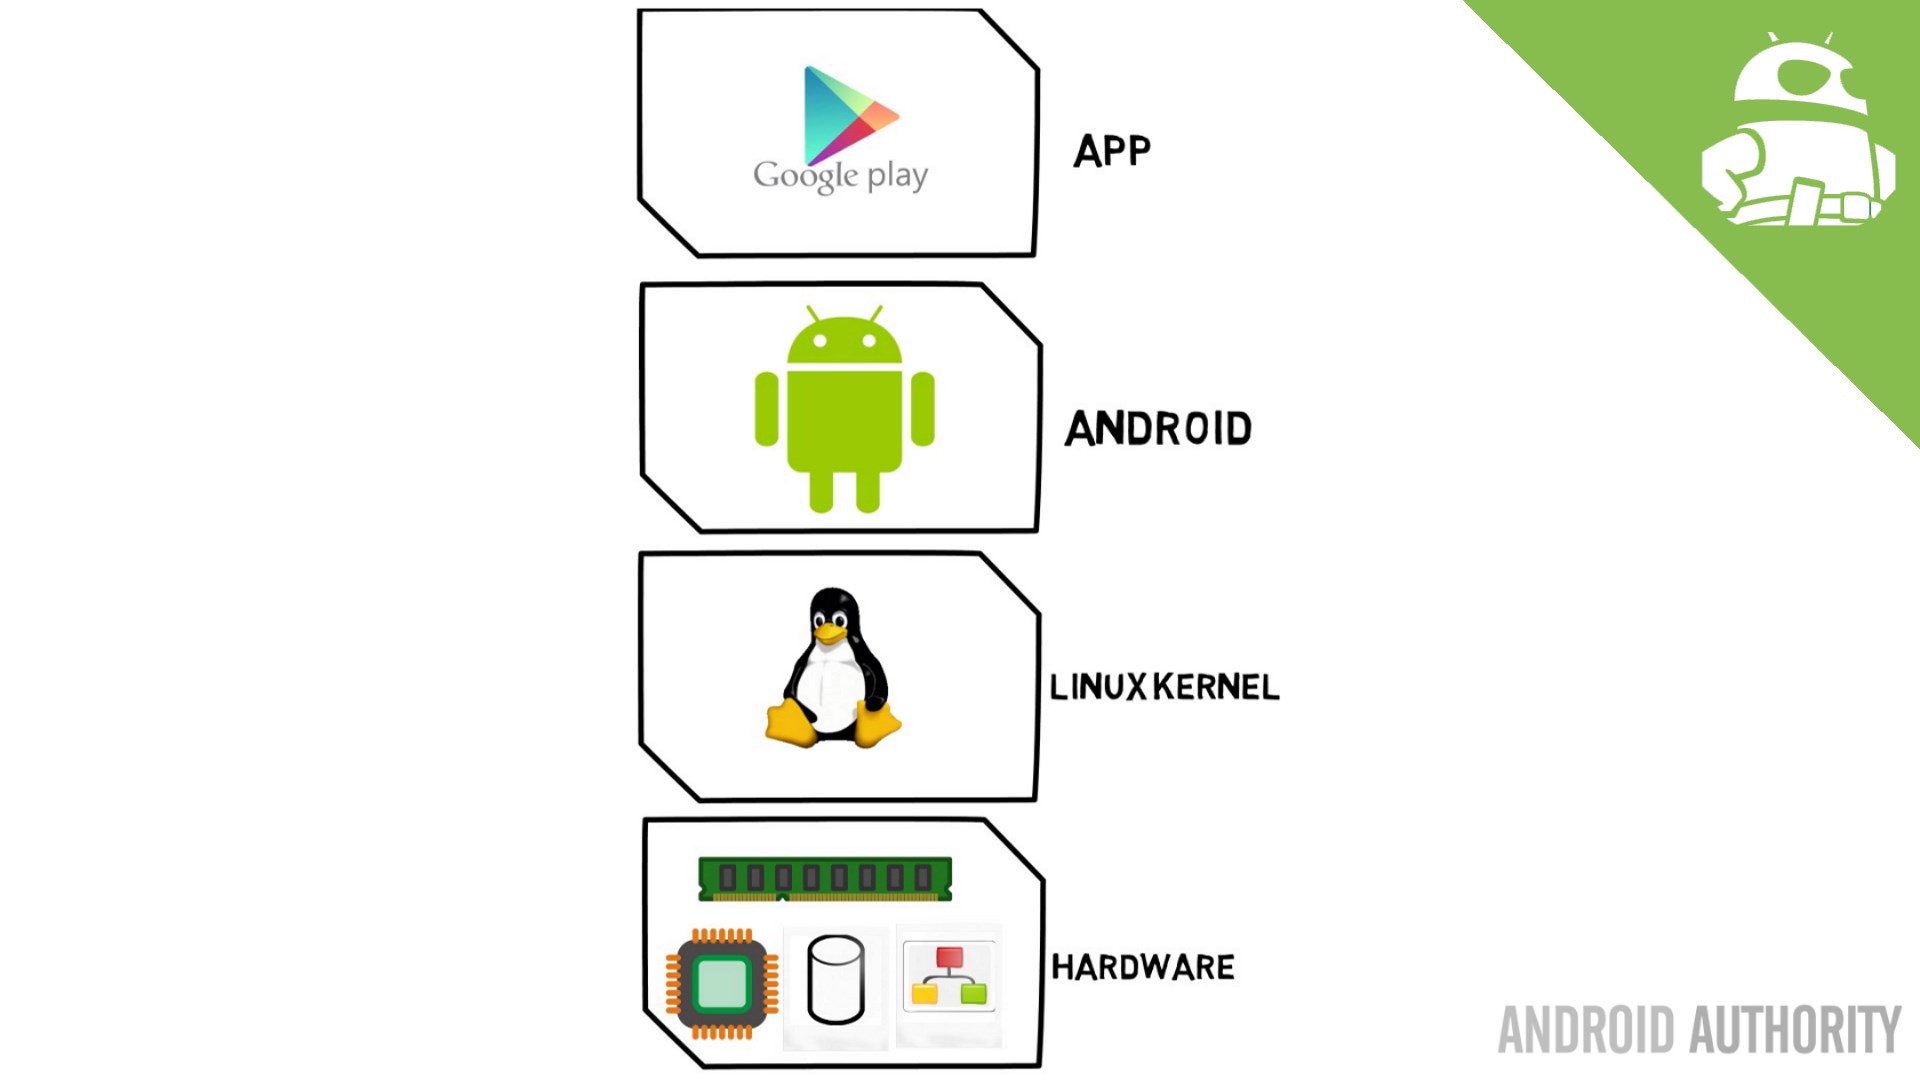
At the heart of Android is the Linux kernel, it is the component responsible for managing memory and processes along with a whole bunch of other resources. Whenever you start an app you are actually starting a Linux process.
A process is a logical container for a program (app). It is started by the kernel and is used as a way to share the system resources (including memory and CPU time) among all the running apps. Each process has an ID, known as the PID (Process ID); a priority, how important is it; its own address space, plus related pages of physical memory; and some state information: running (or runnable), sleeping, stopped and zombied.

The kernel’s job is to schedule CPU time and allocate memory to the process so that it can run. The way it works is that the kernel gives slices of CPU time to each of the running processes. If a process is sleeping (because it is waiting for something like data from the network) then it doesn’t get any CPU time. This juggling of processes goes on at the millisecond level, very fast, and just like the frames of a cartoon, you get the appearance of smoothness and multiple programs running at once.
Finally, when an app exits, the kernel will clean up all the resources used by the app (like open files, allocated memory etc) and eventually delete the process that was created for that app.
Each app can be in one of several different states: running, paused or stopped. These are different from the process states, as defined by Linux, and represent the “Activity Lifecycle” as defined by Android. Google puts it like this, “as a user navigates through, out of, and back to your app, the Activity instances in your app transition through different states in their lifecycle.”
The interesting thing about Android is that it never kills an app directly. Instead, it kills the process in which the activity runs, destroying not only the activity but everything else running in the process, as well. It might do this when it needs to free up RAM or a user can kill a process by using Force Stop in the Application Manager.

When everything is working smoothly, an app will transition from one activity state to another and will either eventually be killed off by Android (after moving to the stopped state) or it will just hang around in the background until the user brings it to the foreground again. However, if things start to go wrong the app can misbehave. It might stop responding to certain events, it might get stuck in some kind of loop or it might just start doing unpredictable things.
In such cases, the app might need to be killed off and then restarted. That is what Force Stop is for, it basically kills off the Linux process for the app and cleans up the mess!
The reason why using Force Stop is recommended when trying to fix a misbehaving app it is 1) it kills of the current running instance of that app and 2) it means that the app will no longer be accessing any of its cache files, which leads us to step 2: Clear Cache.
Clear Cache
After the app has been killed the next step is to delete the data in the cache directory. When an application needs a temporary file, a pre-processed file, or when it wants to keep a local copy of a file which was downloaded from the Internet then it will get placed in the app’s cache directory. Each app has its own directory where it can put working files.
The idea is as follows. If an app downloads files or data from the Internet then it would be a waste of bandwidth plus a waste of time to download the very same files every time the app starts. Instead, any files that need downloading from the Internet can be downloaded once and then stored in the cache. From time to time the app can check if those temporary copies are still valid and refresh the cache if needed.
Another example would be if the app needs to process a file, maybe perform some decoding or decryption on some data. Rather than performing this decoding or decryption every time the app launches, which would use a lot of CPU cycles, the app can do it once and then store the result in the cache. Again, the app could check the validity of the processed file and refresh the cache if needed.
![]()
The reason these are temporary files is that the app should not rely on these files being present as Android can delete them when a device runs low on storage. In these cases, the app just simply downloads the data again, or processes the files again and creates new ones in its cache.
Apps can also store files more permanently by using the app data directory. This is different to the cache directory and is designed for persistent files owned by the app. Since Android is able to delete files in the cache directory without notifying the app, it is also safe for users to delete those files via the “Clear Cache” button!

This can help fix misbehaving apps as it clears out the pool of temporary files and forces the app to recreate them and so gives the app a kind of fresh start. This can often fix the problem as the error was in the processing of a temporary or cached file.
A side benefit of clearing the cache is that it frees up storage space. So if you are running low on internal storage then clearing the cached data for all apps can help.
![]()
Wrap-up
After some experimentation during the Android P beta, Google’s latest version of Android keeps the same buttons and functionality for Force Stop and Clear Cache as previous versions. You’ll still find both under the apps setting menu.
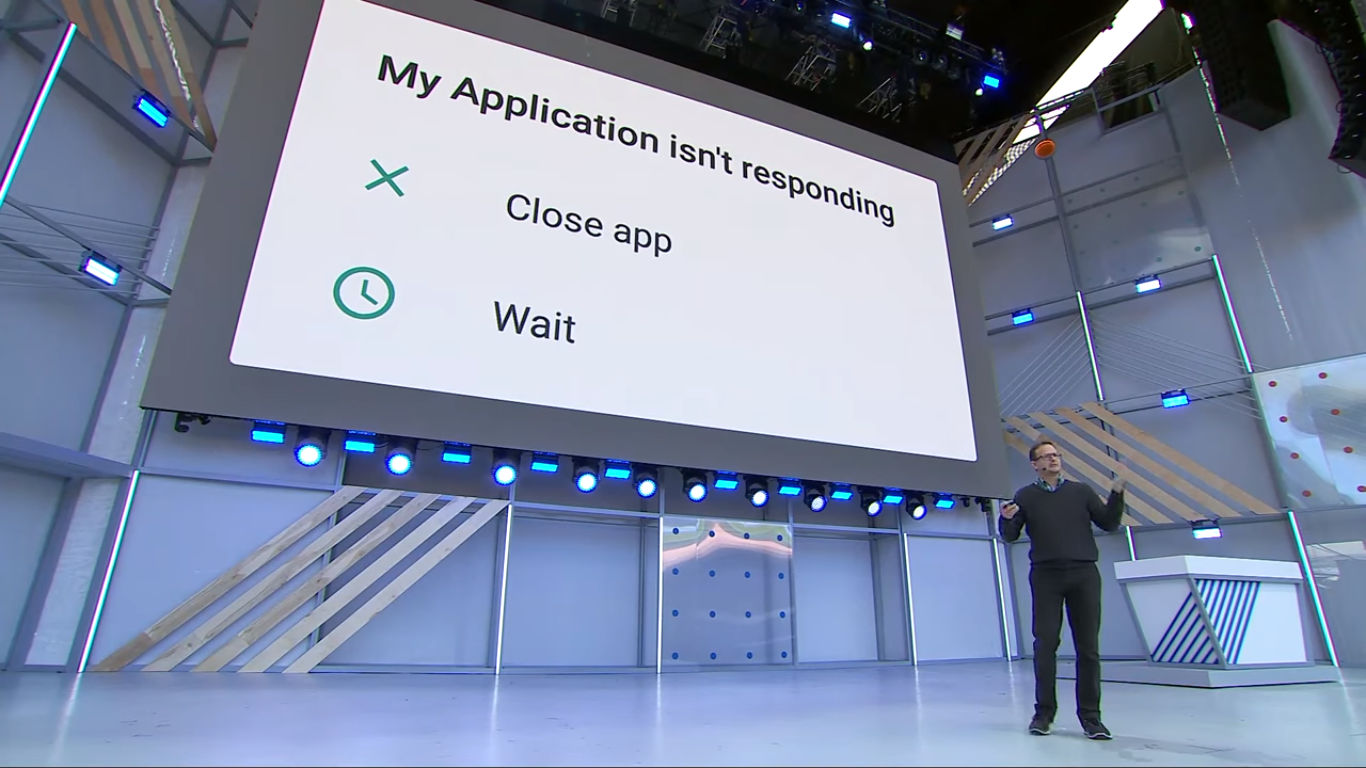
Android 9.0 Pie does introduce something new though – the automatic closing of non-responsive apps. This means that you hopefully won’t have to force close apps that stop responding anymore, the system should handle everything automatically. As such, users won’t see the “app not responding” (ANR) dialog box to alert them to an unresponsive app if they’re running Pie. However, if for some reason an app does stop responding Pie users should still try the Force Stop and Clear Cache buttons to kill the app and then restart it.

Force Stop can still be used to kill frozen apps with Android P, but this should now happen automatically.
![]()
Clear Cache remains in place with Android 9.0, but Clear Data has been relabeled to Clear Storage.
If you need instructions on how to clear an apps’ cache then there are a number of excellent guides on Android Authority including how to clear app data and cache in Android 6.0 Marshmallow and how to regain storage space by cleaning the cache on your Android device. Using Force Stop is very similar, just follow the instructions in the linked guides, but tap on “Force Stop” rather than “Clear Cache.”
What are your experiences with Force Stop and Clear Cache? Are there any apps which you find use a lot of storage space for cached files? Please let me know in the comments below.
Источник


