- Локализация. חתול מדען (хатуль мадан) — кот учёный
- Просмотр и создание локализованных строк в режиме дизайна
- Непереводимая игра слов с использованием местных идиоматических выражений
- Поддержка письма справа налево
- Несколько локалей
- Android string.xml — несколько вещей, которые стоит помнить
- Не используйте повторно
- Разделяйте
- Форматирование
- Множественное число
- Подстветка слов
- String resources
- String
- Kotlin
- String array
- Kotlin
- Quantity strings (plurals)
- Kotlin
- Format and style
- Handle special characters
- Formatting strings
- Kotlin
- Styling with HTML markup
- Kotlin
- Kotlin
- Styling with spannables
- Kotlin
- Kotlin
- Kotlin
- Styling with annotations
- Example — adding a custom typeface
- Kotlin
- Annotation spans and text parceling
- Kotlin
- Kotlin
Локализация. חתול מדען (хатуль мадан) — кот учёный
В статье, посвященной ресурсам, мы уже затрагивали эту тему с теоретической точки зрения. Разберем теперь практическую часть. Мы уже умеем пользоваться строковыми ресурсами и меняли строчки, например, Hello, World на Здравствуй, Мир! Но на самом деле это не совсем правильный подход. Для профессионально написанного приложения лучше использовать другой подход. А именно, локализацию.
Что это значит? Мы не будем менять строчку Hello, World, которая будет считаться строкой по умолчанию, а создадим новый локализованный ресурс. Это даст нам дополнительное преимущество, если пользователь запустит приложение на телефоне с английской локалью, то он увидит текст на знакомом ему языке. Если приложение запустит русский пользователь, то он увидит текст на русском языке. Согласитесь — очень удобно.
Напишем приложение, которое будет поддерживать английскую и русскую локализации. По умолчанию будет использоваться английская локализация. В этом случае, если на телефоне не будет найден нужный локализованный ресурс, то будет применяться английский вариант.
Чтобы не усложнять материал, воспользуемся стандартным приложением, который мы изучали в самом начале. Создадим новый проект «LocaleApp», но на этот раз мы не будем трогать файл strings.xml в каталоге res/values.
Для русской локализации необходимо создать новый подкаталог values-ru в том же каталоге res. Если вы планируете создавать локализацию только для русского языка, то название каталога не трудно запомнить и вы можете создать папку вручную через res | New | Directory. Но вряд ли вы запомните названия других папок. Поэтому покажу способ создания с помощью мастера студии.
Щёлкаем правой кнопкой мыши на папке res и выбираем New | Android resource directory. В диалоговом окне в левой части Available qualifiers: выбираем пункт Locale и переносим его в правую часть Chosen qualifiers: с помощью кнопки с двумя стрелками вправо. В появившейся третьей колонке выбираем нужные языки, например, русский. Вы увидите, что в поле Directory name автоматически появится нужное название папки. Дополнительно вы можете указать и регион в колонке Specific Region Only

В режиме Android вы можете не увидеть созданную папку, поэтому временно переключитесь в режим Project. Скопируйте файл res/values/strings.xml и вставьте его в новую папку. Можете вернуться в прежний режим. Если папка не пуста, то она уже видна.
Изменим его содержание.
В английской версии им соответствуют ресурсы
Запустим приложение и увидим, что текст выводится на русском, если у вас на эмуляторе или реальном устройстве выбраны русские настройки.

Как перейти на американскую локаль? Идём в Настройки→Язык и клавиатура→Выбрать язык. Выбираем английский язык English (United States). Снова запускаем приложение в эмуляторе или на телефоне. Теперь наше приложение будет выглядеть так:

Ресурсы из каталога res/values считаются ресурсами по умолчанию. Они отображаются в том случае, когда система не найдёт ресурсы для текущей локали устройства. В нашем случае, при выборе любого языка, кроме русского будет использоваться res/values. Если мы захотим разделить англичан и американцев, тогда придётся создавать два каталога: res/values-en-rUK и res/values-en-rUS. Обратите внимание, что перед кодом второй части ставится буква ‘r’. Иными словами, мы определяем не только язык, но и регион.
Проведем несколько экспериментов. Удалим из файла res/values-ru/strings.xml строковый ресурс hello_world с текстом Здравствуй, Мир!. Сохраним изменения и запустим проект на устройстве с русским языком. Платформа заменила отсутствующий в локализации ресурс дефолтным английским.
Продолжим опыты и поступим наоборот — удалим теперь ресурс из файла res/values/strings.xml. На устройстве выберем какой-нибудь другой язык, например, итальянский. В этом случае вы увидите что-то непонятное, скорее всего вы получите сообщение об ошибке.
Отсюда можно сделать вывод, что вам необходимо следить за ресурсами по умолчанию. Старайтесь проконтролировать, чтобы ваше приложение всегда содержало все необходимые ресурсы по умолчанию, а уже потом можете начинать локализацию приложения. Для этого вам достаточно будет скопировать файл в новый подкаталог и отредактировать его.
На самом деле локализовать можно не только строковые ресурсы. В разных странах принято рисовать какой-нибудь объект в соответствии со своими традициями, например, изображение почтового ящика. В этом случае вы можете создать каталог /res/drawable-de, в котором будут находиться изображения, предназначенные для немцев.
В коде вы обращаетесь к нужным ресурсам следующим образом:
Система сама подставит нужную строку. Явно указать, что хочется использовать ресурс на конкретном языке, у вас не получится.
Спустя продолжительное время один из читателей подсказал, как всё-таки задействовать локальный ресурс. Объяснять код не буду, сами поймёте, когда наберётесь опыта.
Просмотр и создание локализованных строк в режиме дизайна
Чтобы увидеть, как меняется текст в различных локализованных версиях вашего приложения, необязательно запускать приложение в эмуляторе. Можно в студии на панели инструментов щёлкнуть на значке глобуса и выбрать из выпадающего списка нужный вам пункт (он появится после того, как вы создадите необходимые локализованные ресурсы), и все локализованные строчки сразу поменяются на экране активности.

Можно сразу создать локализованный файл через удобный мастер. Там же в меню есть пункт Edit Translations. , который выводит диалоговое окно со списком уже имеющихся строковых ресурсов из вашей программы (раньше). Вам нужно выбрать язык для перевода, а затем заполнить в таблице нужную колонку.

После того, как вы завершите перевод всех ресурсов, нажимаете на кнопку OK и у вас появится готовая папка с новым файлом strings.xml для выбранной локализации.
Сейчас в студии вместо диалогового окна выводится окно редактора, в котором можно редактировать текст.
Непереводимая игра слов с использованием местных идиоматических выражений
Если вы решили использовать локализацию на разных языках, то можете встретиться с одной проблемой. Предположим, вы перевели только несколько строковых ресурсов и в один прекрасный день решили выложить программу в магазин приложений. Android Studio при сборке подписанного приложения может заругаться, что вы перевели не все строки. Есть два способа обхода проблемы. Вы можете использовать атрибут translatable=»false», чтобы указать среде разработке, что данная строка не требует перевода:
В окне редактора это сделать проще через флажки в столбце Untranslatable.

Второй вариант — явно указать, что все строки в файле не нужно переводить с помощью tools:ignore=»MissingTranslation».
Есть ещё один вариант, когда непереводимые строки размещаются не в ресурсе strings.xml, а в другом файле под именем donottranslate.xml.
Когда вы исправите строковые ресурсы, то избавьтесь от ошибок через Project | Clean. и попытайтесь собрать приложение заново.
Поддержка письма справа налево
Арабы и некоторые другие народы используют непривычную для европейцев схему написания текстов справа налево. В Android 4.2 появилась поддержка данного режима. В блоге (англ.) Native RTL support in Android 4.2 рассказано о некоторых вещах по этой теме.
Теперь вы можете писать приложение для израильских военкоматов. Русские призывники в интервью офицерам душевного здоровья часто используют сочетание хатуль мадан (חתול מדען). Теперь вы знаете, как локализовать строки пушкинского стихотворения про кота учёного.
Несколько локалей
В Android 7.0 (API 24) пользователь может установить несколько локалей. В этом случае, если не будут найдены ресурсы для первой локали, то будут искаться ресурсы для второй локали. Таким образом, если француз знает два языка, например, французский и испанский, а в приложение не поддерживает французского, но поддерживает испанский, то пользователь увидит текст на испанском, а не на английском.
Источник
Android string.xml — несколько вещей, которые стоит помнить
Доброго времени суток! Представляю вашему вниманию вольный перевод статьи от GDE (Google developer expert) Dmytro Danylyk. Собственно, вот оригинал. Статья описывает правильные подходы для работы со strings.xml и особенно полезно это будет разработчикам, которые разрабатывают мультиязыковые приложения. Прошу под кат.
Эта статья о такой тривиальной вещи android как string.xml.
Не используйте повторно
Не используйте повторно строки для разных экранов
Давайте представим, что у вас есть loading dialog на Sign In либо Sign Up экране. Так как оба экрана имеют loading dialog, вы решаете использовать те же строки — R.string.loading.

Позже, если вы решите использовать различные, вам нужно будет создать 2 разные строки и модифицировать их, непосредственно, в .java классах. Если вы используете разные строки с начала — вам бы пришлось модифицировать лишь strings.xml файл.
Вы никогда не будете заранее знать поддержку и перевод какого языка вам предстоит добавить. Всё дело в контексте: в одном языке вы можете использовать тоже слово в одном контексте, но в другом — это слово по смыслу не будет подходить.
Обратите внимание, что в данном случае английская версия strings.xml использует тоже самое слово — “Yes” для обоих случаев R.string.download_file_yes и R.string.terms_of_use_yes strings.
Но украинский вариант strings.xml использует 2 разных слова — “Гаразд” для R.string.download_file_yes и “Так” для R.string.terms_of_use_yes.
Разделяйте
Разделяйте строки, которые относятся к одному экрану с помощью префиксов и комментариев
- Добавляйте префикс в виде имени экрана к каждой строке для более простого понимания к какому экрану относится данный ресурс.
- Чистый string.xml файл поможет достаточно легко поддерживать и переводить различные языки — экран за экраном.
Создание различных strings.xml для каждого экрана
Если вы хотите, вы можете создать string.xml файл для каждого экрана — settings-strings.xml, profile-strings.xml. Но обычно приложение имеет около 10-20 экранов, соответственно, нужно иметь 10-20 string.xml файлов в каждой языковой папке. Я думаю, что это будет сопряжено с беспорядком.
Форматирование
Используйте Resources#getString(int id, Object… formatArgs) для форматирования строк
Никогда не делайте конкатенацию через + оператор, поскольку в других языках порядок слов может варьироваться.
Множественное число
Используйте Resources#getQuantityString(int id, int quantity) для количественных строк
Не решайте проблемы с множественным числом в java коде, поскольку разные языки имеют разные правила для согласования множественного числа
Подстветка слов
Используйте html text для подсветки статический слов
Источник
String resources
A string resource provides text strings for your application with optional text styling and formatting. There are three types of resources that can provide your application with strings:
String XML resource that provides a single string. String Array XML resource that provides an array of strings. Quantity Strings (Plurals) XML resource that carries different strings for pluralization.
All strings are capable of applying some styling markup and formatting arguments. For information about styling and formatting strings, see the section about Formatting and Styling.
String
A single string that can be referenced from the application or from other resource files (such as an XML layout).
Note: A string is a simple resource that is referenced using the value provided in the name attribute (not the name of the XML file). So, you can combine string resources with other simple resources in the one XML file, under one element.
file location: res/values/filename.xml
The filename is arbitrary. The element’s name is used as the resource ID. compiled resource datatype: Resource pointer to a String . resource reference: In Java: R.string.string_name
In XML: @string/string_name syntax: elements: Required. This must be the root node.
A string, which can include styling tags. Beware that you must escape apostrophes and quotation marks. For more information about how to properly style and format your strings see Formatting and Styling, below.
name String. A name for the string. This name is used as the resource ID. example: XML file saved at res/values/strings.xml :
This layout XML applies a string to a View:
This application code retrieves a string:
Kotlin
You can use either getString(int) or getText(int) to retrieve a string. getText(int) retains any rich text styling applied to the string.
String array
An array of strings that can be referenced from the application.
Note: A string array is a simple resource that is referenced using the value provided in the name attribute (not the name of the XML file). As such, you can combine string array resources with other simple resources in the one XML file, under one element.
file location: res/values/filename.xml
The filename is arbitrary. The element’s name is used as the resource ID. compiled resource datatype: Resource pointer to an array of String s. resource reference: In Java: R.array.string_array_name
In XML: @[package:]array/string_array_name syntax: elements: Required. This must be the root node.
Defines an array of strings. Contains one or more elements.
name String. A name for the array. This name is used as the resource ID to reference the array. A string, which can include styling tags. The value can be a reference to another string resource. Must be a child of a element. Beware that you must escape apostrophes and quotation marks. See Formatting and Styling, below, for information about to properly style and format your strings.
example: XML file saved at res/values/strings.xml :
This application code retrieves a string array:
Kotlin
Quantity strings (plurals)
Different languages have different rules for grammatical agreement with quantity. In English, for example, the quantity 1 is a special case. We write «1 book», but for any other quantity we’d write «n books». This distinction between singular and plural is very common, but other languages make finer distinctions. The full set supported by Android is zero , one , two , few , many , and other .
The rules for deciding which case to use for a given language and quantity can be very complex, so Android provides you with methods such as getQuantityString() to select the appropriate resource for you.
Although historically called «quantity strings» (and still called that in API), quantity strings should only be used for plurals. It would be a mistake to use quantity strings to implement something like Gmail’s «Inbox» versus «Inbox (12)» when there are unread messages, for example. It might seem convenient to use quantity strings instead of an if statement, but it’s important to note that some languages (such as Chinese) don’t make these grammatical distinctions at all, so you’ll always get the other string.
The selection of which string to use is made solely based on grammatical necessity. In English, a string for zero is ignored even if the quantity is 0, because 0 isn’t grammatically different from 2, or any other number except 1 («zero books», «one book», «two books», and so on). Conversely, in Korean only the other string is ever used.
Don’t be misled either by the fact that, say, two sounds like it could only apply to the quantity 2: a language may require that 2, 12, 102 (and so on) are all treated like one another but differently to other quantities. Rely on your translator to know what distinctions their language actually insists upon.
It’s often possible to avoid quantity strings by using quantity-neutral formulations such as «Books: 1». This makes your life and your translators’ lives easier, if it’s an acceptable style for your application.
Note: A plurals collection is a simple resource that is referenced using the value provided in the name attribute (not the name of the XML file). As such, you can combine plurals resources with other simple resources in the one XML file, under one element.
file location: res/values/filename.xml
The filename is arbitrary. The
element’s name is used as the resource ID. resource reference: In Java: R.plurals.plural_name syntax: elements: Required. This must be the root node.
A collection of strings, of which, one string is provided depending on the amount of something. Contains one or more elements.
name String. A name for the pair of strings. This name is used as the resource ID. A plural or singular string. The value can be a reference to another string resource. Must be a child of a
element. Beware that you must escape apostrophes and quotation marks. See Formatting and Styling, below, for information about to properly style and format your strings.
quantity Keyword. A value indicating when this string should be used. Valid values, with non-exhaustive examples in parentheses:
| Value | Description |
|---|---|
| zero | When the language requires special treatment of the number 0 (as in Arabic). |
| one | When the language requires special treatment of numbers like one (as with the number 1 in English and most other languages; in Russian, any number ending in 1 but not ending in 11 is in this class). |
| two | When the language requires special treatment of numbers like two (as with 2 in Welsh, or 102 in Slovenian). |
| few | When the language requires special treatment of «small» numbers (as with 2, 3, and 4 in Czech; or numbers ending 2, 3, or 4 but not 12, 13, or 14 in Polish). |
| many | When the language requires special treatment of «large» numbers (as with numbers ending 11-99 in Maltese). |
| other | When the language does not require special treatment of the given quantity (as with all numbers in Chinese, or 42 in English). |
example: XML file saved at res/values/strings.xml :
XML file saved at res/values-pl/strings.xml :
Kotlin
When using the getQuantityString() method, you need to pass the count twice if your string includes string formatting with a number. For example, for the string %d songs found , the first count parameter selects the appropriate plural string and the second count parameter is inserted into the %d placeholder. If your plural strings do not include string formatting, you don’t need to pass the third parameter to getQuantityString .
Format and style
Here are a few important things you should know about how to properly format and style your string resources.
Handle special characters
When a string contains characters that have special usage in XML, you must escape the characters according to the standard XML/HTML escaping rules. If you need to escape a character that has special meaning in Android you should use a preceding backslash.
By default Android will collapse sequences of whitespace characters into a single space. You can avoid this by enclosing the relevant part of your string in double quotes. In this case all whitespace characters (including new lines) will get preserved within the quoted region. Double quotes will allow you to use regular single unescaped quotes as well.
| Character | Escaped form(s) |
|---|---|
| @ | \@ |
| ? | \? |
| New line | \n |
| Tab | \t |
| U+XXXX Unicode character | \uXXXX |
| Single quote ( ‘ ) | |
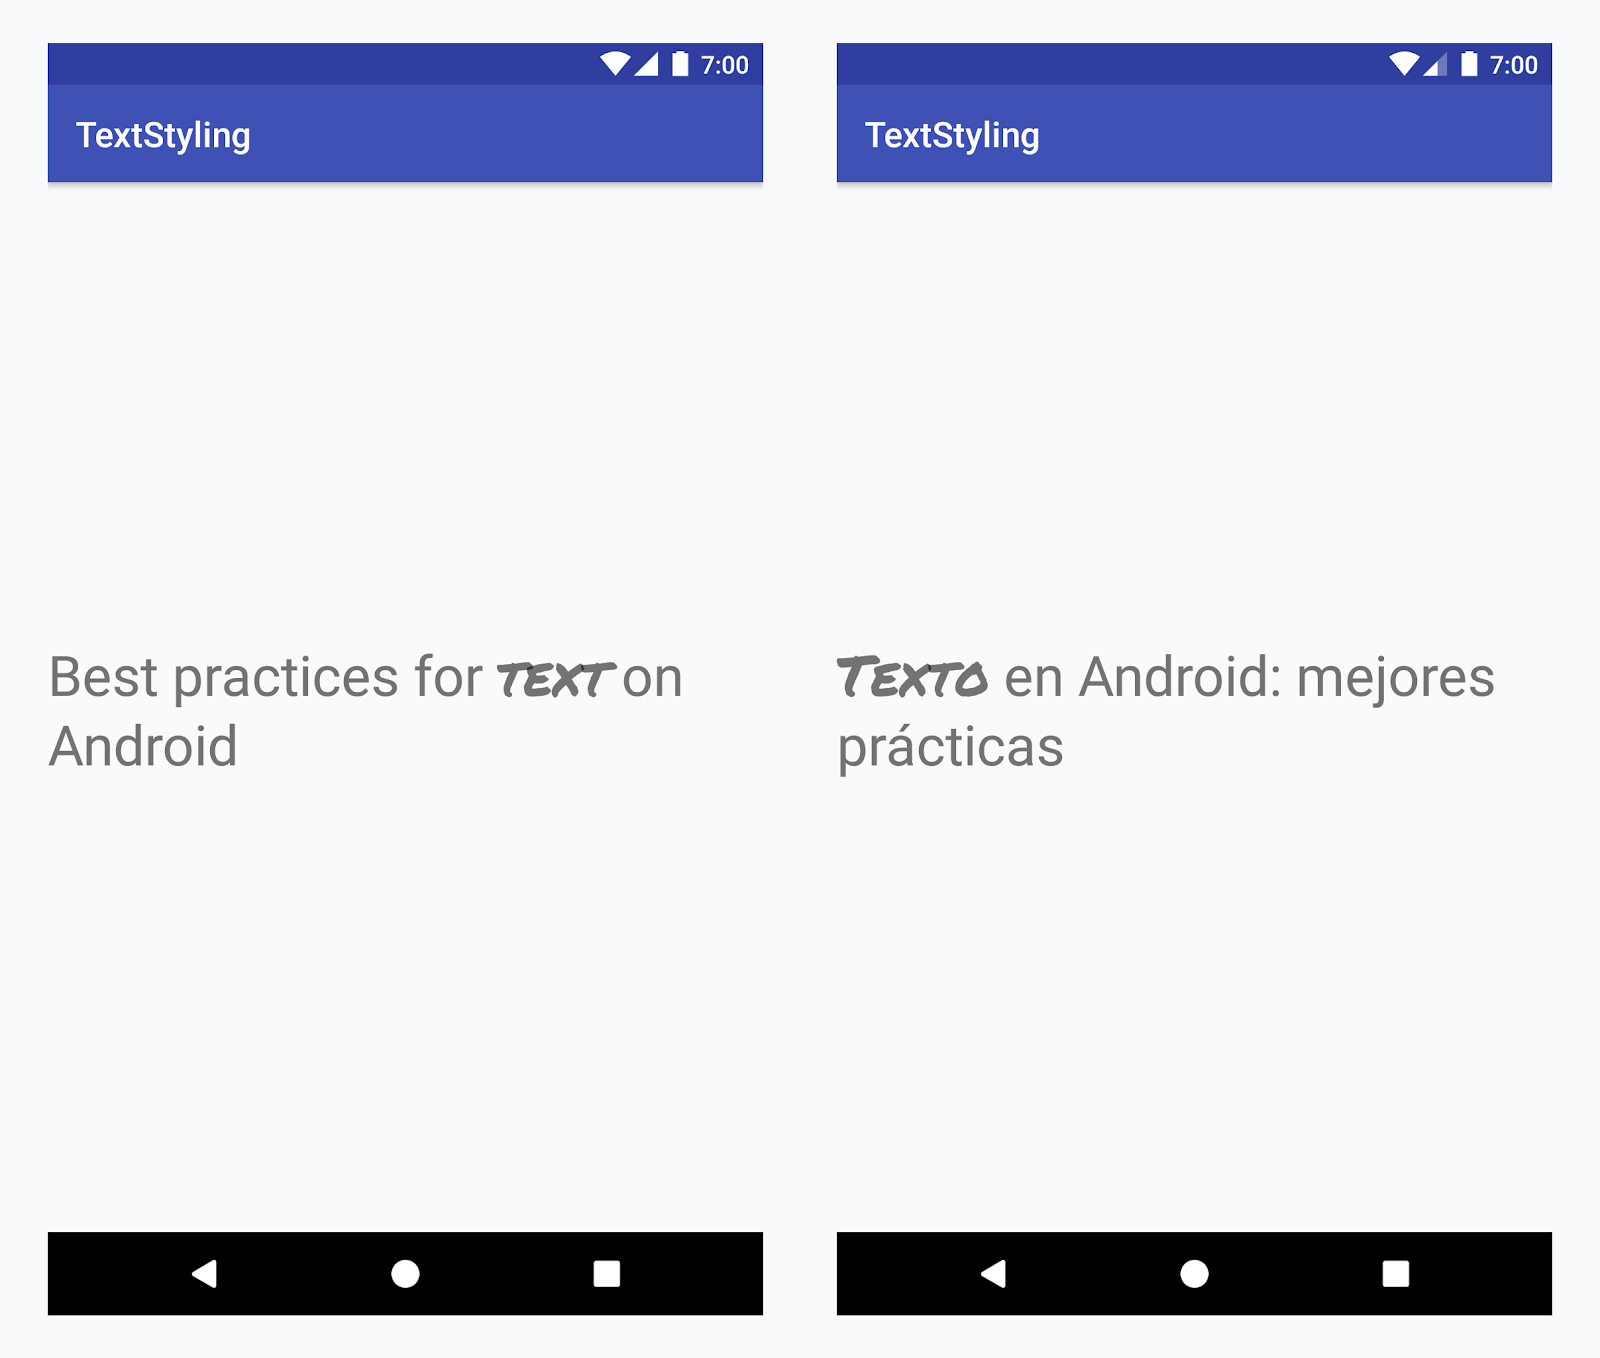
| Double quote ( » ) | \» Note that surrounding the string with single quotes does not work. Whitespace collapsing and Android escaping happens after your resource file gets parsed as XML. This means that (space, punctuation space, Unicode Em space) all collapse to a single space ( » » ), because they are all Unicode spaces after the file is parsed as an XML. To preserve those spaces as they are, you can either quote them ( » » ) or use Android escaping ( \u0032 \u8200 \u8195 ). Note: From XML parser’s perspective, there is no difference between «Test this» and «Test this» whatsoever. Both forms will not show any quotes but trigger Android whitespace-preserving quoting (that will have no practical effect in this case). Formatting stringsIf you need to format your strings, then you can do so by putting your format arguments in the string resource, as demonstrated by the following example resource. In this example, the format string has two arguments: %1$s is a string and %2$d is a decimal number. Then, format the string by calling getString(int, Object. ) . For example: KotlinStyling with HTML markupYou can add styling to your strings with HTML markup. For example: The following HTML elements are supported:
If you aren’t applying formatting, you can set TextView text directly by calling setText(java.lang.CharSequence) . In some cases, however, you may want to create a styled text resource that is also used as a format string. Normally, this doesn’t work because the format(String, Object. ) and getString(int, Object. ) methods strip all the style information from the string. The work-around to this is to write the HTML tags with escaped entities, which are then recovered with fromHtml(String) , after the formatting takes place. For example:
In this formatted string, a element is added. Notice that the opening bracket is HTML-escaped, using the notation. Then format the string as usual, but also call fromHtml(String) to convert the HTML text into styled text: KotlinBecause the fromHtml(String) method formats all HTML entities, be sure to escape any possible HTML characters in the strings you use with the formatted text, using htmlEncode(String) . For instance, if you are formatting a string that contains characters such as » fromHtml(String) , the characters come out the way they were originally written. For example: KotlinStyling with spannablesA Spannable is a text object that you can style with typeface properties such as color and font weight. You use SpannableStringBuilder to build your text and then apply styles defined in the android.text.style package to the text. You can use the following helper methods to set up much of the work of creating spannable text: KotlinThe following bold , italic , and color methods wrap the helper methods above and demonstrate specific examples of applying styles defined in the android.text.style package. You can create similar methods to do other types of text styling. KotlinHere’s an example of how to chain these methods together to apply various styles to individual words within a phrase: KotlinThe core-ktx Kotlin module also contains extension functions that make working with spans even easier. You can check out the android.text package documentation on GitHub to learn more. For more information on working with spans, see the following links: Styling with annotations
Example — adding a custom typefaceLoad the string resource and find the annotations with the font key. Then create a custom span and replace the existing span. KotlinIf you’re using the same text multiple times, you should construct the SpannableString object once and reuse it as needed to avoid potential performance and memory issues. For more examples of annotation usage, see Styling internationalized text in Android Annotation spans and text parcelingBecause Annotation spans are also ParcelableSpans , the key-value pairs are parceled and unparceled. As long as the receiver of the parcel knows how to interpret the annotations, you can use Annotation spans to apply custom styling to the parceled text. To keep your custom styling when you pass the text to an Intent Bundle, you first need to add Annotation spans to your text. You can do this in the XML resources via the tag, as shown in the example above, or in code by creating a new Annotation and setting it as a span, as shown below: KotlinRetrieve the text from the Bundle as a SpannableString and then parse the annotations attached, as shown in the example above. KotlinFor more information on text styling, see the following links: Content and code samples on this page are subject to the licenses described in the Content License. Java is a registered trademark of Oracle and/or its affiliates. Источник  Когда к мобильному устройству присоединены наушники  ОС Google Android развивается, и по всему видимому |