- How to Add a Library Project to Android Studio?
- Different Ways To Add Library Project to Android Studio
- Method 1
- Method 2
- Method 3
- Method 4
- How to Add External Library in Android Studio?
- Method 1: Copy external library to the libs folder
- Method 2: Using the module library
- Android studio add external library
- Adding External Library in Android Studio
- VIDEO TUTORIAL DEMO
- 1. Adding Gradle Dependency
- 2. Adding .jar/.aar Dependency
- 3. Adding dependency as a module
How to Add a Library Project to Android Studio?
Adding an external library in Android Studio is a very common thing but still, most beginners or freshers find it difficult to do. Some of you must have gone through this. Whenever you want to add some external library and you try to do that with maven(File > Project Structure > Dependencies) and try to add your dependencies there but when you hit Gradle sync, it fails. So now, without fixing this, you want to go for building your app then you will get the error: Error: A problem occurred configuring project ‘:app’. There are many external libraries available that make many specific tasks simple and easy with the APIs and Classes they provide. So including all those libraries in our project is really going to help you a lot. Many developers are often confused about how to add these libraries to their projects. This article is helpful for all such people.
In this article, we will see different ways to add library projects to our project. But before jumping to that let’s have a quick look at this: We can use Gradle, to add library projects with a single line code. Android Studio Project has a modular structure and we have a main module called “app”. There may be multiple modules in a Project. We can connect them together through Gradle, this connection is known as Dependency. Now Let’s get back to our main agenda.
Different Ways To Add Library Project to Android Studio
Method 1
Almost every well-known Android library is available in a Maven repository and its installation takes only one line of code in the app/build.gradle file:
Let’s add the external library to our project:
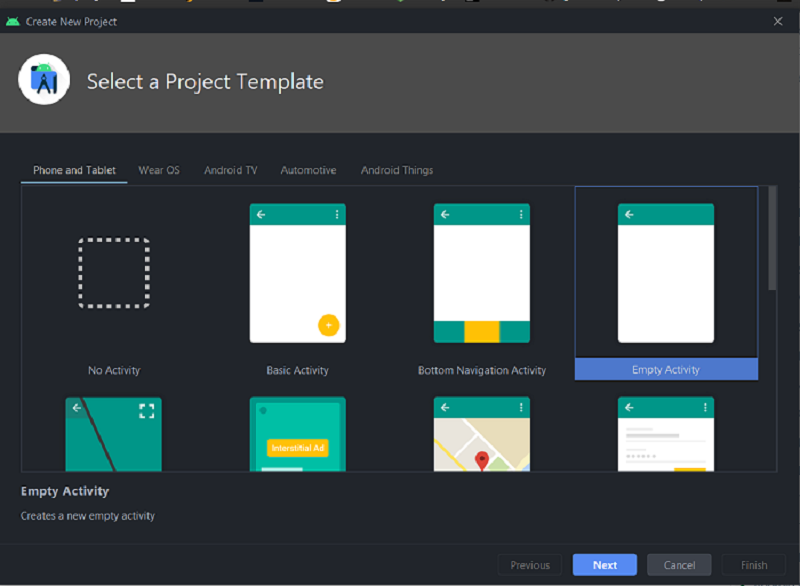
Step 1: Create a new project using Android Studio and name it anything you want (GFG in this example) and hit the finish button.
Step 2: The original project structure created by Android Studio looks like this:
Step 3: In the root directory (GFG/), create a new folder: /libs in which we’ll place our external libraries (this step is not required – only for keeping a cleaner project structure).

Step 4: Paste your library in the newly created /libs folder. For this example, we are using the PagerSlidingTabStrip library (you just need to download ZIP from GitHub, rename the library directory to “PagerSlidingTabStrip” and copy it). The new structure of our project should look like this:

Step 5: Edit settings.gradle by adding your library to include. If you use a custom path like I did, you have also to define the project directory for our library. A whole settings.gradle should look like below:
project(‘:PagerSlidingTabStrip’).projectDir = new File(‘libs/PagerSlidingTabStrip’)
Step 5.1: If you face “Default Configuration” error, then try this instead of step 5,
Step 6: In app/build.gradle add our library project as a dependency:
compile fileTree(dir: ‘libs’, include: [‘*.jar’])
Step 6.1: If you followed step 5.1, then follow this instead of 6,
compile fileTree(dir: ‘libs’, include: [‘*.jar’])
Step 7: If your library project doesn’t have build.gradle file you have to create manually.
Step 8: That’s all. Just click‚ synch the project with Gradle. Your library should be available for your project.
Method 2
Step 1: Follow to File > New Module
Click on “Import Existing Project“.
Step 2: Select the desired library and the desired module. Then click finish. Android Studio will import the library into your project and will sync Gradle files.
Step 3: In the next step you need to add the imported module to your project’s dependencies. Right-click on the app folder > Open Module settings
Step 4: Navigate to the dependencies tab > Click on the ‘+’ button -> click on Module Dependency. The library module will be then added to the project’s dependencies.
Method 3
Step 1: Navigate to File > Project Structure

Step 2: Then click on Modules.
To import the library using Gradle, you can have to add it to the dependencies section of your build.gradle (the module’s one).
Method 4
Just go to Project Structure > under Modules (see below images) just click the plus button and select Import Existing Project and import. Then sync your Gradle files. There are chances to face the error
Error: The SDK Build Tools revision (xx.x.x) is too low. Minimum required is yy.y.y
Then just open the build.gradle file in your library project directory and update the buildToolsVersion to the suggested one.
then try importing the module by clicking on File > Project Structure
Module > Import Module
After importing the library module, select your project module and add the dependency and then select the imported module.
Источник
How to Add External Library in Android Studio?
Android Studio is the official IDE (Integrated Development Environment) for Android app development and it is based on JetBrains’ IntelliJ IDEA software. Android Studio provides many excellent features that enhance productivity when building Android apps. In this article, we will learn how to add external libraries to our android project.
Method 1: Copy external library to the libs folder
Let us have an external library that we want to use in our project i.e a jar file.
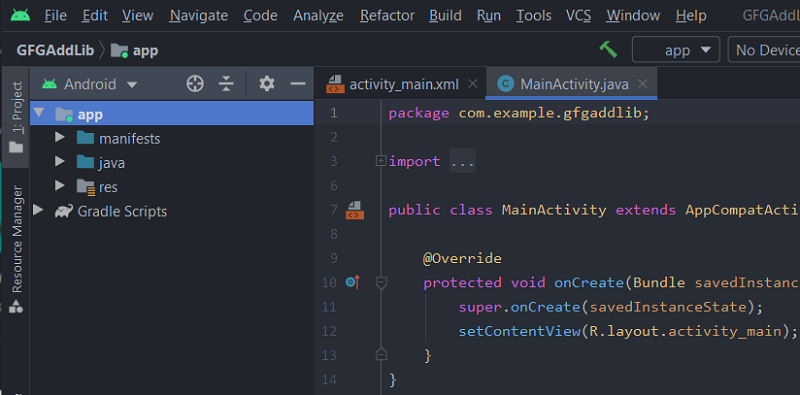
Create a new project named GFGAddLib.
Now, our project has been created.
Now click on the Android drop-down and change to Project files.
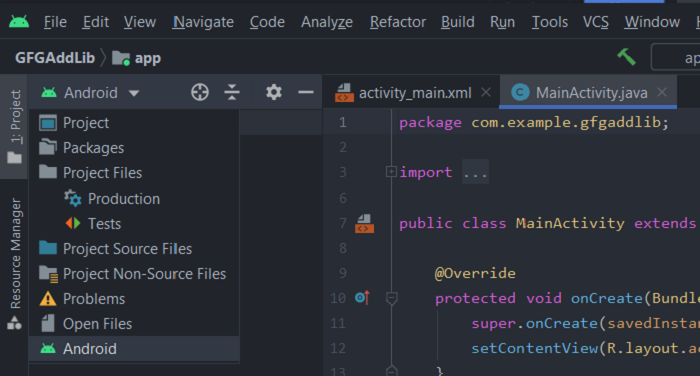
Click on Project files.
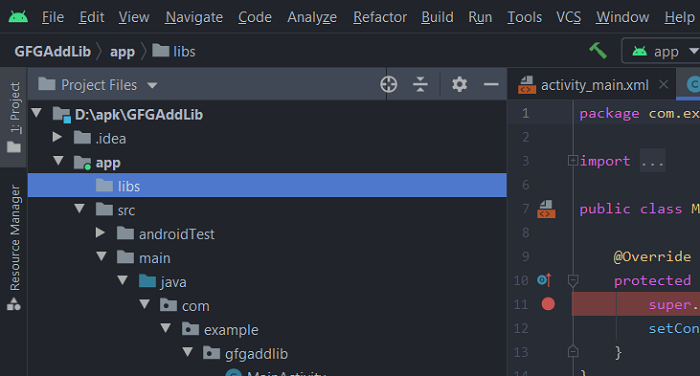
Copy the jar file to the libs folder.
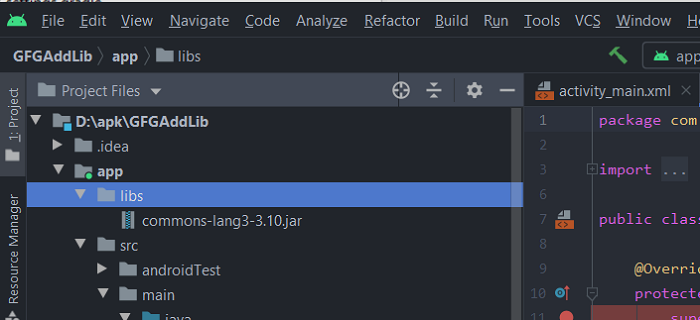
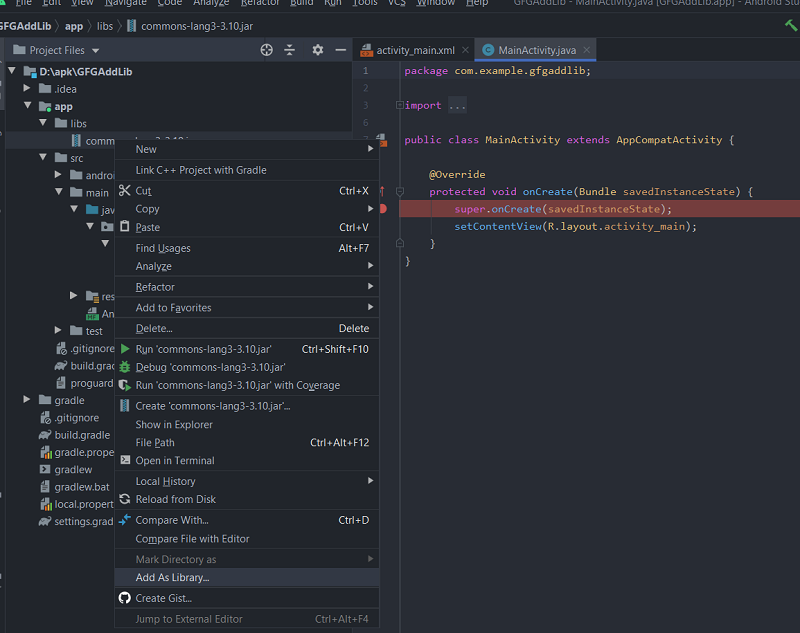
Here, you can see our added jar file under the libs folder. Right-click on the jar file and select Add As Library.
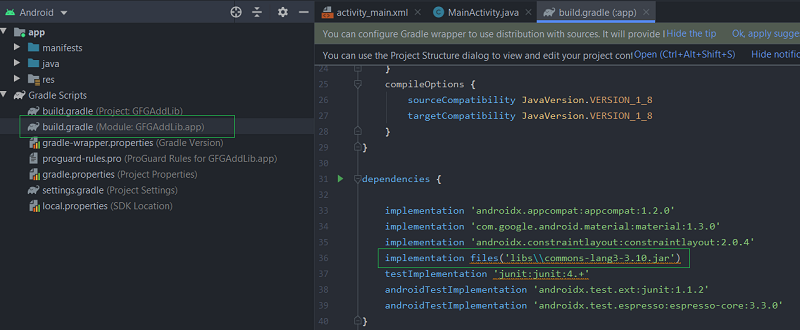
Now come back to the Android tab, you can see that your library has been already declared in build.grade (Module: GFGAddLib.app)
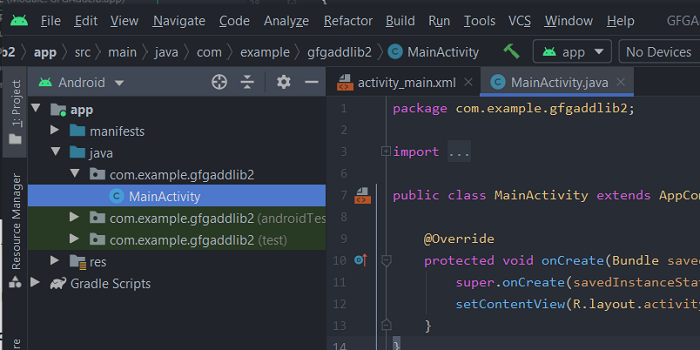
The library is successfully added to our project.
Method 2: Using the module library
Let us have a new project GFGAddLib2 and we want to use the same common-lang3-3.4.jar library for this project.
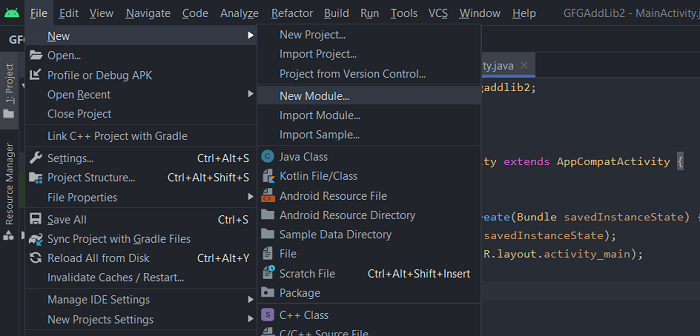
Create a new Android Module. Go to the File -> New -> New Module
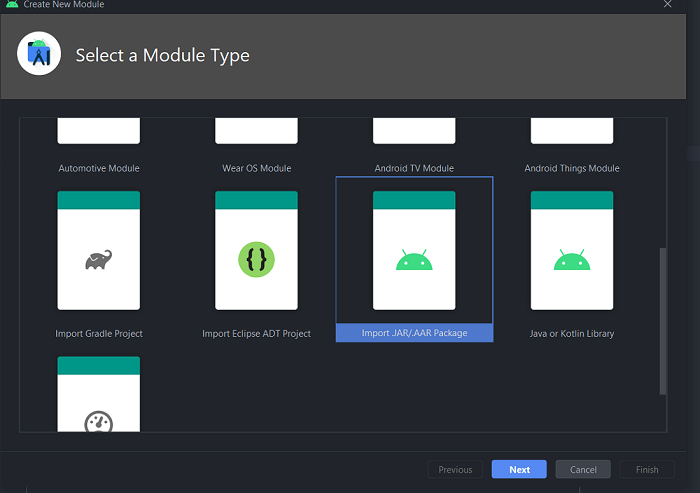
Select Import JAR/.AAR Package and click Next.
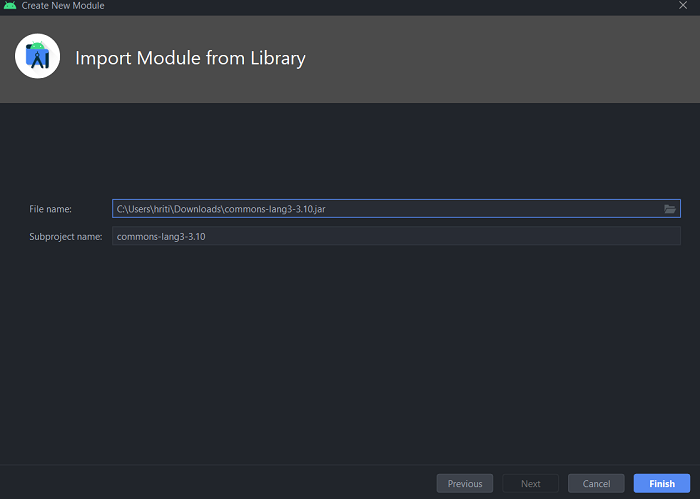
Select the location of your JAR file and click on Finish.
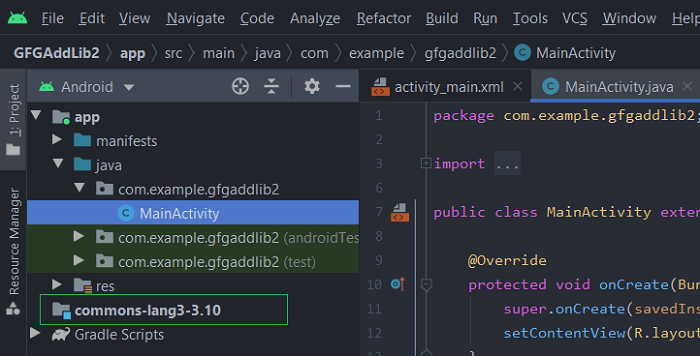
Module library has been created. Next, we need to declare the dependency of the main project on the newly created module. Now go to the File and click on Project structure.
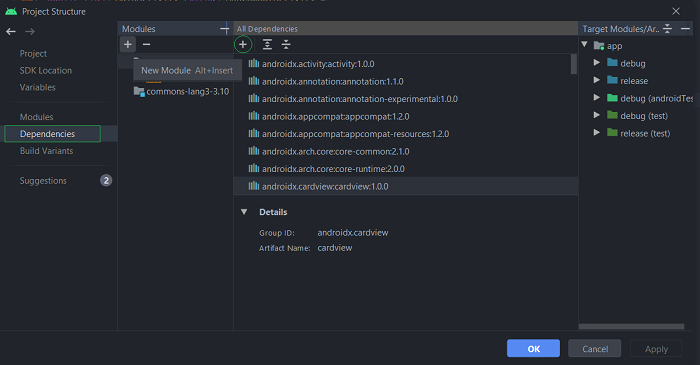
Now click on circled + sign and select Module Dependency
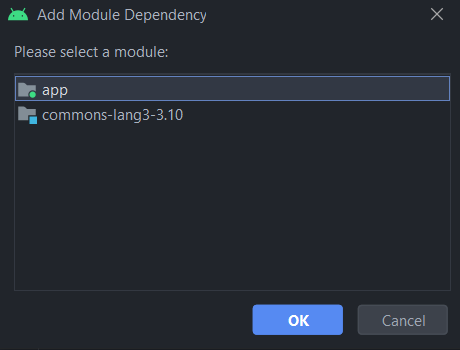
Click OK, a new dialogue box will appear, select the jar file and click OK.
Источник
Android studio add external library
Adding External Library in Android Studio
Adding an external library in Android Studio is a very common thing but still, most beginners or freshers find it difficult to do. So let’s learn how to add any external library to our Android Studio project and the pros & cons associated with it.
VIDEO TUTORIAL DEMO
Let’s discuss three ways of adding an external library as follows:
- Adding Gradle dependency.
- Adding .jar or .aar dependency.
- Adding dependency as a module.
1. Adding Gradle Dependency
It is very easy to add Gradle dependency. Most of us are familiar with this method as it is a common way and recommended too. Suppose you want to add Picasso to your project then you can add Gradle dependency as mentioned below to your project in build.gradle at the app level inside the dependencies block.
In the above implementation, 2.71828 is the latest version of the library. It will be different for different libraries and you can get it from respective Github repositories or release note’s pages.
Pros: If we need the updated version of the library we can directly see the latest version over its Github repository and replace it with the existing one and our library will be updated.
Cons: If you want to change any kind of code in the existing library then it’s not possible as it is read-only.
2. Adding .jar/.aar Dependency
In some cases, we don’t get the Gradle dependency of the library. Instead, we get only the .jar/.aar file. In such case you can follow the below steps:
- Find the .jar/.aar file and download it.
- Then copy the file from the downloaded location and go to Android Studio.
- Go to the App module and paste the file inside the libs folder. (If you don’t see the libs folder, create a new directory inside the App module.)
- After adding the file right-click on it and select Add As Library.
Add to App Module
Pros: I don’t see any pro for this. As we only need to add any .jar/.aar dependency if the library provider doesn’t have any other way to do.
Cons:
- Here updating the library is a bit lengthy task as we again need to download the latest jar and follow the same steps as mentioned above.
- You cannot modify the code if you want to as the files are read-only.
3. Adding dependency as a module
There can be a situation when we need to modify the library code according to our requirement then in that case we can follow this method.
- Go to the Github repo link of the library you are looking for.
- Click on the green color Code dropdown button.
Download Github Repository
» data-medium-file=»https://i0.wp.com/www.androhub.com/wp-content/uploads/github_repo_download_zip.png?fit=300%2C220&ssl=1″ data-large-file=»https://i0.wp.com/www.androhub.com/wp-content/uploads/github_repo_download_zip.png?fit=576%2C423&ssl=1″ src=»https://i0.wp.com/www.androhub.com/wp-content/uploads/github_repo_download_zip.png?resize=576%2C423&ssl=1″ alt width=»576″ height=»423″ data-recalc-dims=»1″ data-lazy-srcset=»https://i0.wp.com/www.androhub.com/wp-content/uploads/github_repo_download_zip.png?w=576&ssl=1 576w, https://i0.wp.com/www.androhub.com/wp-content/uploads/github_repo_download_zip.png?resize=300%2C220&ssl=1 300w» data-lazy-sizes=»(max-width: 576px) 100vw, 576px» data-lazy-src=»https://i0.wp.com/www.androhub.com/wp-content/uploads/github_repo_download_zip.png?resize=576%2C423&is-pending-load=1#038;ssl=1″ srcset=»data:image/gif;base64,R0lGODlhAQABAIAAAAAAAP///yH5BAEAAAAALAAAAAABAAEAAAIBRAA7″> Download Github Repository
 Import New Module
  Select Module to Import
Then right-click on the App directory -> Open Module Settings -> Dependencies -> Click on + button inside Declared Dependencies -> Module Dependency -> Select your library -> Ok.  Open Module Settings
 Select Module Dependency
Pros: You can modify the code according to your requirement.
Cons: Getting the updated version of the library can be difficult since we are making code changes here.
So these are the three ways of adding any external library to the Android Studio project. Hope this will help you guys.
Источник


