- Assets (Активы)
- Чтение файлов
- Используем собственные шрифты
- Загрузка локальных файлов из активов в WebView
- Получаем список файлов в папке assets
- Ограничение на размер файлов
- Assets Folder in Android Studio
- How the asset folder is different from the Resource Raw folder?
- But when to use which folder?
- How to Create Assets Folder in Android Studio?
- How to Add Vector Assets in Android Studio?
- How Vector Asset is different from Image Asset?
- Problem using PNG’s
- Bitmap vs Vector
- Benefits of Vector Assets
- How do vector assets render?
- Vector Formats
- Step by Step Implementation
- Adding Vector Assets in Android Studio
Assets (Активы)
В Android имеется ещё один каталог, в котором могут храниться файлы, предназначенные для включения в пакет — assets. Этот каталог находится на том же уровне, что и res. Для файлов, располагающихся в assets, в R.java не генерируются идентификаторы ресурсов. Для их считывания необходимо указать путь к файлу. Путь к файлу является относительным и начинается с /assets. Этот каталог, в отличие от подкаталога res, позволяет задавать произвольную глубину подкаталогов и произвольные имена файлов и подкаталогов.
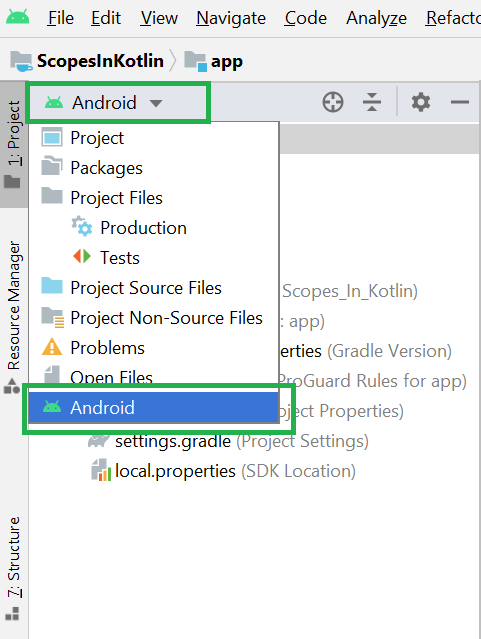
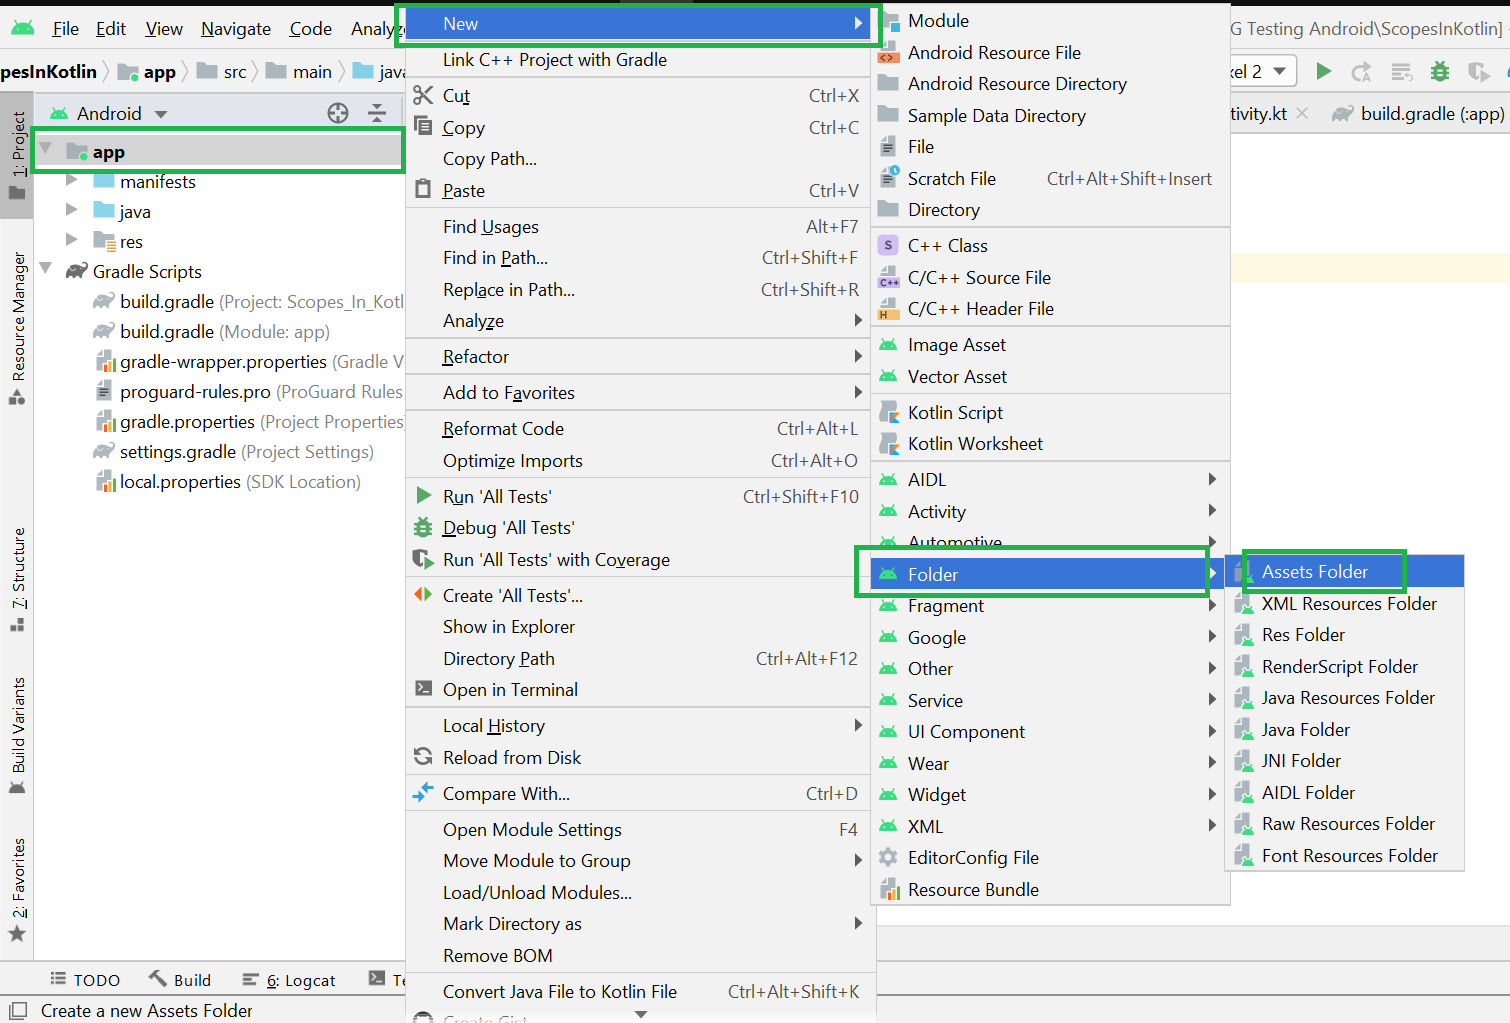
По умолчанию проект в студии не содержит данную папку. Чтобы её создать, выберите меню File | New | Folder | Assets Folder.
Чтение файлов
Для доступа к файлам используется класс AssetManager. Пример для чтения текстового файла.
Сначала на Kotlin.
Для доступа к графическому файлу из актива можно использовать следующий код:
Вы также можете загрузить изображение в Bitmap, используя BitmapFactory.decodeStream(), вместо Drawable.
Функция-расширение для Kotlin, которая вернёт Bitmap.
Используем собственные шрифты
Напишем практический пример создания приложения, в котором будут использоваться собственные шрифты, не входящие в стандартную библиотеку шрифтов Android. Для этого мы упакуем нужные шрифты вместе с приложением. Поместим в каталог assets/fonts файлы шрифтов (можно скачать бесплатные шрифты с сайтов 1001 Free Fonts или Urban Fonts ).
В файл разметки добавим пару текстовых полей с заготовленным текстом для вывода этого текста с нашим шрифтом.
В классе активности загрузим объект EditText из ресурсов, а затем создадим объект Typeface, используя вызов статического метода Typeface.createFromAsset(). Метод createFromAsset() принимает два параметра:
- объект AssetManager, который можно получить вызовом метода getAssets()
- путь к файлу актива.
Например, загрузить шрифт для текстового поля EditText можно следующим способом:
Запустив проект, мы увидим в текстовых полях надписи Happy New Year! и Meow!, выводимые нашими собственными шрифтами.

Пример для фрагмента.
Загрузка локальных файлов из активов в WebView
Если нужно загрузить локальные страницы и изображения из активов в WebView, то можно использовать префикс file://android_asset. Подробнее смотрите в статье про WebView.
Получаем список файлов в папке assets
Можно получить список файлов, которые находятся в папке assets. Для быстрой проверки кода я вручную скопировал в папку два файла:
Кроме ваших файлов, также возвращаются странные папки /images, /sounds, /webkit. Учитывайте это в своих проектах. Так как в папке можно создавать собственные подпапки, то можно воспользоваться вспомогательным методом:
Ограничение на размер файлов
По сети гуляет информация, что существует ограничение в 1 Мб на размер файлов в папке assets. При превышении размера у вас может появиться ошибка:
Я не сталкивался, поэтому рецепт решения проблемы не предлагаю.
Источник
Assets Folder in Android Studio
It can be noticed that unlike Eclipse ADT (App Development Tools), Android Studio doesn’t contain an Assets folder in which we usually use to keep the web files like HTML. Assets provide a way to add arbitrary files like text, XML, HTML, fonts, music, and video in the application. If one tries to add these files as “resources“, Android will treat them into its resource system and you will be unable to get the raw data. If one wants to access data untouched, Assets are one way to do it. But the question arises is why in the asset folder? We can do the same things by creating a Resource Raw Folder. So let discuss how the assets folder is different from the Resource Raw folder?
How the asset folder is different from the Resource Raw folder?
In Android one can store the raw asset file like JSON, Text, mp3, HTML, pdf, etc in two possible locations:
- assets
- res/raw folder

Both of them appears to be the same, as they can read the file and generate InputStream as below
But when to use which folder?
Below is some guidance that might be helpful to choose
1. Flexible File Name: (assets is better)
- assets: The developer can name the file name in any way, like having capital letters (fileName) or having space (file name).
- res/raw: In this case, the name of the file is restricted. File-based resource names must contain only lowercase a-z, 0-9, or underscore.
2. Store in subdirectory: (possible in assets)
- assets: If the developer wants to categories the files into subfolders, then he/she can do it in assets like below.

3. Compile-time checking: (possible in res/raw)
- assets: Here, the way to read it into InputStream is given below. If the filename doesn’t exist, then we need to catch it.
- res/raw folder: Here, the way to read it into InputStream is:
So putting a file in the res/raw folder will provide ensure the correct file-name during compile time check.
4. List filenames at runtime: (possible in assets)
- assets: If the developer wants to list all the files in the assets folder, he/she has used the list() function and provide the folder name or ” “ on the root folder as given below.
- res/raw: This is not possible in this folder. The developer has to know the filename during development, and not runtime.
So, in assets, one can read the filename during runtime, list them, and use them dynamically. In res/raw, one needs to code them ready, perhaps in the string resources file.
5. Filename accessible from XML: (possible in res/raw)
So if you need to access your file in any XML, put it in the res/raw folder. Let’s make a table to remember the whole scenario easily.
| Res/Raw Folder |
|---|
| Flexible File Name NO |
| Store in subdirectory NO |
| Compile-time checking YES |
| List filenames at runtime NO |
Filename accessible from XML How to Create Assets Folder in Android Studio?Now let’s discuss how to create an assets folder in the android studio. Below is the step-by-step process to create an assets folder in Android studio. Step 1: To create an asset folder in Android studio open your project in Android mode first as shown in the below image.
Step 2: Go to the app > right-click > New > Folder > Asset Folder and create the asset folder.
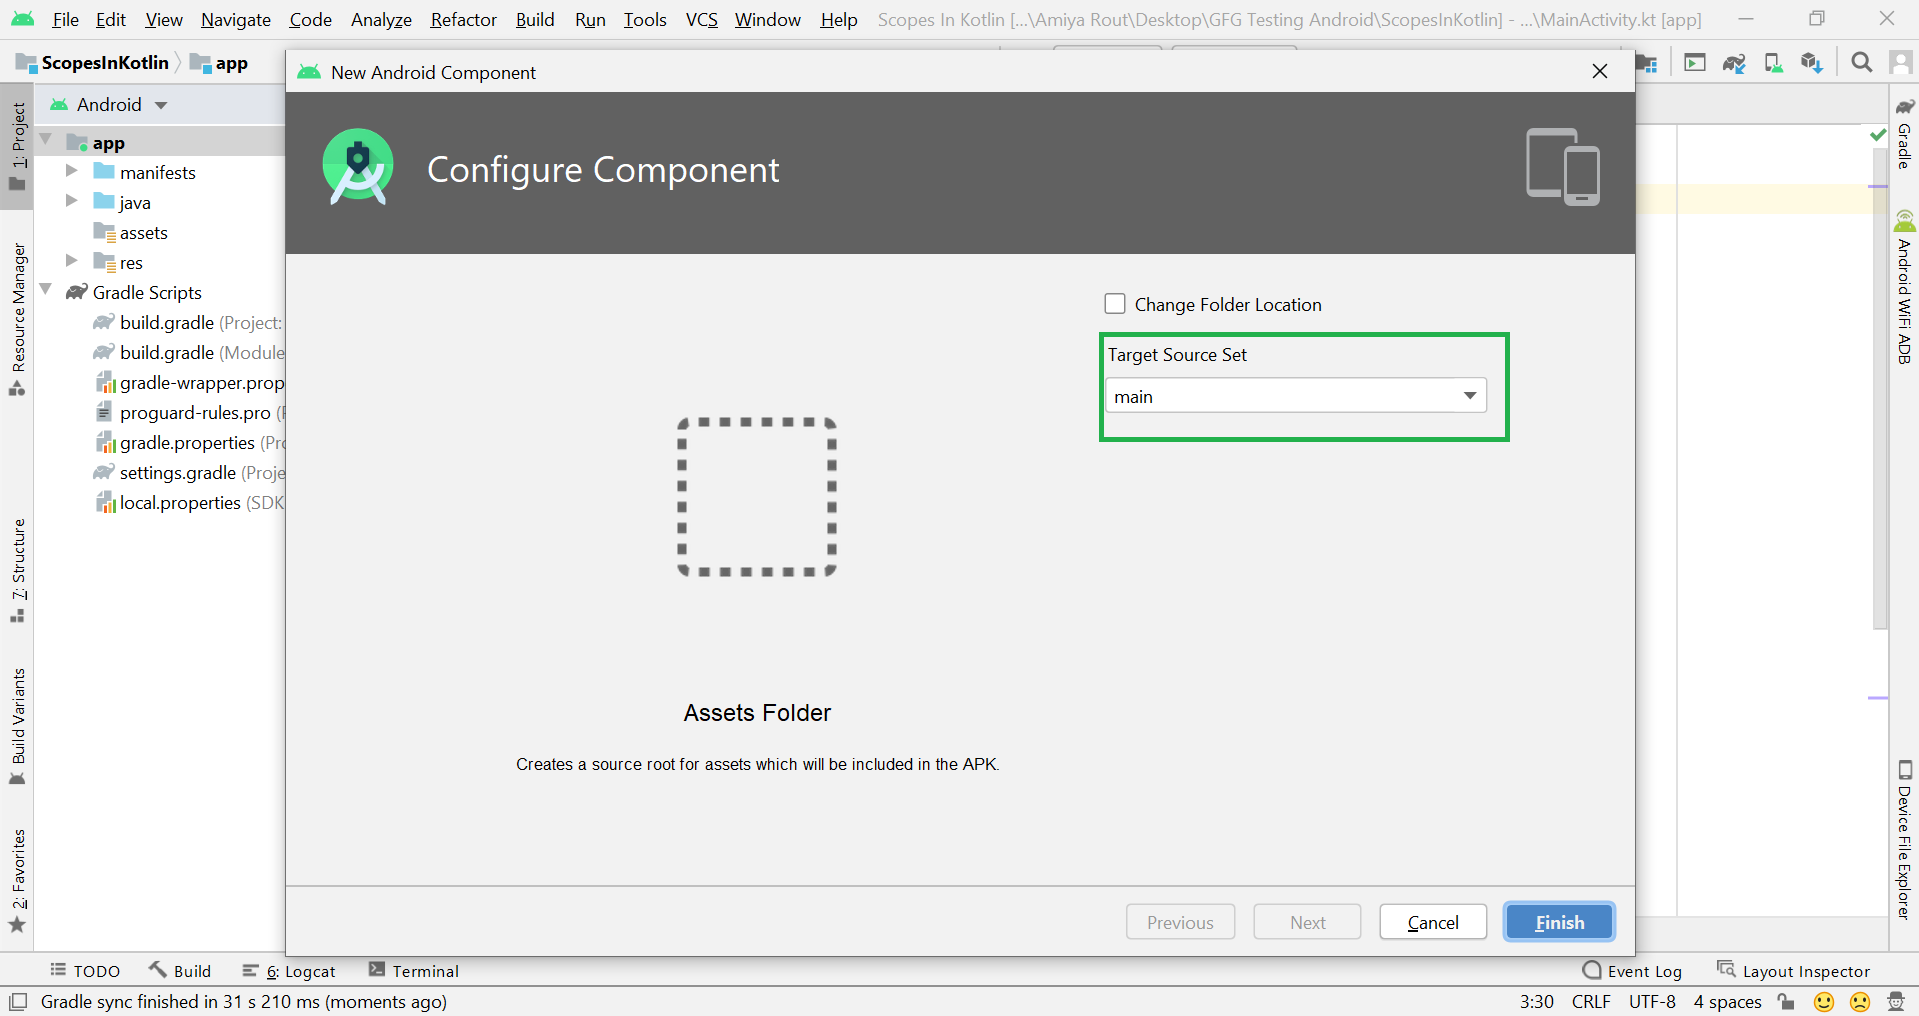
Step 3: Android Studio will open a dialog box. Keep all the settings default. Under the target source set, option main should be selected. and click on the finish button.
Step 4: Now open the app folder and you will find the assets folder by the name of “assets” as shown in the below image. Источник How to Add Vector Assets in Android Studio?Vector Assets in Android Studio helps to add material icons and import Scalable Vector Graphics and Adobe Photoshop Document files into your project as vector drawable resources. How Vector Asset is different from Image Asset?Image Asset Studio helps us create different types of icons with different densities and shows us exactly where they’ll be placed in our project. It includes tools for adjusting our icons and adding backdrops, all while displaying the result in a preview pane, so they appear exactly as we intended. Vector Asset Studio helps to add a vector graphic to our project as an XML file that describes the image. Problem using PNG’sThe PNG format can surely handle high-resolution photos. PNG format is a lossless web format. Hence, file sizes tend to get very large. If we want to work with photos on the web, we should always try to continue with JPEG. And the main issue for printing a .png file is its inherent color profile. The colors of the images may be a little dull since the printer has to interpret a different color language. Each PNG asset which we use is a certain density specific. Therefore, we have to deal with different versions of the same image for different screen sizes. To get rid of such problems we use vector assets. Bitmap vs VectorThere are the following differences between Bitmap and Vector: Benefits of Vector AssetsImage scalability is the major advantage of using the vector drawable. The same file can be resized for different screen sizes without loss of image quality which results in smaller APK files and less developer maintenance. We can also use vector images for animation. How do vector assets render?The vector assets are first compiled to binary format at compile time and then at runtime. Next, the application is needed to load this up, generates a model object from binary code, and perform some canvas operations to draw the individual paths to the screen. Vector FormatsThere are the following vector file formats:
Step by Step ImplementationStep 1: Right-click on drawable > New > Vector Asset After clicking on Vector Asset a new dialog box is opened that is shown below. Step 2: Click on Clip Art and Search for the Icons and click ok button Step 3: Change the color of the icon Icon color can be changed either by directly adding color code or by adjusting the color using brightness and then click on choose button. Step 4: Click Next Step 5: Now Click on Finish Button Step 6: Icon is created in the drawable folder as shown in the image Источник Adding Vector Assets in Android StudioIn the previous lesson, you added a menu item to your toolbar. In this lesson, you’ll learn how to add an icon for a menu item. Right-click the res > drawable folder in the Explorer area on the left of Android Studio. From the menu that appears, select New > Vector Asset: When you click on Vector Asset, you’ll see the Configure Vector Asset dialogue box appear in earlier versions of Android Studio: In later versions, you’ll see this dialog box: Notice the highlighted button in the image above. Click this button, either Icon or Clip Art, to see lots of icons you can choose from: Select an icon that reflects what your menu item will do. We’ve gone for a smiley-face for our favourites menu item: Although the Size says 24dp by 24dp, you can change this. Select the Override checkbox and the size text boxes will activate. Type a new size for your icon. We’ll leave ours on 24, though. Click the Next button to see what folder your icon is going in to: Now click the Finish button to add the image to your drawable folder. You can now use this drawable as an icon for your toolbar. With your favourites_page menu item still selected, click on the icon property. Click the Pick a Resource button again to bring up the Resources dialogue box. You should see your new icon there, in the drawable section: Click OK and your properties area should look like this: If you want to change the colour of a Vector Asset, double click the XML file in the drawable folder (not the ic_launcher ones). You should see something like this: A vector image is one built with paths. The path data connects series of points. Contrast this with a bitmap where images are built from a series of dots on a grid. So you can’t change the path data without change the image. But you can change the fill colours. For the smiley-face we’ve chosen the first two paths in the XML file are for the eyes. The third set of points are for the mouth and the circle. (There is no fill for the background.) You can change the hexadecimal values from #000000 to anything you like. Click the black colour squares in the margins to bring up a colour dialogue box. Select some new colour for your vector shape. You’re not quite ready to test it out, though, as the icon won’t show until we add some code later. Let’s add two more menu items. Try to do these two yourself. Add a new menu item to your layout. Change the ID to web_page. Set the title for your web string resource via the Resources dialogue box. Set the showAsAction to ifRoom. Add a new Vector Asset to your drawable folder, choosing any icon you like. Set the icon property to your new drawable. Your Properties area might then look something like this: And your layout might look like this: Add a third menu item to your layout. Change the ID to settings. Set the title to your settings_page string resource via the Resources dialogue box. Set the showAsAction to never. Because this menu item will never appear on the toolbar, you don’t need an icon. Your Properties area might then look something like this: Your layout will look something like this one: Now that we have all our menu items in place, we can switch to the Java code. We’ll start that in the next lesson below. Источник  Когда к мобильному устройству присоединены наушники  ОС Google Android развивается, и по всему видимому |