- ⚡ Is Your Android Studio Always Slow? 🚀Here’s How to Speed Up Immediately.
- A very quick and effective trick to boost Android Studio
- ⚙️ Android Studio Requirements
- 🚀Speeding Up Android Studio
- Android Studio is very slow
- 6 Answers 6
- Android Studio slow performance
- 6 Answers 6
- Android Studio got very slow and constantly «updating indices»
- 12 Answers 12
- Why emulator is very slow in Android Studio?
- 20 Answers 20
⚡ Is Your Android Studio Always Slow? 🚀Here’s How to Speed Up Immediately.
A very quick and effective trick to boost Android Studio

As an android developer, we get to spend a huge chunk of our time on Android Studio, the Google’s official compiler for developing native Android apps. Over the years, it has evolved into a very powerful IDE with lots of features and functionalities. But there are still some problems, which hasn’t been fixed yet for a lots of developers due to various reasons such as Gradle build time, Android Studio speed etc.

There have been many articles including official documentation on how to speed up. Some works and some not. But this article is not about gradle build time. Rather this is about more common but frustrating problem: slow Android Studio. Let’s see how to speed it and make it faster in some very easy ways.
There is a supporting video for this blog post if you would prefer to learn about this trick to speed up Android Studio.
⚙️ Android Studio Requirements
According to Android Studio’s official system requirements, it takes at minimum 3 GB RAM to run smoothly. Honestly, its a lot and I believe that is the biggest cause of being it too slow all the time.

The android developers are always complaining about the speed of Android Studio and how its slow ALL THE TIME. This makes overall development slow and frustrating. It affects productivity negatively.


So enough chit chat. Let’s see how to make it a lot faster in a very easy way.
🚀Speeding Up Android Studio
You might have read different tricks such as Offline Gradle, increasing memory in gradle.properties file, disabling Instant Run and so on. Let me show you a very easy way, shared by none other than Jake Wharton on Reddit about a year ago.
So, let me show you how to do this.
First, click on File -> Settings -> Plugins to open dialog like this.
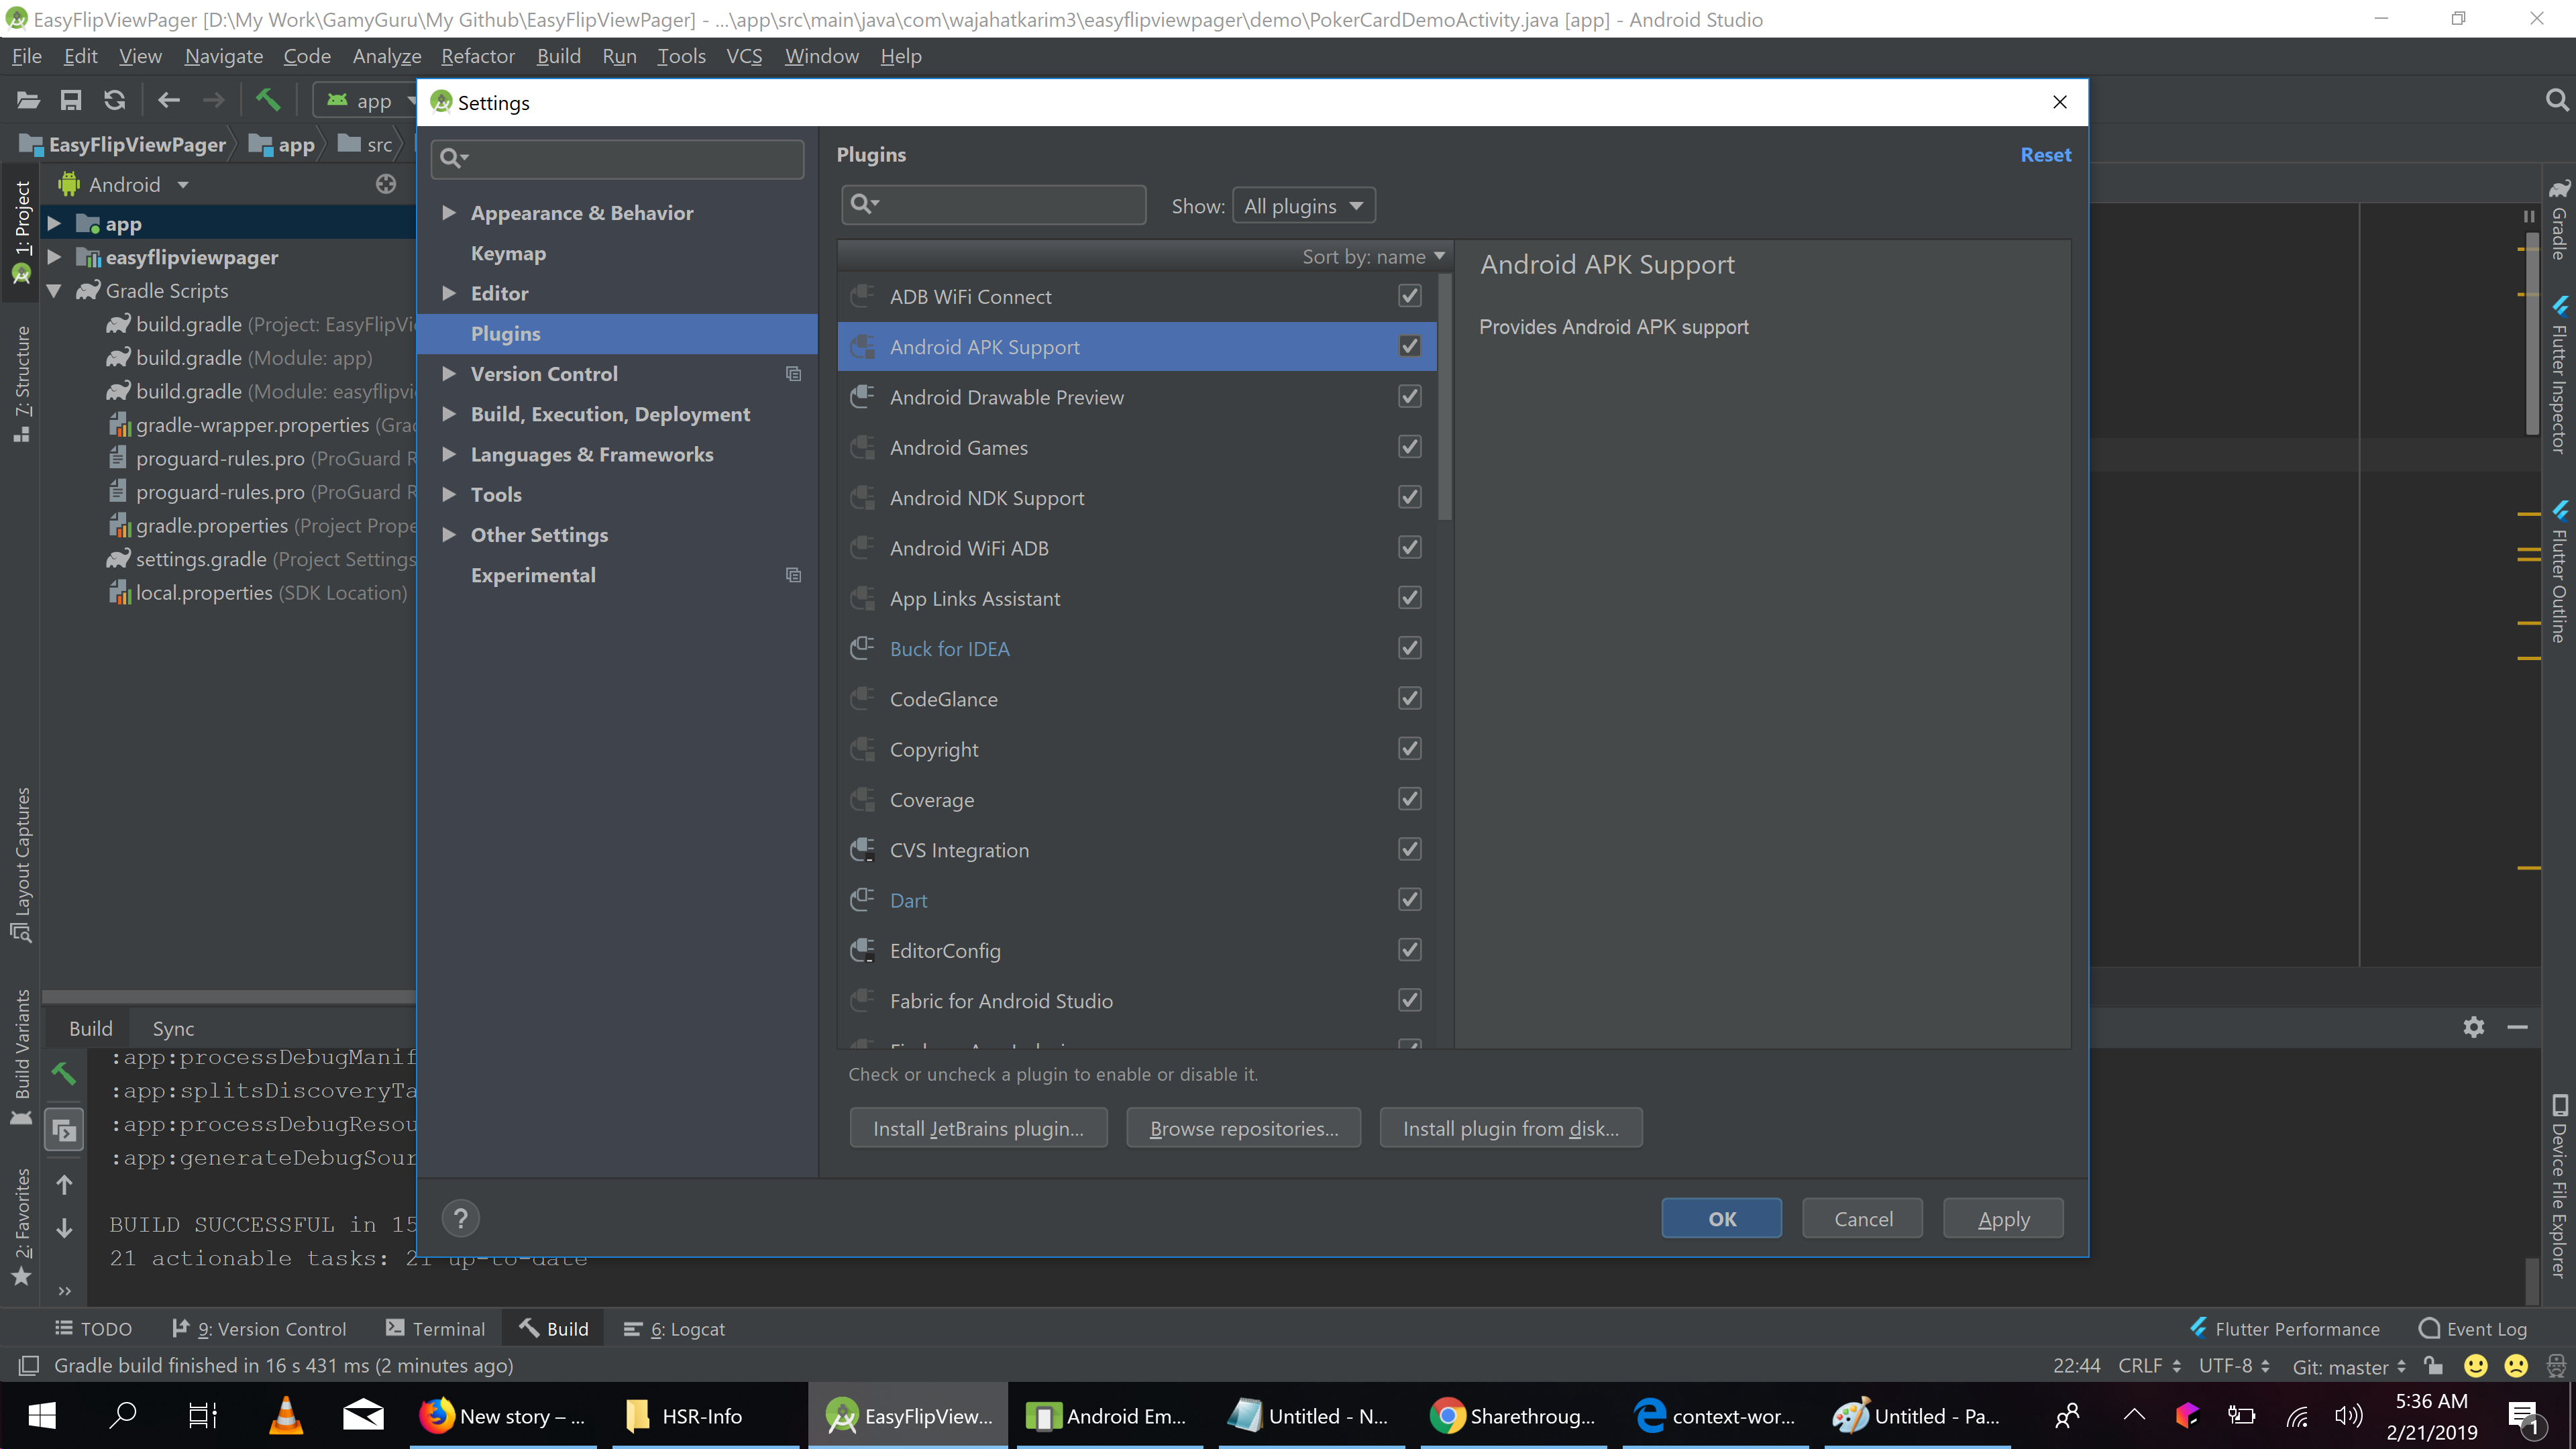
Now, disable or Check Off all the plugins which not usable for you. I have disabled following:
Источник
Android Studio is very slow
I have a project with about 20 modules inside. Gradle clean takes about 5min. As ell if i add a new module gradle update projects needs more than 5min.
There are no dependencies to external libraries. Dependencies are only inside the project between several modules.
I had same Project without gradle and it worked fine. I did not convert the old project to gradle. I have created a new project with the file structure recomended by gradle. But with this performance this is not very usefull.
Any idea what’s going wrong with gradle?
6 Answers 6
Just create a file named gradle.properties in the following directory:
Add this line to the file:
My Android studio in Ubuntu was too slow and I have done these things to speed up to very fast. in the welcome screen click (you can also go to it by file>close project)
Hope it will help
This could help too:
If you notice that Android Studio works slowly, consider the possibility to reduce the number of folders under antivirus protection.
Each antivirus check in your project consumes resources. You can significantly improve the performance, if you exclude certain folders from the antivirus protection.
Source: tip of the day from Android Studio.
Edit: The same point was made in the 2019 Google I/O talk: https://youtu.be/8rfvfojtRss?list=WL&t=756

Set Custom VM options in Help—>EDIT Custom VM options.
Compiler—>Command-line options set —offline.
Gradle—>check OfflineWork.
Launch SDK Manager—> Download HAXM Installer.
Now Android studio work like charm in Windows. Happy Coding:)

On Windows, I have found than my anti-spyware consider the jar files like archive. So I had exclude them from scan, but it’s not very secure .
I have a MacBook that I use for Android Studio and when I started out it was completely unusable taking 5 to 10 minutes for a build even for the smallest app. The Android emulator still does not work. Two things made the system usable. More memory added — I originally had 2GB and now have 8GB . and using actual Android hardware connected via USB.
My MacBook spec is as follows — macOS Sierra Version 10.12.3 MacBook (13-inch, Mid 2010) Processor 2.4 GHz Intel Core 2 Duo Memory 8 GB 1067 MHz DDR3 Graphics NVIDIA GeForce 320M 256 MB Serial Number — oops!
The phone I use for build is an LG Sporty using Android 4.4.2 KitKat
Android Studio has the Intel HAXM extensions loaded and switched on.
Источник
Android Studio slow performance
I’ve updated Android Studio to version 2.3 yesterday and since after I’m experiencing a slow performance, it was working fine before, though slow when gradle building, but now it taking 100% of processors resources.
What is the requirements for Android Studio to run smoothly?
My computer runs Windows 7 x64, i7 core, with 8 cores, 10Gb of RAM


6 Answers 6
Here you go with three easy steps to get Android Studio Fast :
Step 1 : Open gradle.properties file of your app and add in two lines as follows.
Step 2 : File —> Settings —> Compiler ——> Command-line-Options (enter –offline) File —-> Settings —–> Compiler ——> ——> Enable Configure on Demand
Description : Click File visible at the left most corner of your Android Studio and then select Settings under it. In the Settings screen search for Compiler and here you should find Command-Line-Options , where you need to enter –offline . At the bottom most you will also have to enable the option Configure On Demand .
Step 3 : File —-> Settings —–> Gradle —–> Enable Offline work
Description : Under the Settings screen, search for Gradle and Enable Offline Work option in it.
To run Android environment on low configuration machine.
- Close the unnecessary web tabs in browser
- For Antivirus users, exclude the build folder which is auto generated
- Android studio have 1.2 GB default heap can decrease to 512 MB
Help > Edit custom VM options
Layouts performance will be speed up
- For Gradle one of the core component in Android studio Make sure like right now 3.0beta is latest one
Below tips can affect the code quality so please use with cautions:
Studio contain Power safe Mode when turned on it will close background operations that lint , code completions and so on.
You can run manually lint check when needed ./gradlew lint
Most of are using Android emulators on average it consume 2 GB RAM so if possible use actual Android device these will reduce your resource load on your computer. Alternatively you can reduce the RAM of the emulator and it will automatically reduce the virtual memory consumption on your computer. you can find this in virtual device configuration and advance setting.
Gradle offline mode is a feature for bandwidth limited users to disable the downloading of build dependencies. It will reduce the background operation that will help to increase the performance of Android studio.
Android studio offers an optimization to compile multiple modules in parallel. On low RAM machines this feature will likely have a negative impact on the performance. You can disable it in the compiler settings dialog.
Источник
Android Studio got very slow and constantly «updating indices»
There are more similar question on the SO, but I haven’t found my answer on any of them so I am opening new one.
Android Studio 2.2.3 (but was same with the 2.2.2) Gradle 2.14.1 JRE 1.8.0
I am using it on the mac, OS X El Capitan (2.5 GHz, i5, 8GB RAM).
It has been working great until few weeks ago, and now it is so painfully slow. Most of the time it is «indexing/updating indices».
I am not that concerned about build time (it takes about 30-40sec, but I can live with that) as much as that constant indexing that makes coding almost impossible (overall responsiveness is pretty poor).
Is there anything in my gradle files that could cause this?
I do have some dependencies, but the app itself is relatively simple.
P.S. I have enabled — offline work, parallel and daemon. I have increased VM heap size. I have uploaded to latest Android Studio. I have replaces maven with jcenter(). Is there anything I am missing?

12 Answers 12
It also happened to me,I just Sync ‘app’ and it was solved.
Invalidate Caches / Restart under «File Menu»

For the others having the same problem:
My android studio returned back to its original performance (which was ok). It is hard to me to say what made an improvement because I have done lots of changes at once, here are few I recall:
- replaced maven with -> jcenter()
- set flag in properties to use default gradle wrapper
- updated android studio to latest version (at the moment 2.2.3)
- enabled gradle daemon — Configuration On Demand
- invalidate cache and restart(few times)
some of it I have tried before asking this question, but I think all came back to normal when I did last update to Android studio 2.2.3

Also, you can try:
Files -> Invalidate Caches / Restart.
This worked for me.


Try to store Sdk on other drive and also try to invalidate cache and restart. Hope this helps


I just deleted the .idea folder and restarted Android Studio then I pressed button «Sync Project with Gradle Files»

and everything goes fine.

Invalidate Caches / Restart solved my problem.
I got rid of constant «updating indices» issues by increasing the max heap size of Android Studio process.
To do so, change Studio’s JVM options (Help -> Edit Custom VM Options. ) to include -Xmx2g where 2g is the amount of memory enough to keep Studio happy with your project complexity.
Just go to File -> Invalidate Caches / Restart
Then on the dialog that opens select «Invalidate and Restart»

I’ve had the same problem, but only when having multiple ‘packages’ under ‘app/java/com.example.projectname’ If you have multiple packages within your java folder, try this. It worked instantly for me.
In Android Studio’s ‘Project Window,’ right click on ‘app/java/com.example.android.projectname’ then click ‘Show in Explorer.’ Move all of your ‘.java’ files out of their sub-folder and place them all in the ‘app/java/com.example.android.projectname’ folder.
Next, go back into Android Studio and open up all of your ‘.java’ files. At the top of your code you should see package com.example.android.projectname.subfolder; Because you’ve removed the ‘packages’ and relocated the ‘.java’ files, you need to change every ‘.java’ file’s package to read package com.example.android.projectname;
You’ll also need to go into the manifest and change ‘activity android:name=. ‘
Источник
Why emulator is very slow in Android Studio?
I just setup Android Studio on my PC, which is new launch to develop Android application.
My problem is that, when I try to run my small app in emulator, it take to much time to launch and after then emulator is working slow too.
AVD Name: Glaxy
Device: Glaxy Nexus (4.65″, 720x 1280: xhdpi)
Target: Android 4.2.2 — API Level 17
Memory Option: Ram 500, VM Heap 64
Internal Storage: 200MiB
I have good window pc: Intel Core 2 Duo 2.93Ghz and Ram is 3gb
I am new in Android development and java.

20 Answers 20
The Best Solution is to use Android Emulator with Intel Virtualization Technology.
Now if your system have a Processor that have a feature called as Intel Virtualization Technology, then Intel X86 images will be huge benefit for you. because it supports Intel® Hardware Accelerated Execution Manager (Intel® HAXM).
To check that your processor support HAXM or not : Click Here
You need to manually install the Intel HAXM in your system. Follow these steps for that.
- First of all go to — adt -> extras -> intel -> Hardware_Accelerated_Execution_Manager
- Make sure that Intel Virtualization is enabled from BIOS Settings.
- Now install Intel HAXM in your system and select amount of memory(i prefer to set it as default value).
- After installation create new Android Virtual Device (AVD) which should have a Target of API Level xx
- Now set the CPU/ABI as Intel Atom(x86).
- If you are on Windows then do not set RAM value more than 768 MB while setting up an emulator.
- Run the emulator. It will be blazing fast then ordinary one.
Hope it will be helpful for you. 🙂 Thanks.
Just edit the AVD settings as below,
Enable snapshot options and please use INTEL HAXM software for speedup.just visit https://software.intel.com/en-us/articles/intel-hardware-accelerated-execution-manager-intel-haxm and download.
The new Android Studio incorporates very significant performance improvements for the AVDs (emulated devices).
But when you initially install the Android Studio (or, when you update to a new version, such as Android Studio 2.0, which was recently released), the most important performance feature (at least if running on a Windows PC) is turned off by default. This is the HAXM emulator accelerator.
Open the Android SDK from the studio by selecting its icon from the top of the display (near the right side of the icons there), then select the SDKTools tab, and then check the box for the Intel x86 Emulator Accelerator (HAXM installer), click OK. Follow instructions to install the accelerator.
Be sure to completely exit Android Studio after installing, and then go to your SDK folder (C:\users\username\AppData\Local\extras\intel\Hardware_Accelerated_Execution_Manager, if you accepted the defaults). In this directory Go to extras\intel\Hardware_Accelerated_Execution_Manager and run the file named «intelhaxm-android.exe».
Then, re-enter the Studio, before running the AVD again.
Also, I found that when I updated from Android Studio 1.5 to version 2.0, I had to create entirely new AVDs, because all of my old ones ran so slowly as to be unusable (e.g., they were still booting up after five minutes — I never got one to completely boot). As soon as I created new ones, they ran quite well.
I tried all the suggested remedies and none had any impact. The Android Studio emulator experience was simply unusable with my setup (Windows 10, AndroidStudio 3.5, Quadcore 3.2 Ghz, 32GB with SSD drive).
I tried Updating Studio, Installing Intel HAXM, Changing the memory settings via SDK, using an actual device, excluding the various folders from in the Windows Anti-virus among other things.
The solution that made it work like a breeze was to exclude the Android Debug Bridge (adb.exe) «as a process» from the Windows Security / Virus Protection. You can either do it yourself or read the details below to know how to do it.
I suggest verifying the severity of the speed issue yourself. The same will be used to verify the difference immediately after you apply the remedy. Running the options from within Android Studio just makes it more complex.
Steps to check the issue:
Get the path for your Android SDK Tools. You can find it from SDK Manager -> Appearance and Behavior -> System Settings -> Android SDK.
Open a command prompt or terminal window. You can do right click on Windows (Start) Icon -> Run and execute «cmd». This should give you a windows command prompt or terminal window.
In the terminal window, change your drive and path to your Android SDK folder using the CD command. Now change to the sub-folder Platform-tools.
You will find the Android Debug Bridge (adb.exe) in this folder. This plays a very crucial role in operating the emulator as well as the actual device.
In the terminal window, execute the adb.exe tool with the command adb. It should instantly return back with the help parameters for adb.
Now execute adb.exe with a command like — adb devices. This should simply stall and take several seconds to come back with the information even if you have no devices or emulator running. In my setup it took almost 30 seconds. This is the issue.
Anything you do with the emulator goes via adb and gets stuck here. Once the remedy is applied, it should execute the adb devices command as instantly as the simple adb command without any parameter.
Steps to remedy:
Go to Windows «Virus and Threat Protection» setting. There are several ways to reach it. You can use Right Click on Windows (Start) Icon and choose Settings. Choose Update & Security, then Windows Security, then Virus and Threat Protection.
You will find the option Virus and Threat Protection Settings. Select it. You will find several options, look for Exclusions. Select the option Add or remove exclusions. This will take you to the list of Files, Folders, Processes which are presently excluded by the windows anti-virus. It may be empty or may have some data.
Select «+ Add an Exclusion». You will find 4 options — File, Folder, File Type and Process. This is critical. Please choose Process.
In the «Enter Process Name» input box type in the name adb.exe. Please dont forget to type in the extension, just putting adb will not work. Accept the input with «Add» button.
You are done. Now goto the command prompt again and follow the same steps you did earlier to check the issue. Hopefully you will be pleasantly surprised and your entire Android Studio emulator experience should become seamless.
Note that the steps may slightly vary depending upon your version of Windows, Android Studio and SDK tools however it should still apply.
Источник


