- Android studio android emulator slow
- Resolution
- ⚡ Is Your Android Studio Always Slow? 🚀Here’s How to Speed Up Immediately.
- A very quick and effective trick to boost Android Studio
- ⚙️ Android Studio Requirements
- 🚀Speeding Up Android Studio
- Configure hardware acceleration for the Android Emulator
- Configure graphics acceleration
- Requirements
- Configure graphics acceleration in the AVD Manager
- Configure graphics acceleration from the command line
- Enable Skia rendering for Android UI
- Configuring VM acceleration
- General requirements
- Development environment requirements
- Virtualization extension requirements
- Restrictions
- About hypervisors
- Check if a hypervisor is installed
- Configure VM acceleration on Windows
- Choose a hypervisor on Windows
- Double-check when disabling Hyper-V
- Configure VM acceleration using Intel HAXM on Windows
- Configure VM acceleration using Android Emulator Hypervisor Driver for AMD Processors on Windows
- Configure VM acceleration using Windows Hypervisor Platform
- Configure VM acceleration on macOS
- Configure VM acceleration on Linux
- Requirements
- Check whether KVM is currently installed on Linux
- Install KVM on Linux
Android studio android emulator slow
Android Virtual Device (Emulator) is taking very long time to start and then running extremely slow.
Resolution
First of all I installed Install Intel x86 Emulator Accelerator (HAXM). This can be downloaded directly from Intel or using Android SDK Manager. In the SDK Manager it’s located under Extras.
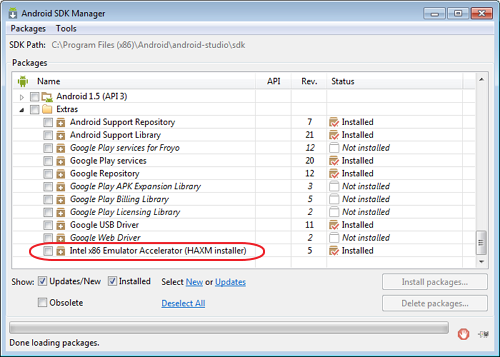
In the version of Android Studio I used (0.8.9), Android SDK Manager downloads HAXM, but doesn’t actually run the installer (I assume this will be fixed in later releases). To run the installed I had to go to C:\Program Files (x86)\Android\android-studio\sdk\extras\intel\Hardware_Accelerated_Execution_Manager and manually launch intelhaxm.exe.
HAXM works with Intel devices, so created a new Emulator with Intel CPU.
This improved things considerably, but the emulator was still feeling a bit sluggish . The final step was selecting Use Host GPU in Android Virtual Device Manager (AVD).
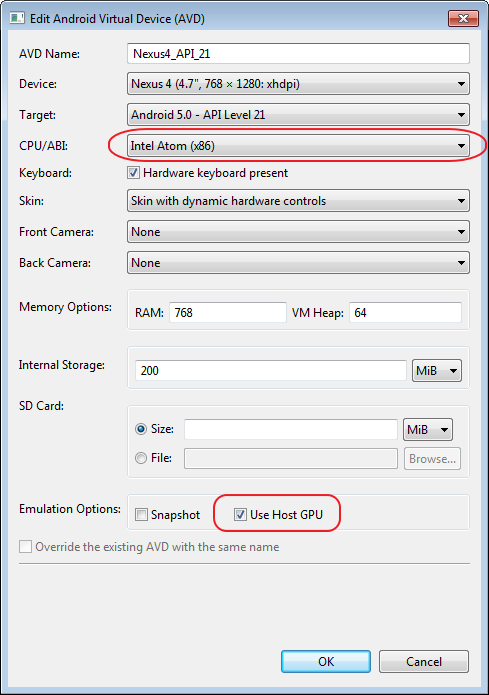
After these changes Android Emulator was launching in 5-10 seconds and running without any noticeable lag.
Be aware that these features are hardware dependent (CPU/GPU) and may not work on some systems.
Android Studio Beta 0.8.9
Windows 8.1 64bit
Intel Core i7 4770K CPU
Nvidia G-Force GTX660Ti
Источник
⚡ Is Your Android Studio Always Slow? 🚀Here’s How to Speed Up Immediately.
A very quick and effective trick to boost Android Studio

As an android developer, we get to spend a huge chunk of our time on Android Studio, the Google’s official compiler for developing native Android apps. Over the years, it has evolved into a very powerful IDE with lots of features and functionalities. But there are still some problems, which hasn’t been fixed yet for a lots of developers due to various reasons such as Gradle build time, Android Studio speed etc.

There have been many articles including official documentation on how to speed up. Some works and some not. But this article is not about gradle build time. Rather this is about more common but frustrating problem: slow Android Studio. Let’s see how to speed it and make it faster in some very easy ways.
There is a supporting video for this blog post if you would prefer to learn about this trick to speed up Android Studio.
⚙️ Android Studio Requirements
According to Android Studio’s official system requirements, it takes at minimum 3 GB RAM to run smoothly. Honestly, its a lot and I believe that is the biggest cause of being it too slow all the time.

The android developers are always complaining about the speed of Android Studio and how its slow ALL THE TIME. This makes overall development slow and frustrating. It affects productivity negatively.


So enough chit chat. Let’s see how to make it a lot faster in a very easy way.
🚀Speeding Up Android Studio
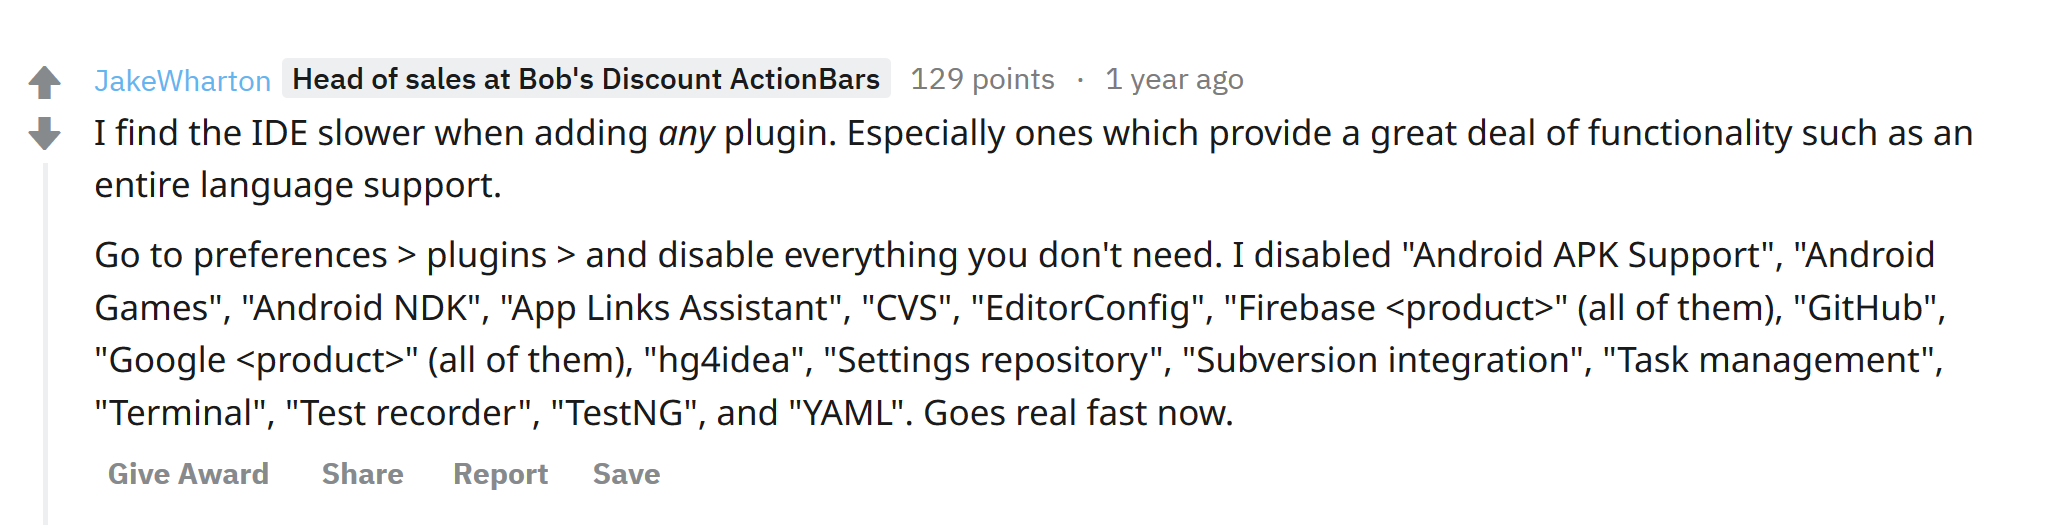
You might have read different tricks such as Offline Gradle, increasing memory in gradle.properties file, disabling Instant Run and so on. Let me show you a very easy way, shared by none other than Jake Wharton on Reddit about a year ago.
So, let me show you how to do this.
First, click on File -> Settings -> Plugins to open dialog like this.
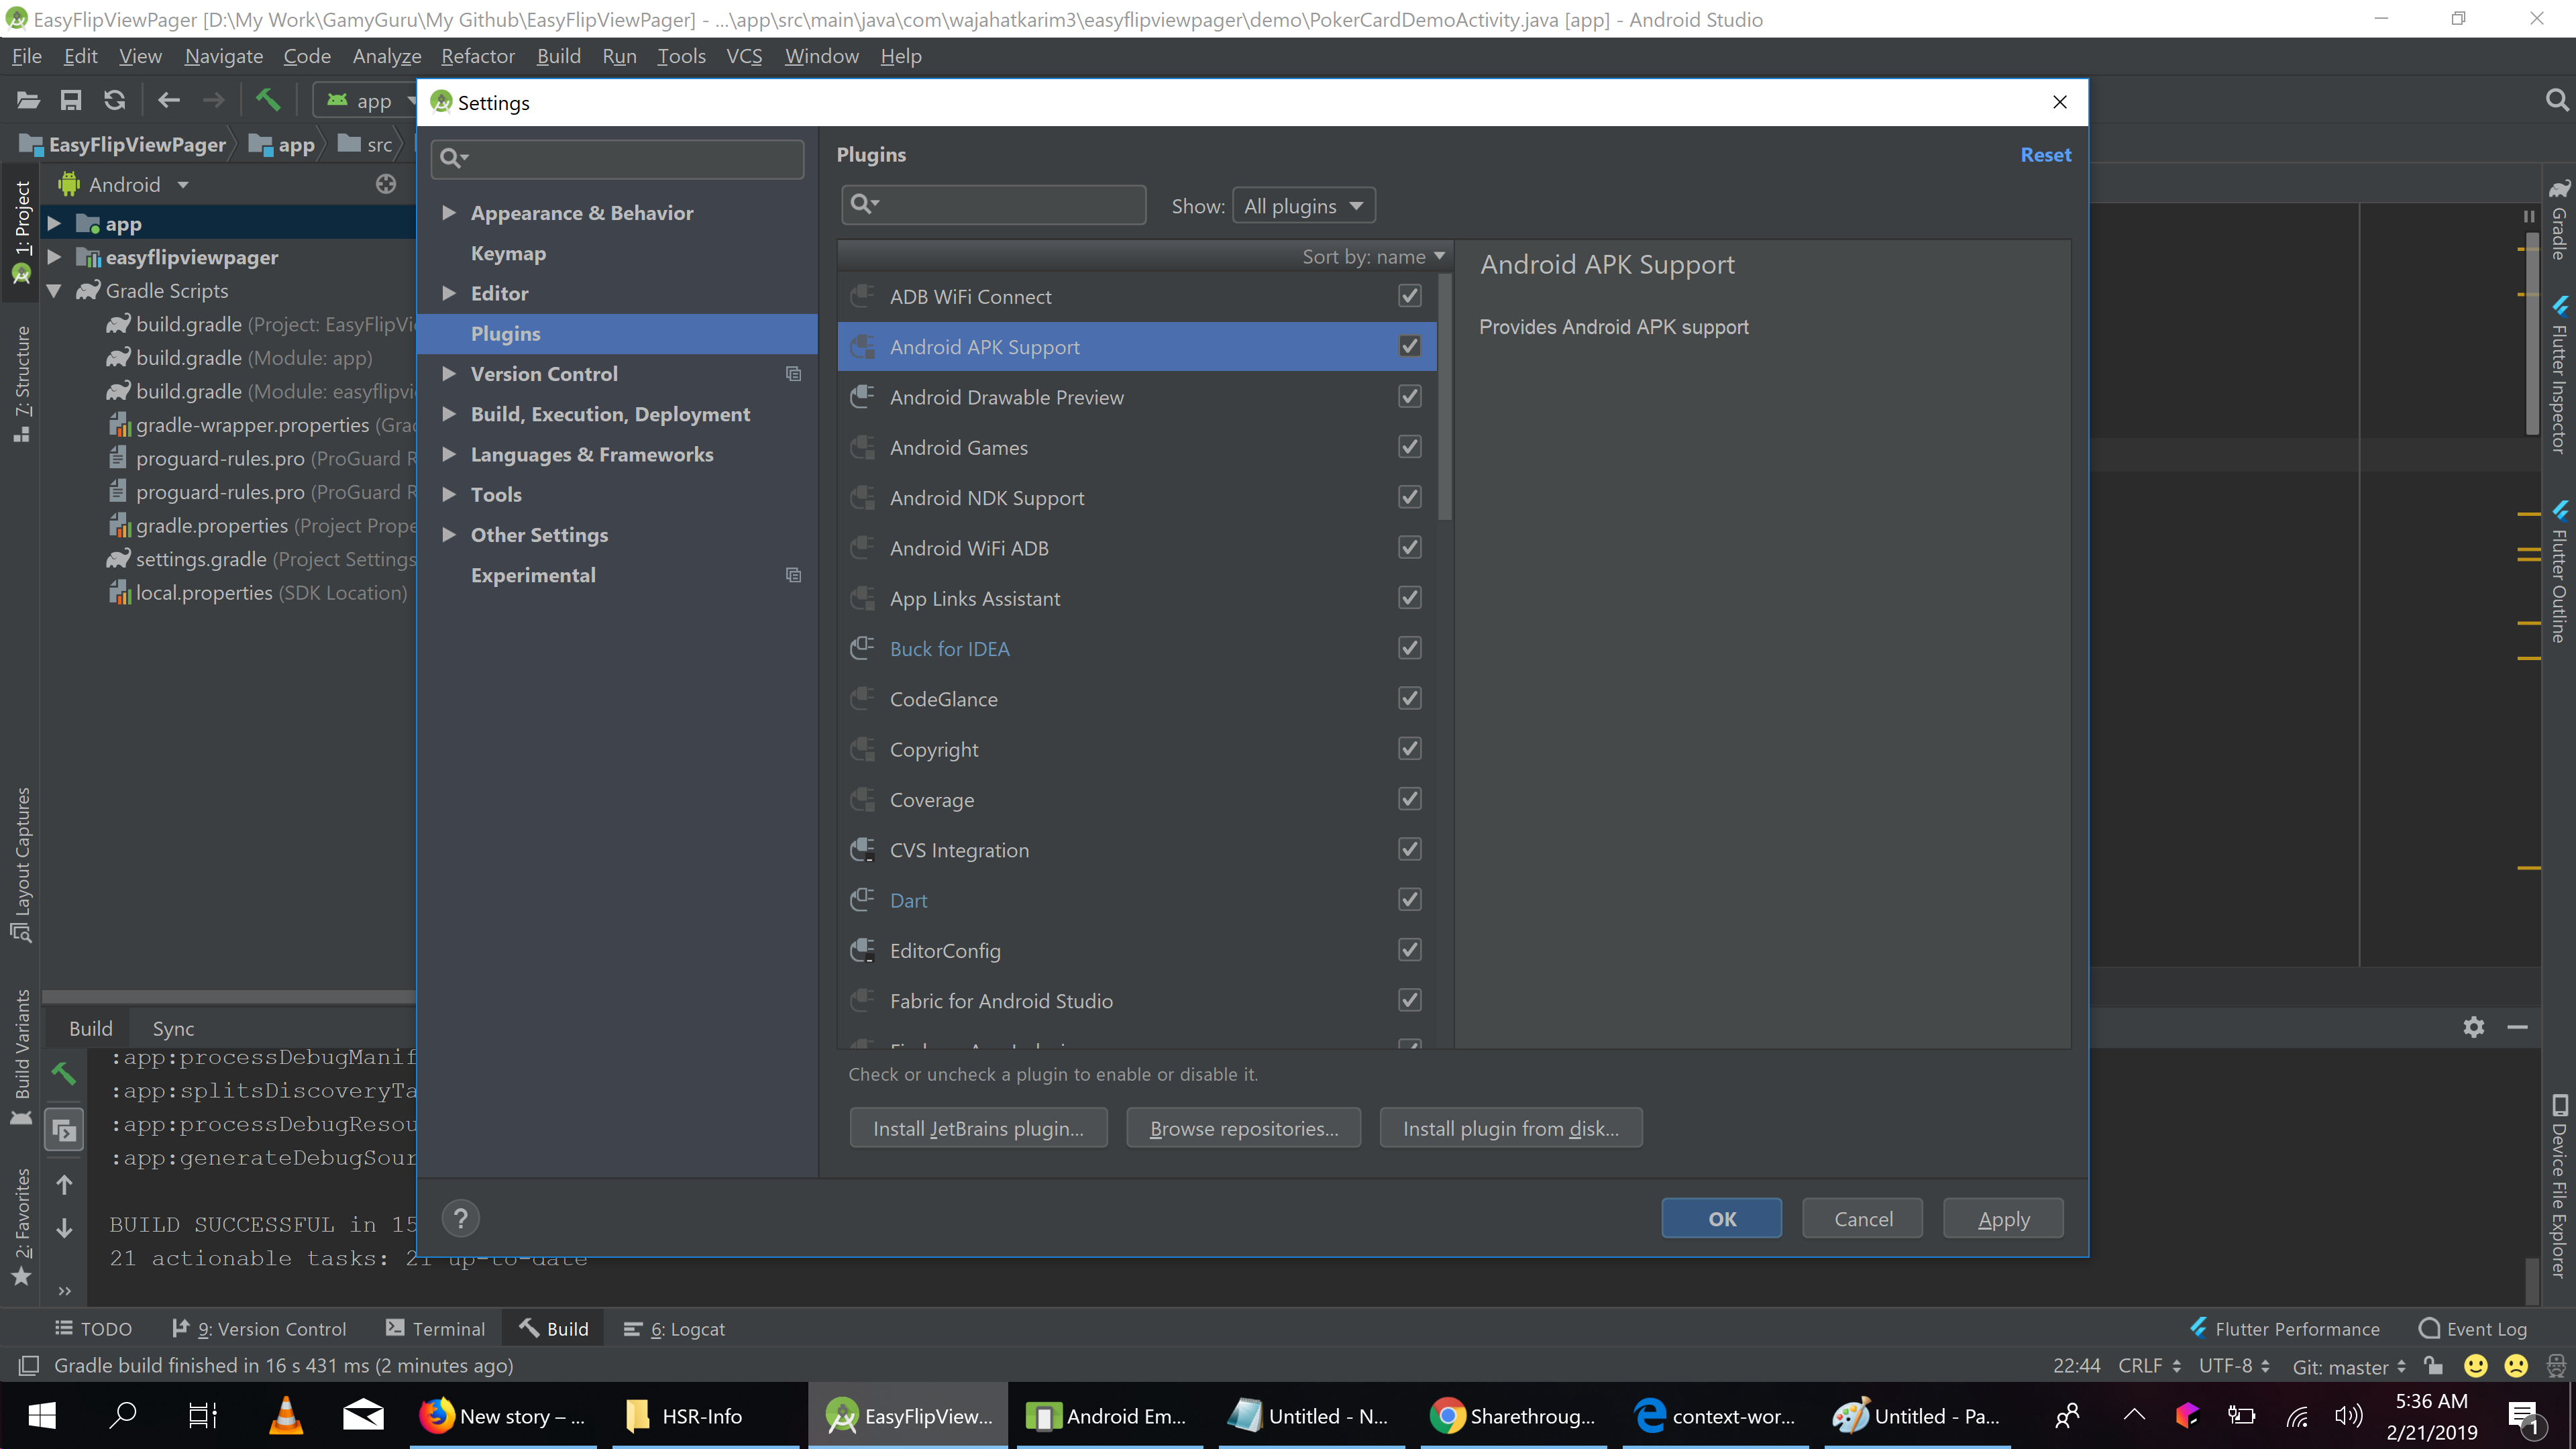
Now, disable or Check Off all the plugins which not usable for you. I have disabled following:
Источник
Configure hardware acceleration for the Android Emulator
The Android Emulator can use hardware acceleration features to improve performance, sometimes drastically. This page describes how you can configure graphics and virtual machine (VM) acceleration to get higher performance from the emulator.
Configure graphics acceleration
Graphics acceleration uses your computer’s hardware (typically the GPU) to make screen rendering faster. Android devices use OpenGL for Embedded Systems (OpenGL ES or GLES) for rendering both 2D and 3D graphics on the screen.
When you create an Android Virtual Device (AVD) in the AVD Manager, you can specify whether the emulator should use hardware or software to emulate the GPU of the AVD. Hardware acceleration is recommended and is typically faster. However, you might need to use software acceleration if your computer uses graphics drivers that aren’t compatible with the emulator.
By default, the emulator decides whether to use hardware or software graphics acceleration based on your computer setup. If your GPU hardware and drivers are compatible, the emulator uses the GPU. Otherwise, the emulator uses software acceleration (using your computer’s CPU) to simulate GPU processing.
If you start the emulator from the command line, you can also override the graphics acceleration setting in the AVD for that virtual device instance.
Requirements
To use graphics acceleration, your development environment must meet the following requirements:
- SDK Tools: Latest release recommended (version 17 minimum)
- SDK Platform: Latest release recommended (Android 4.0.3, Revision 3, minimum)
Configure graphics acceleration in the AVD Manager
To configure graphics acceleration for an AVD, follow these steps:
- Open the AVD Manager.
- Create a new AVD or edit an existing AVD.
- On the Verify Configuration page, find the Emulated Performance section.
- Select a value for the Graphics: option.
- Click Finish.
Configure graphics acceleration from the command line
To specify a graphics acceleration type when you run an AVD from the command line, include the -gpu option, as shown in the following example:
The value of mode can be set to one of the following options:
- auto : Let the emulator choose between hardware or software graphics acceleration based on your computer setup.
- host : Use the GPU on your computer for hardware acceleration. This option typically provides the highest graphics quality and performance for the emulator. However, if your graphics drivers have issues rendering OpenGL, you might need to use the swiftshader_indirect or angle_indirect options.
- swiftshader_indirect : Use a Quick Boot-compatible variant of SwiftShader to render graphics using software acceleration. This option is a good alternative to host mode if your computer can’t use hardware acceleration.
- angle_indirect : (Windows only) Use a Quick Boot-compatible variant of ANGLE Direct3D to render graphics using software acceleration. This option is a good alternative to host mode if your computer can’t use hardware acceleration. In most cases, ANGLE performance should be similar to using host mode because ANGLE uses Microsoft DirectX instead of OpenGL. On Windows, Microsoft DirectX drivers typically have fewer issues than OpenGL drivers. This option uses Direct3D 11 and requires Windows 10, Windows 8.1, or Windows 7 SP1 with the Windows 7 Platform Update.
- guest : Use guest-side software rendering. This option provides the lowest graphics quality and performance for the emulator.
Note: If you enable a graphics acceleration option that your computer doesn’t support, you are likely to see incorrect images displayed during emulation.
The following mode options are deprecated:
- swiftshader : Deprecated in version 27.0.2 Use swiftshader_indirect instead.
- angle : Deprecated in version 27.0.2. Use angle_indirect instead (Windows only).
- mesa : Deprecated in version 25.3. Use swiftshader_indirect instead.
Enable Skia rendering for Android UI
When using images for API level 27 or higher, the emulator can render the Android UI with Skia. Skia helps the emulator render graphics more smoothly and efficiently.
To enable Skia rendering, use the following commands in adb shell:
Configuring VM acceleration
VM acceleration uses your computer’s processor to significantly improve the execution speed of the emulator. A tool called a hypervisor manages this interaction using virtualization extensions that your computer’s processor provides. This section outlines the requirements for using VM acceleration and describes how to set up VM acceleration on each operating system.
General requirements
To use VM acceleration with the emulator, your computer must meet the general requirements in this section. Your computer also needs to meet other requirements that are specific to your operating system.
Development environment requirements
To use VM acceleration, your development environment must meet the following requirements:
Virtualization extension requirements
In addition to the development environment requirements, your computer’s processor must support one of the following virtualization extensions technologies:
- Intel Virtualization Technology (VT, VT-x, vmx) extensions
- AMD Virtualization (AMD-V, SVM) extensions
Most modern processors support these virtualization extensions. If you’re not sure whether your processor supports these extensions, check the specifications for your processor on the manufacturer’s site. If your processor doesn’t support one of these extensions, then you can’t use VM acceleration.
Restrictions
VM acceleration has the following restrictions:
- You can’t run a VM-accelerated emulator inside another VM, such as a VM hosted by VirtualBox, VMWare, or Docker. You must run a VM-accelerated emulator directly on your host computer.
- Depending on your operating system and hypervisor, you can’t run software that uses another virtualization technology at the same time that you run a VM-accelerated emulator. For example, VirtualBox, VMWare, and Docker currently use a different virtualization technology, so you can’t run them at the same time as the accelerated emulator.
About hypervisors
VM acceleration requires a hypervisor.
Without a hypervisor and VM acceleration, the emulator must translate the machine code from the VM block by block to conform to the architecture of the host computer. This process can be quite slow. With a hypervisor, the VM and the architecture of the host computer match, so the emulator can run code directly on the host processor using the hypervisor. This improvement drastically increases both the speed and performance of the emulator.
The hypervisor that will work best for you depends on your computer’s operating system and configuration. For more information, see one of the following sections:
Check if a hypervisor is installed
You can use the emulator -accel-check command-line option to check if a hypervisor is currently installed on your computer.
The following examples show how to use the emulator accel-check option. In each example, Sdk is the location of the Android SDK:
Configure VM acceleration on Windows
VM acceleration on Windows can use one of three hypervisors: the Intel Hardware Accelerated Execution Manager (HAXM), the Android Emulator Hypervisor Driver for AMD Processors or the Windows Hypervisor Platform (WHPX).
Choose a hypervisor on Windows
Use the following criteria to determine which hypervisor you should use:
| Criteria | Hypervisor |
|---|---|
| You have an Intel processor and do not need to run Hyper-V at the same time as the Android Emulator. | Use Intel HAXM. |
| You have an Intel processor and do need to run Hyper-V at the same time as the Android Emulator. | Use WHPX. |
| You have an AMD processor and do not need to run Hyper-V at the same time as the Android Emulator. | Use Android Emulator Hypervisor Driver for AMD Processors. |
| You have an AMD processor and do need to run Hyper-V at the same time as the Android Emulator. | Use WHPX. |
Double-check when disabling Hyper-V
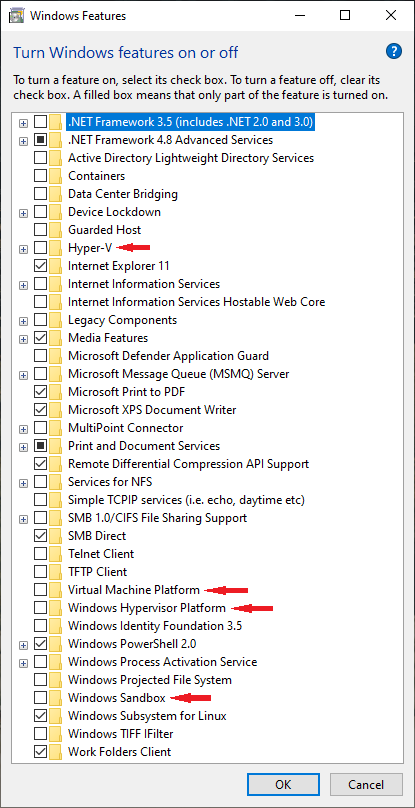
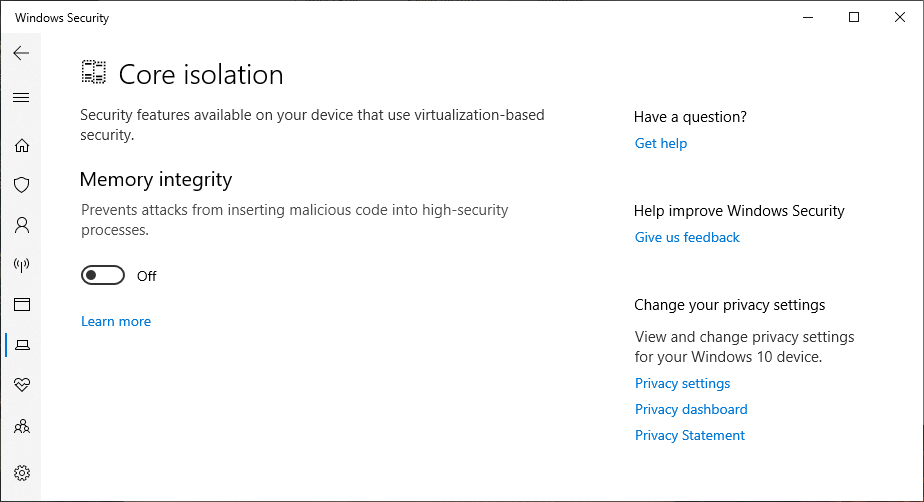
Hyper-V must be disabled to use Intel HAXM or the Android Emulator Hypervisor Driver for AMD Processors. However, unchecking «Hyper-V» in Windows Features Dialog might not guarantee that Hyper-V is disabled. Quite a few features in Windows 10 will enable Hyper-V implicitly. Users may not even know Hyper-V is activated when they enable one of these features.
To our best knowledge, these includes Virtual Machine Platform, Windows Hypervisor Platform, Windows Sandbox, Core Isolation, Credential Guard. Additionally, Windows Subsystem for Linux version 2 requires Virtual Machine Platform, meaning that it implicitly requires Hyper-V. This list is not exhaustive, please notify us on our bug tracker if you find an item that should be included here.
Double-check that the features listed above are also disabled when disabling Hyper-V. Reference Microsoft documentation and the examples below to find out how each individual feature can be disabled.
Some platforms fail to immediately disable Hyper-V when it is switched off. When this occurs, there is no error returned by the Windows OS and Hyper-V appears disabled in the Windows Features Dialog. Please file a bug on Microsoft’s issue tracker when this occurs.
Configure VM acceleration using Intel HAXM on Windows
Before you can install and use Intel HAXM, your computer must meet the following requirements:
- Intel processor with Virtualization Technology (VT-x), Intel EM64T (Intel 64) features, and Execute Disable (XD) Bit functionality enabled
- 64-bit Windows 10, Windows 8, or Windows 7 (or 32-bit version of the operating system on a 64-bit processor)
- To use Intel HAXM on Windows 10 or 8, you must turn off Hyper-V in the Windows Features Dialog.
Note: Installing certain software might turn Hyper-V back on. Refer to Disabling Hyper-V for more details.
To install the Intel HAXM driver, follow these steps:
- Open the SDK Manager.
- Click the SDK Update Sites tab and then select Intel HAXM.
- Click OK.
- After the download finishes, run the installer. Typically, you can find the installer in the following location: sdk \extras\intel\Hardware_Accelerated_Execution_Manager\intelhaxm-android.exe
- Use the wizard to complete the installation.
After installing Intel HAXM, confirm that the virtualization driver is operating correctly by entering the following command in a Command Prompt window:
You should see a status message that includes the following information:
You can adjust the amount of memory available to the Intel HAXM kernel extension by running the installer again.
You can uninstall Intel HAXM using either the installer or the Windows Control Panel. Before you uninstall Intel HAXM, shut down any x86 emulators that are currently running.
Configure VM acceleration using Android Emulator Hypervisor Driver for AMD Processors on Windows
Before you can install and use the Android Emulator Hypervisor Driver for AMD Processors, your computer must meet the following requirements:
- AMD processor with Secure Virtual Machine (SVM) Technology
- 64-bit Windows 10, Windows 8, or Windows 7 (32-bit Windows is not supported)
- To use Android Emulator Hypervisor Driver for AMD Processors on Windows 10 or 8, you must turn off Hyper-V in the Windows Feaures Dialog.
Note: Installing certain software might turn Hyper-V back on. Refer to Disabling Hyper-V for more details.
The Android Emulator Hypervisor Driver for AMD Processors can be installed via the SDK Manager in Android Studio 4.0 Canary 5 or later, or from Github (see below). To install from the SDK Manager, follow these steps:
- Open Tools->SDK Manager.
- Click the SDK Tools tab and then select Android Emulator Hypervisor Driver for AMD Processors.
- Click OK to download and install the Android Emulator Hypervisor Driver for AMD processors.
After installation, confirm that the driver is operating correctly by entering the following command in a Command Prompt window:
You should see a status message that includes the following information:
The following error message means either that SVM is not enabled in your BIOS or that Hyper-V is not disabled (Refer to Disable Hyper-V).
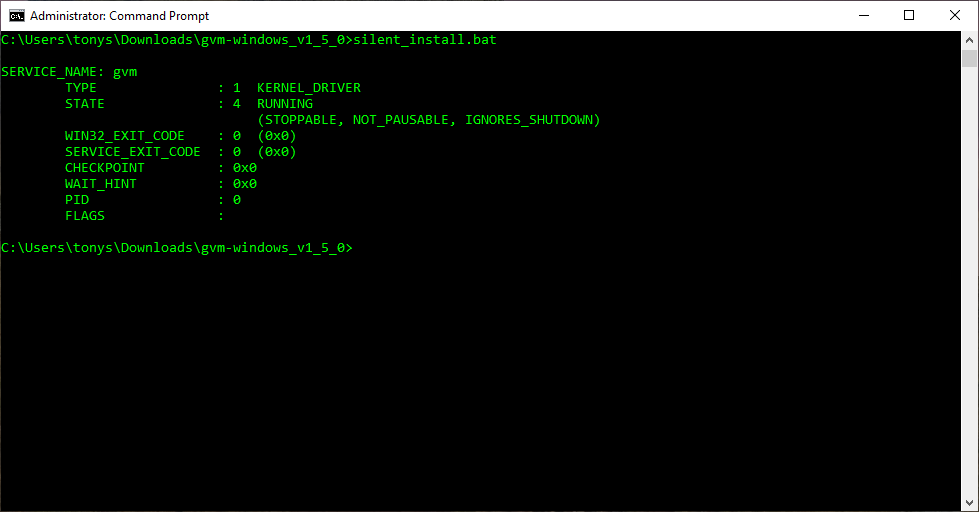
The Android Emulator Hypervisor Driver for AMD Processors can also be downloaded and installed from github. After unpacking the driver package, run «silent_install.bat» in a Command Prompt with Administrator privileges. Successfully completing a new installation would have the following output:
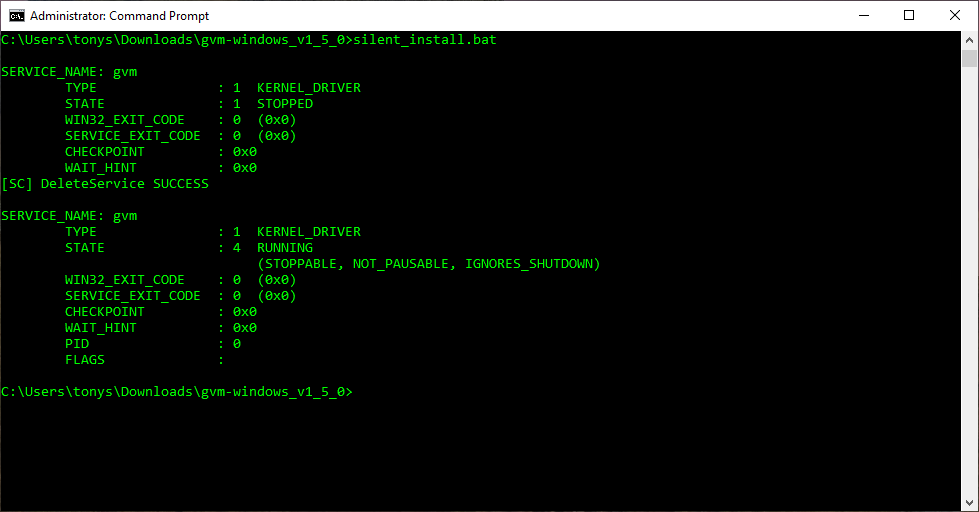
Upgrading an installation would result in the following output, which includes messages regarding the old driver’s uninstallation:
You can uninstall Android Emulator Hypervisor Driver for AMD Processors using the following commands in a Command Prompt with Administrator privileges.
Note: Shut down any x86 emulators before uninstalling the Android Emulator Hypervisor Driver for AMD Processors.
Configure VM acceleration using Windows Hypervisor Platform
Before you can enable WHPX, your computer must meet the following requirements:
- Intel processors: Support for Virtualization Technology (VT-x), Extended Page Tables (EPT), and Unrestricted Guest (UG) features. VT-x must be enabled in your computer’s BIOS settings.
- AMD processors: AMD Ryzen processor recommended. Virtualization or SVM must be enabled in your computer’s BIOS settings.
- Android Studio 3.2 Beta 1 or higher (download from developer.android.com)
- Android Emulator version 27.3.8 or higher (download using the SDK Manager)
- Windows 10 with April 2018 Update or higher
To install WHPX on Windows, follow these steps:
- From the Windows desktop, right-click the Windows icon and select Apps and features.
- Under Related settings, click Programs and Features.
- Click Turns Windows Features on or off.
Select Windows Hypervisor Platform
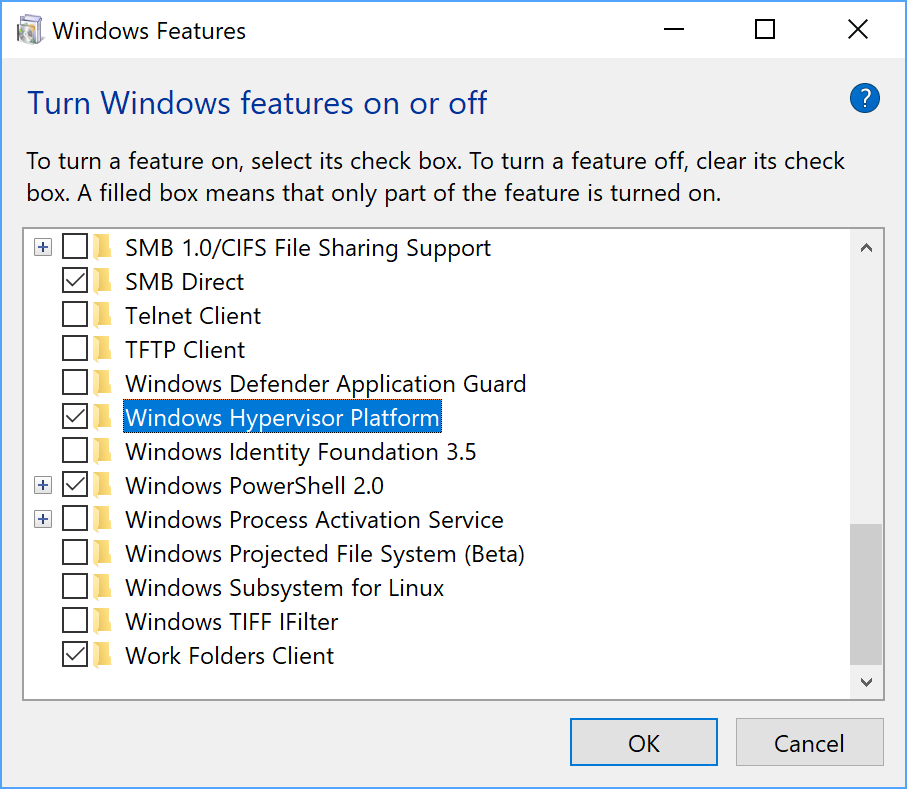
Click OK.
Once the installation has finished, restart your computer.
Configure VM acceleration on macOS
On Mac OS X v10.10 Yosemite and higher, the Android Emulator uses the built-in Hypervisor.Framework by default, and falls back to using Intel HAXM if Hypervisor.Framework fails to initialize.
To use VM acceleration on macOS when the Hypervisor.Framework is not available, you must install the Intel HAXM kernel extension.
To install the Intel HAXM kernel extension, follow these steps:
- Open the SDK Manager.
- Click the SDK Update Sites tab and then select Intel HAXM.
- Click OK.
- After the download finishes, run the installer. Typically, you can find the installer in the following location: sdk /extras/intel/Hardware_Accelerated_ExecutionManager/IntelHAXM version .dmg
- Follow the on-screen instructions to complete the installation.
After installation finishes, confirm that the new kernel extension is operating correctly by opening a terminal window and running the following command:
You should see a status message containing the following extension name, indicating that the kernel extension is loaded:
You can adjust the amount of memory available to the Intel HAXM kernel extension by running the installer again.
You can stop using the Intel HAXM kernel extension by uninstalling it. Before you uninstall it, shut down any x86 emulators that are currently running, then run the following command in a terminal window:
Configure VM acceleration on Linux
Linux-based systems support VM acceleration through the KVM software package. Follow the instructions for installing KVM on your Linux system, and verify that KVM is enabled. For Ubuntu systems, see Ubuntu KVM Installation.
Requirements
Running KVM requires specific user permissions. Make sure that you have sufficient permissions as specified in the KVM installation instructions.
To use VM acceleration on Linux, your computer must also meet these requirements:
- For Intel processors: Support for Virtualization Technology (VT-x), Intel EM64T (Intel 64) features, and Execute Disable (XD) Bit functionality enabled.
- For AMD processors: Support for AMD Virtualization (AMD-V).
Check whether KVM is currently installed on Linux
You can use the emulator -accel-check command-line option to check whether you have KVM installed. Alternatively, you can install the cpu-checker package containing the kvm-ok command.
The following example shows how to use the kvm-ok command.
Install the cpu-checker package:
An output of 1 or greater means that virtualization is supported. An output of 0 means that your CPU doesn’t support hardware virtualization.
Run the kvm-ok command:
Expected output: INFO: /dev/kvm exists KVM acceleration can be used
If you get the following error, it means that you can still run virtual machines. Your virtual machine will be slower without the KVM extensions. INFO: Your CPU does not support KVM extensions KVM acceleration can NOT be used
Install KVM on Linux
Use the following command to install KVM:
Cosmic (18.10) or later
Lucid (10.04) or later
Karmic (9.10) or earlier
Content and code samples on this page are subject to the licenses described in the Content License. Java is a registered trademark of Oracle and/or its affiliates.
Источник


