- Installing the Android SDK
- Пишем и собираем приложения для Android в linux консоли
- Введение
- Железо
- Операционная система
- Установка пакетов
- Настройка adb
- Постановка задачи
- Создание подписи
- Манифест
- Layout
- Исходный код приложения
- Скрипт для сборки
- Сборка и установка
- Заключение
- Install Android Studio
- Windows
- Linux
- Required libraries for 64-bit machines
- Chrome OS
Installing the Android SDK
Android Studio provides everything you need to start developing apps for Android, including the Android Studio IDE and the Android SDK tools.
If you didn’t download Android Studio, go download Android Studio now, or switch to the stand-alone SDK Tools install instructions.
Before you set up Android Studio, be sure you have installed JDK 6 or higher (the JRE alone is not sufficient)—JDK 7 is required when developing for Android 5.0 and higher. To check if you have JDK installed (and which version), open a terminal and type javac -version . If the JDK is not available or the version is lower than 6, go download JDK.
To set up Android Studio on Windows:
- Launch the .exe file you just downloaded.
- Follow the setup wizard to install Android Studio and any necessary SDK tools.
On some Windows systems, the launcher script does not find where Java is installed. If you encounter this problem, you need to set an environment variable indicating the correct location.
Select Start menu > Computer > System Properties > Advanced System Properties. Then open Advanced tab > Environment Variables and add a new system variable JAVA_HOME that points to your JDK folder, for example C:\Program Files\Java\jdk1.7.0_21 .
The individual tools and other SDK packages are saved outside the Android Studio application directory. If you need to access the tools directly, use a terminal to navigate to the location where they are installed. For example:
To set up Android Studio on Mac OSX:
- Unzip the downloaded zip file, android-studio-ide- -mac.zip .
- Drag and drop Android Studio into the Applications folder.
- Open Android Studio and follow the setup wizard to install any necessary SDK tools.
Depending on your security settings, when you attempt to open Android Studio, you might see a warning that says the package is damaged and should be moved to the trash. If this happens, go to System Preferences > Security & Privacy and under Allow applications downloaded from, select Anywhere. Then open Android Studio again.
The individual tools and other SDK packages are saved outside the Android Studio application directory. If you need access the tools directly, use a terminal to navigate into the location where they are installed. For example:
To set up Android Studio on Linux:
- Unpack the downloaded Tar file, android-studio-ide- -linux.zip , into an appropriate location for your applications.
- To launch Android Studio, navigate to the android-studio/bin/ directory in a terminal and execute studio.sh .
You may want to add android-studio/bin/ to your PATH environmental variable so that you can start Android Studio from any directory.
If the SDK is not already installed, follow the setup wizard to install the SDK and any necessary SDK tools.
Note: You may also need to install the ia32-libs, lib32ncurses5-dev, and lib32stdc++6 packages. These packages are required to support 32-bit apps on a 64-bit machine.
Android Studio is now ready and loaded with the Android developer tools, but there are still a couple packages you should add to make your Android SDK complete.
The stand-alone SDK Tools package does not include a complete Android development environment. It includes only the core SDK tools, which you can access from a command line or with a plugin for your favorite IDE (if available).
If you didn’t download the SDK tools, go download the SDK now, or switch to the Android Studio install instructions.
To get started on Windows:
Your download package is an executable file that starts an installer. The installer checks your machine for required tools, such as the proper Java SE Development Kit (JDK) and installs it if necessary. The installer then saves the Android SDK Tools to a specified the location outside of the Android Studio directories.
- Double-click the executable ( .exe file) to start the install.
- Make a note of the name and location where you save the SDK on your system—you will need to refer to the SDK directory later when using the SDK tools from the command line.
- Once the installation completes, the installer starts the Android SDK Manager.
To get started on Mac OSX:
Unpack the ZIP file you’ve downloaded. By default, it’s unpacked into a directory named android-sdk-mac_x86 . Move it to an appropriate location on your machine, such as a «Development» directory in your home directory.
Make a note of the name and location of the SDK directory on your system—you will need to refer to the SDK directory later when using the SDK tools from the command line.
To get started on Linux:
Unpack the .zip file you’ve downloaded. The SDK files are download separately to a user-specified directory.
Make a note of the name and location of the SDK directory on your system—you will need to refer to the SDK directory later when using the SDK tools from the command line.
Troubleshooting Ubuntu
- If you need help installing and configuring Java on your development machine, you might find these resources helpful:
- https://help.ubuntu.com/community/Java
- https://help.ubuntu.com/community/JavaInstallation
- Here are the steps to install Java:
-
If you are running a 64-bit distribution on your development machine, you need to install additional packages first. For Ubuntu 13.10 (Saucy Salamander) and above, install the libncurses5:i386 , libstdc++6:i386 , and zlib1g:i386 packages using apt-get :
For earlier versions of Ubuntu, install the ia32-libs package using apt-get :
The Android SDK tools are now ready to begin developing apps, but there are still a couple packages you should add to make your Android SDK complete.
Then, select which SDK bundle you want to install:
Источник
Пишем и собираем приложения для Android в linux консоли

В данной статье я покажу как можно собрать apk файл в Ubuntu используя лишь
утилиты командной строки.Обычно для создания приложений для Adroid используется Android Studio. Но для сборки небольших программ можно обойтись командной строкой. Например, когда ресурсы компьютера ограничены и ваше приложение очень простое.
В качестве постоянной среды разработки это, возможно, не очень удобно, но если вам нужно
иногда собирать какие-нибудь мелкие утилиты — это в самый раз.Введение
Разработка под Android не является основным направлением моей деятельности, я иногда делаю какие-то небольшие приложения для своих нужд.
Раньше я использовал QPython, но он достаточно тяжел и неудобен в работе. Поэтому я перешел к разработке нативных программ. Даже при поверхностном знании Java
это не составляет больших трудностей.Данное руководство в большой степени базируется на этом документе: Building an Android App
from the Command Line. Кому интересны подробности, обращайтесь к первоисточнику.Похожая статья: Пишем, собираем и запускаем HelloWorld для Android в блокноте уже встречалась на этом ресурсе, но в ней было рассмотрена разработка в Windows.
Здесь же я рассмотрю, как можно собрать приложение в linux.
Железо
Тестирование проводилось на стареньком нетбуке с процессором Атом, 1Гб ОЗУ
и 8Гб SSD диска.Операционная система
Я тестировал приложение на Ubuntu 17.04. Начиная с Ubunu 16.04 android-sdk можно установить через пакетный менеджер.
В принципе, тот же SDK можно
скачать с сайта.
Качать файл из раздела ‘Get just the command line tools’
По сути это не сильно меняет процесс, но через пакетный менеджер все гораздо проще.
Разница будет лишь в путях и установке дополнительных пакетов «android-platform».Установка пакетов
Итак, приступим к установке.
Будет установлено большое количество пакетов, включая Java.
Далее, в зависимости от требуемой версии Android, необходимо установить нужную
версию пакетов. Для lolipop 5.1 необходимо ставить:Так же необходимо установить дополнительный пакет.
Если вы планируете устанавливать apk-пакет через adb, то необходимо немного дополнительных настроек.
Настройка adb
С помощью lsusb найти подключенное устройство
И создать файл с правилом:
В файл добавить одну строку:
Здесь «1782» взято из вывода lsusb.
После подключения через adb, на устройстве необходимо подтвердить соединение.
Теперь все готово к работе.
Постановка задачи
Приложение, которое будем собирать немного сложнее, чем ‘Hello world’.
- Требуется по нажатию кнопки взять строку из буфера обмена.
- Вырезать подстроку
- Записать подстроку обратно в буфер.
- С помощь Toast вывести подстроку или сообщение об ошибке.
В общем-то все просто.
Я подготовил пример который возьмем за основу.
Создание подписи
Сначала создадим ключ для подписи файла:
Это нам пригодится позже.
Манифест
Здесь указываем имя приложения в атрибуте «android:label». Так же приложение будет использоваться свою иконку, она указана в атрибуте «android:icon». Сама иконка лежит в каталоге «res/drawable-mdpi» файл «icon.png». В качестве иконки можно взять любой небольшой png файл.
Layout
Файл с расположением элементов находится в каталоге «/res/layout/».
В него можно добавлять виджеты, если вы захотите расширить функционал.
Исходный код приложения
Исходный код приложения находится здесь «java/ru/kx13/extractvidid»
Код весьма прост и примитивен, но этот шаблон можно использовать в других приложениях.
Скрипт для сборки
Я не стал использовать утилит сборки типа make или ant, т.к. весь код находится в одном файле и особых преимуществ это не даст. Поэтому это обычный shell скрипт:
Некоторые замечания по поводу путей.
- По умолчанию, переменная BASE указывает на путь, в который пакетный менеджер сохраняет файлы. Если вы ставите SDK вручную, то путь надо будет изменить.
- Если вы используете версию API отличную от 22, то вам надо подправить переменные BUILD_TOOLS и PLATFORM
Сборка и установка
Для сборки просто запустите
Если все настроено правильно никаких сообщений не будет выведено, а в каталоге «build» появится файл «Extractor.apk»
Теперь надо установить наше приложение
Если все прошло нормально, на устройстве появится новое приложение. Можно запускать и пользоваться.
В общем случае можно перекинуть файл apk на устройство любым удобным способом.
Заключение
Как видно из статьи начать разработку в консоли совсем несложно.
Консольные утилиты позволяют разрабатывать программы при весьма небольших ресурсах.
Источник
Install Android Studio
Setting up Android Studio takes just a few clicks.
Windows
To install Android Studio on Windows, proceed as follows:
- If you downloaded an .exe file (recommended), double-click to launch it.
If you downloaded a .zip file, unpack the ZIP, copy the android-studio folder into your Program Files folder, and then open the android-studio > bin folder and launch studio64.exe (for 64-bit machines) or studio.exe (for 32-bit machines).
- Follow the setup wizard in Android Studio and install any SDK packages that it recommends.
That’s it. The following video shows each step of the setup procedure when using the recommended .exe download.
As new tools and other APIs become available, Android Studio tells you with a pop-up, or you can check for updates by clicking Help > Check for Update.
To install Android Studio on your Mac, proceed as follows:
- Launch the Android Studio DMG file.
- Drag and drop Android Studio into the Applications folder, then launch Android Studio.
- Select whether you want to import previous Android Studio settings, then click OK.
- The Android Studio Setup Wizard guides you through the rest of the setup, which includes downloading Android SDK components that are required for development.
That’s it. The following video shows each step of the recommended setup procedure.
As new tools and other APIs become available, Android Studio tells you with a pop-up, or you can check for updates by clicking Android Studio > Check for Updates.
Note: If you use Android Studio on macOS Mojave or later, you might see a prompt to allow the IDE to access your calendar, contacts, or photos. This prompt is caused by new privacy protection mechanisms for applications that access files under the home directory. So, if your project includes files and libraries in your home directory, and you see this prompt, you can select Don’t Allow.
Linux
To install Android Studio on Linux, proceed as follows:
- Unpack the .zip file you downloaded to an appropriate location for your applications, such as within /usr/local/ for your user profile, or /opt/ for shared users.
If you’re using a 64-bit version of Linux, make sure you first install the required libraries for 64-bit machines.
-
- To launch Android Studio, open a terminal, navigate to the android-studio/bin/ directory, and execute studio.sh .
- Select whether you want to import previous Android Studio settings or not, then click OK.
- The Android Studio Setup Wizard guides you through the rest of the setup, which includes downloading Android SDK components that are required for development.
- If you haven’t already done so, install Linux for Chrome OS.
- Open the Files app and locate the DEB package you downloaded in the Downloads folder under My files.
- If you have installed Android Studio before, select whether you want to import previous Android Studio settings, then click OK.

Tip: To make Android Studio available in your list of applications, select Tools > Create Desktop Entry from the Android Studio menu bar.
Required libraries for 64-bit machines
If you are running a 64-bit version of Ubuntu, you need to install some 32-bit libraries with the following command:
If you are running 64-bit Fedora, the command is:
That’s it. The following video shows each step of the recommended setup procedure.
As new tools and other APIs become available, Android Studio tells you with a pop-up, or you can check for updates by clicking Help > Check for Update.
Chrome OS
Follow these steps to install Android Studio on Chrome OS:
Right-click the DEB package and select Install with Linux (Beta).
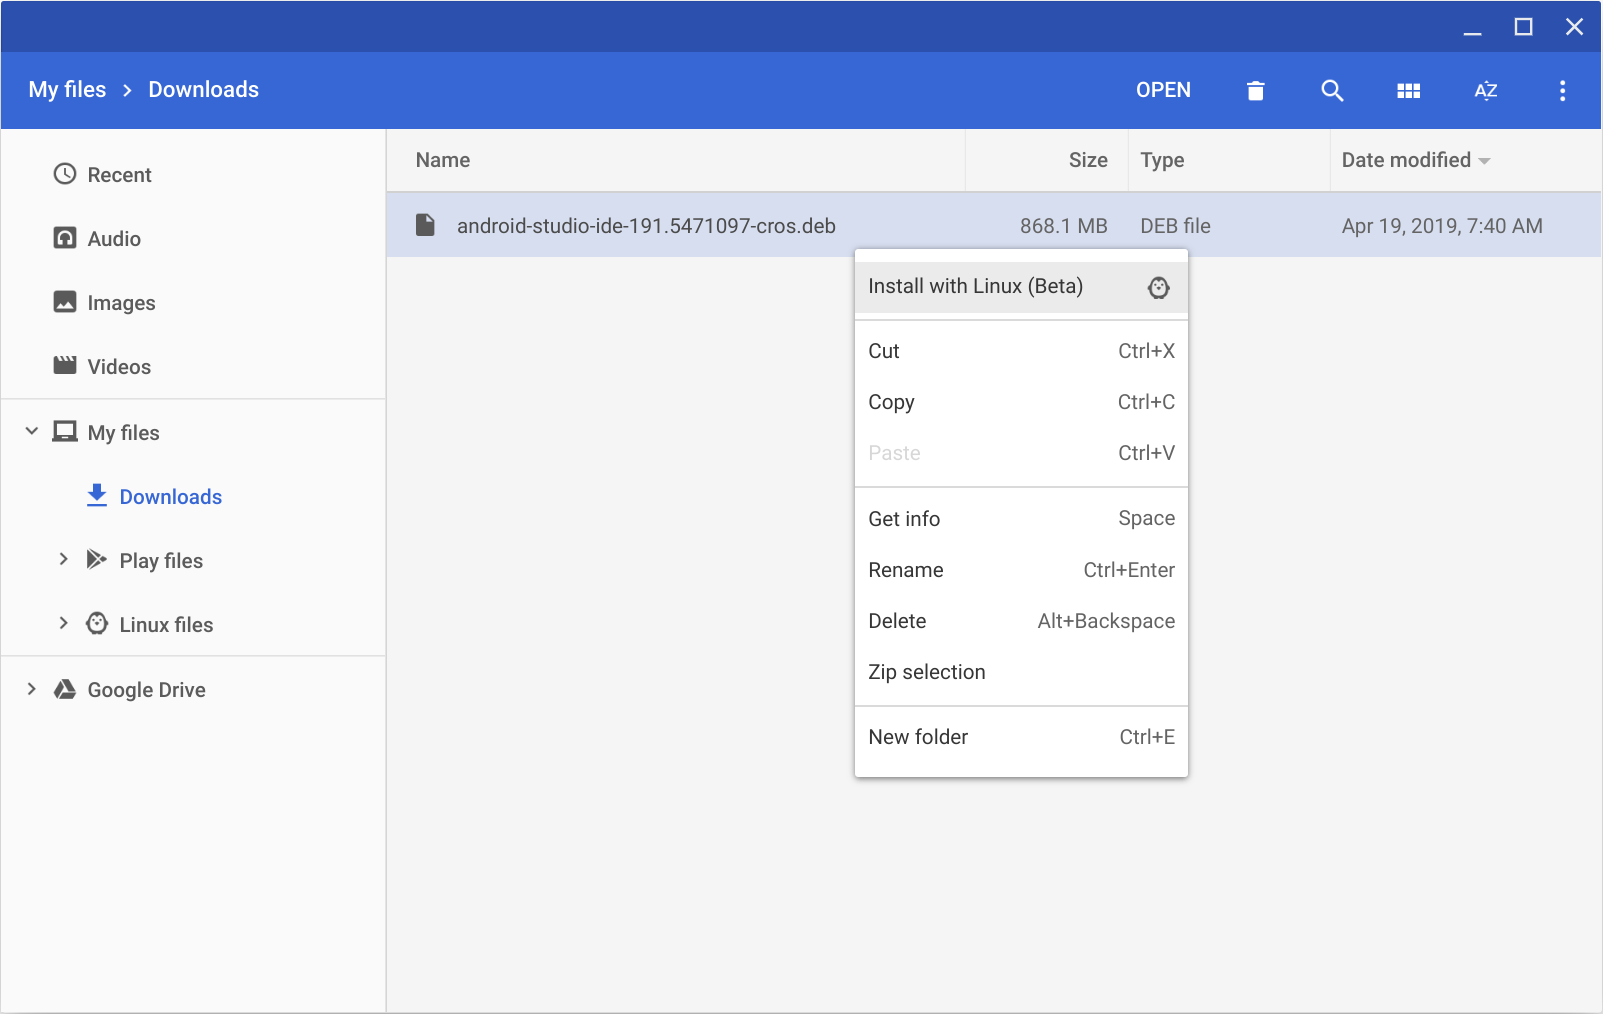
The Android Studio Setup Wizard guides you through the rest of the setup, which includes downloading Android SDK components that are required for development.
After installation is complete, launch Android Studio either from the Launcher, or from the Chrome OS Linux terminal by running studio.sh in the default installation directory:
That’s it. As new tools and other APIs become available, Android Studio tells you with a pop-up, or you can check for updates by clicking Help > Check for Update.
Content and code samples on this page are subject to the licenses described in the Content License. Java is a registered trademark of Oracle and/or its affiliates.
Источник


