- How to Generate APK and Signed APK Files in Android Studio
- Creating an APK file
- Creating a Signed APK File
- Creating a New Key Store
- Finishing Up
- Summary
- Create an APK File
- Create a Signed APK File
- Create a New Key Store and Key
- Android Studio: как создать APK-файл
- Что такое АПК файл
- Как создать файл APK
- Где лежит АПК файл
- Запуск компиляции вручную
- Запуск автоматической компиляции
How to Generate APK and Signed APK Files in Android Studio
Android Studio allows you to create two kinds of APK files.
First are the debug APK files that are generated solely for testing purposes. They will run on your Android mobile. However, they cannot be uploaded to the Play Store or made available to the public.
Secondly, you can generate signed APK files. Signed APK files come in handy when you’ve tested your application and it is ready to be uploaded on the Play Store and released to the general public.
This tutorial will show you how to create an Android app by generating APK files using Android Studio.
First things first: open up a project file in Android Studio. If you don’t have a project file yet, simply create a New Project.


Creating an APK file
Generating a debug APK file is easy and is a matter of just a few clicks.
First, open up your project or application that you want to import into an APK file. Then, select Build > Build Bundle(s)/APK(s) > Build APK(s) from the toolbar menu.


Android Studio will take a few moments to generate an APK file.
Once the APK build is complete, you’ll receive a notification on the bottom right corner of your screen. From that notification, select Locate and you will be led to the APK file location.


If you miss the notification, you can still locate the APK file in the following path within your project folder: app/build/outputs/apk/debug. The file is named app-debug.apk by default.
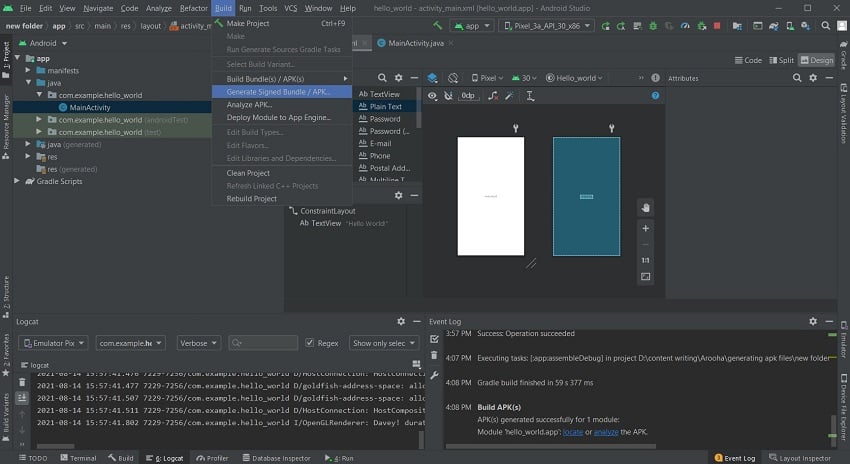
Creating a Signed APK File
To generate a signed APK file, open the Build menu from the toolbar and select Generate Signed Bundle/APK.


This opens up a screen where you have to select between creating an Android App Bundle and creating an APK file. Check the APK radio button and proceed to the next window.


In the next window, you will be shown the module (your application) for which the APK file is being generated. You’ll be asked about your Key store path, Key store password, Key alias, and the Key password.


Creating a New Key Store
Assuming that this is the first time you’re creating a Signed APK file, you will have to create a new key store.
Keys are used by the developer to access their application once it has been uploaded to the Play Store. The need for the keys usually arises when you have to update your application. All of the keys are stored in the key store.
Both the key store and the keys are protected by passwords of their own. The passwords should be at least six characters in length. Also, it is a good practice to keep multiple copies of your keys since they are your only gateway to your application. If the key is lost, you will not be able to access your application or update it.
Creating your own app requires you to create a new key store. To do so, select Create new. You will find it underneath the input field where you enter the key store path.


You will then be redirected to a new window.


In the new window, enter the path for your new key store, and then enter a password to protect it.
In the same window, you will also be setting a new key for your application. Enter an identity for your key in the key alias field and then enter a password for it.
You can keep the same password as that of your key store, but it’s a good practice to give a new password to each of your keys. The same goes for the key alias.
The next field defines the validity of your application. This is the duration after which the key to your application will expire, leaving your application inaccessible. The default validity for a key is 25 years.
For each key that you generate, you’re given a certificate that contains all the information about you and your company. You don’t necessarily have to fill in all the details—just choose the ones you think should go on your certificate. A key will still be generated, even without filling in each field of the certificate.
Finishing Up
Once you have filled in the details for the certificate, select OK. You will then be directed back to the Generate Signed Bundle or APK screen.
Here, all of the fields will now be pre-filled for you. Go through all the details to stay on the safe side. Then, select Next.


On the last screen, you will now be able to see the destination of your Signed APK file. Below that, you will see two more options: Debug and Release.
Debugging is used when the application is still in the testing phase. Since your application has passed the testing phase and is ready for deployment, select Release.
There are two more checkboxes towards the bottom of the screen. Select V2 (Full APK Signature) and click Finish.


You will be notified by Android Studio once the APK build is finished. Now, you can click on Locate from the notification to open up the file location.
The Signed APK file is named app-release.apk by default. You will find it in your project folder in the app/release directory.
Summary
These are the steps you need to follow to generate APK and Signed APK files for the purposes of testing your app and making it downloadable via Google Play respectively:
Create an APK File
- Create the project in Android Studio.
- Select Build >Build Bundle(s)/APK(s) >Build APK(s) from the toolbar menu.
You can now transfer your debug APK file to your Android mobile phone and test it for bugs. You can also test it out on your PC using the Android emulator.
Create a Signed APK File
- Create the project in Android Studio.
- Select Build >Signed Bundle/APK from the toolbar menu.
- Configure the settings for your APK file and possibly create a new key store and key.
Create a New Key Store and Key
- Select a key store path.
- Enter a password for your key store.
- Give your key an identity, validity period, and password.
- Enter any personal or organizational details you want included in the key certificate.
You can now release this signed APK file to the public by publishing it on Google Play Store.
Easy but tricky, right? Hopefully, this tutorial helped to clear up any confusion you had about generating APK and signed APK files and bettered your understanding of both file types.
Источник
Android Studio: как создать APK-файл
Для того чтобы установка нового мобильного приложения под управлением Android выполнялась легко и быстро, программные файлы и папки упаковывают в один исполняемый документ. В статье подробно описано, что такое Android Studio, как создать APK файл в Android Studio.

Что такое АПК файл
Современные программы, как правило, состоят из десятков документов и папок, которые требуют много места. В интегрированной среде разработки Android Studio, работающей под Windows, OS X и Linux, предусмотрен сервис компиляции программ для платформы Android. В результате получается один упакованный исполняемый файл формата AndroidPackageKit (APK), обеспечивающий установку приложения с необходимыми библиотеками и ресурсами. В процессе распаковки пользователь выбирает полную установку либо распаковку отдельных компонентов. Второй вариант, как правило, выбирают разработчики для дальнейшего просмотра и редактирования программы.

Как создать файл APK
Так как для программирования часто используется Java, среда Android SDK у разработчика, скорее всего, уже есть на компьютере. SDK используется для нахождения и устранения ошибок в программе и должна быть установлена перед компиляцией, так как Android Studio для создания .apk использует компоненты этой среды.
Рассмотрим применительно к Android Studio, как сделать apk документ. В среде AndroidStudio компиляция apk может быть выполнена двумя способами: вручную и автоматически.

Где лежит АПК файл
В смартфонах используются два вида хранилища данных: внутреннее и внешнее. Внутреннее хранилище использует защищенную область памяти смартфона. Для исключения нерегламентированного вмешательства приложения получают доступ только к «своим» документам, расположенным в этом хранилище.
Вешнее хранилище расположено в памяти смартфона или на карте памяти. Данные, размещенные в этом хранилище, пользователь сможет извлечь для собственных целей.
В Android файлы приложений, загруженные из GooglePlay или скачанные с сайта разработчика, хранятся в папке /data/app. Если требуется извлечь файл .apk из установленного приложения, можно использовать менеджер файлов или специальную программу APK Extractor (программа доступна для загрузки в GooglePlay). Если для хранения приложений используется карта памяти, чтобы найти в Android Studio, где лежит APK, нужно проверить папку /mnt/asec/APPNAME/pkg.apk.

Запуск компиляции вручную
Далее необходимо в Android Studio перейти на вкладку «Build», затем – «GenerateSigned APK». Как подписывать АПК файлы? Можно перейти в сценарий, где изменятся настройки подписи (build.gradle). Сгенерированные подписи хранятся в соответствующих файлах.
После окончания сборки появится окно с кнопкой «Locate», которая показывает в Android Studio где находится АПК файл. Найти его можно по имени, одинаковому с именем создаваемого проекта. Например, если проект называется MyProject, документы будут лежать в разделе
В зависимости от издания Android Studio полученный документ формата .apk размещен в директориях

Запуск автоматической компиляции
Рассмотрим теперь, как в Android Studio собрать apk программным способом.
В Android Studio формирование АПК запускается кнопкой «Run», которая активизирует работу команды «assembleRelease», предварительно помещенную в настройки проекта.
При использовании данного способе создания исполняемого файла нет необходимости каждый раз вводить реквизиты доступа и подписывать документ вручную. Сведения о подписи добавляются в файл сценария. В настройки проекта добавляется команда «assembleRelease», которая запускается кнопкой «Run», как и другие команды. В результате автоматической компиляции в разделе build/apk/ появятся два файла: -release-u unaligned.apk и -release.apk. Они отличаются тем, что в первом случае документ содержит подпись, но не выровнен. А во втором случае – представляет собой готовый дистрибутив, который после смены имени на коммерческое подлежит свободному распространению.
В помощь новичкам: на youtube содержатся видео с подробным описанием как создать АПК файл в Android Studio. Например, первый урок:
Источник


