- What is the Shortcut to Auto Import All in Android Studio?
- For Windows/Linux
- For macOS
- Free Online Tutorials
- Enable Auto Import in Android Studio
- Как автоматически импортировать необходимые классы в Android Studio с ярлыка?
- 8 ответов:
- Develop Android Auto App using Android Studio
- By: Ambreen Altaf Hussain
- Android Auto
- Test Your Application on Emulator:
What is the Shortcut to Auto Import All in Android Studio?
There are some basics import in Android Studio that is predefined present in Android studio. like Menu, AppBar, MenuItem, Bundle, Toast, etc. When we require those then we import that manually. In case of pasting some code copied from the Internet in Editor, it asks to import every Views and class. You can simply import all of them by pressing the ALT + ENTER key. Here, we are going to explain how to auto-import all in Android studio.
Import like this:
For Windows/Linux
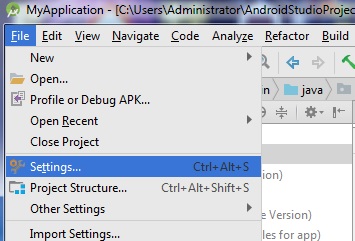
Step 1: Go to File and then Select Settings
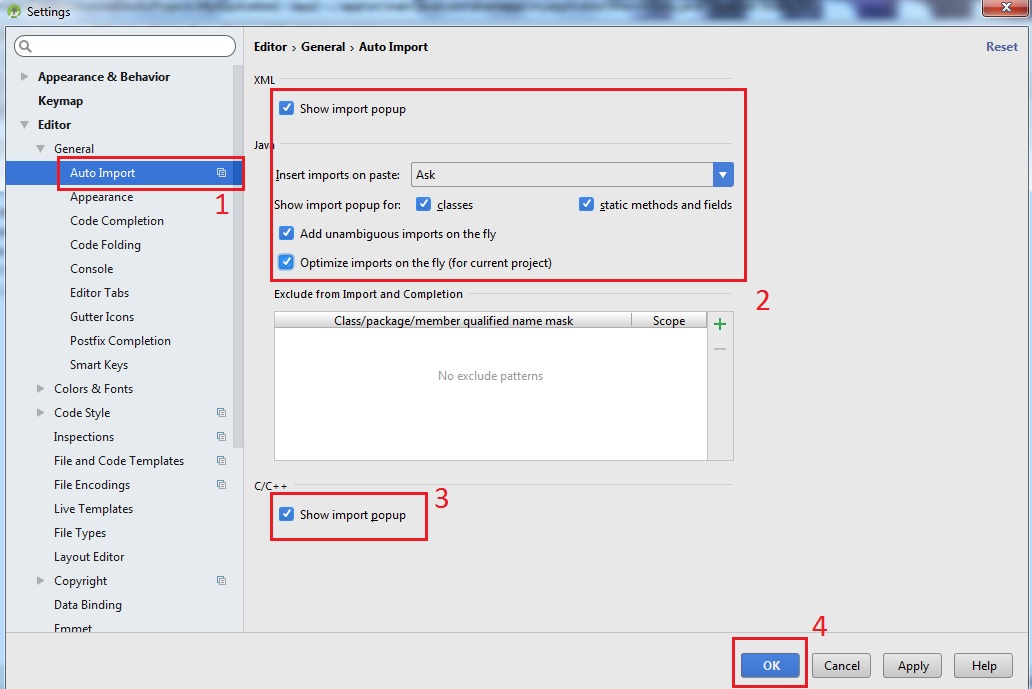
Step 2: Then Go to Editor > General > Auto Import
Here Select Java and then change Insert imports on paste value to All
Step 3: Then mark the “Add unambiguous imports on the fly” option as checked. Then click on Apply and Ok.
Note: We can import a single missing import using Alt + Enter which shown in the pop-up. To optimize imports (to remove unused imports ) use Ctrl + Alt + O. If for some reason auto-import is not enabled you can go to settings by typing shortcut: Ctrl + Alt + S.
For macOS
If you use macOS, the only difference is where you can configure the above settings. Just click Android Studio > Preferences. The subsequent settings are very similar.
Источник
Free Online Tutorials
Tutorials, Resources and Snippets
Enable Auto Import in Android Studio
Introduce:
By default, when programming languages such as C/C ++, C #, Swift, or Java, you must declare yourself the libraries that contain the methods or classes we use, with C/C ++ using #include, with C# uses using using with Swift and Java using the Import keyword. And sometimes they just remember the class name or method name without remembering the namespace or package letters, then using the suggestion of the IDE then having to manually import them. Instead of doing so manually, Android Studio has a feature that allows us to do it automatically and easily when we type the class name or method name.
Enable Auto Import in Android Studio
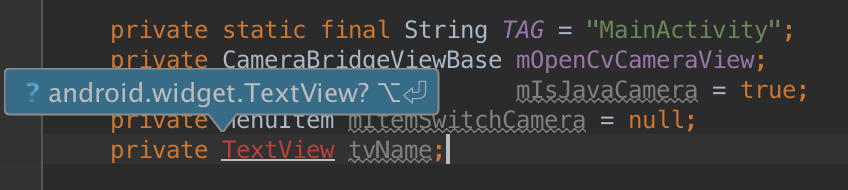
You are probably familiar with the popup import package when you type the class name as shown below:
If you have a large project, you have to spend a lot of time importing a package like this. So Android Studio provides us with an Auto Import function to automate packages when we use classes and methods that are related to that class.
By default in Android Studio, the Auto Import feature is disabled and to enable it on your computer, do the following:
Mac OS:
Click on Android Studio on the Toolbar and select Preferences… to open the Preferences dialog box.
In this dialog we choose Editor> General> Auto and tick all check boxes in the right pane.

Then click Apply and OK to let Android Studio save the settings.
Windows and Linux
For Windows and Linux we do the following
Go to File on the toolbar and select Settings
In the Setting dialog box select Editor> General> Auto and tick all check boxes in the right pane.
Then click Apply and OK to let Android Studio save the settings.
Now we can write code very comfortably and Android Studio automatically imports the necessary packages for us.
Conclude
Here we have shared with you a very interesting and useful feature in the toolkit for Android development is Android Studio. Share your experiences or tips when using Android Studio for everyone to learn and exchange.
Источник
Как автоматически импортировать необходимые классы в Android Studio с ярлыка?
Я только что переключился на Android Studio 0.5.1, и здесь все идет так медленно, потому что ничего не работает обычным способом..
Ho я импортирую необходимые классы с ярлыком?
Я имею в виду, как это?
8 ответов:
перейти к файлу — > настройки — > редактор — > Автоимпорт — > Java и сделать следующие вещи:
выберите Вставить импорт при вставке значения для всех
сделать галочку на добавить однозначный импорт на лету вариант и » оптимизация импорта на лету*

перейдите к отсутствующему объявлению с помощью курсора и нажмите alt + enter

Ctrl + Alt + O для оптимизации импорта
на моем Mac опция автоматического импорта не показывала, что она изначально была скрыта
а затем набрал в поле поиска авто затем появилась опция автоматического импорта. И теперь опция автоматического импорта теперь всегда отображается по умолчанию в Editor->General . надеюсь, этот вариант также поможет другим. Смотрите прилагаемый скриншот 
File — > Settings — > Keymap Измените настройки keymaps на предыдущую IDE, с которой вы знакомы
Источник
Develop Android Auto App using Android Studio
After serving several years of Android OS into mobile phones, Google launches Android platform for vehicles named Android Auto. While driving a car it is a difficult task to get connected with friends and family especially when it is urgent to inform about the meeting plan and so on.

By: Ambreen Altaf Hussain
Android Auto
Android Auto provides great experiences into your car devices such as Voice reply of your text messages without losing concentration from the road. It provides Car-Optimized Android User Interface which is quite easy to interact with Voice Actions and Touchscreen.
Android Auto launches with support of two types of applications.
Audio Apps
Messaging Apps
You can create a new application or can modify your existing messaging or audio application to run into cars.
Let’s get start with creating an application for android auto:
Note: Install v4 support library that is required to create notifications compatible for android auto devices.

Declaring Auto Capabilities:
The features that your automotive app is going to support should be declared in an XML Configuration file and make a reference of that file in your app’s manifest by adding these lines.
Now, Create an XML file named “automotive_app_desc” under res/XML directory and declare the feature you want to access in your Android auto, basically there are two features
Media – Used for media elements and auto playback.
Notifications – Used for notifications and auto messaging.
Declare the feature you want to use in automotive_app_desc
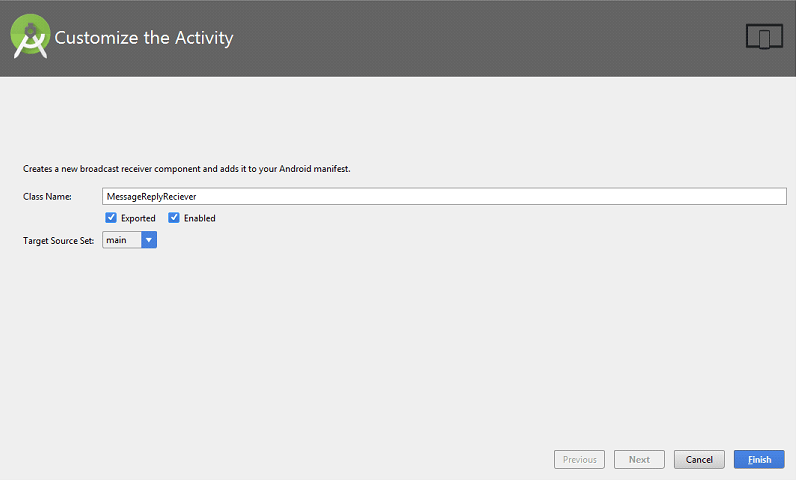
You need to add a MessageReplyReciever for replying from you android auto. Add by right click on project new Others BroadCast Reciever.
Register this activity in your android’s manifest by adding these lines
Now, when you have added a Replying Service you have to add also a Read Service which extends Broadcast Receiver.
Also register this activity into app’s manifest. Now your manifest should look like this.
Androidmanifest.xml:
Let’s move towards the coding.
Now first step is to create the intent and pendingintent for which will be triggered when the messages heard and replied to the participant
int conversation_id = 42;
private Intent createIntent(int conversationId, String action) <
return new Intent()
.addFlags(Intent.FLAG_INCLUDE_STOPPED_PACKAGES)
.setAction(REPLY_ACTION)
.putExtra(«CONVERSATION_ID», conversation_id);
>
setAction method will take the action parameter you declared in the intent-filter in app’s manifest whereas conversation_id connects the participant to the user.
Now declare the pending intent for read and reply separately.
PendingIntent For Read:
PendingIntent readPendingIntent = PendingIntent.getBroadcast(getApplicationContext(),
conversation_id,
createIntent(conversation_id, READ_ACTION),
PendingIntent.FLAG_UPDATE_CURRENT);
PendingIntent For Write:
PendingIntent replyIntent = PendingIntent.getBroadcast(getApplicationContext(),
conversation_id,
createIntent(conversation_id, REPLY_ACTION),
PendingIntent.FLAG_UPDATE_CURRENT);
Build a RemoteInput for receiving voice input in a Car Notification
RemoteInput remoteInput = new RemoteInput.Builder(EXTRA_VOICE_REPLY)
.setLabel(«Reply by voice»)
.build();
Create the Unread Conversation and populate it with the participant name,read and reply intents.
UnreadConversation.Builder unreadConvBuilder =
new UnreadConversation.Builder(participant)
.setLatestTimestamp(timestamp)
.setReadPendingIntent(readPendingIntent)
.setReplyAction(replyIntent, remoteInput);
Create the NotificationCompat Builder to show notifications on android auto.
NotificationCompat.Builder builder = new NotificationCompat.Builder(getApplicationContext())
.setContentText(message)
.setWhen(timestamp)
.setContentTitle(participant)
.setContentIntent(readPendingIntent)
.extend(new CarExtender().setUnreadConversation(unreadConvBuilder.build()));
mNotificationManager.notify(conversation_id, builder.build());
CarExtender Constructor is used to extend regular notifications into Android Auto notifications.
.extend(new CarExtender().setUnreadConversation(unreadConvBuilder.build());
Now, lets’s have a look at complete code:
MessageReadReceiver.java:
package com.mobilesiri.androidauto;
import android.content.BroadcastReceiver;
import android.content.Context;
import android.content.Intent;
import android.support.v4.app.NotificationManagerCompat;
import android.util.Log;
public class MessageReadReceiver extends BroadcastReceiver <
private static final String TAG = MessageReadReceiver.class.getSimpleName();
@Override
public void onReceive(Context context, Intent intent) <
if (MyMessagingService.READ_ACTION.equals(intent.getAction())) <
int conversationId = intent.getIntExtra(MyMessagingService.CONVERSATION_ID, -1);
if (conversationId != -1) <
Log.d(TAG, «Conversation » + conversationId + » was read»);
NotificationManagerCompat notificationManager = NotificationManagerCompat.from(context);
notificationManager.cancel(conversationId);
>
>
>
>
MessageReplyReceiver.java:
package com.mobilesiri.androidauto;
import android.content.BroadcastReceiver;
import android.content.Context;
import android.content.Intent;
import android.os.Bundle;
import android.support.v4.app.RemoteInput;
import android.util.Log;
public class MessageReplyReceiver extends BroadcastReceiver <
private static final String TAG = MessageReplyReceiver.class.getSimpleName();
@Override
public void onReceive(Context context, Intent intent) <
if (MyMessagingService.REPLY_ACTION.equals(intent.getAction())) <
int conversationId = intent.getIntExtra(MyMessagingService.CONVERSATION_ID, -1);
CharSequence reply = getMessageText(intent);
Log.d(TAG, «Got reply (» + reply + «) for ConversationId » + conversationId);
>
>
private CharSequence getMessageText(Intent intent) <
Bundle remoteInput = RemoteInput.getResultsFromIntent(intent);
if (remoteInput != null) <
return remoteInput.getCharSequence(MyMessagingService.EXTRA_VOICE_REPLY);
>
return null;
>
>
MainActivity.java:
package com.mobilesiri.androidauto;
import android.app.PendingIntent;
import android.content.Intent;
import android.os.Handler;
import android.os.IBinder;
import android.os.Message;
import android.os.Messenger;
import android.support.v4.app.NotificationCompat;
import android.support.v4.app.NotificationManagerCompat;
import android.support.v4.app.RemoteInput;
import android.support.v7.app.AppCompatActivity;
import android.os.Bundle;
import android.view.View;
import android.widget.Button;
import android.widget.Toast;
public class MainActivity extends AppCompatActivity <
public static final String READ_ACTION =
«com.mobilesiri.androidauto.ACTION_MESSAGE_READ»;
public static final String REPLY_ACTION =
«com.mobilesiri.androidauto.ACTION_MESSAGE_REPLY»;
public static final String CONVERSATION_ID = «conversation_id»;
public static final String EXTRA_VOICE_REPLY = «extra_voice_reply»;
private static final String TAG = MyMessagingService.class.getSimpleName();
final Messenger mMessenger = new Messenger(new IncomingHandler());
private NotificationManagerCompat mNotificationManager;
@Override
protected void onCreate(Bundle savedInstanceState) <
super.onCreate(savedInstanceState);
setContentView(R.layout.activity_main);
mNotificationManager = NotificationManagerCompat.from(getApplicationContext());
>
public IBinder onBind(Intent intent) <
return mMessenger.getBinder();
>
int conversation_id = 42;
private Intent createIntent(int conversationId, String action) <
return new Intent()
.addFlags(Intent.FLAG_INCLUDE_STOPPED_PACKAGES)
.setAction(REPLY_ACTION)
.putExtra(«CONVERSATION_ID», conversation_id);
>
private void sendNotification(int conversationId, String message,
String participant, long timestamp) <
PendingIntent readPendingIntent = PendingIntent.getBroadcast(getApplicationContext(),
conversation_id,
createIntent(conversation_id, READ_ACTION),
PendingIntent.FLAG_UPDATE_CURRENT);
RemoteInput remoteInput = new RemoteInput.Builder(EXTRA_VOICE_REPLY)
.setLabel(«Reply by voice»)
.build();
PendingIntent replyIntent = PendingIntent.getBroadcast(getApplicationContext(),
conversation_id,
createIntent(conversation_id, REPLY_ACTION),
PendingIntent.FLAG_UPDATE_CURRENT);
NotificationCompat.CarExtender.UnreadConversation.Builder unreadConvBuilder =
new NotificationCompat.CarExtender.UnreadConversation.Builder(participant)
.setLatestTimestamp(timestamp)
.setReadPendingIntent(readPendingIntent)
.setReplyAction(replyIntent, remoteInput);
NotificationCompat.Builder builder = new NotificationCompat.Builder(getApplicationContext())
.setContentText(message)
.setWhen(timestamp)
.setContentTitle(participant)
.setContentIntent(readPendingIntent)
.extend(new NotificationCompat.CarExtender().setUnreadConversation(unreadConvBuilder.build()));
mNotificationManager.notify(conversation_id, builder.build());
>
class IncomingHandler extends Handler <
@Override
public void handleMessage(Message msg) <
sendNotification(1, «Hello! How are you?», «Ambreen Altaf»,
System.currentTimeMillis());
>
>
>
Test Your Application on Emulator:
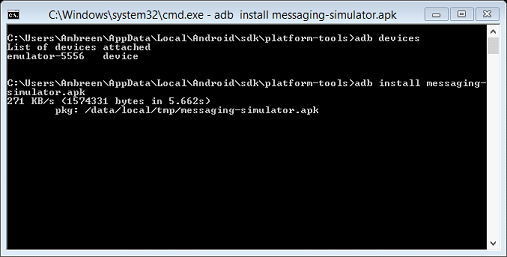
It’s not necessary that you should have a car device to test your application. You can run it on your emulator by installing Android Auto API from the SDK manager. When you have done with installation check your sdk extras google simulators, you will get two apk’s one for media browsing and second one is for messaging-simulator. Now you have to install this apk into your emulator for this copy messaging-simulator.apk into sdkplatform-tools. Now run command prompt here and type these command
Run messaging simulator in your emulator, it will ask you for the notification enabling.
Источник


