- Распознавание Barcode Android
- Создание нового проекта
- Интегрируем ZXing
- Сканируем
- Обработка результатов сканирования
- Creating a Barcode Scanner using Android Studio
- What is this article about
- Prerequisite
- Let’s write some code
- Barcode Scanning API Programmer’s Guide
- Overview
- Configuring Development Environment
- Adding the Barcode Scanner SDK to the Android Studio Project
- Adding Permissions in the Manifest File
- Connecting the Scanner to the Device
- SDK Installation
- Establishing a Connection with the Scanner
- Making the Scanner Beep
- LED On/Off
- Firmware Update
- Connect Scanner Using Scan-To-Connect (STC) Barcode
- Scanner Connect Event
- Scanner Connect Event
- Scanner Enable/Disable
- Get Currently Connected Scanner and Paired Devices
Распознавание Barcode Android
В данной статье мы будем использовать ZXing (Zebra Crossing), чтобы расшифровать штрихкод в нашем Android приложении.
Используя ZXing, нам не нужно думать о том, что у пользователя нет сканера barcode, так как классы, предоставляемые библиотекой позаботятся об этом. Интегрируя ZXing в наше приложение мы можем предоставить пользователю более простую возможность сканировать шрихкоды, также это позволит нам сфокусироваться на разработке основной части приложения.
Создание нового проекта
Шаг 1
В Eclipse создайте новый Android проект. Введите имя приложения, проекта и название пакета. 
Шаг 2
Откройте основной шаблон. Eclipse должен был создать стандартный шаблон. Внутри него замените существующий контент на кнопку
После кнопки добавим два текстовых поля, которые будут отображать результаты отсканированной информации.
Добавьте к кнопке текст. Откройте файл res/values/strings
Чтобы просканировать пользователь должен будет нажать на кнопку. Когда приложение получает результат распознавания, оно отобразит его в текстовых полях.
Интегрируем ZXing
Шаг 1
ZXing — библиотека с открытым исходным кодом, предоставляющая возможность распознавания штрихкодов на Android. Некоторые пользователи уже имеют установленное приложение ZXing, поэтому достаточно передать ему код и дождаться результатов. В данном приложении мы рассмотрим способ, вызывающий соответствующую функцию другого приложения. Если данное приложение отсутствует у пользователя, то будет выведено предложение скачать его.
В Eclipse добавим новый пакет в Ваш проект. Для этого кликнем правой кнопкой мыши по папке src и выберем «New»->«Package», а затем введем com.google.zxing.integration.android в качестве имени пакета.
Шаг 2
Eclipse предлагает несколько способов импортирования существующего кода в проект. В данной статье самым простым методом будет создание двух классов, содержащий код из ZXing. Кликните правой кнопкой мыши по Вашему проекту, выберете «New»->«Class» и введите «IntentIntegrator» в качестве названия класса. Остальные параметры Вы можете не изменять. Как только Вы создали класс, проделайте тоже самое, но назовите класс «IntentResult».
Скопируйте код из обоих классов библиотеки, а затем вставьте его в созданные классы.
Теперь Вы можете подключить файлы в основной класс
Вернемся на минутку и также подключим следующие файлы. Обратите внимание, что Eclipse мог уже их подключить за Вас
Изучите содержание двух классов. Изучив их Вы обнаружите, что они не считывают код. Эти два класса являются просто интерфейсами, предоставляющими доступ к функционалу сканирования.
Сканируем
Шаг 1
Давайте реализуем сканирование, когда пользователь нажимает на нашу кнопку. В главном файле приложения существует метод onCreate, который должен выглядеть примерно так
Перед данной функцией создайте следующие переменные, которые будут хранить нашу кнопку и два текстовых поля, созданных в шаблоне
После существующего кода в onCreate добавьте строки, которые будут инициализировать переменные
Теперь, добавим обработчик нажатия
Расширим класс, чтобы объявить интерфейс OnClickListener
Шаг 2
Теперь, мы можем реагировать на нажатие кнопки началом процесса сканирования. Добавим метод onClick
Проверяем, была ли нажата именно кнопка сканирования
Внутри блока с условием создадим экземпляр класса IntentIntegrator, который мы импортировали
Сейчас, давайте вызовем процедуру, которая начнет сканирование
В данный момент должно начаться распознавание, но только, если у пользователя установлено необходимое приложение. Если его нет, то будет предложено начать загрузку. Результат сканирования будет возвращен приложению.
Обработка результатов сканирования
Шаг 1
Сканер будет запущен, когда нажата кнопка. Затем будет возвращен результат сканирования в метод onActivityResult. Добавим его в наш код
Внутри функции постараемся обработать результат
Шаг 2
Как и любые другие данные, полученные от другого приложения, было бы не плохо проверить, что результат не пуст. Продолжим мы только, если у нас есть правильный результат
Если мы не получили результат сканирования (например, пользователь отменил сканирование), то мы просто выведем сообщение
Вернемся в блок с условием, давайте разберемся с тем, что нам вернула библиотека. Объект Intent Result имеет метод, обеспечивающий получение результата сканирования. Получим результат сканирования, как строку
Также, получим вид barcode
Шаг 3
Теперь, наше приложение имеет всю необходимую для отображения информацию. В нашей статье мы просто отобразим ее пользователю.
Запустите наше приложение на реальном устройстве вместо эмулятора, чтобы увидеть, как работает функционал распознавания штрихкодов. Попробуйте просканировать штрихкод с какой-нибудь книги или любого другого товара.
Результаты сканирования
Источник
Creating a Barcode Scanner using Android Studio

Step by step guide to building a barcode scanning application using Android Studio.
What is this article about
This article will guide you through creating an android application using which you can make use of your mobile camera to scan a barcode and read the data in them.
Prerequisite
- The latest version of Android Studio installed. ( download from here )
- A mobile device to test the application. (you can make use of the inbuild android emulator but in some pc, it may cause some issues.)
- Knowledge of java or any object-oriented programing language.
Let’s write some code
- Create a new application in android studio and name it Barcode Scanner.
- Open up your app-level Gradle file and add the below dependency there.
3. Now hit on Sync now button and wait for the build to complete. Once the build is complete open up your manifest file and add the necessary permissions.
also, add the metadata field in your manifest file, inside the application tag and above the activity tag.
here’s a full view of my manifest file
4. Now you have set up all the dependency needed for the barcode scanner to work and all the permission necessary. Let’s build the UI for the app.
5. Open your activity_main.xml file and write the below code inside.
Now your view should look something like this

here we have something called a sufaceview in android and a textview field to display the text scanned by the barcode.
SurfaceView: It provides a dedicated drawing surface embedded inside the view hierarchy.
You have completed the UI code for the Barcode App, now let’s write the java code to make wonders happen.
6. Open MainActivity.java file and you will see the following code.
let’s add some code of our own
7. First, we need to bind the views.
8. Now we will write the method to scan the image for a barcode.
this method will help us scan and display the text in the textview we created in the XML file.
9. The complete java code will look something like this.
Now try scanning this barcode and you will see the value that is embedded in the barcode in the textview.

The final screen should something like this.
Источник
Barcode Scanning API Programmer’s Guide
Overview
The aim of this guide is to familiarize the user with the Barcode Scanner SDK for Android and its functionalities. Instructions are given in detail about integrating the Barcode Scanner SDK to Android Studio Project and to work with APIs for users to develop their applications. The provided code snippets can benefit the user in implementing LED, Beeper, Firmware Updates etc. Each functionality is explained individually with screenshots where necessary for the easy understanding of the user and to make development with reduced time and effort.
Configuring Development Environment
Adding the Barcode Scanner SDK to the Android Studio Project
Add the barcode_scanner_library_vx.x.x.x (ex: barcode_scanner_library_v2.4.10.0) as a Module in your Android Studio Project by navigating to, File -> Project Structure -> Modules
Click on the ‘+» icon to add the ‘barcode_scanner_library_vx.x.x.x.aar’ file. Then select ‘import JAR/AAR Package’ and click ‘Next’.
Locate the Android SDK library package, ‘.aar’ file to add to the project.
After adding the Module successfully, select the Dependencies from the options given. In the Modules section select ‘app’. Then in ‘Declared Dependencies’ section click the ‘+’ icon.
From the dropdown select ‘Module Dependency’.
Select the added Module and click ‘OK’ to proceed.
Adding Permissions in the Manifest File
Following permissions should be added in the Manifest File in order for the app to establish a Bluetooth connection with the scanner.
Connecting the Scanner to the Device
User can make a connection between the scanner and the device using either ‘SSI BT Classic (discoverable)’ Barcode or ‘Scan-To-Connect’ Barcode.
Using the ‘SSI BT Classic (discoverable)’ barcode (This is available in the Program Reference Guide of the Zebra Scanner Product), a Bluetooth connection can be established with the scanner and the device on which the app is running. Scan the barcode and start a Bluetooth scan in your device. Once the scanner is detected, pair with it.
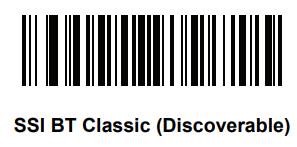
The noteworthy difference between the two barcodes is that, Scan-To-Connect doesn’t require setting up the connection manually with the Android device. Unlike ‘SSI BT Classic (discoverable)’, a one scan of the Scan-To-Connect barcode establishes a connection with both the device and the app in one go.
SDK Installation
Inside the ‘onCreate’ method SDK must be initialized. Out of the several available operational modes (such as DCSSDK_MODE.DCSSDK_OPMODE_SNAPI, DCSSDK_MODE.DCSSDK_OPMODE_BTLE), Operational Mode of the Scanner must be set to DCSSDK_OPMODE_BT_NORMAL. Even though other operational modes are present, this guide is mainly focused on making a connection via DCSSDK_OPMODE_BT_NORMAL and carrying out the functions. Along with the initialization of the SDK an ArrayList to contain scanner information must be created.
Establishing a Connection with the Scanner
For the ease of explaining, two buttons have been used in the UI to establish the connection with the connected scanner and to make the scanner beep. With the press of the button used for connecting, the following ‘connectToScanner’ method gets called. If the ‘sdkHandler’ is not null, ‘scannerInfoList’ will get filled with all the Scanners that are connected to the device. Here inside the try catch block the ‘scanner ID’ of the first connected scanner in the ‘scannerInfoList’ is taken and then ‘connectScanner’ AsyncTask gets executed. Here an AsyncTask is used to prevent the main thread from being blocked while the scanner connection task is taking place.
With ‘dcssdkEstablishCommunicationSession’ the app makes a connection with the Scanner.
Making the Scanner Beep
Here the ‘BeepScanner’ AsyncTask gets called and then the ‘executeCommand’ method gets executed. One has the option to replace 1 in the ‘inXml’ with any integer between 0 and 26 as there are 27 beep combinations available.
Given below is a code snippet detailing the 27 combinations available for the scanner.
Inside the ‘BeepScanner’ AsyncTask, parameters such as ‘scannerId’, ‘opcode’, ‘outXml’ get passed on to the ‘executeCommand’ method which finally gives out the corresponding beep.
LED On/Off
The following UI is used to explain the LED ON/OFF states of the scanner. Code snippets for establishing a Bluetooth connection with the scanner are given above.
The method ‘redLedOnClicked’ gets called with the press of the ‘LED ON’ button. Similarly, ‘redLedOffClicked’ gets called with the press of the button ‘LED OFF’.
Using the following code, ‘inXml’ is created based on the ‘RMD attribute value’ passed on to it by ‘redLedOnClicked’ and ‘redLedOffClicked’ methods.
LED ON/OFF takes place when the ‘Scanner ID’ and the ‘opcode’ parameters are sent to the ‘executeCommand’ method.
Firmware Update
Firmware can be updated using ‘.SCNPLG’ files. These plugins can be obtained using the 123Scan Configuration Utility. Once 123Scan is installed, Plugin files for supported scanners can be found in ‘C:\ProgramData\123Scan2\Plug-ins’.
First of all, permissions have to be included in the Manifest file for the device to access firmware files in the storage.
Secondly, the class ‘IDcsSdkApiDelegate’ must be implemented. Then the declaration of the String ‘inXml’ must take place.
The object ‘sdkHandler’ should be notified of the implemented class. Then it is necessary to subscribe to events in order to be updated when the scanner gets reconnected, especially after a firmware update. The following code snippet takes care of that.
With the implementation of ‘IDcsSdkApiDelegate’ interface the following methods will be implemented as well.
Once the ‘Update Firmware’ button of the given UI is clicked, the following ‘updateFirmware’ method gets called. Note that the location of the firmware file is given in the ‘inXml’ String. The ‘UpdatingFirmware’ ‘AsyncTask’ gets executed as the next statement fulfilling requested task.
Finally, ‘executeCommand’ is called when the ‘scannerId’,’opcode’ and ‘outXml’ are all set.
Once a firmware update has started, user can be notified of the firmware update events. This is achieved by declaring a ‘handler’ inside ‘dcssdkEventFirmwareUpdate(FirmwareUpdateEvent firmwareUpdateEvent)’ method. Integer ‘FW_UPDATE_EVENT’ must be defined at the beginning of the class.
It is required to use handlers so as not to block the Event thread. With the use of a handler, the main thread will not be halted for the current process to execute. Multiple threads can run parallelly without interrupting each other.
Inside the handler, ‘firmwareUpdateEvent’ parameter gets passed on to the method ‘processFirmwareUpdateEvents’.
Several types of Firmware Update events are available. Namely SCANNER_UF_SESS_START, SCANNER_UF_SESS_END, SCANNER_UF_DL_PROGRESS, SCANNER_UF_STATUS, SCANNER_UF_DL_START and SCANNER_UF_DL_END. SCANNER_UF_STATUS event will only take place in the event of a firmware update error.
Once the firmware update process is finished, it is required for the firmware to be launched on to the scanner and be rebooted. This is achieved by the code inside the event ‘SCANNER_UF_SESS_END’. It is important for the working thread to sleep for a second before rebooting takes place.
As a final step, a call to ‘executeCommand’ method is made for the launching of the firmware on to the scanner to be completed. This can be verified with the rebooting beep of the scanner.
After rebooting of the scanner, it will be automatically reconnected to the app if Scan-To-Connect barcode had been used initially to connect the scanner to the app. If the connection had been made with the SSI BT Classic (Discoverable), scanner must be reconnected to the app manually. This can be achieved by pressing the ‘connect’ button in the UI. Once rebooting is completed and if the ‘connect’ button of the UI is pressed, the user can be notified of this reconnection by the ‘dcssdkEventCommunicationSessionEstablished’ event.
Connect Scanner Using Scan-To-Connect (STC) Barcode
Preliminary environment setting has been described in previous sections. First it is ensured that the ACCESS_COARSE_LOCATION permission is given, if not, permission is set inside the ‘onCreate’ method along with the execution of the ‘initializeDcsSdk’ method where initializations take place.
Inside the ‘initializeDcsSdk’ method, Bluetooth operational mode is set and a call is made to ‘generatePairingBarcode’.
Inside the ‘generatePairingBarcode’, value of ‘barCodeView’ is checked. For devices with Android versions 6.xxx and below, the method ‘updateBarcodeView’ is called directly and the Bluetooth Address of the device is retrieved automatically rendering the STC barcode across the screen.
The code snippet given below explains how the SDK manages to obtain the Bluetooth Address of Android 6.xxx and below versions. Please note that this snippet of code is already present in the SDK and doesn’t need to be included in any custom application development.
For Android versions 7.0 and above value of ‘barCodeView’ will be null and displaying the STC barcode will require the user to manually enter the Bluetooth address of the android device. The following explanation of the UI screenshot is for the easy understanding of users with Android 7 or higher version devices. An EditText is provided in the dialog box for the user to enter the Bluetooth address. Once the Bluetooth Address is entered and the ‘OK’ button is pressed, the ‘displayStc’ method gets called after which the STC barcode gets displayed on the screen.
Here the barcode is generated based on the Bluetooth Address, Bluetooth Protocol and the Scanner Configuration provided to the method dcssdkGetPairingBarcode(DCSSDKDefs.DCSSDK_BT_PROTOCOL.SSI_BT_LE, DCSSDKDefs.DCSSDK_BT_SCANNER_CONFIG.SET_FACTORY_DEFAULTS, bluetoothAddress).
Given below is the set of available Bluetooth protocols in the Barcode Scanner SDK.
Provided below is the set of supported Bluetooth scanner configurations in Barcode Scanner SDK.
Code snippets extracted from Barcode Scanner SDK are for information purpose only and need not be included in the Java file.
Note that the operational mode set using the method, ‘sdkHandler.dcssdkSetOperationalMode(DCSSDK_OPMODE_BT_LE)’ should be compatible with the Bluetooth protocol used. For instance, if ‘DCSSDK_OPMODE_BT_NORMAL’ is used as the operational mode, then the Bluetooth protocol to be used is the ‘SSI_BT_CRADLE_HOST’.
Scanner Connect Event
Once the STC barcode is available on the screen, the connection can be established by scanning the barcode with the Bluetooth scanner. The beep tone of the scanner confirms that the scanner has paired with the device as well as with the App.
Scanner Connect Event
If the user wishes to disconnect the scanner from the App as well as from the device, it can be achieved by pressing the ‘Disconnect’ button in the UI. Here the ‘scannerId’ is obtained from the ‘scannerInfoList’ and the method, ‘dcssdkTerminateCommunicationSession(scannerId)’ is provided with the obtained ‘scannerId’ to terminate the connection.
Scanner Enable/Disable
When the connection between the device and the scanner has been established, enabling and disabling the scanner can be achieved using the following two methods.
With the press of the ‘ENABLE’ button the following method gets called. When the OPCODE is given as ‘DCSSDK_DEVICE_SCAN_ENABLE’ along with the corresponding inXml, the scanner can be used for barcode scanning purpose.
With the press of the button ‘DISABLE’ barcode scanning functionality of the scanner will be disabled.
Get Currently Connected Scanner and Paired Devices
All the paired Bluetooth devices can be obtained using the API call ‘dcssdkGetAvailableScannersList’.
First the array list must be initialized inside the class.
With the API call ‘dcssdkGetActiveScannersList’, information about the scanner that is paired with the device as well as connected to the app can be obtained. This is accomplished by the ‘getActiveScanners’ method.
Источник


