- Android studio bitbucket git
- Простое управление версиями с помощью Git в Android Studio
- Предпосылки
- 1. Создайте проект Android Studio
- 2. Интеграция Git
- 3. Интеграция с GitHub или Bitbucket
- 4. Окно контроля версий
- Локальные изменения T ab
- Консоль T ab
- Вкладка журнала
- 5. Создание коммита
- FreshByte Labs
- Android Studio git tutorial using github, bitbucket
Android studio bitbucket git
If you are working on a big application with Android Studio and you may want to securely store the project code to a remote server. For this purpose, we can use BitBucket repository system. Which will allow you to create a repository and push all source code safely.
 It is an online Application for versioning control, web-based storage of codes. In simplest term, it can contain a repository of project source codes in Mercurial or Git revision control system. It’ll provide you all Git features with Project management system. So you can create Multiple branches, Tags and manage your source code safely even with multiple developers working on the same project.
In this post, we’ll explain the complete steps to upload and manage your project source code with Android Studio and BitBucket. Let’s see with following steps:
1. First of all, create a BitBucket account, You can create a BitBucket account from here.

2. After creating Account, Login to BitBucket website and Create a new repository.

3. After that, get the link of the new repository. It’ll be used in Android Studio later.


After clicking on Add, Project files will change to the green color.
7. Now Again right click on Project and in menu Go to Git-> Select Commit Directory.


In the next pop up window, you have to enter your email and password of BitBucket account. Enter it carefully.
10. It’ll show all the Committed files and message you entered before when committing directory. Now Click on Push. It’ll push all code files to the BitBucket repository.
Источник
Простое управление версиями с помощью Git в Android Studio
Как вы знаете, рекомендуется всегда использовать управление исходным кодом (SCM) для своих проектов, даже для личных проектов. Знаете ли вы, что Android Studio имеет удивительную интеграцию с Git для управления исходным кодом? Если вы не знали или не имели опыта его использования, тогда продолжайте читать этот пост. Даже если вы уже использовали интеграцию Git с Android Studio, вы все равно можете воспользоваться некоторыми полезными приемами в этом посте.
Я покажу вам множество функций поддержки Git в Android Studio, а также насколько легко выполнять различные операции Git (фиксация, push, pull, ветвление и т. Д.) Из Android Studio.
В этом руководстве я покажу вам список функций SCM, доступных в Android Studio. Мы рассмотрим следующие области:
- интеграция нового проекта Android Studio с Git
- работа с GitHub или Bitbucket
- исследовать окно контроля версий
- фиксаций
- ветви
- толкание и извлечение из удаленного хранилища
Предпосылки
Чтобы следовать этому руководству, вам понадобится:
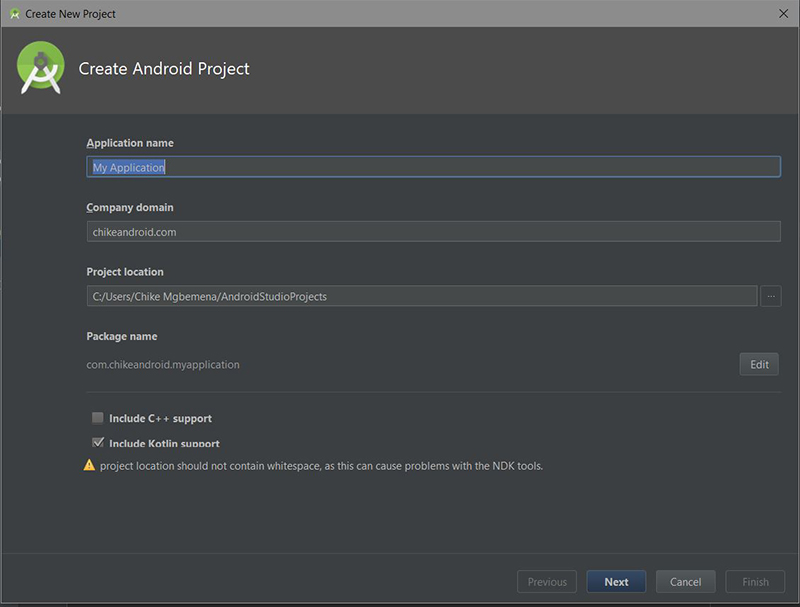
1. Создайте проект Android Studio
GitApplicationDemo Android Studio и создайте новый проект (вы можете назвать его GitApplicationDemo ) с пустым действием MainActivity .
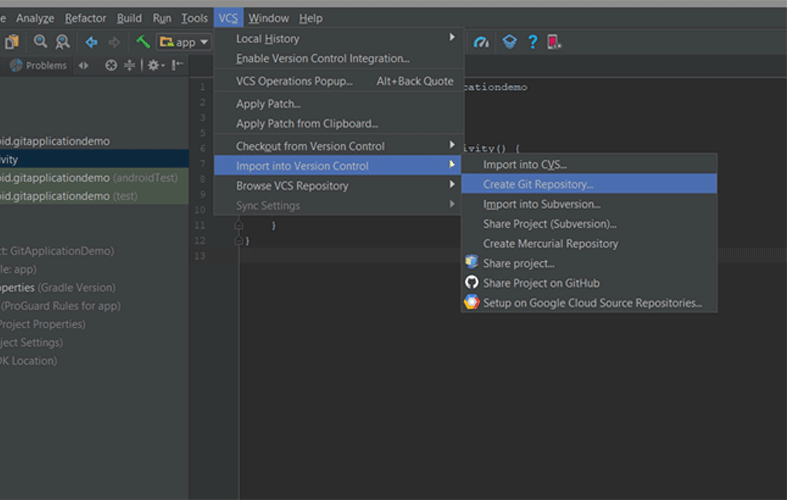
2. Интеграция Git
После того, как ваш проект Android Studio был настроен, щелкните меню VCS , наведите курсор на меню « Импорт в контроль версий» и выберите « Создать Git-репозиторий» …
Затем выберите верхнюю родительскую папку вашего Android Studio Project.
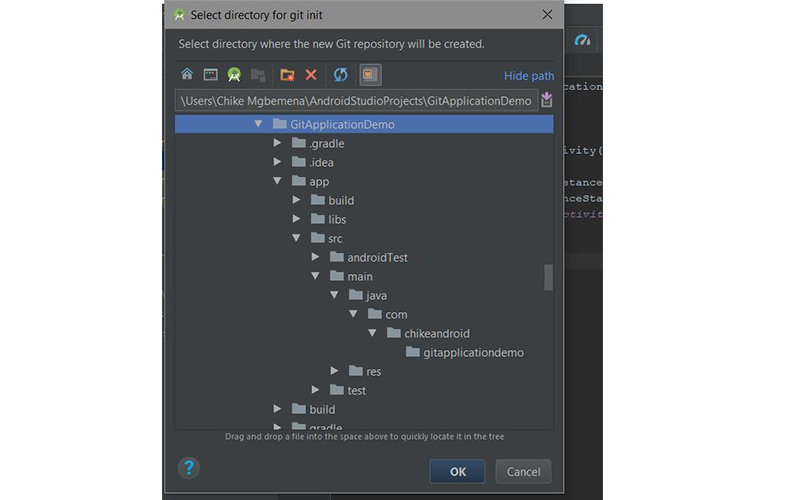
Нажмите кнопку ОК , чтобы инициализировать проект с помощью Git. Под капотом Android Studio выполняет команду Git:
Напомним, что эта команда будет делать:
Эта команда создает пустой Git-репозиторий — в основном каталог .git с подкаталогами для objects , refs/heads , refs/tags и файлами шаблонов. Первоначальный файл HEAD который ссылается на HEAD главной ветви, также создается.
Появится информационный диалог:
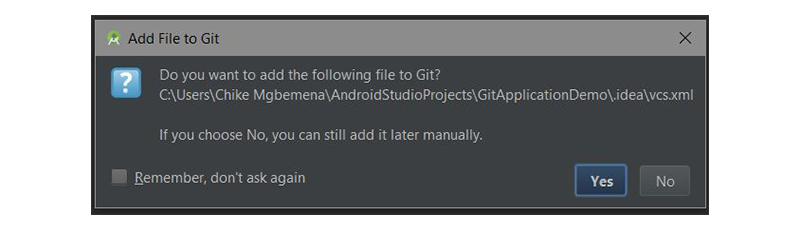
Это говорит нам о файле с именем vcs.xml в папке .idea . Эта папка содержит только настройки проекта. Обратите внимание, что этот формат используется во всех последних версиях IntelliJ IDEA.
В идеале файлы в .idea/ не должны доходить до Git, поэтому вы должны добавить его в .gitignore .
По умолчанию мы переключаемся на основную ветку. Вы всегда можете просмотреть текущую ветку вашего проекта в правом нижнем углу Android Studio.

3. Интеграция с GitHub или Bitbucket
Вы можете легко работать с любым репозиторием исходного кода Android, который находится в GitHub или Bitbucket в Android Studio. Позвольте мне показать вам, как это сделать.
Перейдите в Файл> Создать> Проект из контроля версий> GitHub .
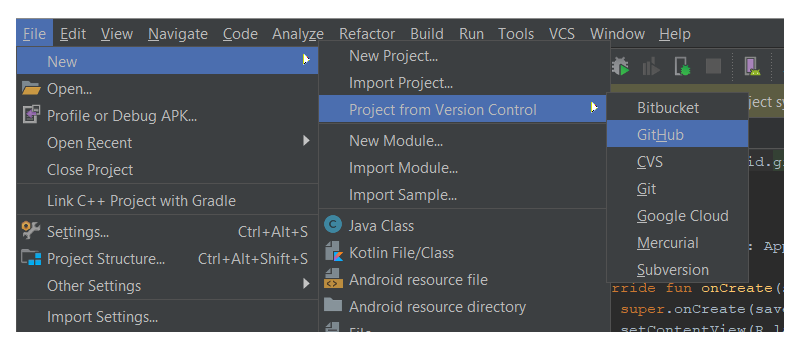
(Если вы хотите работать с репозиторием из Bitbucket, выберите Bitbucket . Если вы хотите просто клонировать репозиторий Git из Интернета на локальный компьютер, выберите опцию меню Git .)
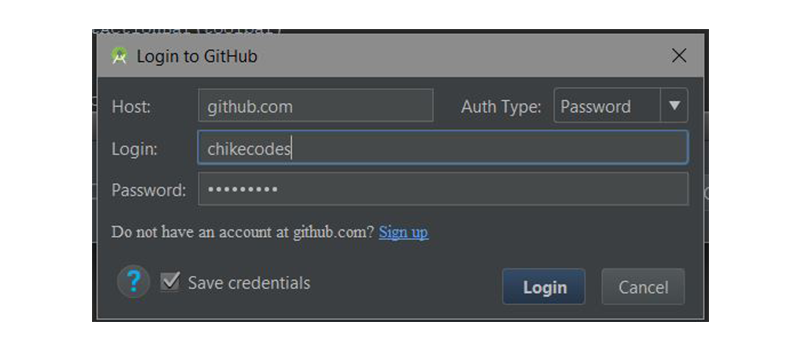
Затем введите учетные данные GitHub и нажмите « Войти» .
Если вход был успешным, появится диалоговое окно Clone Repository . В этом диалоговом окне отображается раскрывающийся список, содержащий список репозиториев на GitHub, которым вы в настоящее время владеете или над которыми работали.
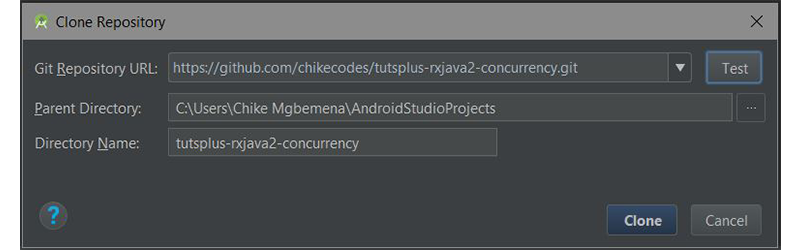
Нажмите Клонировать, чтобы клонировать репо на локальный компьютер в уже выбранном родительском каталоге.
4. Окно контроля версий
После успешного запуска нашего проекта Android Studio с помощью Git, Android Studio покажет окно контроля версий . Нажмите на вкладку « Контроль версий » (в левом нижнем углу Android Studio) и давайте рассмотрим, что у нас там. Обратите внимание, что вы можете использовать Alt-9, чтобы быстро открыть это окно.
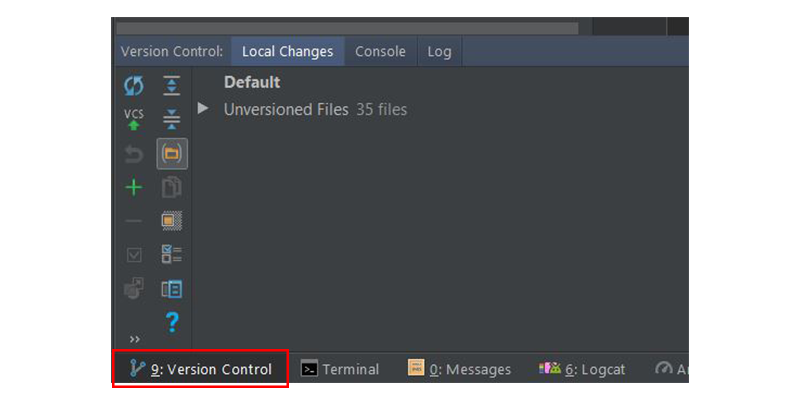
Внутри этого окна у нас есть три разных вкладки: Локальные изменения , Консоль и Журнал .
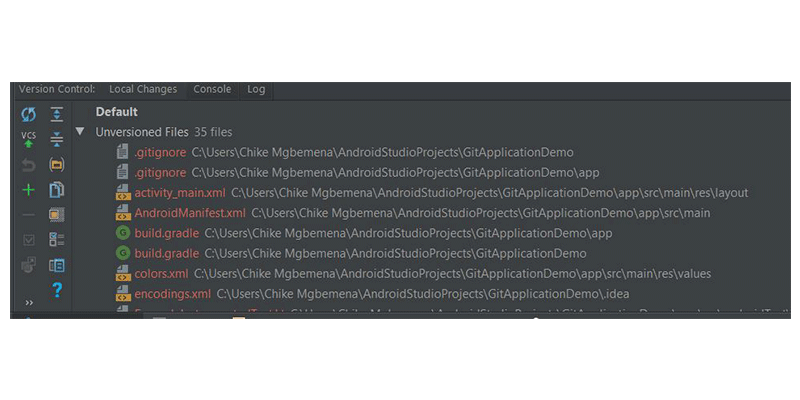
Локальные изменения T ab
Здесь показан список файлов, которые были изменены локально (на вашем компьютере) и еще не добавлены в хранилище.
Давайте посмотрим на панели инструментов элементов, доступные, когда вы находитесь на вкладке Локальные изменения .
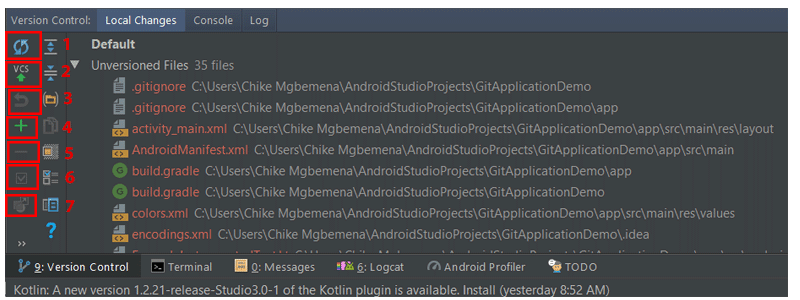
- Нажмите на этот значок, чтобы обновить статус ваших файлов на текущем рабочем месте. Сочетание клавиш Control-F5 .
- Этот значок при нажатии подтвердит ваши текущие изменения. Сочетание клавиш Control-Alt-Z .
- Нажмите на этот значок, чтобы откатить любые выбранные изменения.
- Нажмите на этот значок, чтобы создать новый список изменений. Обратите внимание, что список изменений — это набор изменений в файлах, который представляет собой логическое изменение исходного кода. Это сочетание клавиш Alt-Insert .
- Нажмите эту кнопку, чтобы удалить выбранный список изменений.
- Чтобы активировать список изменений, просто нажмите этот значок.
- Чтобы переместить выбранный файл в другой список изменений, щелкните этот значок.
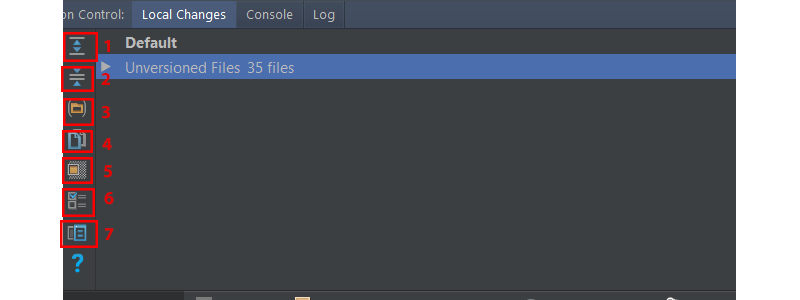
- Нажмите на этот значок, чтобы развернуть, чтобы просмотреть все файлы.
- Нажмите на этот значок, чтобы свернуть все файлы.
- Нажмите этот значок, чтобы отобразить измененные файлы, сгруппированные по папкам.
- Нажмите этот значок, чтобы скопировать путь к выбранному файлу в буфер обмена системы.
- Нажмите этот значок, чтобы отобразить узел игнорируемых файлов со списком существующих файлов, игнорируемых Git.
- Нажмите на этот значок, чтобы настроить список файлов, которые будут игнорироваться Git.
- Нажмите этот значок, чтобы открыть панель « Просмотр различий», чтобы сравнить текущий файл с последней принятой ревизией.
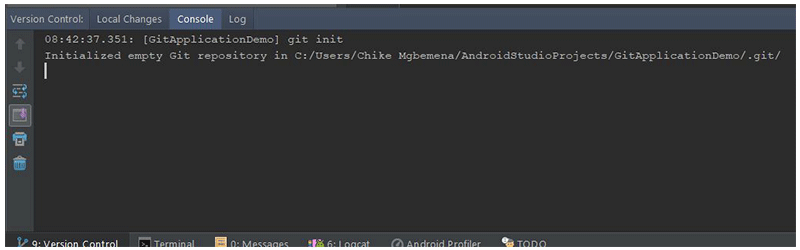
Консоль T ab
Внутри этой вкладки мы видим результат выполнения команд, связанных с Git. Обратите внимание, что вы не можете писать команды Git на этой вкладке — делайте это в окне терминала в Android Studio.
Вкладка журнала
На этой вкладке отображаются все изменения, которые были зафиксированы во всех ветвях локального и удаленного репозитория. Внутри этой вкладки вы можете просматривать коммиты в любой ветке.
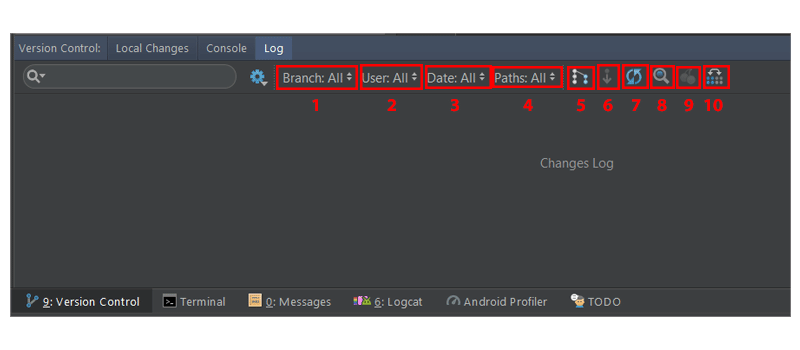
Поле поиска используется для поиска коммитов, которые имеют введенную строку или регулярное выражение.
- Это раскрывающийся список, который используется для фильтрации фиксаций по веткам. Чтобы просмотреть все локальные и удаленные коммиты, просто выберите « Все» (по умолчанию).
- Чтобы отфильтровать коммиты по автору, используйте этот выпадающий список. Вы должны будете ввести имя автора, чтобы просмотреть его коммиты. Выберите Все, чтобы просмотреть коммиты всех пользователей.
- Используйте этот раскрывающийся список, чтобы отфильтровать коммиты по временному диапазону или по определенной дате Чтобы быть точным в дате, просто нажмите « Выбрать» и выберите дату. Выберите Все, чтобы просмотреть коммиты, сделанные на все даты.
- Используйте это раскрывающееся меню для фильтрации коммитов по пути измененных файлов.
- Эта кнопка (IntelliSort) позволяет более удобно просматривать слияния, сначала отображая входящие коммиты, прямо под коммитом слияния.
- Если эта кнопка включена, длинные ветви отображаются полностью, даже если в них нет коммитов.
- Используйте эту кнопку, чтобы обновить список коммитов в проекте.
- Чтобы перейти к хешу, тегу или ветке, просто используйте эту кнопку.
- Нажмите эту кнопку, чтобы применить изменения из выбранного коммита к текущей ветви.
- Нажмите эту кнопку, чтобы выделить коммиты из выбранной ветви, которые еще не были применены к текущей ветви.
Вы можете узнать больше об окне инструмента контроля версий в документации IntelliJ IDEA .
5. Создание коммита
Вы заметите, что когда мы настроили интеграцию Git с нашим проектом Android Studio, цвет имени нашего файла стал коричневым. Согласно официальной документации IntelliJ IDEA, для файлов с коричневыми метками:
Файл существует локально, но отсутствует в хранилище и не запланирован для добавления.
Давайте теперь посмотрим, как сделать коммит в Android Studio. Но сначала нам нужно добавить наши изменения в рабочем каталоге в область подготовки. В консоли мы будем использовать команду git add .
Но мы можем сделать это прямо из Android Studio. Выберите раскрывающийся список « Неверсированные файлы» на вкладке « Локальные изменения », щелкните правой кнопкой мыши и перейдите в « Git»> «Добавить» или используйте Control-Alt-A . Помните, что выбор корневой папки добавит все, что находится внутри нее, в область подготовки.
Источник
FreshByte Labs
Android Studio git tutorial using github, bitbucket
Hi guys! In this tutorial we will see how to work with git in android studio. We will be showing how to setup git using both github and bitbucket.
Git is basically a distributed version control system for tracking changes in source code during software development. Repository hosting services like github, bitbucket etc are used for version control using git.
We will be breaking down the tutorial into the following steps :
1) Downloading and Installing git
2) Create an account on github/bitbucket and then save the credentials to your git configuration
3) Create a remote git repository using github/bitbucket.
4) Create an android studio project and initialise git within the project.
5) Add the remote repository as the origin of your android studio project.
6) Commit and push your code into remote repository(github/bitbucket)
1) Downloading and Installing git
- For mac users first of all go to your terminal and check if git is already installed by typing the command git —version , if you get a version value like shown below you already have git installed and you are good to go. If you don’t have git installed, you will be getting a message like «command not found», in that case go here >>https://git-scm.com/download/mac . and install git on your mac
 |
| git version check |
- For windows users check if git is already installed by typing git —version in the command prompt, if you are able to get a proper version, then you already have git installed. If you don’t have git installed, go here >>https://git-scm.com/download/win and complete the installation
- If you are working with github, go here >>https://github.com/ and create an account(signup)
 |
| github signup |
- If you are working with bitbucket, go here >>https://bitbucket.org/account/signup/ and create an account(no need to signup for both github and bitbucket, choose only one which is convenient to you)
 |
| bitbucket signup |
- Once you have created the account in one of the repository hosting services, you will now need your local git version control system to be connected with it. For that, go to your terminal and type git —version to ensure that git is properly installed. It should be displaying proper git version number, if not try installing git properly as discussed above. Now, execute the following command in your terminal(mac) or cmd(windows) to connect your remote repo with your local git.
git config —global user.email «your_github_or_bitbucket@email.com»
git config —global user.name «your_ github_or_bitbucket_username «
- As shown above you will have to specify your registered email and username in above commands. Now when you make commits and other activities to your remote repo(github/bitbucket), your identity will be shown based on these credentials
- For github, login with your account and click on the plus button at the top right corner which brings up an option «new repository».
 |
| github — create new repository |
- Click on «new repository» and enter the details to complete repository creation. You can either make your repository «public» or «private» as well. When made public, it can be accessed by anyone across the globe whereas private repositories can be accessed only by select individuals whom you choose to share it with. Private repositories were a paid feature in github before, but now it has been made free, thanks to github!
- Once the repository has been created successfully, it will bring up a screen like shown below
 |
| unique link to your github remote repo(highlighted with red marker) |
- Copy the command that starts with » git remote add origin .. «, which is the unique link to your remote repo. This command will be used in our android studio terminal to connect your local repo with the remote repo that we just created.
- For Bitbucket, repository creation is similar to github and is straight forward(If you are using github, you are free to skip this step). After logging in to your bitbucket dashboard, you can see a ‘+’ button on the left sidebar, click on it and then select repository from next window to create a new bitbucket repository.
 |
| create new bitbucket repository |
- Give a name to your repository and similar to github here also you have option to make it public or private. Choose private if you want it be accessed by people whom you give access only. Now complete repository creation
- Once the repository has been created you will see the following window from which you will need to copy the remote repo url at the bottom of the screen as shown below
 | |
|
- The above copied url will be used in android studio terminal to connect local git repo with the bitbucket repo that we now created
- Now start up your android studio. First of all create a new android studio project, finally when your project gets properly build click to open the terminal window at the bottom of the Android Studio IDE.
- Now type the following command in your android studio terminal to initialise git within your android studio peoject and hit enter
 |
| git init command executed in android studio terminal |
5) Add the remote repository as the origin of your android studio project.
- This url will be different for your repository, so make sure to copy the right url from your repository. Now paste this inside your android studio terminal and hit enter. If everything is fine, we won’t see any error and hence we have successfully linked our local repo with the remote repo.
If you are asked to enter the password, please enter the password for your github/bitbucket account, you wont be shown a password preview, but keep typing and then press enter
- Now we will see how to move your repository from your local machine to the remote github/bitbucket repository. For that, first of all we will need to add all the files that we need to move to your remote github repository. Since we are starting with a new project let us add entire project( all the files) to github/bitbucket repo. So type in the following command and hit enter
- As a result of the above command the entire project gets added(i.e, gets prepared for commit). Here ‘.’ means you are going to add all files to remote repo. Instead if you need to add only a single file, you will need to execute something like this git add your_filename.java . For now we will be doing git add . since we will have to move entire project to our remote repo(github/bitbucket)
- Before we push our project to github/bitbucket, we will need to commit the changes with a commit message. Since we are making an initial commit for our project we can keep the commit message as «initial commit»(of course, you may set a different message of your choice!). Always make sure to keep a meaningful commit message to all your commits. This helps a lot since it becomes a lot easier to identify changes in each commit at a later point of time. Now execute the following command to commit all the files that have been added.
 |
| committing all the added files to git |
- As soon as the commit command is executed, all the files gets saved in your local git. Now we are ready to «push» our changes into our remote github/bitbucket repo. So execute the following push command to push all the committed changes into the remote repository’s master branch
 |
| pushing committed changes to github/bitbucket remote repo |
- Now if we go ahead and check our repo in github, we can see that all the files have been successfully pushed like shown below
- Now if we check the «commit» tab you can see your «initial commit» is shown there with the person who did the commit and the date in which the commit has been made. Hence it becomes helpful in identifying a commit very easily.
- Now go inside one of your files and make a small change for testing purpose (below i’m adding a comment inside MainActivity.java file)
 |
| added a test comment to commit |
- Now go ahead and commit this change by running the following command in android studio terminal
- As a result of the above command all the changes get added and committed with the commit message «test commit». This command is basically a shortcut to both add and commit the changes in a single command. (You can alternatively type git add . and git commit -m «test commit» separately also)
- Now again execute the push command like shown below
- Now if you check your repository in github, you can see that the changes have been reflected there also.
 |
| test commit successfully pushed |
- Now if you check the commit tab you can see that our new commit has appeared there as well, see image below
- Thats all for this tutorial guys, i will try to make more tutorials on git like this later
Источник


